Cable Crochet Christmas Stocking Pattern
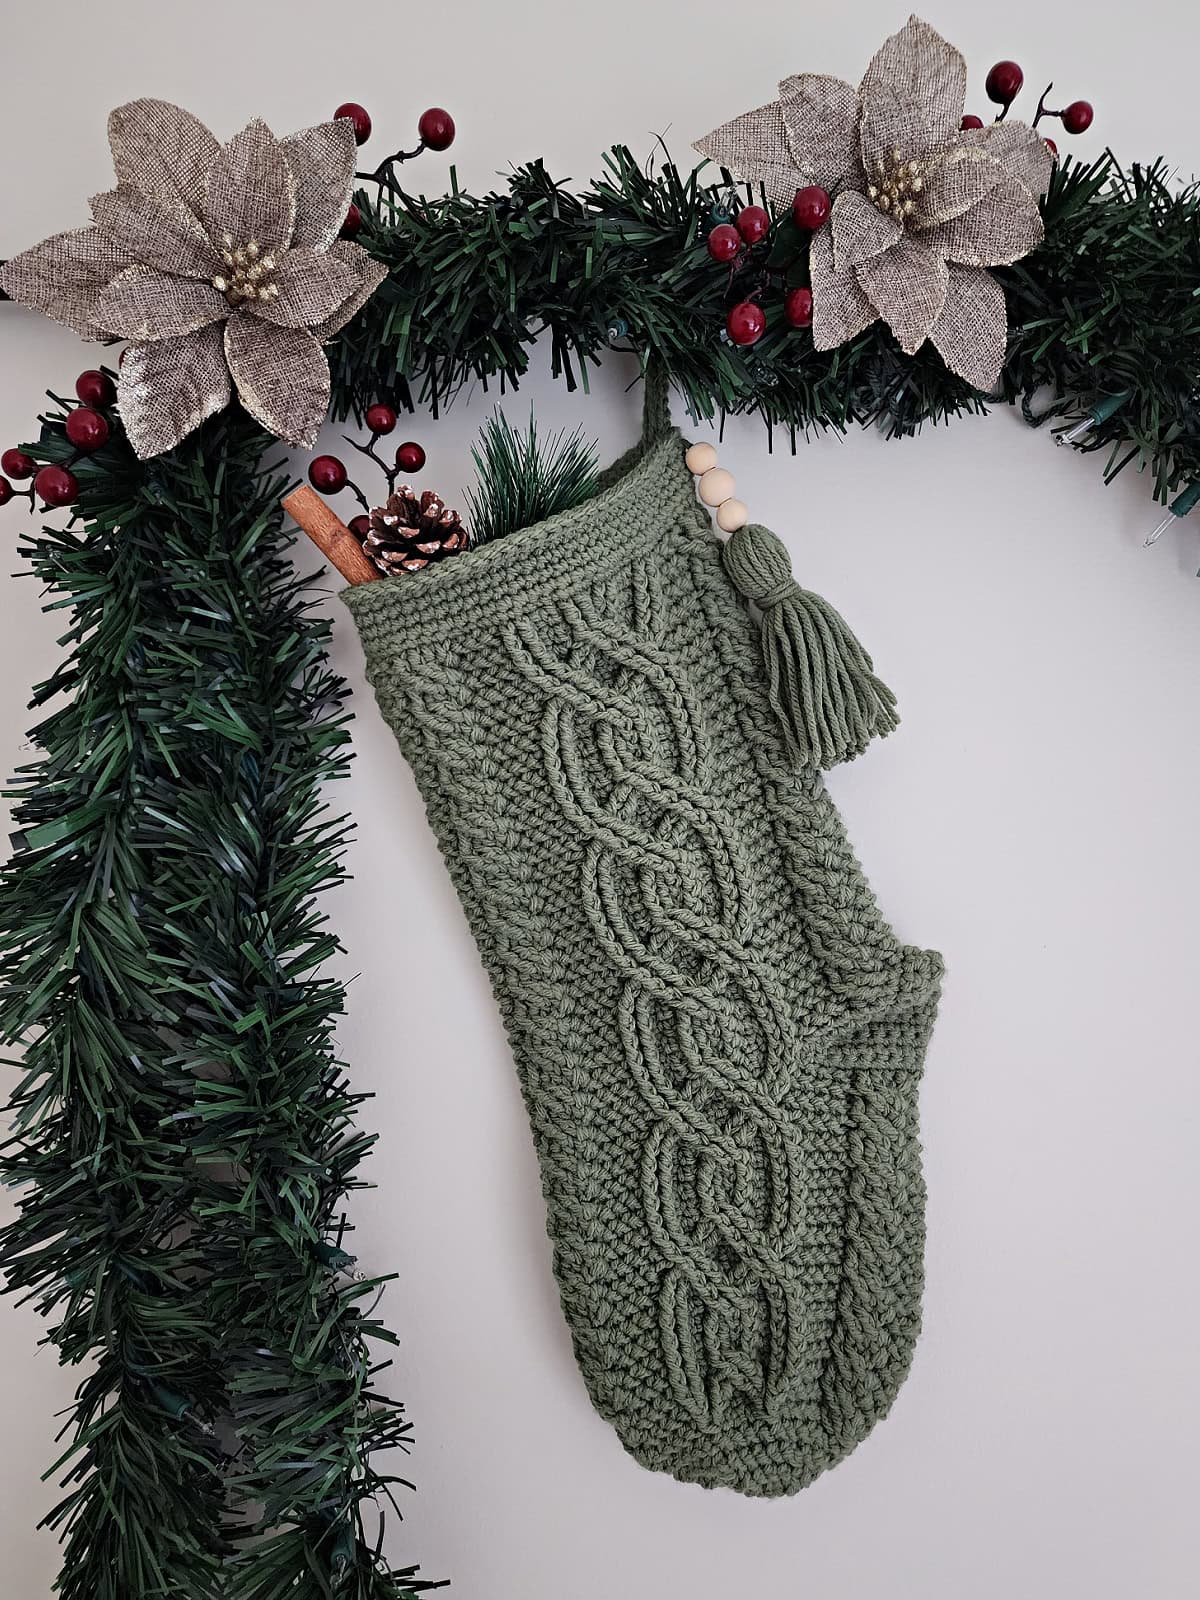
The Olivette Christmas Stocking is a festive and elegant cable crochet Christmas stocking pattern, showcasing intricate crochet cable patterns that evoke a cozy, timeless charm.
Crafted with care, this stocking combines classic design with modern sophistication, making it the perfect addition to your mantle. Its generous size is ideal for holding thoughtful gifts and treats, adding warmth and tradition to your Christmas celebrations.
The cable crochet Christmas stocking pattern is free in the post below, or you can find an ad-free print friendly version (that includes all photo tutorials + a BONUS crochet cable stitch chart) on Ravelry, or on Etsy (aff).
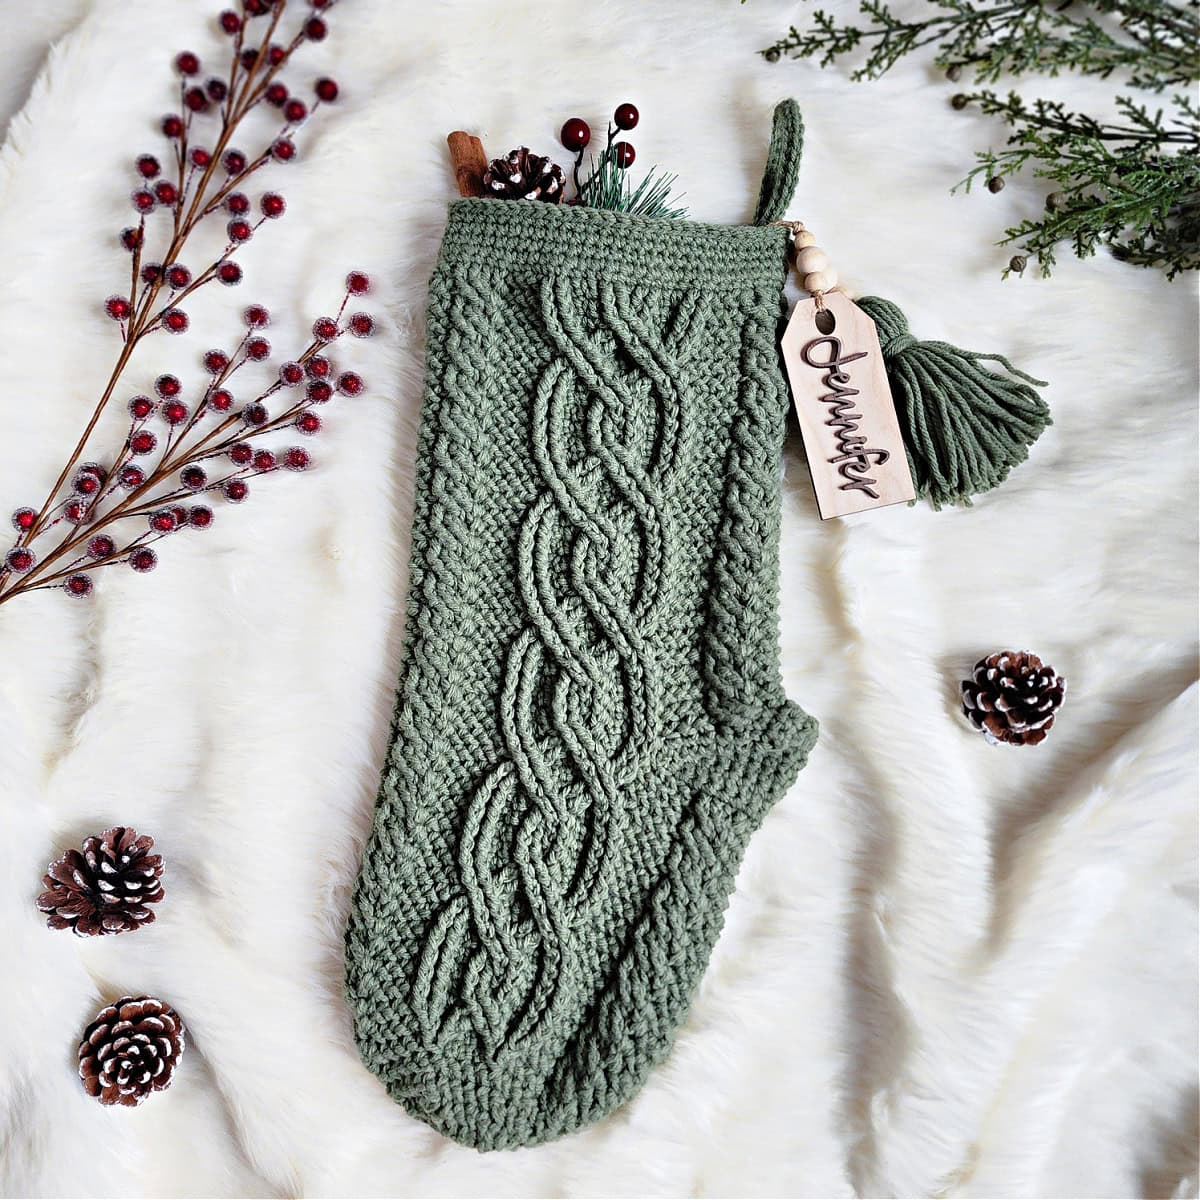
A cable crochet Christmas stocking is more than just a decoration—it’s a heartfelt expression of holiday cheer. Whether you’re making it for your own crochet Christmas decorations or gifting it to someone special, a Christmas stocking captures the warmth and joy of the season.
Why Choose a Cable Crochet Christmas Stocking?
Cable patterns are renowned for their elegant, textured appearance. Traditionally associated with knitting, cables have made their way into the crochet world, bringing a fresh take on classic holiday designs. A cable crochet stocking offers:
- Timeless Appeal: The braided, rope-like textures of cables create a classic look that never goes out of style.
- Customization Options: Adjust colors, sizes, and embellishments to match your holiday decor or personalize for loved ones.
- Durability: Handmade stockings are sturdy and designed to last for years, becoming cherished family heirlooms.
Related: If you love cabled stockings, we have two other cable crochet Christmas stocking patterns: Big Bold Cabled Stocking and Braided Cables Christmas Stocking.
Tips for Crocheting Cables
- Master the Basics: Cable stitches often involve post stitches, like front post and back post double crochet. Practice these before starting your project.
- Follow the Chart: Many patterns include charts to help visualize cable designs. These are especially helpful for keeping your stitches aligned. The Ad-Free PDF includes a BONUS stitch chart!
- Work Slowly: Cables require attention to detail. Take your time to ensure your stitches are precise and uniform. Check out my 2 Tips for Proper Post Stitch Placement that are a huge help when crocheting cables!
- Block Your Work: After finishing, blocking your stocking can enhance the cable definition and give your project a polished look.
How To Get The
Olivette Cable Christmas Stocking Pattern
Option 1: Scroll down for the free crochet stocking pattern right here in this blog post.
Option 2: Purchase the ad-free printable PDF from one of my shops:
Decorating Ideas for Your Stocking
Once your cable crochet stocking is complete, it’s time to embellish and display it. Here are a few ideas:
- Add Names: Personalize the cuff with embroidered names, or wooden tags.
- Use Metallic Yarn: Incorporate metallic thread or yarn for a festive sparkle.
- Hang with Style: Use a decorative stocking holder or rustic ribbon to hang it by the fireplace.
Crochet Stocking Yarn
For this crochet Christmas sock, I chose Lion Brand Yarns Pound of Love in Olive.
Pound of love is a premium acrylic, worsted weight yarn that is currently available in 38 colors. It’s soft on the hands while crocheting, yet sturdy enough to hold its shape for this cable crochet Christmas stocking pattern.
What is the BEST yarn to use for crochet Christmas stockings?
When searching for crochet Christmas patterns, you’ll find that the most popular weight of yarn used for crochet stockings is worsted weight yarn. Worsted weight yarn is not only durable, it also works up pretty quickly.
Worsted weight yarns are great for both simple crochet stitch pattern stockings and crochet stockings with cables.
The following are my favorite worsted weight yarns to use for Christmas stockings: Lion Brand Pound of Love, Lion Brand Vanna’s Choice, and Lion Brand Wool Ease.
Olivette Cabled Crochet Stocking – FREE Crochet Stocking Pattern
The cable crochet Christmas stocking pattern is free below, but if you love to work offline, or need to order your yarn, I’ve got a couple other great options for you.
Purchase the ad-free, printable PDF for the stacked diamonds stocking crochet pattern that includes all photo tutorials, Plus a BONUS crochet stitch chart, on Ravelry, or Etsy (aff).
Save this pattern to your Ravelry favorites.
Subscribe to my YouTube Channel!
This post contains affiliate links.
Materials
- Yarn: Worsted Weight / 4 / Yarn, Lion Brand Yarn Pound of Love was used for the sample in the photos.
- Olive: #550-172T / 420 yards
- Crochet Hooks: G/6/4.00mm; H/8/5.00mm, or size needed to obtain gauge (My favorite crochet hooks are the Clover Amour Crochet Hooks, I’ve never had an ache in my hands since switching).
- Locking Stitch Markers
- Scissors
- Yarn Needle
- Personalized Wood Stocking Tag (optional)
Abbreviations (U.S. Terms)
- ch(s): chain(s)
- sl st: slip stitch
- st(s): stitch(es)
- sc: single crochet
- ext sc: extended single crochet
- fpdc: front post double crochet
- fptr: front post treble crochet
- Hhdc: herringbone half double crochet
- fpdc2tog: front post double crochet decrease
- FLO Hhdc2tog: herringbone half double crochet decrease
- yo: yarn over
- RS: right side
- Rep: repeat
- Rnd: round
- yo: yarn over
- FLO: front loop only
- Join yarn with a standing single crochet
- Surface Crochet Tutorial
- Special Join Technique
Experience Level
- Intermediate
Size
- One Size: 6.75″W x 17″L (laid flat)
Gauge
- In Hhdc, with a 5mm hook: 8 sts = 2″; 4 rows = 1.25″
Special Stitches
- Extended Single Crochet (ext sc): Insert hook into stitch indicated, yo, pull up a loop, yo, pull thru 1 loop on hook, yo, pull thru remaining two loops on hook.
- Herringbone Half Double Crochet (Hhdc): Yo insert hook into designated stitch, yarn over, pull up a loop and pull it through 1 loop on hook, yarn over, pull through remaining 2 loops on hook.
- FLO Herringbone Half Double Crochet Decrease (FLO Hhdc2tog): Yo, insert your hook into the FLO of each of the next 3 sts, yo, pull up a loop and pull this loop through 1 loop on hook, yarn over, pull through remaining 2 loops on hook.
- Front Post Double Crochet (fpdc): Yo, insert hook from front to back to front around the post of the indicated stitch, yo, pull up a loop, yo, pull thru 2 loops, yo, pull thru remaining 2 loops.
- Front Post Treble Crochet (fptr): Yo 2 twice, insert hook from front to back to front around the post of the designated stitch, yo, pull up a loop, (yo, pull thru 2 loops) 3 times.
- Front Post Double Crochet Decrease (fpdc2tog): (yo, insert your hook from front to back to front around the post of the next stitch, yo, pull up a loop, yo, pull thru 2 loops on your hook) twice, yo, pull thru remaining three loops on your hook.
- Join yarn with a standing single crochet: Begin with a slip knot on your hook, insert your hook into the stitch or space indicated, yo, pull up a loop, yo and draw thru both loops on hook.
Pattern Notes
- Turning chains are not included in stitch count unless noted otherwise.
- Yarn Notes: The stocking shown was made using Lion Brand Yarn Pound of Love. Other yarns can be substituted as long as gauge is met.
- Lion Brand Yarn Pound of Love, worsted weight yarn, 100% Premium Acrylic, (solids: 1,020 yards / 454 g / 16 oz / 932 m)
- Yardage & Color: Olive #550-172T / 420 yards
- Construction Notes: This cabled Christmas stocking is worked from the top down beginning at the cables. After working the leg of stocking, a short row heel is added. After the heel, stitches are picked up to work the foot of stocking, then the toe is made. Four rounds of single crochet cuff are added to the top edge to finish it off. Finish with a hanging loop and tassel.
Olivette Cable Crochet Christmas Stocking Pattern
Leg of Stocking
Note: This section is worked in continuous rounds (a spiral). Do not join at the end of each round, instead use a scrap piece of yarn to keep track of the beginning of each round. Move the scrap of yarn up as you complete each round.
Note #2: Because it’s worked in a spiral, you may notice a slight lean/twist in your stocking as you are crocheting. This is normal and will straighten out when the stocking is in use and the stitches loosen up. You can also block it once you’ve finished and encourage the stitches to straighten out more quickly.
Set-Up: With yarn & a 5.00mm crochet hook, ch 58, being careful not to twist the ch, sl st into the back hump of the 1st ch.
Rnd 1 (RS): Ch 1, working into the back humps of the foundation chain, sc in each ch around. Do not join. (58 sts)
Rnd 2: Hhdc in the first st, *fpdc around each of the next 4 sts, Hhdc in each of the next 3 sts, fpdc around each of the next 2 sts, ext sc in each of the next 2 sts, fpdc around each of the next 2 sts, ext sc in the next st, fpdc around each of the next 2 sts, ext sc in each of the next 2 sts, fpdc around each of the next 2 sts, Hhdc in each of the next 3 sts, fpdc around each of the next 4 sts*, Hhdc in each of the next 2 sts, rep from * to *, then Hhdc in the last st. Do not join. (58 sts)
Rnd 3: Hhdc in the first st, *skip each of the next 2 post sts, fptr around each of the next 2 post sts, fptr around each of the 2 skipped post sts, Hhdc in each of the next 3 sts, fpdc around each of the next 2 post sts, ext sc in each of the next 2 sts, fpdc around each of the next 2 post sts, ext sc in the next st, fpdc around each of the next 2 post sts, ext sc in each of the next 2 sts, fpdc around each of the next 2 post sts, Hhdc in each of the next 3 sts, skip each of the next 2 post sts, fptr around each of the next 2 post sts, fptr around each of the 2 skipped post sts*, Hhdc in each of the next 2 sts, rep from * to *, then Hhdc in the last st. Do not join. (58 sts)
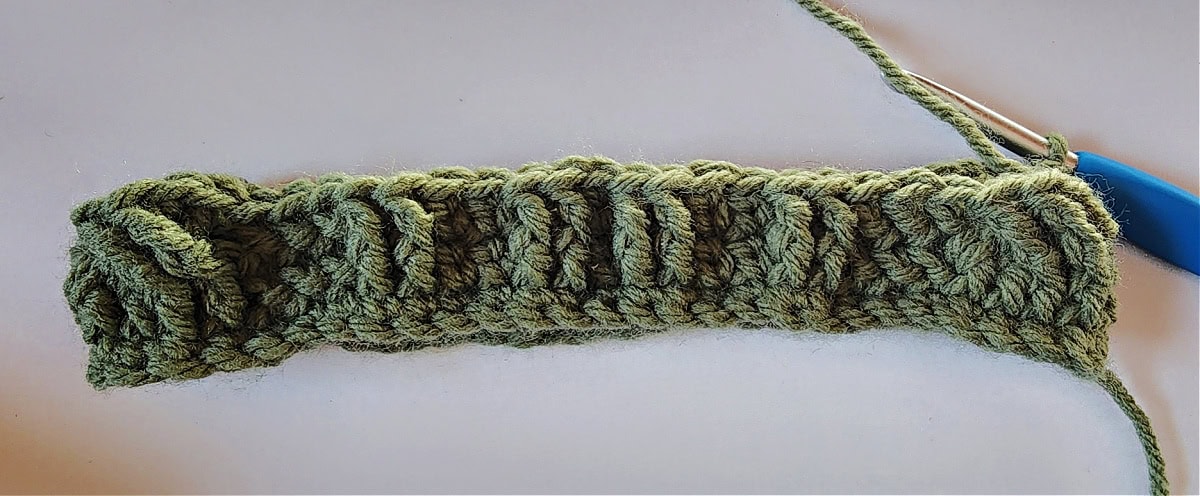
Rnd 4: Hhdc in the first st, *fpdc around each of the next 4 post sts, Hhdc in each of the next 3 sts, fpdc around each of the next 2 post sts, ext sc in each of the next 2 sts, skip each of the next 2 post sts & skip the next ext sc, fptr around each of the next 2 post sts, working behind the fptr’s just worked, ext sc in the skipped ext sc, working in front of the fptr’s worked, fptr around each of the 2 skipped post sts, ext sc in each of the next 2 sts, fpdc around each of the next 2 post sts, Hhdc in each of the next 3 sts, fpdc around each of the next 4 post sts*, Hhdc in each of the next 2 sts, rep from * to *, then Hhdc in the last st. Do not join. (58 sts)
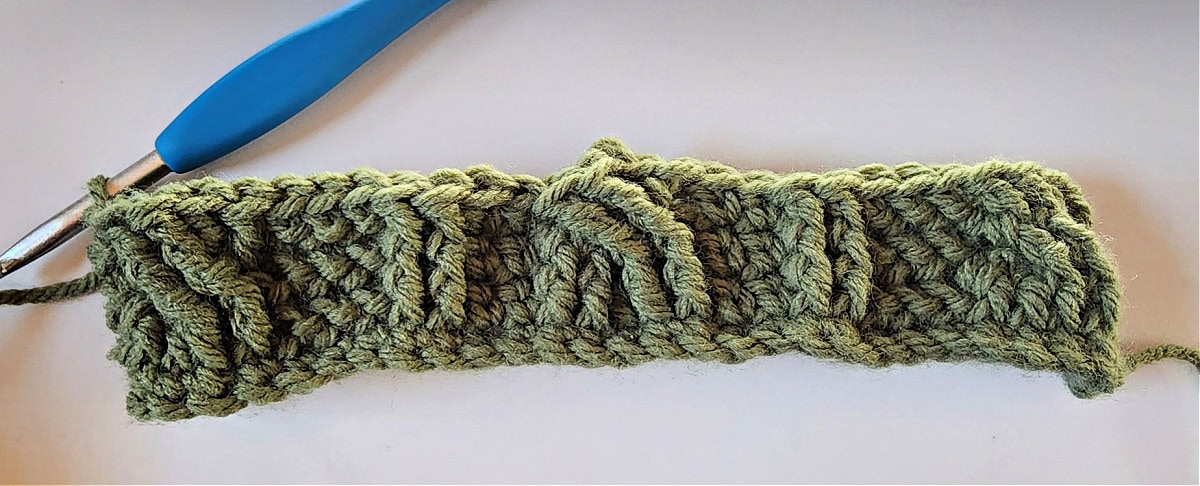
Rnd 5: Hhdc in the first st, *skip each of the next 2 post sts, fptr around each of the next 2 post sts, fptr around each of the 2 skipped post sts, Hhdc in each of the next 3 sts, Hhdc in the top of the next post st, fpdc around the same post st as the Hhdc just worked in, fpdc around the next post st, skip each of the next 2 ext sc, fpdc around each of the next 2 post sts, ext sc in the top of the same post st as the fpdc just worked around, ext sc in the next st, ext sc in the top of the next post st, fpdc around the same post st as the ext sc just worked in, fpdc around the next post st, skip each of the next 2 ext sc, fpdc around each of the next 2 post sts, Hhdc in the top of the same post st as the last fpdc just worked around, Hhdc in each of the next 3 sts, skip each of the next 2 post sts, fptr around each of the next 2 post sts, fptr around each of the 2 skipped post sts*, Hhdc in each of the next 2 sts, rep from * to *, then Hhdc in the last st. Do not join. (58 sts)
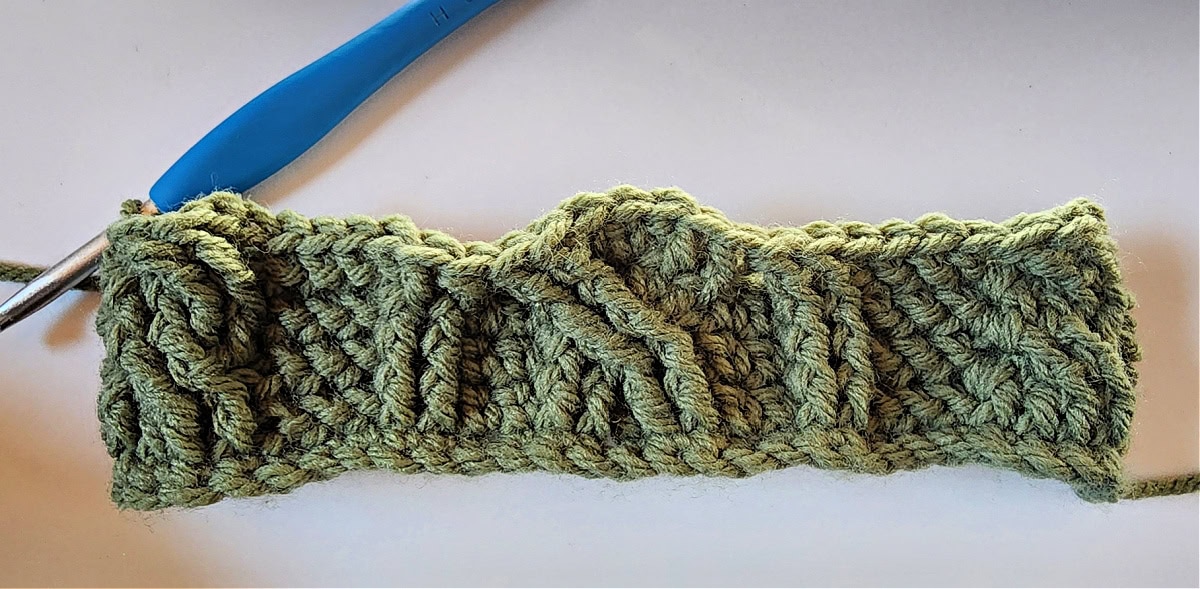
Rnd 6: Hhdc in the first st, *fpdc around each of the next 4 post sts, Hhdc in each of the next 4 sts, skip each of the next 2 post sts, fptr around each of the next 2 post sts, fptr around each of the 2 skipped post sts, ext sc in each of the next 3 sts, skip each of the next 2 post sts, fptr around each of the next 2 post sts, fptr around each of the 2 skipped post sts, Hhdc in each of the next 4 sts, fpdc around each of the next 4 post sts*, Hhdc in each of the next 2 sts, rep from * to *, then Hhdc in the last st. Do not join. (58 sts)
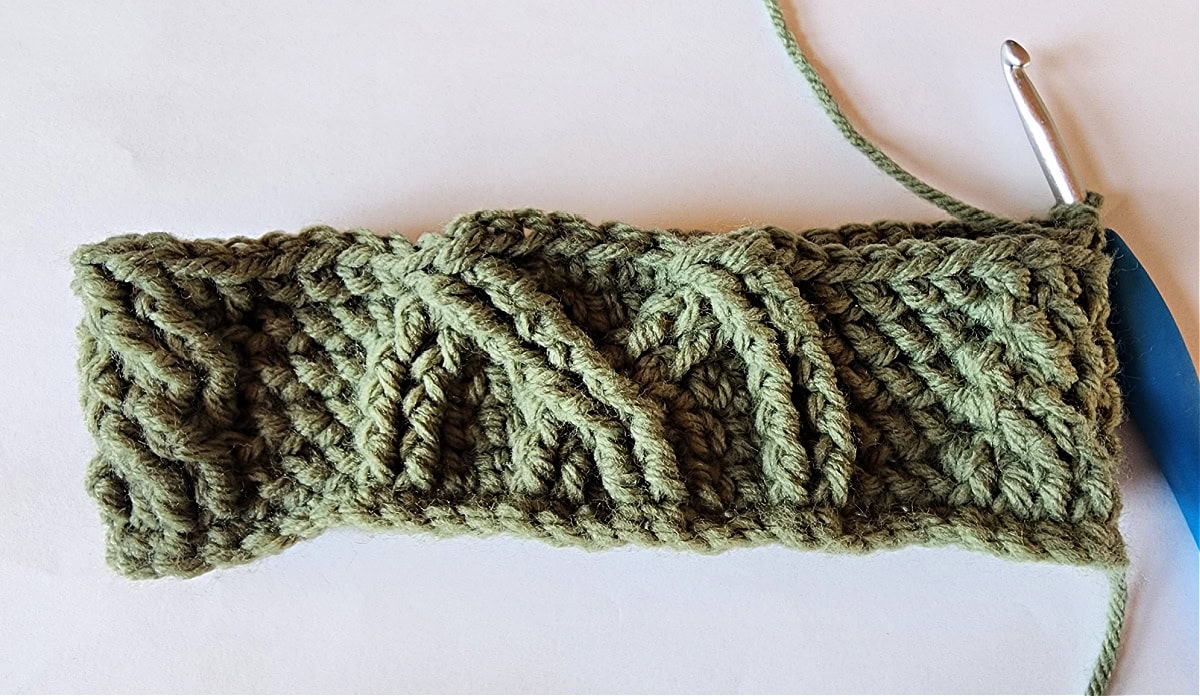
Rnd 7: Hhdc in the first st, *skip each of the next 2 post sts, fptr around each of the next 2 post sts, fptr around each of the 2 skipped post sts, Hhdc in each of the next 3 sts, skip the next st, fpdc around each of the next 2 post sts, ext sc in the top of the same post st as the fpdc just worked, ext sc in the next post st, fpdc around the same post st as the ext sc just worked in, fpdc around the next post st, skip the next ext sc, ext sc in the next st, skip the next ext sc, fpdc around each of the next 2 post sts, ext sc in the top of the same post st as the fpdc just worked, ext sc in the next post st, fpdc around the same post st as the ext sc just worked in, fpdc around the next post st, skip the next Hhdc, Hhdc in each of the next 3 sts, skip each of the next 2 post sts, fptr around each of the next 2 post sts, fptr around each of the 2 skipped post sts*, Hhdc in each of the next 2 sts, rep from * to *, then Hhdc in the last st. Do not join. (58 sts)
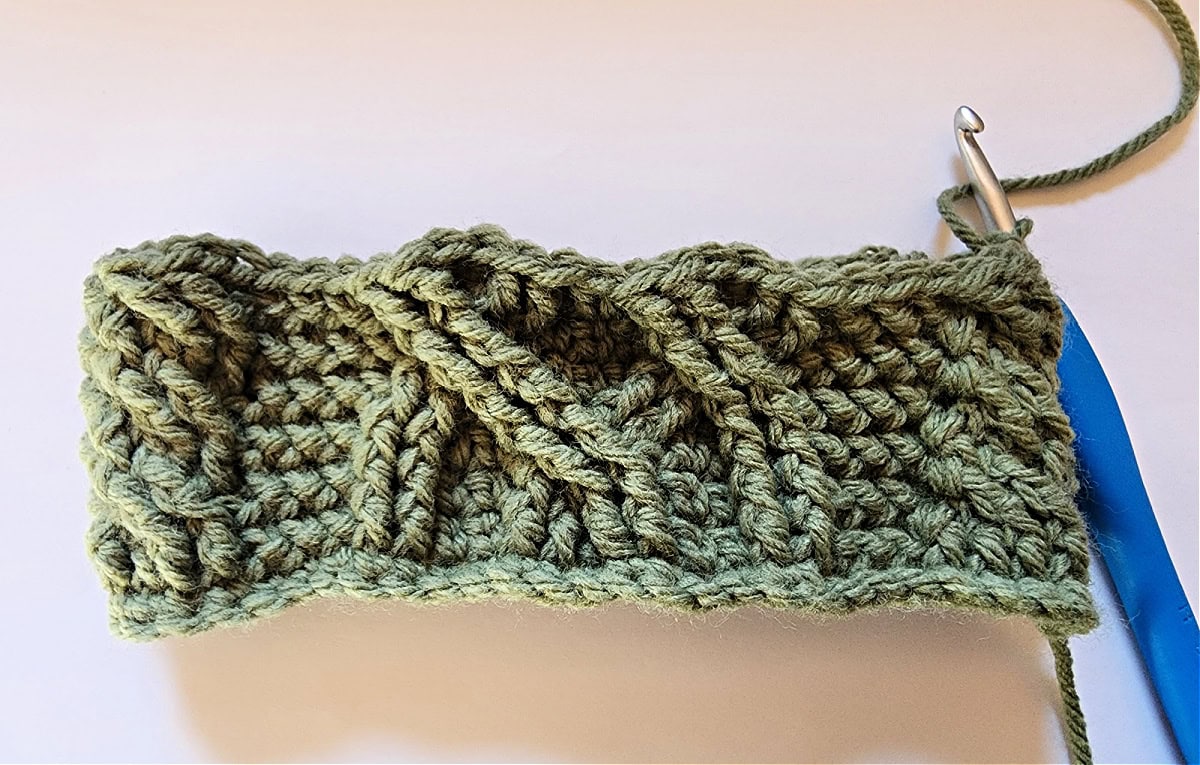
Rnd 8: Rep Rnd 4.
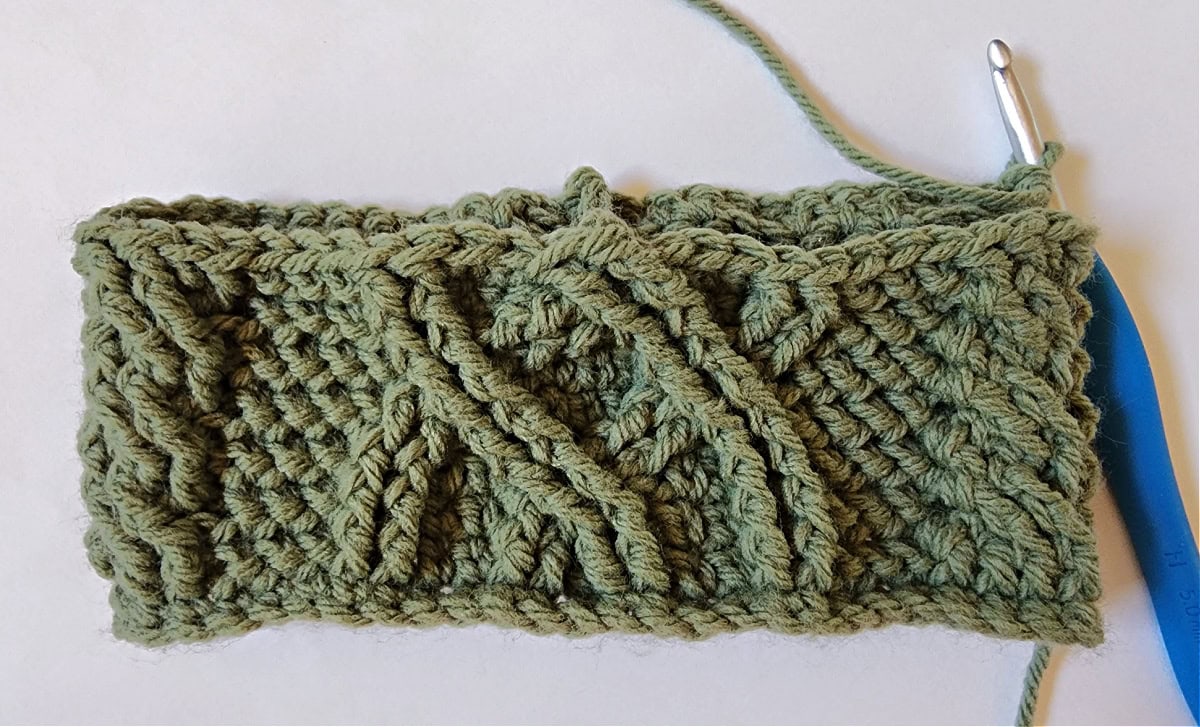
Rnd 9: Rep Rnd 3.
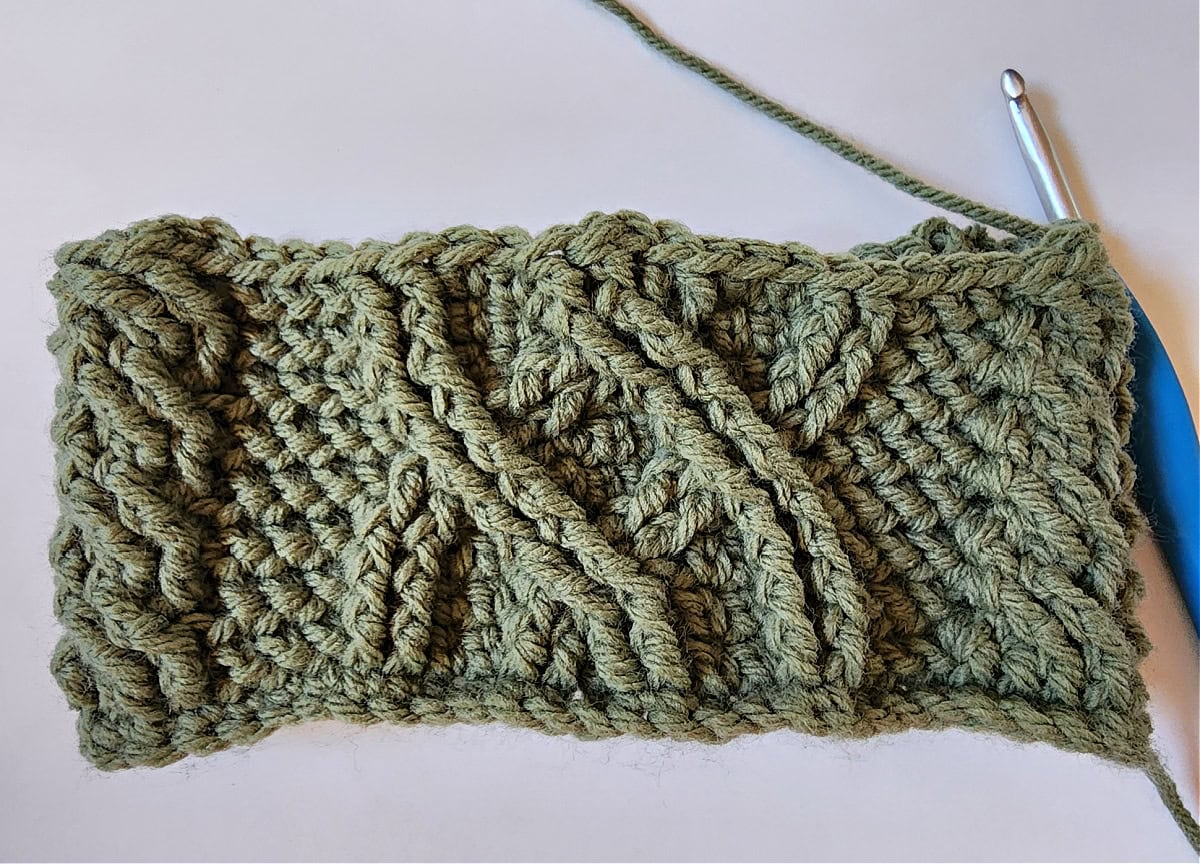
Rnd 10: Hhdc in the first st, *fpdc around each of the next 4 post sts, Hhdc in each of the next 3 sts, fpdc around each of the next 2 post sts, ext sc in each of the next 2 sts, fpdc around each of the next 2 post sts, ext sc in the next st, fpdc around each of the next 2 post sts, ext sc in each of the next 2 sts, fpdc around each of the next 2 post sts, Hhdc in each of the next 3 sts, fpdc around each of the next 4 post sts*, Hhdc in each of the next 2 sts, rep from * to *, then Hhdc in the last st. Do not join. (58 sts)
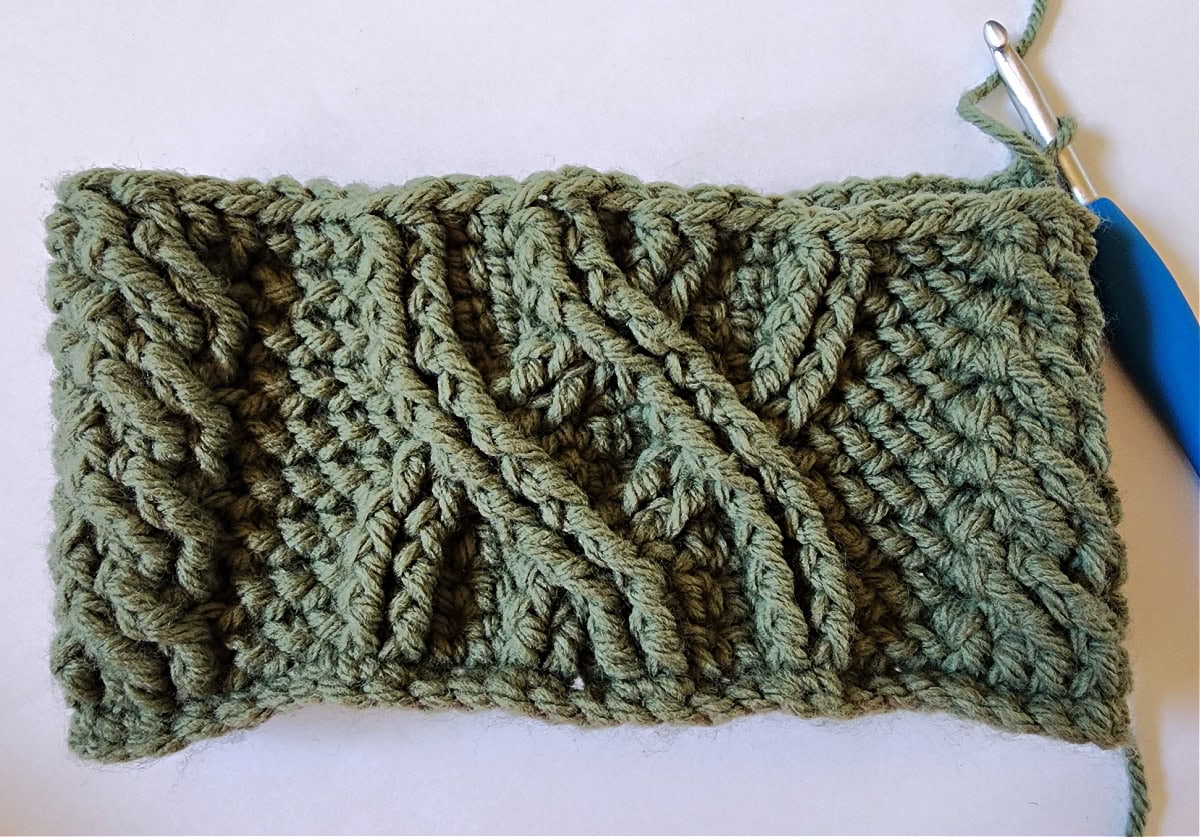
Rnd 11: Rep Rnd 3.
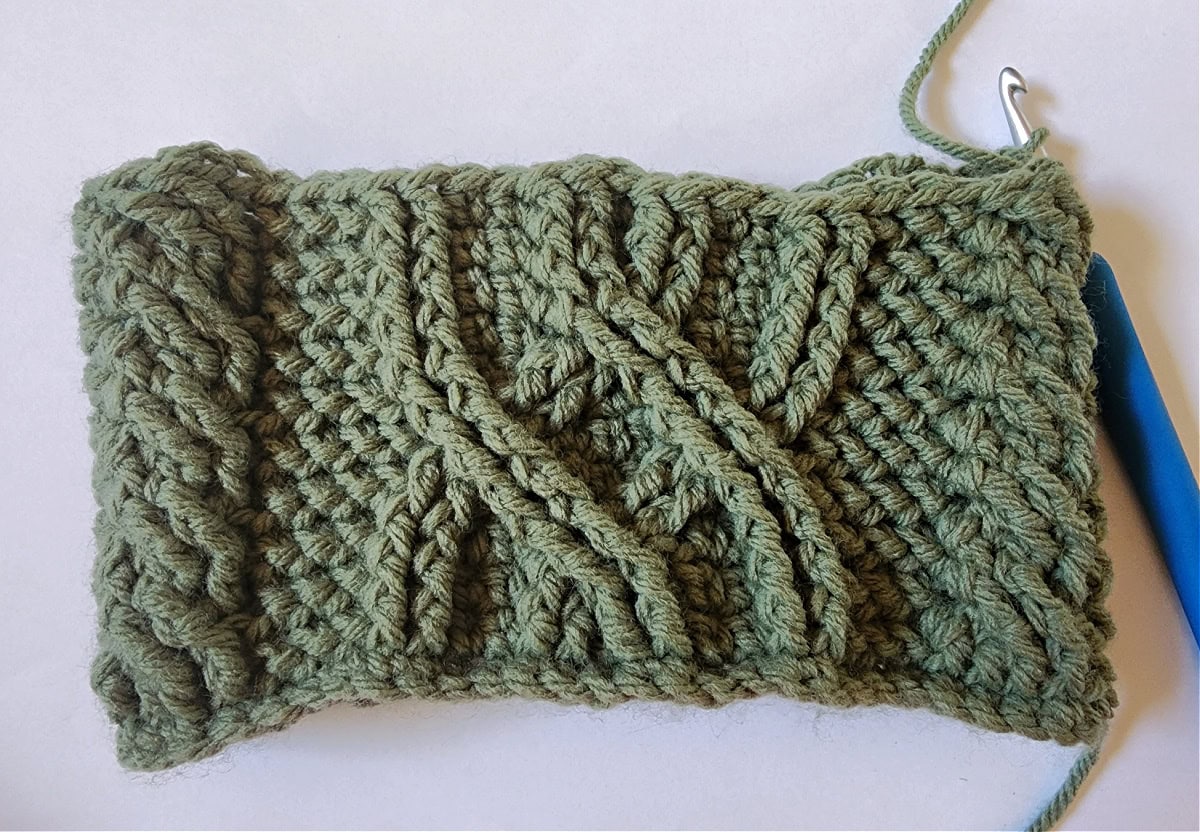
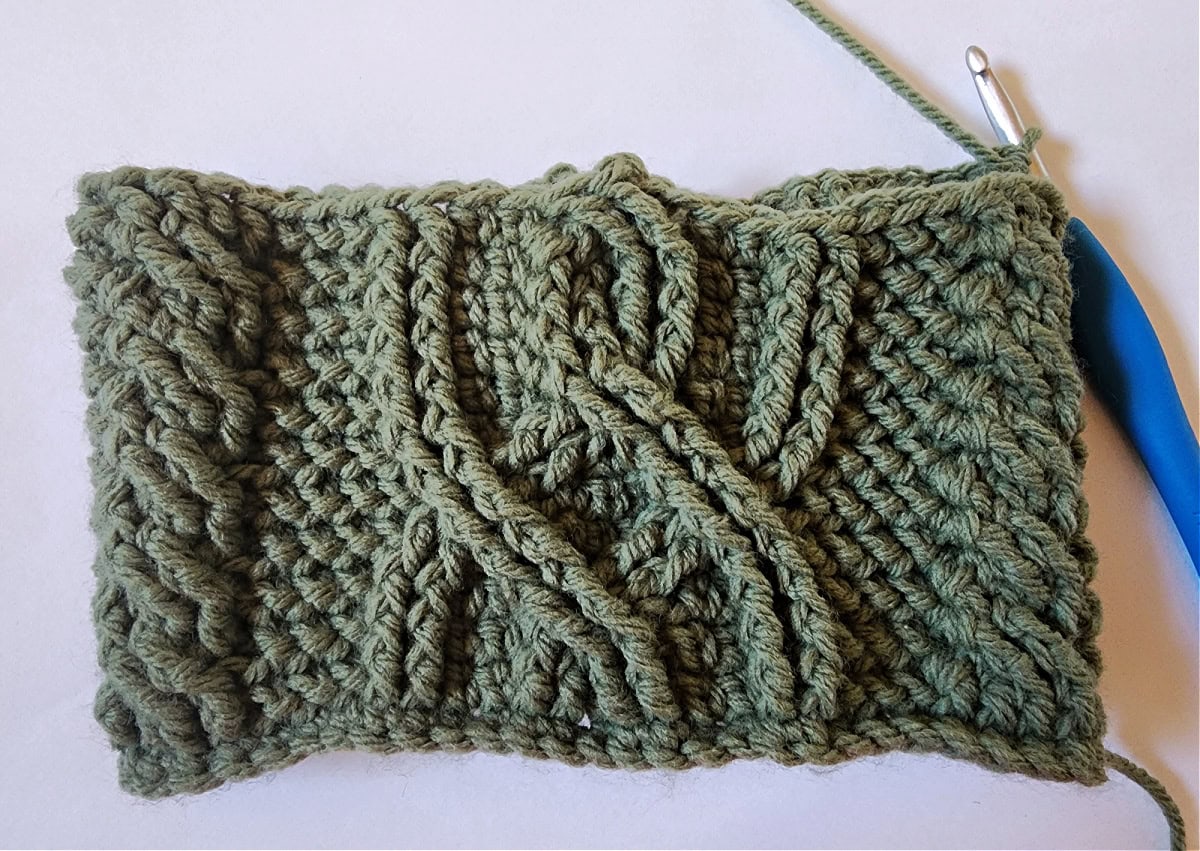
Rnd 12 – 27: Rep Rnds 4 – 11.
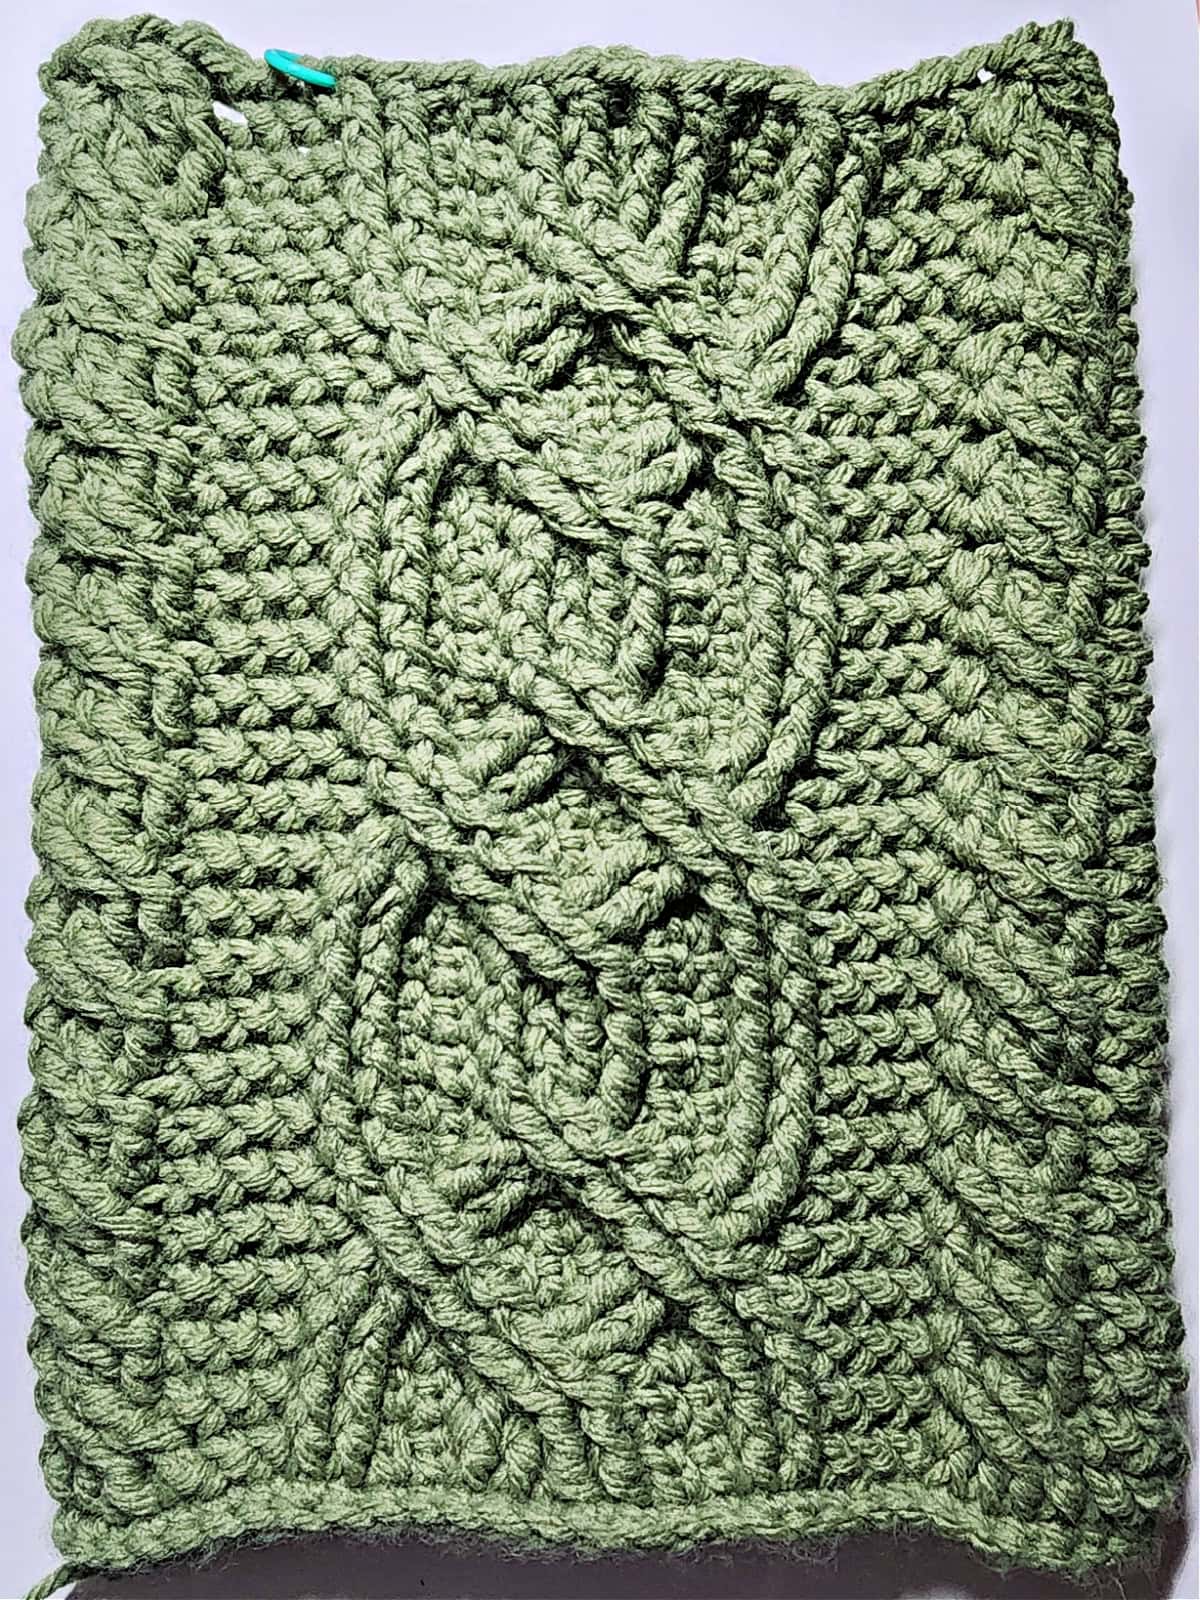
Place Stitch Marker: At the end of round 27, place a stitch marker in stitch #51 to mark the beginning of the heel.
Fasten off. Weave in ends. Approximate length at this point is 8.5″.
Continue on to the Stocking Heel.
Stocking Heel
Note: This heel is a crochet short row heel.
Row 1 (RS): With yarn & a 5.00 mm crochet hook, begin by leaving an 8″ tail of yarn to sew gap closed in the next section, then join yarn with a standing sc in the st you marked with a stitch marker, sc in each of the next 15 sts. Turn. (16 sts)
Row 2: Ch 1, sc in next 10 sts. Turn. (10 sts)
Row 3: Ch 1, sc in next 4 sts. Turn. (4 sts)
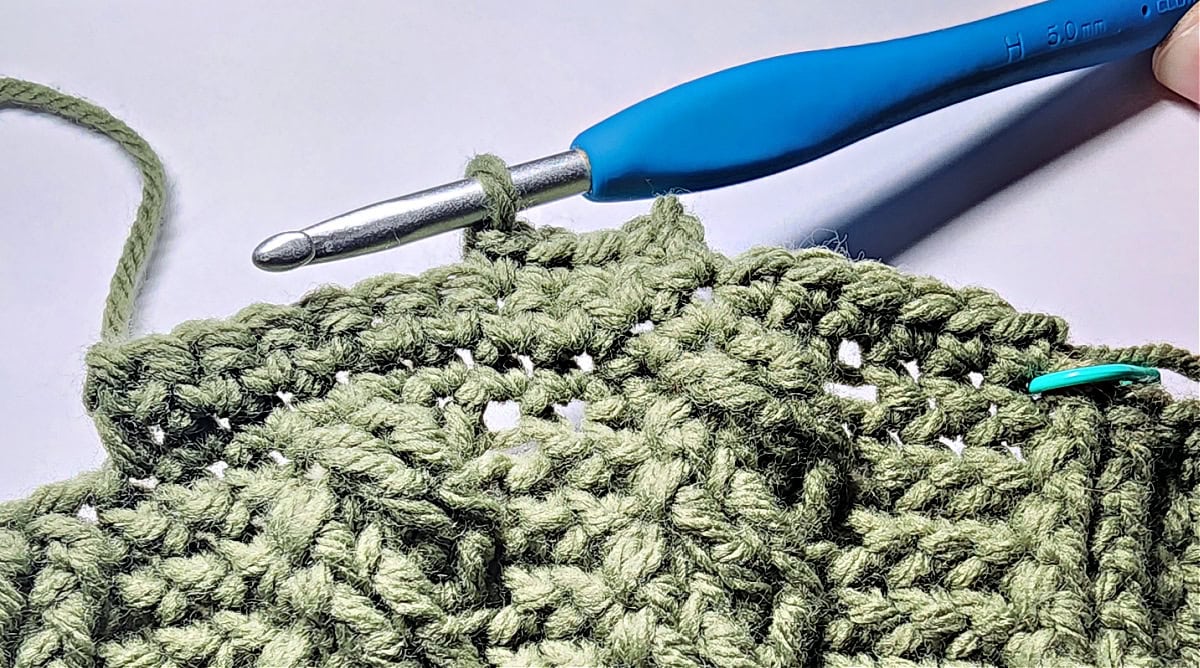
- Row 1 began at the green stitch marker and was worked to the left for 16 sts.
- Row 2 began on the left and was worked for 10 sts.
- Row 3 began on the right and worked for 4 sts.
Row 4: Ch 1, sc in next 4 sts, sc in next st of Row 1. Turn. (5 sts)
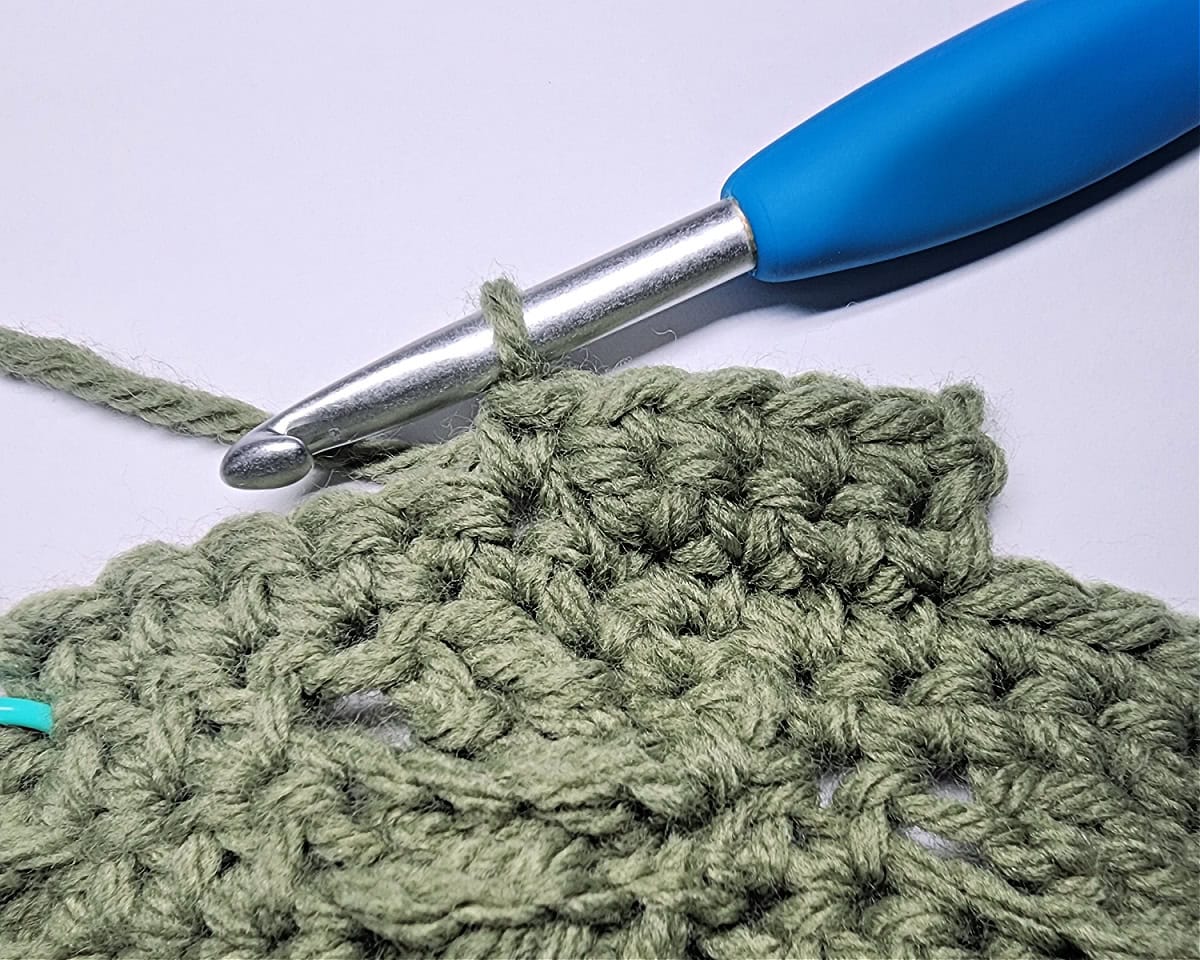
Row 5: Ch 1, sc in next 5 sts, sc in next st of Row 2. Turn. (6 sts)
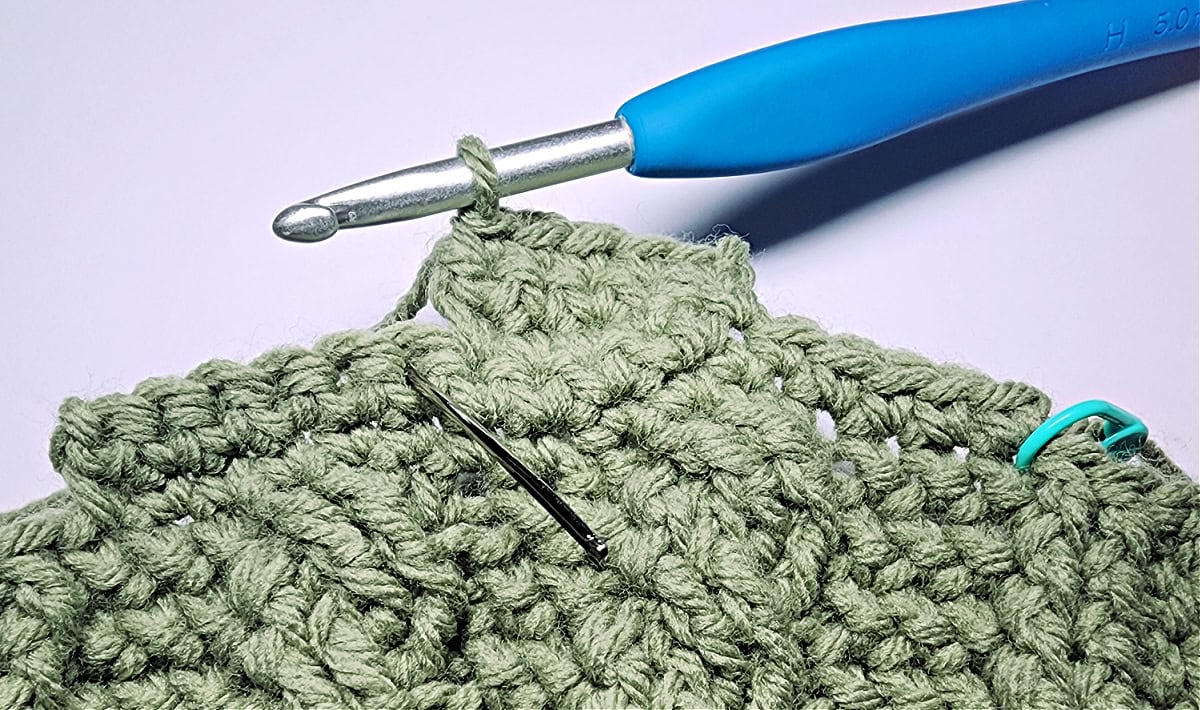
Row 6: Ch 1, sc in next 6 sts, sc in next st of Row 1. Turn. (7 sts)
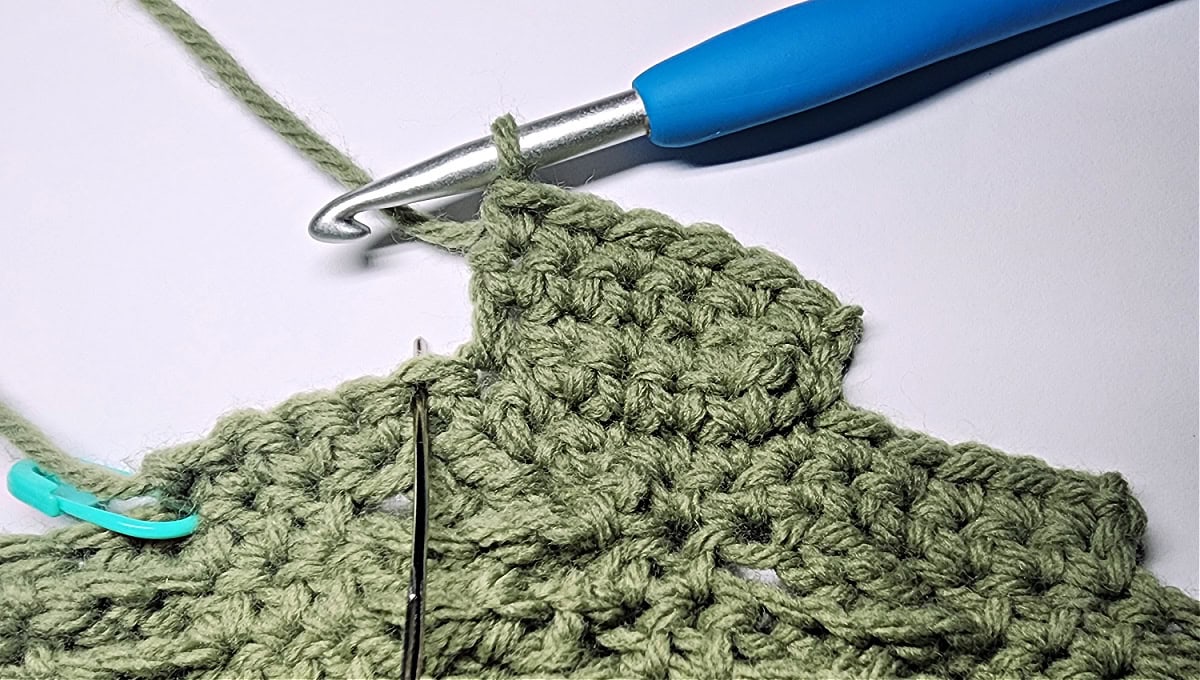
into the next stitch of Row 1.
Row 7: Ch 1, sc in next 7 sts, sc in next st of Row 2. Turn. (8 sts)
Row 8: Ch 1, sc in next 8 sts, sc in next st of Row 1. Turn. (9 sts)
Row 9: Ch 1, sc in next 9 sts, sc in next st of Row 2. Turn. (10 sts)
Row 10: Ch 1, sc in next 10 sts, sc in next st of Row 1. Turn. (11 sts)
Row 11: Ch 1, sc in next 11 sts, sc in next st of Row 2. Turn. (12 sts)
Row 12: Ch 1, sc in next 12 sts, sc in next st of Row 1. Turn. (13 sts)
Row 13: Ch 1, sc in next 13 sts, sc in next st of Row 2. Turn. (14 sts)
Row 14: Ch 1, sc in next 14 sts, sc in next st of Row 1. Turn. (15 sts)
Row 15: Ch 1, sc in next 15 sts, sc in next st of Row 2. Do not turn. (16 sts)
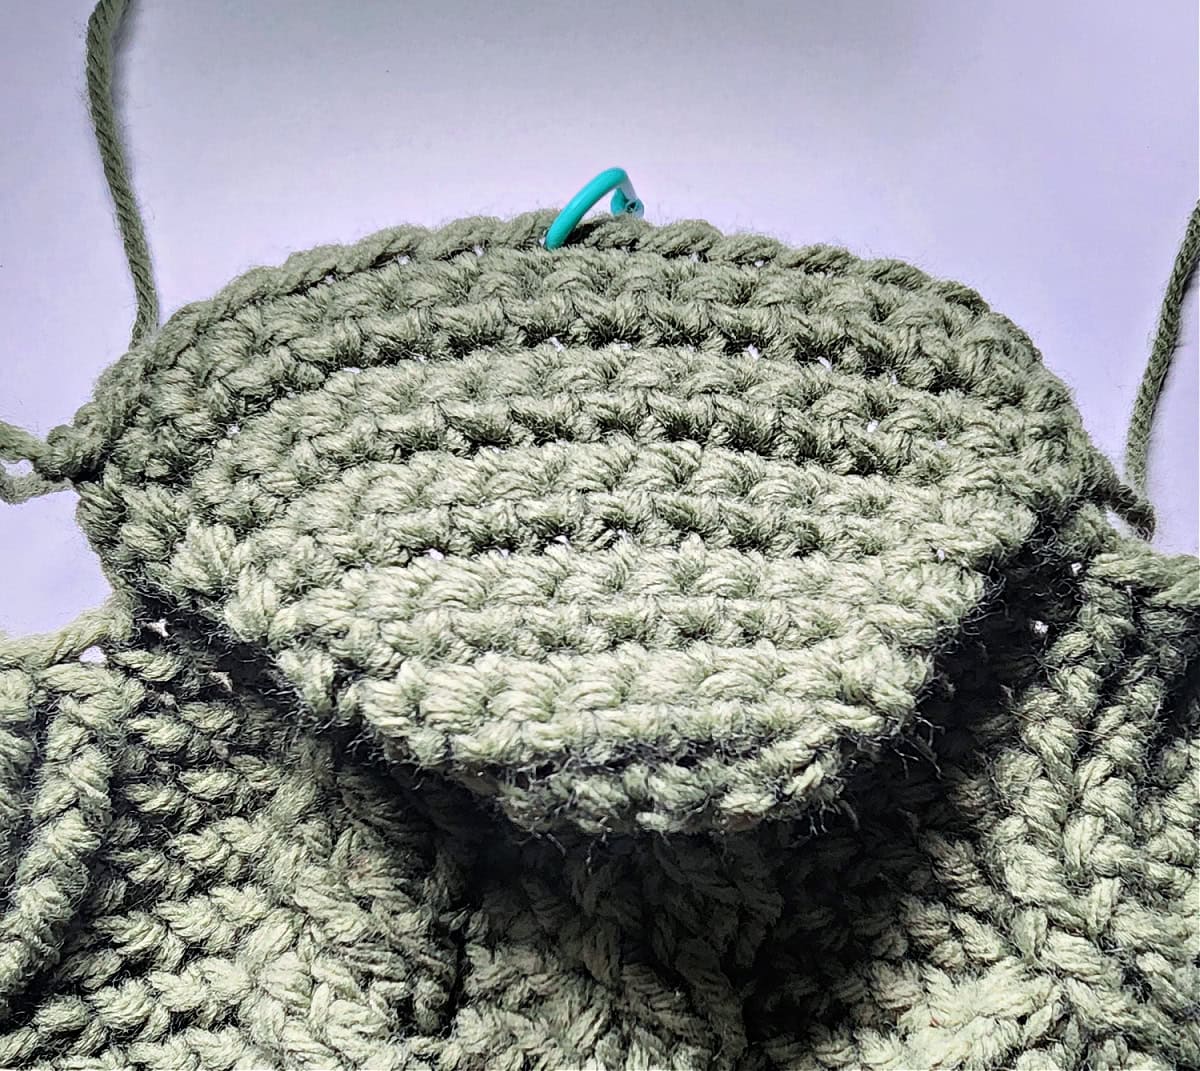
the last row of the heel. This SM marks where to join yarn to begin the Foot of Stocking.
Place Stitch Marker: Place a stitch marker in st #9 to mark the beginning of the Foot of Stocking.
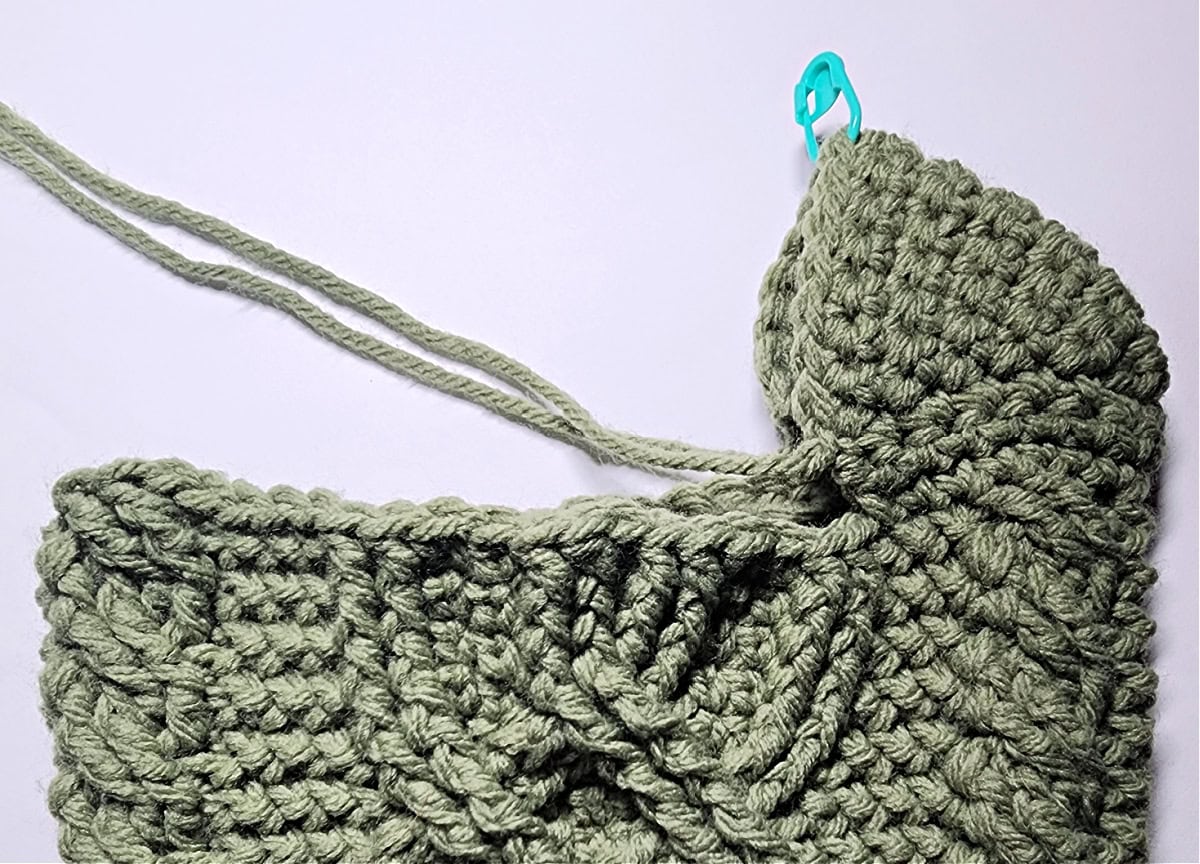
Fasten off leaving an 8″ tail of yarn to sew gap closed in the next section.
Foot of Stocking
Note: This section is worked in continuous rounds (a spiral). Do not join at the end of each round, instead use a scrap piece of yarn to keep track of the beginning of each round. Move the scrap of yarn up as you complete each round.
Note about Rnd 1: This round is very similar to Rnd 4 of the Leg of Stocking. The only difference is that the first and last 8 stitches of the round are worked into the stitches of the heel.
Rnd 1 (RS): With yarn & a 5.00mm crochet hook, join yarn with a sl st in the st marked with a SM, ch 1, Hhdc in the same st, fpdc around each of the next 4 sc of the heel, Hhdc in each of the next 3 sts of the heel, fpdc around each of the next 2 post sts, ext sc in each of the next 2 sts, skip each of the next 2 post sts & skip the next ext sc, fptr around each of the next 2 post sts, working behind the fptr’s just worked, ext sc in the skipped ext sc, working in front of the fptr’s worked, fptr around each of the 2 skipped post sts, ext sc in each of the next 2 sts, fpdc around each of the next 2 post sts, Hhdc in each of the next 3 sts, fpdc around each of the next 4 post sts, Hhdc in each of the next 2 sts, fpdc around each of the next 4 post sts, Hhdc in each of the next 3 sts, fpdc around each of the next 2 post sts, ext sc in each of the next 2 sts, skip each of the next 2 post sts & skip the next ext sc, fptr around each of the next 2 post sts, working behind the fptr’s just worked, ext sc in the skipped ext sc, working in front of the fptr’s worked, fptr around each of the 2 skipped post sts, ext sc in each of the next 2 sts, fpdc around each of the next 2 post sts, Hdc in each of the next 3 sts of the heel, fpdc around each of the next 4 sc of the heel, Hhdc in the last st of the heel. Do not join. (58 sts)
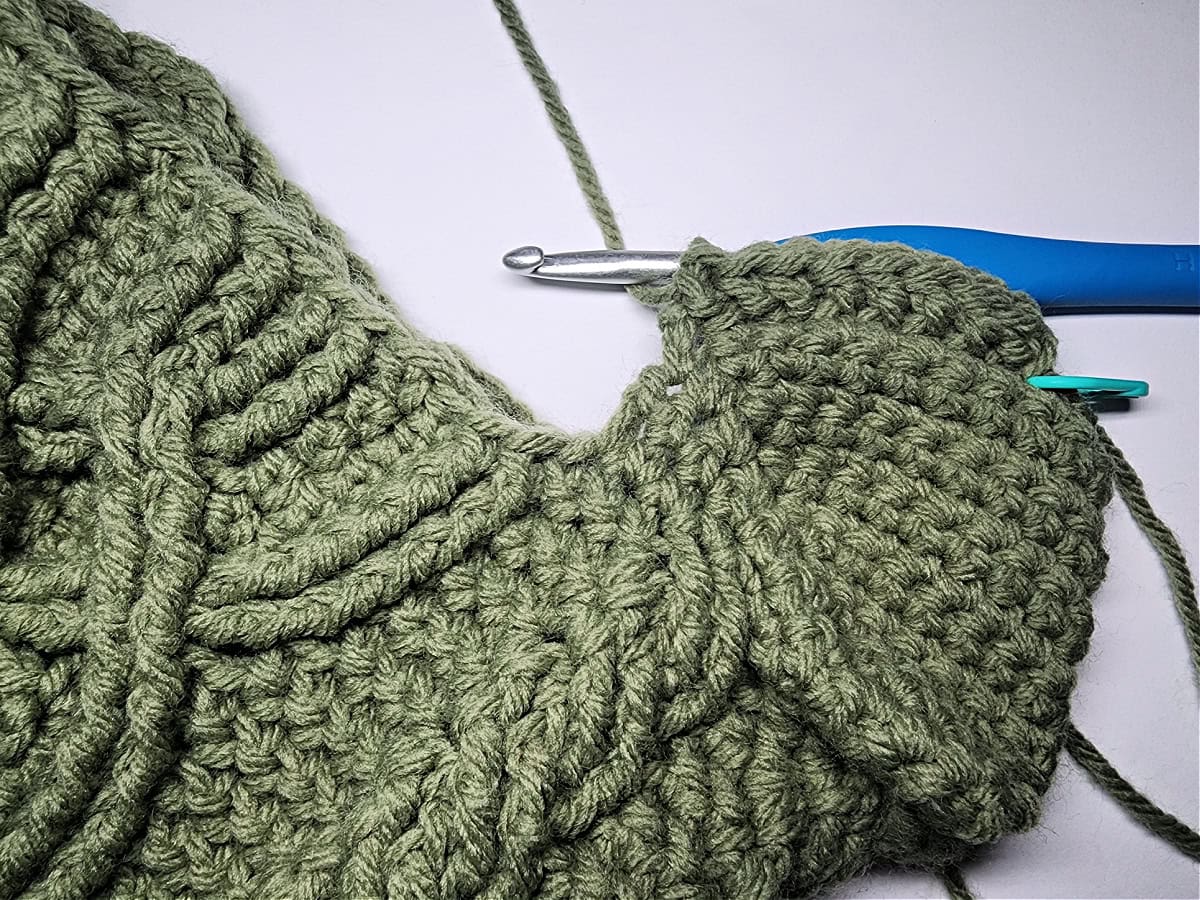
worked. Note the green SM, this was to mark where to join yarn to begin the foot of stocking.
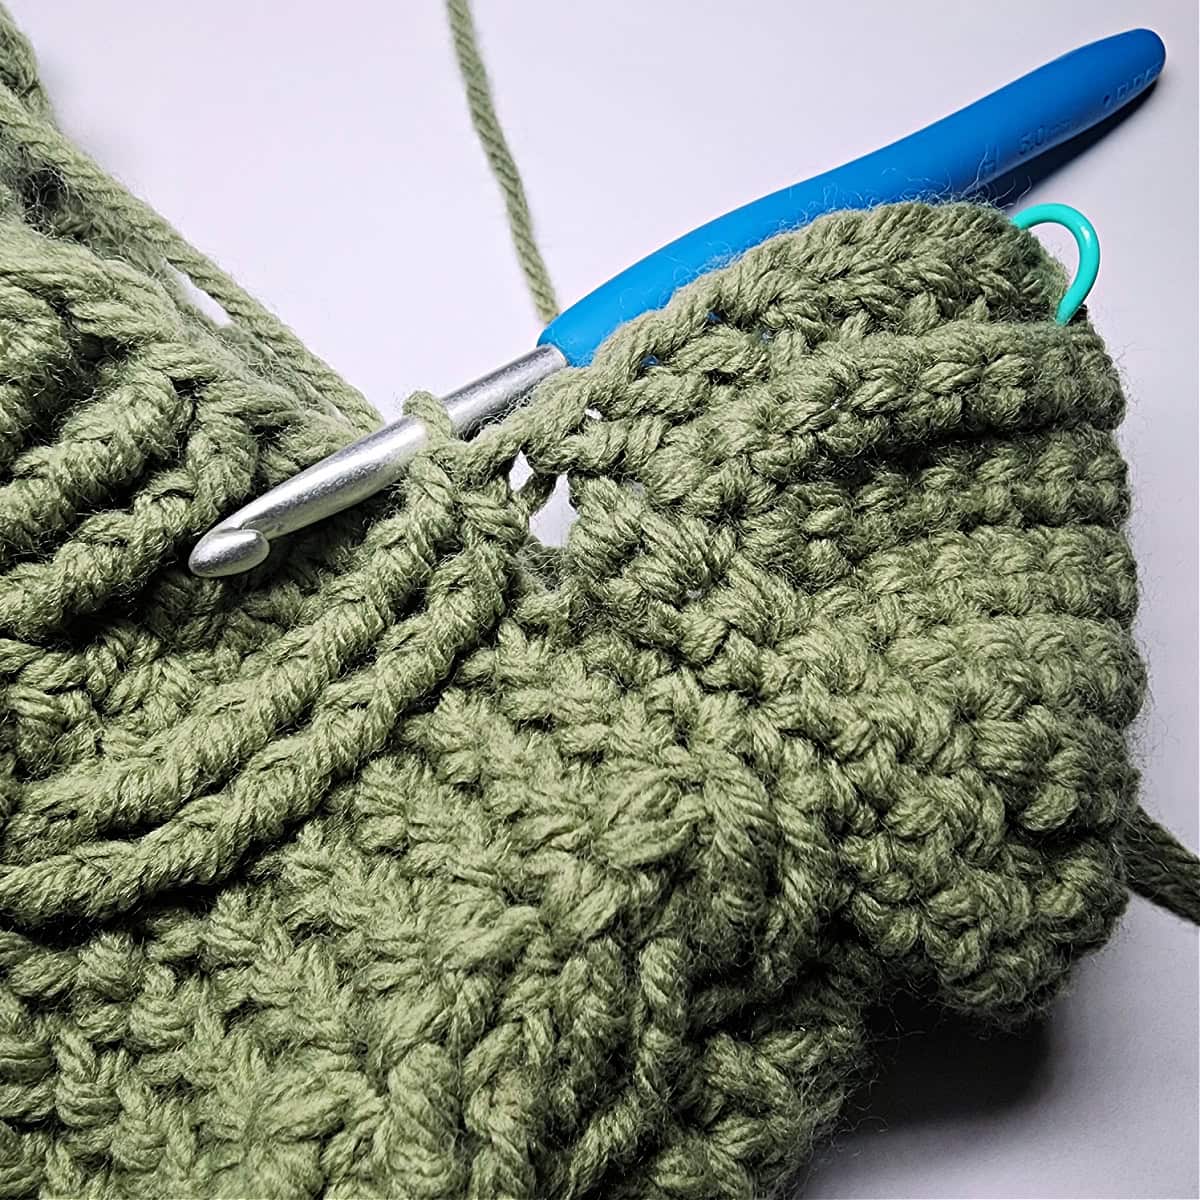
round of the leg and fpdc around the previous post stitches.
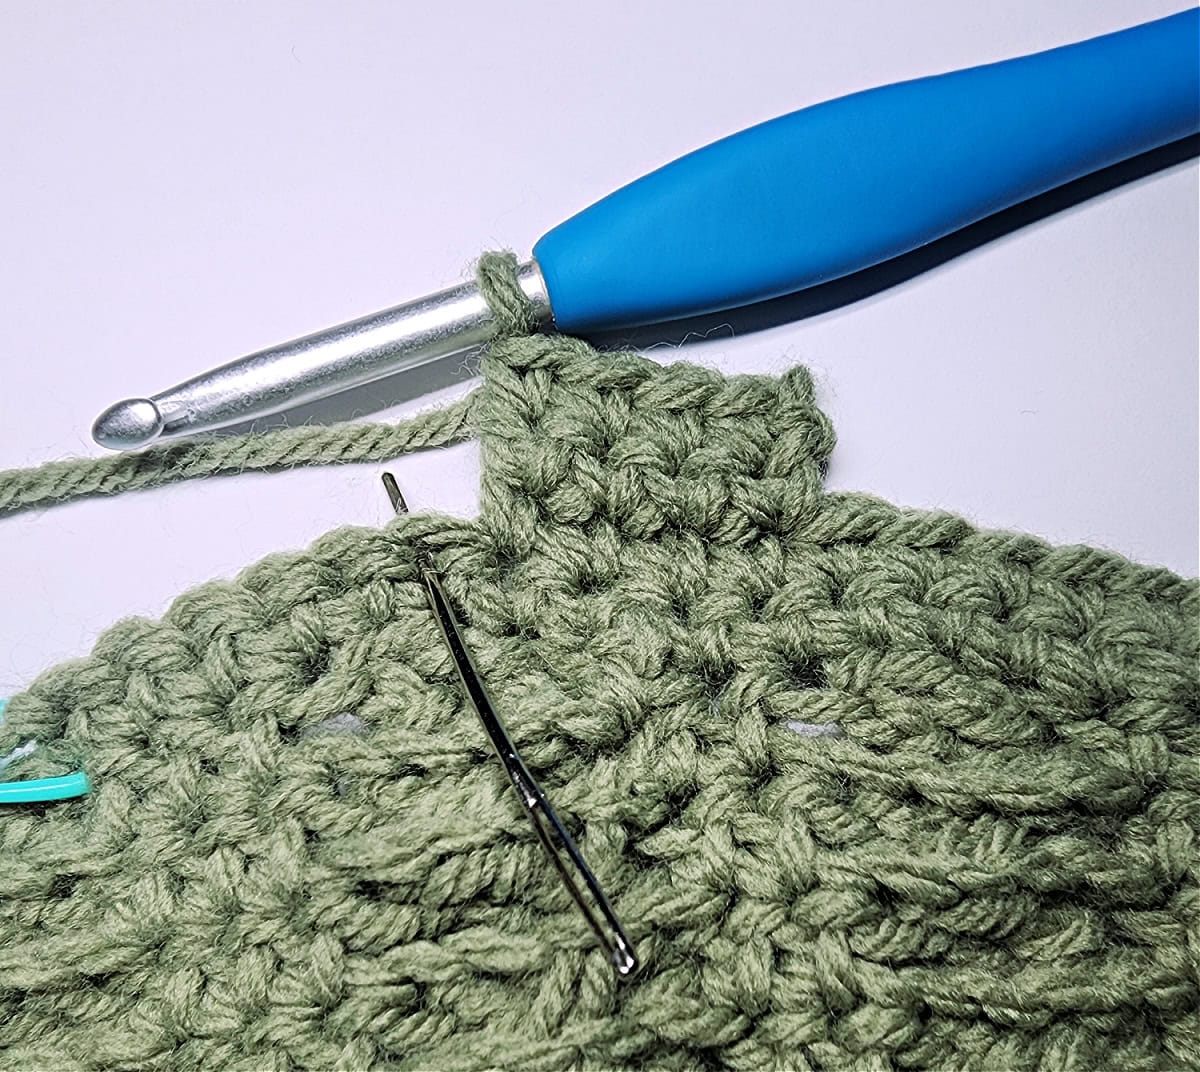
Tip! After working Round 1 of the Foot of Stocking, use a yarn needle and tails of yarn to stitch closed the small gaps near the first and last stitches of the heel. It’s easier to do this now, rather than waiting until you’ve completed your stocking. See photos below.
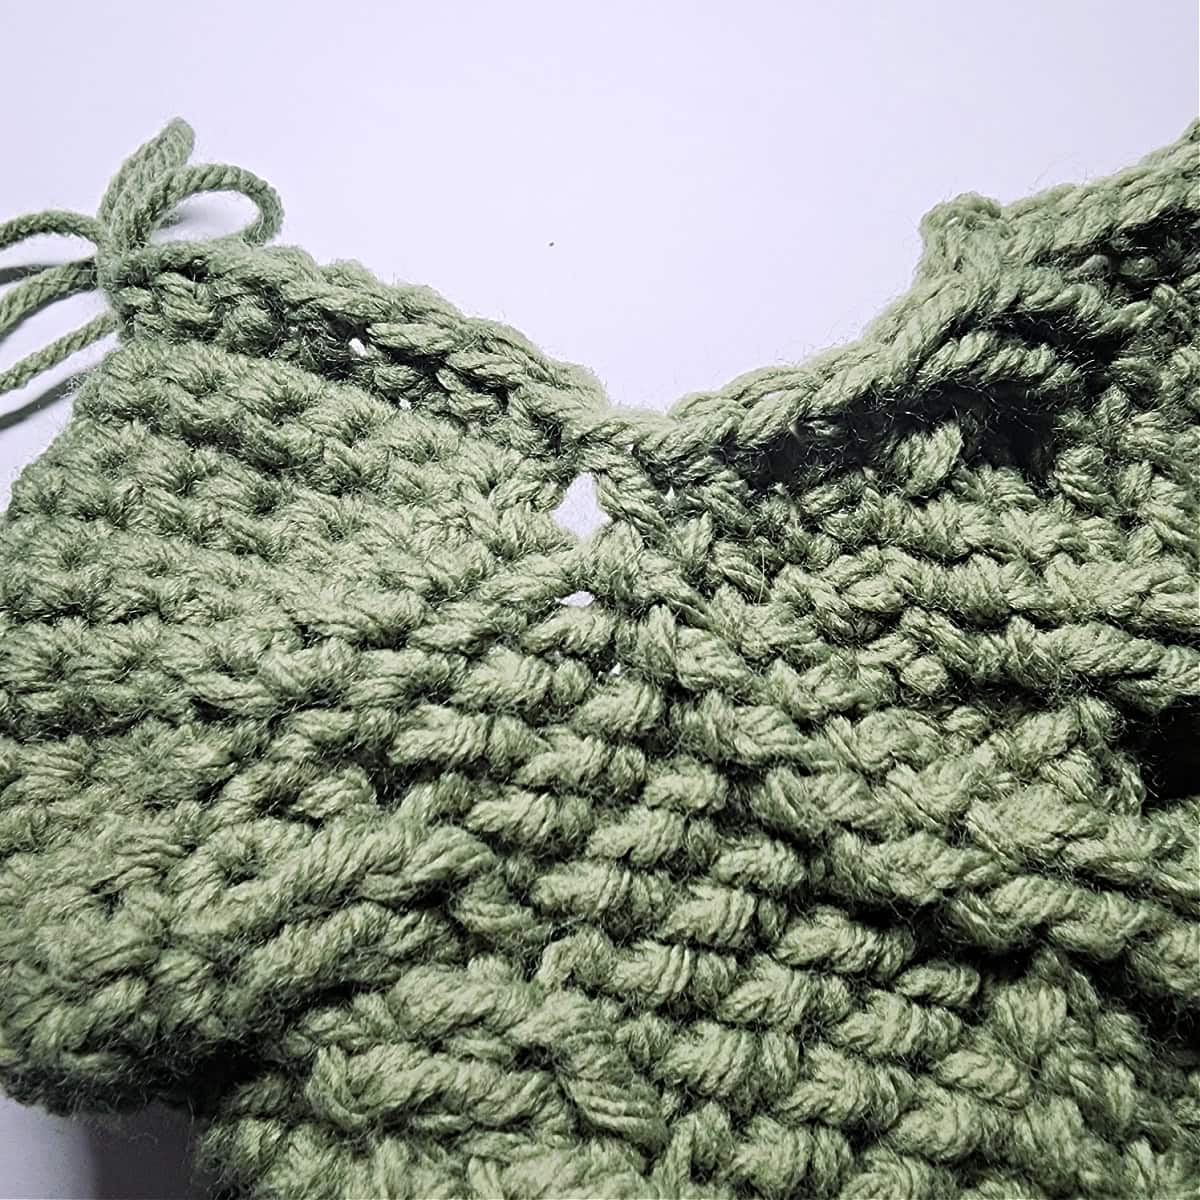
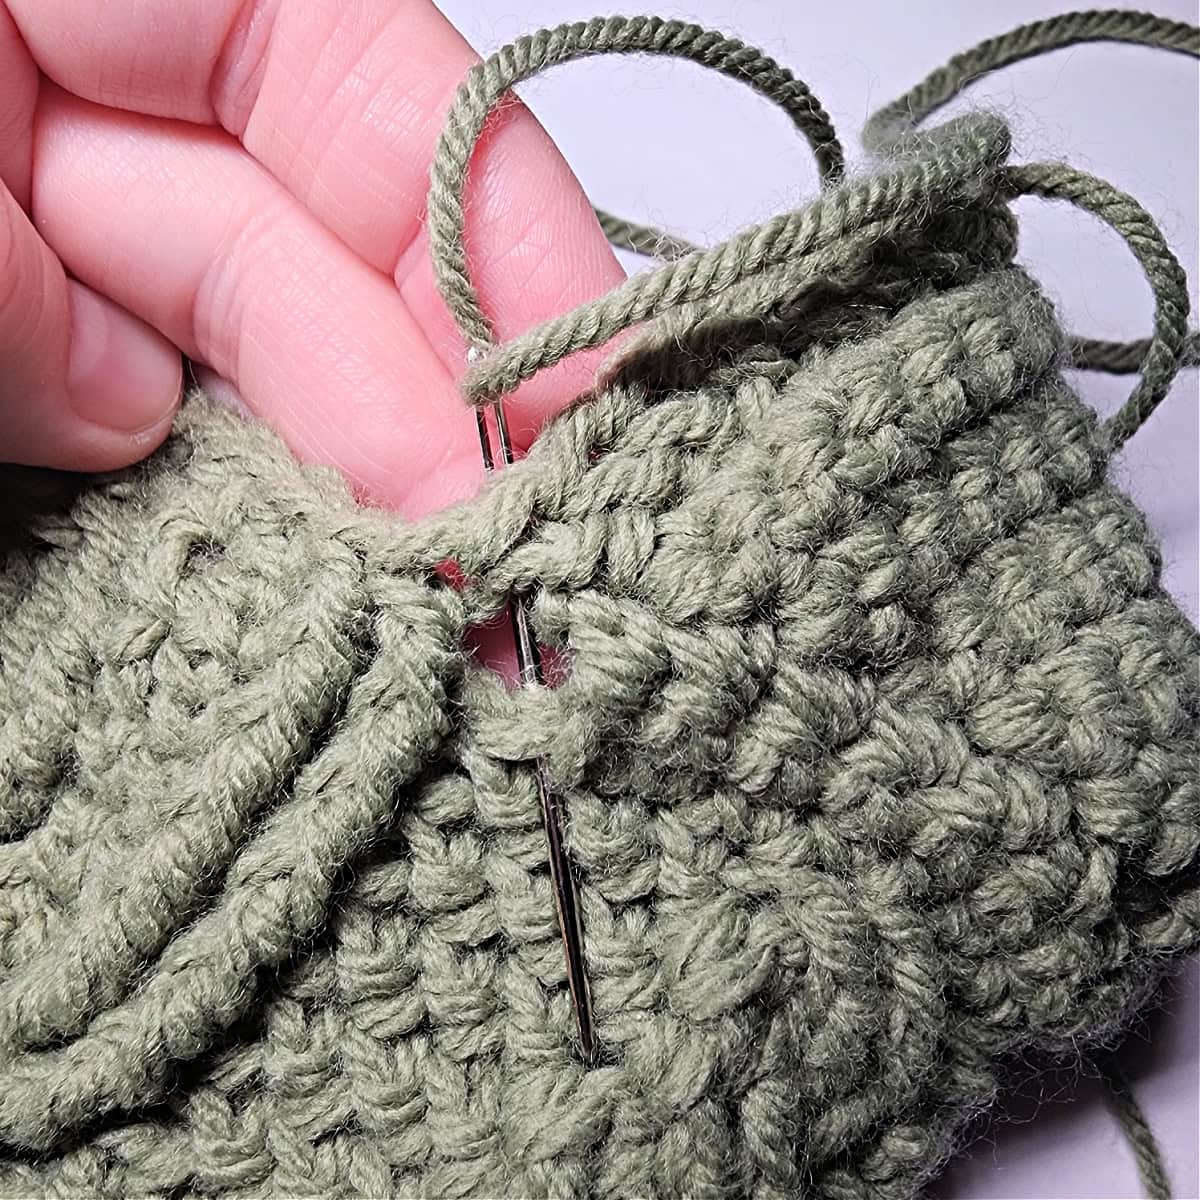
heel and Rnd 1 of the foot.
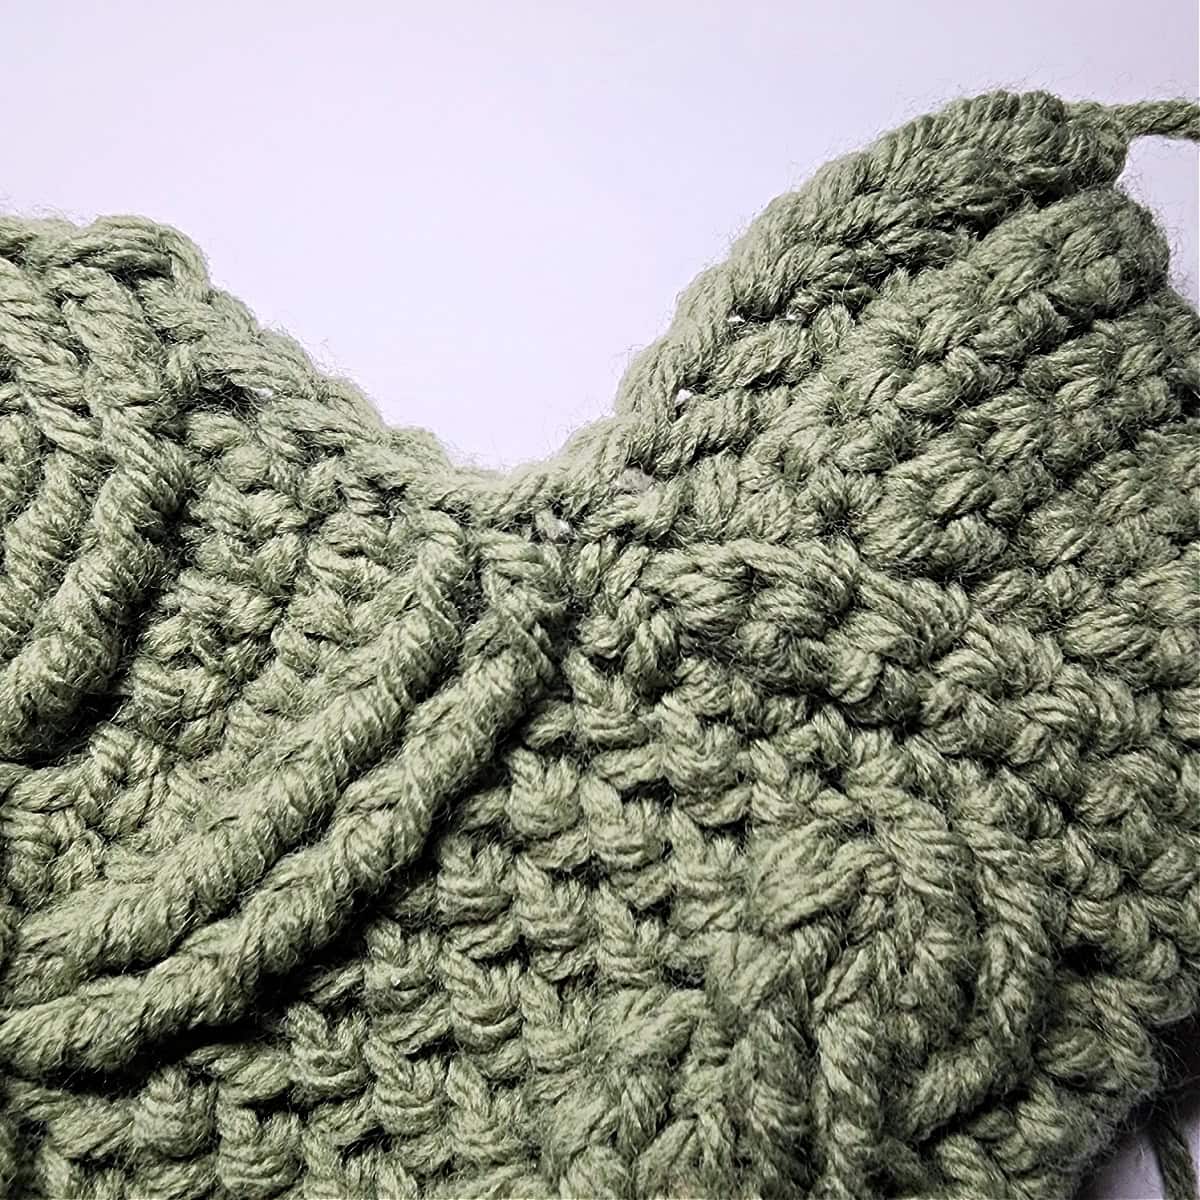
Rnd 2: Hhdc in the first st, *skip each of the next 2 post sts, fptr around each of the next 2 post sts, fptr around each of the 2 skipped post sts, Hhdc in each of the next 3 sts, Hhdc in the top of the next post st, fpdc around the same post st as the Hhdc just worked in, fpdc around the next post st, skip each of the next 2 ext sc, fpdc around each of the next 2 post sts, ext sc in the top of the same post st as the fpdc just worked around, ext sc in the next st, ext sc in the top of the next post st, fpdc around the same post st as the ext sc just worked in, fpdc around the next post st, skip each of the next 2 ext sc, fpdc around each of the next 2 post sts, Hhdc in the top of the same post st as the last fpdc just worked around, Hhdc in each of the next 3 sts, skip each of the next 2 post sts, fptr around each of the next 2 post sts, fptr around each of the 2 skipped post sts*, Hhdc in each of the next 2 sts, rep from * to *, then Hhdc in the last st. Do not join. (58 sts)
Rnd 3: Hhdc in the first st, *fpdc around each of the next 4 post sts, Hhdc in each of the next 4 sts, skip each of the next 2 post sts, fptr around each of the next 2 post sts, fptr around each of the 2 skipped post sts, ext sc in each of the next 3 sts, skip each of the next 2 post sts, fptr around each of the next 2 post sts, fptr around each of the 2 skipped post sts, Hhdc in each of the next 4 sts, fpdc around each of the next 4 post sts*, Hhdc in each of the next 2 sts, rep from * to *, then Hhdc in the last st. Do not join. (58 sts)
Rnd 4: Hhdc in the first st, *skip each of the next 2 post sts, fptr around each of the next 2 post sts, fptr around each of the 2 skipped post sts, Hhdc in each of the next 3 sts, skip the next st, fpdc around each of the next 2 post sts, ext sc in the top of the same post st as the fpdc just worked, ext sc in the next post st, fpdc around the same post st as the ext sc just worked in, fpdc around the next post st, skip the next ext sc, ext sc in the next st, skip the next ext sc, fpdc around each of the next 2 post sts, ext sc in the top of the same post st as the fpdc just worked, ext sc in the next post st, fpdc around the same post st as the ext sc just worked in, fpdc around the next post st, skip the next Hhdc, Hhdc in each of the next 3 sts, skip each of the next 2 post sts, fptr around each of the next 2 post sts, fptr around each of the 2 skipped post sts*, Hhdc in each of the next 2 sts, rep from * to *, then Hhdc in the last st. Do not join. (58 sts)
Rnd 5: Hhdc in the first st, *fpdc around each of the next 4 post sts, Hhdc in each of the next 3 sts, fpdc around each of the next 2 post sts, ext sc in each of the next 2 sts, skip each of the next 2 post sts & skip the next ext sc, fptr around each of the next 2 post sts, working behind the fptr’s just worked, ext sc in the skipped ext sc, working in front of the fptr’s worked, fptr around each of the 2 skipped post sts, ext sc in each of the next 2 sts, fpdc around each of the next 2 post sts, Hhdc in each of the next 3 sts, fpdc around each of the next 4 post sts*, Hhdc in each of the next 2 sts, rep from * to *, then Hhdc in the last st. Do not join. (58 sts)
Rnd 6: Hhdc in the first st, *skip each of the next 2 post sts, fptr around each of the next 2 post sts, fptr around each of the 2 skipped post sts, Hhdc in each of the next 3 sts, fpdc around each of the next 2 post sts, ext sc in each of the next 2 sts, fpdc around each of the next 2 post sts, ext sc in the next st, fpdc around each of the next 2 post sts, ext sc in each of the next 2 sts, fpdc around each of the next 2 post sts, Hhdc in each of the next 3 sts, skip each of the next 2 post sts, fptr around each of the next 2 post sts, fptr around each of the 2 skipped post sts*, Hhdc in each of the next 2 sts, rep from * to *, then Hhdc in the last st. Do not join. (58 sts)
Rnd 7: Hhdc in the first st, *fpdc around each of the next 4 post sts, Hhdc in each of the next 3 sts, fpdc around each of the next 2 post sts, ext sc in each of the next 2 sts, fpdc around each of the next 2 post sts, ext sc in the next st, fpdc around each of the next 2 post sts, ext sc in each of the next 2 sts, fpdc around each of the next 2 post sts, Hhdc in each of the next 3 sts, fpdc around each of the next 4 post sts*, Hhdc in each of the next 2 sts, rep from * to *, then Hhdc in the last st. Do not join. (58 sts)
Rnd 8: Rep Rnd 6.
Rnd 9: Rep Rnd 5.
Rnds 10 – 17: Rep Rnds 2 – 9.
Do not fasten off. Continue on to Toe. Length from the last row of the heel is approximately 5.25″.
Toe
Note: This section is worked in continuous rounds (a spiral). Do not join at the end of each round, instead use a scrap piece of yarn to keep track of the beginning of each round. Move the scrap of yarn up as you complete each round.
Rnd 1: Hhdc in the first st, *skip each of the next 2 post sts, fptr around each of the next 2 post sts, fptr around each of the 2 skipped post sts, Hhdc in each of the next 3 sts, Hhdc in the top of the next post st, fpdc2tog around the same post st as the Hhdc just worked and the next post st, skip each of the next 2 ext sc, fpdc2tog around each of the next 2 post sts, ext sc in the top of the same post st as the post st just worked, ext sc in the next st, ext sc in the top of the next post st, fpdc2tog around the same post st as the ext sc just worked and the next post st, skip each of the next 2 ext sc, fpdc2tog around each of the next 2 post sts, Hhdc in the top of the same post st as the fpdc2tog just worked, Hhdc in each of the next 3 sts, skip each of the next 2 post sts, fptr around each of the next 2 post sts, fptr around each of the 2 skipped post sts*, Hhdc in each of the next 2 sts, rep from * to *, then Hhdc in the last st. Do not join. (50 sts)
Rnd 2: Hhdc in the first st, *fpdc2tog twice, Hhdc in each of the next 4 sts, fpdc2tog twice, ext sc in each of the next 3 sts, fpdc2tog twice, Hhdc in each of the next 4 sts, fpdc2tog twice*, Hhdc in each of the next 2 sts, rep from * to *, then Hhdc in the last st. Do not join. (38 sts)
Rnd 3: Hhdc in each st around. (38 sts)
Rnd 4: Hhdc in each of the first 2 sts, * FLO Hhdc2tog, Both Loops Hhdc in each of the next 4 sts, rep from * around. (32 sts)
Rnd 5: * Both Loops Hhdc in each of the next 3 sts, FLO Hhdc2tog, rep from * around to the last 2 sts, Both Loops Hhdc in each of the last 2 sts. (26 sts)
Rnd 6: * FLO Hhdc2tog, Both Loops Hhdc in the next st, rep from * around to the last 2 sts, FLO Hhdc2tog. (17 sts)
Fasten off leaving a tail of yarn. With the tail of yarn & a yarn needle, sew the toe closed. Weave in ends. Continue on to the Cuff.
Cuff
Note: This section is worked in continuous rounds (a spiral). Do not join at the end of each round, instead use a scrap piece of yarn to keep track of the beginning of each round. Move the scrap of yarn up as you complete each round.
Rnd 1 (RS): With yarn & a 5.00mm crochet hook, join yarn with a single crochet in a stitch at the top of the stocking near the back of the leg, sc in each remaining st around. Do not join. (58 sts)
Rnds 2 – 4: Sc in each st around. (58 sts)
Rnd 5: Sl st (aka surface crochet) in each st around. Join with a Special Join Technique.
Fasten off. Continue on to Hanging Loop & Decorative Yarn Tassel.
Hanging Loop
Using a 4.00mm crochet hook and yarn to match your stocking, ch 31, working into the back hump of the ch, sc in the 2nd ch from your hook and in each ch across. (30 sts)
Fasten off leaving an 8” tail. Using a yarn needle and the tail of yarn, fold the loop in half and sew it onto the inside of the stocking at the center back of the leg. Weave in ends. Make a Tassel, if desired.

I Made It! Now What?
Pin this post!: Save this free Xmas crochet pattern to your Pinterest boards so that you can come back and make it again.
Leave a comment below: We love to hear your feedback.
Share Your Finished Projects on Facebook or Instagram: I love to see your finished projects! Share with us on social media and tag me @acrochetedsimplicity or use the hashtag #ACrochetedSimplicity so I can find your posts.
Join us in the Facebook Community Group!
Come share your finished projects with us in the A Crocheted Simplicity Crochet Community Group on Facebook. Join us for fun community events such as crochet alongs, join in on crochet conversations, ask questions, get advice, and share your love for crochet!

More Free Crochet Christmas Stocking Patterns I Think You’ll Love
- O’ Christmas Tree Stocking
- Buffalo Plaid Stocking
- Diamonds & Fur crochet Christmas Stocking
- Joyful Textures Christmas Stocking
- Argyle Christmas Stocking
- Houndstooth Christmas Stocking
- Classic Textures Christmas Stocking
- Faux Fur Christmas Stocking
