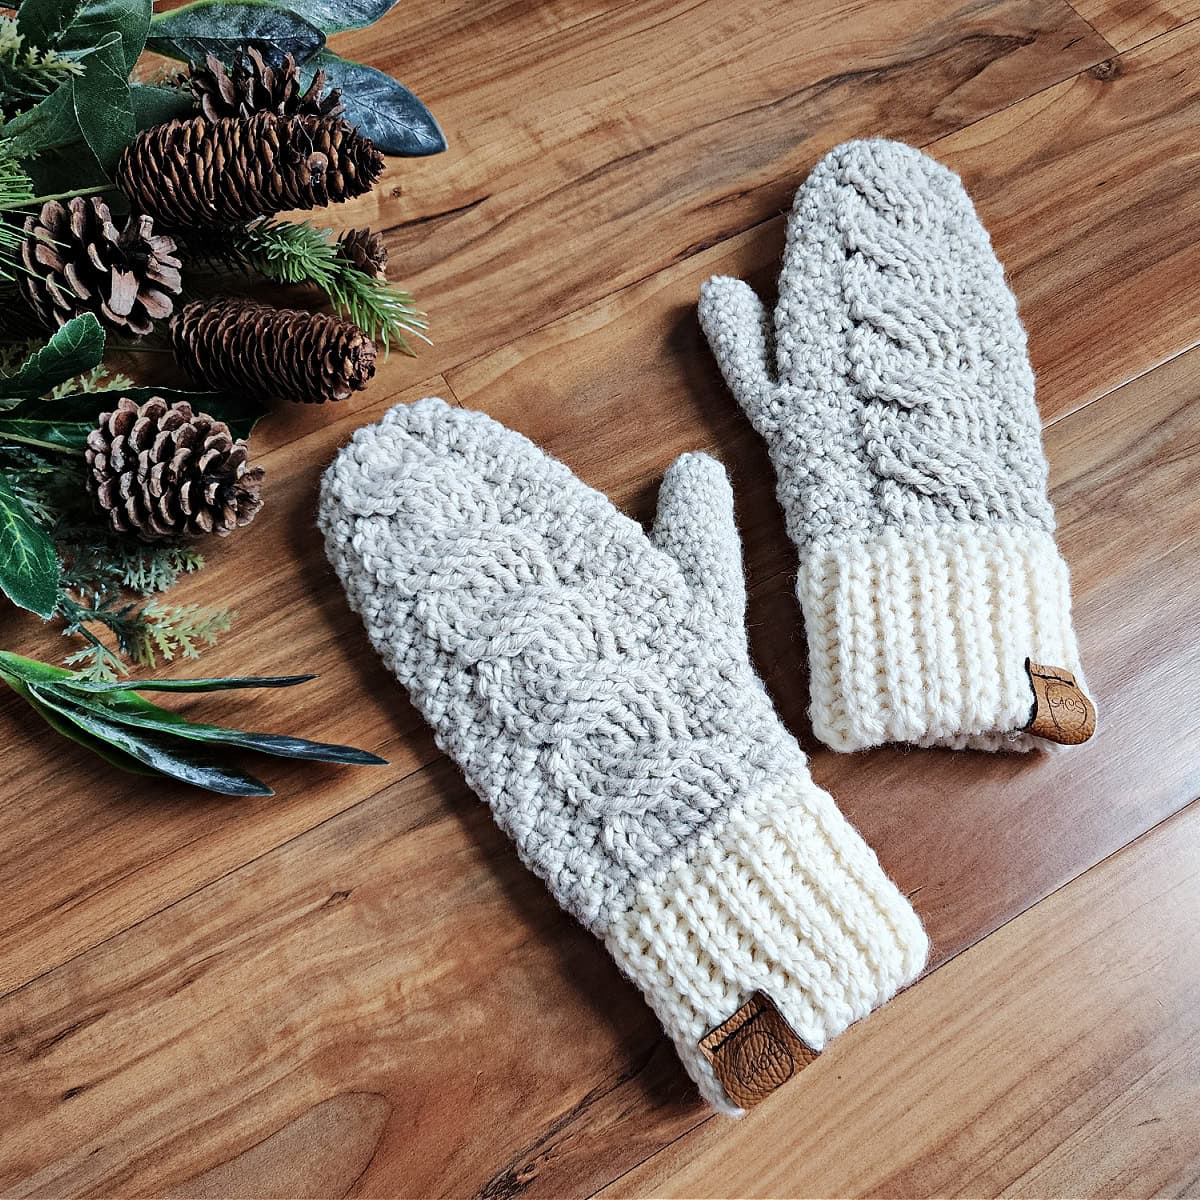
Cable Crochet Mittens
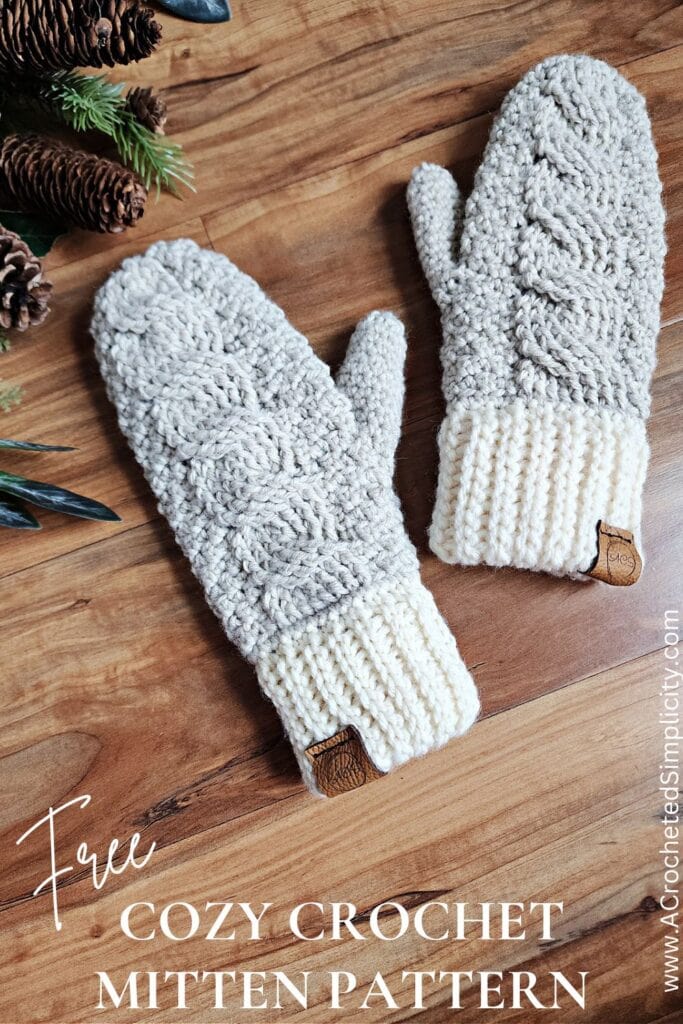
When it comes to winter accessories, few items combine warmth, style, and craftsmanship like cable crochet mittens.
Whether you’re an experienced crocheter or just starting out, creating cable crochet mittens is a rewarding project that adds a touch of handmade charm to your winter wardrobe. Cables make the warmest winter mittens!
You’ll find the cable crochet mittens free pattern below, or an ad-free print friendly PDF (including all photo tutorials) on Ravelry, or Etsy (aff).
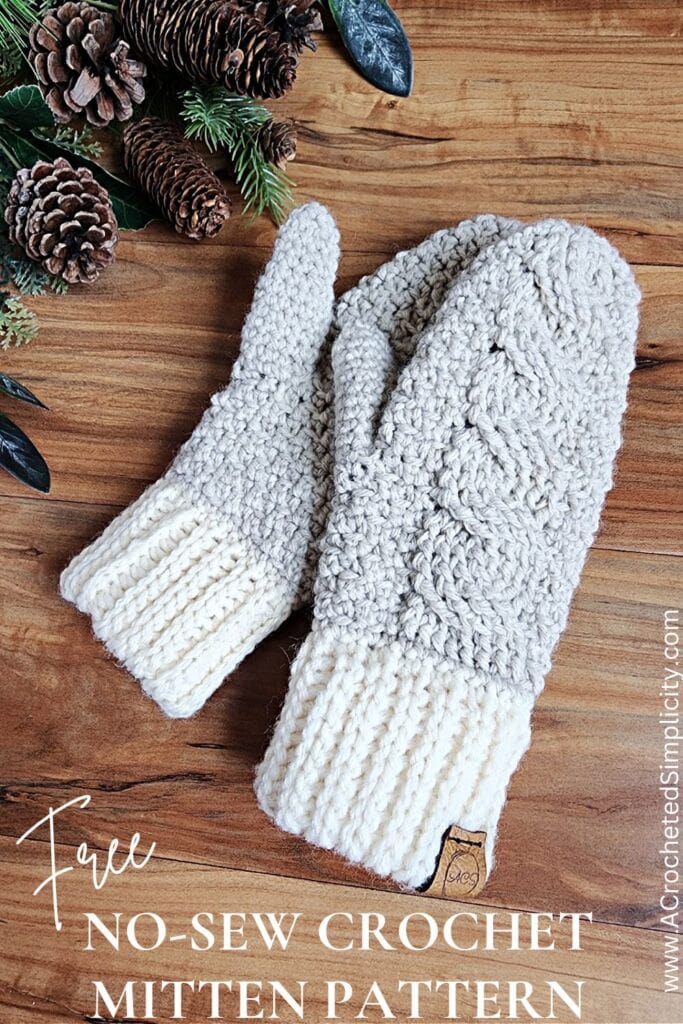
No-Sew Cable Crochet Mittens
For those who prefer a more seamless approach, these no-sew cable crochet mittens are a popular option. These mittens are crocheted in one piece, meaning there’s no need to sew or join separate parts. The result is a cleaner, more polished finish and a snug fit.
This cable crochet mitten pattern includes sizes toddler through adult large mittens.
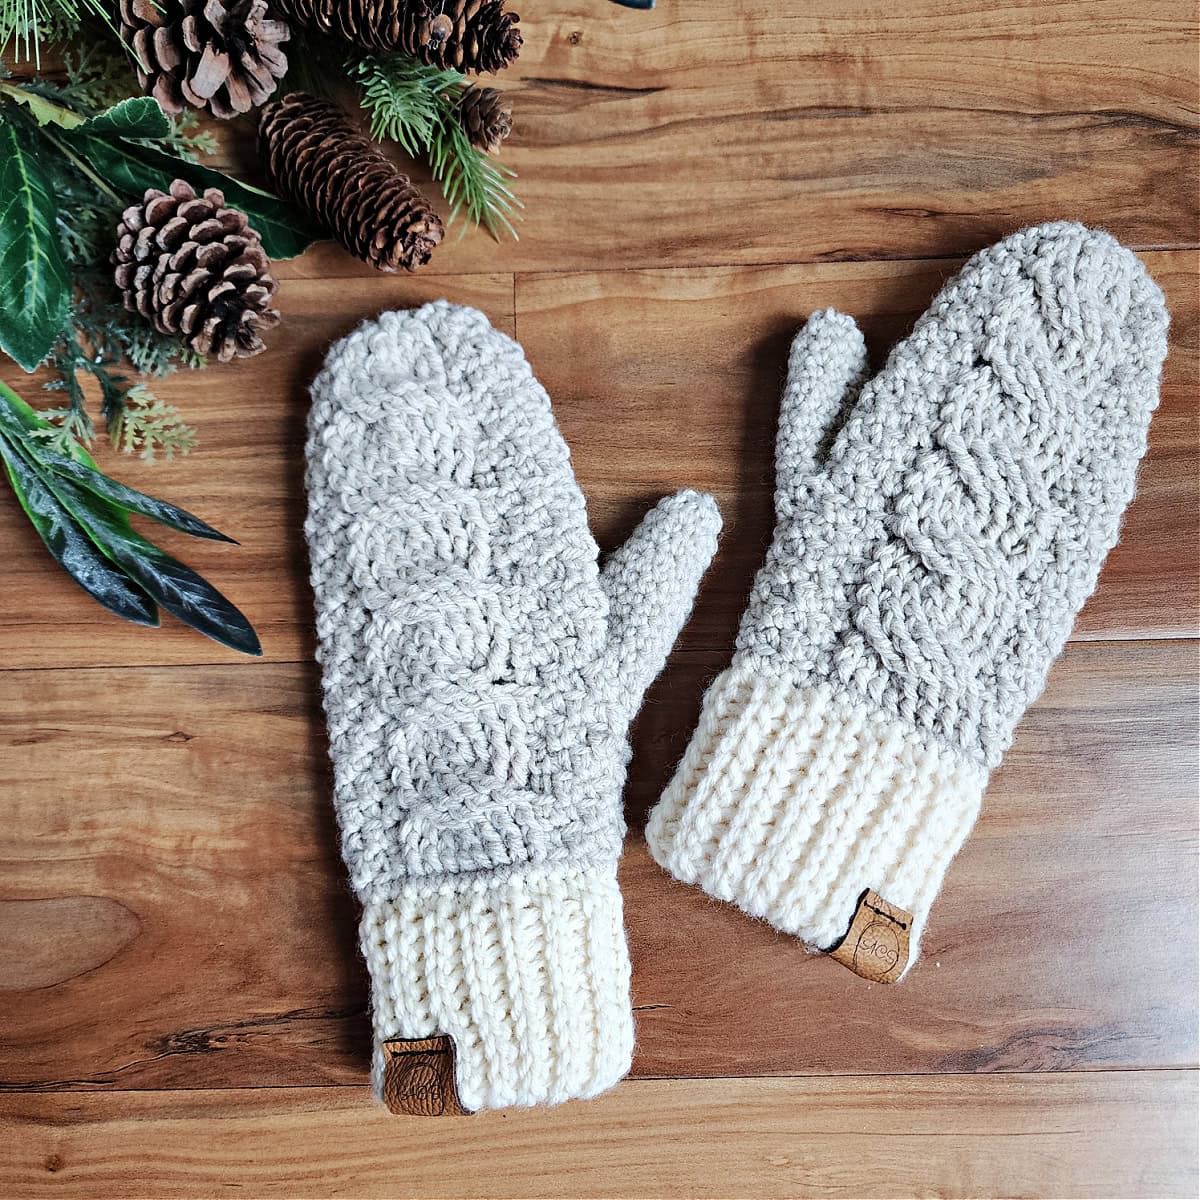
What Are Cable Crochet Mittens?
Cable crochet mittens are a type of mitten that features raised, braided patterns known as cables. These cables are created using special crochet techniques that give the fabric depth and texture, much like traditional knit cables but with a crochet hook. The result is a pair of mittens that not only looks sophisticated but also provides extra warmth and durability.
Choosing the Right Yarn for Crochet Cable Mittens
The type of yarn you use can greatly impact the look and feel of your mittens. For classic warmth and texture, opt for:
- Wool yarn: Ideal for maximum warmth and durability.
- Acrylic yarn: Great for affordability, easy care, and softness.
- Blended yarns: Combine the best features of both wool and synthetic fibers.
How to Make DIY Crochet Mittens
This is a pattern for crochet mittens in one piece beginning with the stretchy mitten cuff.
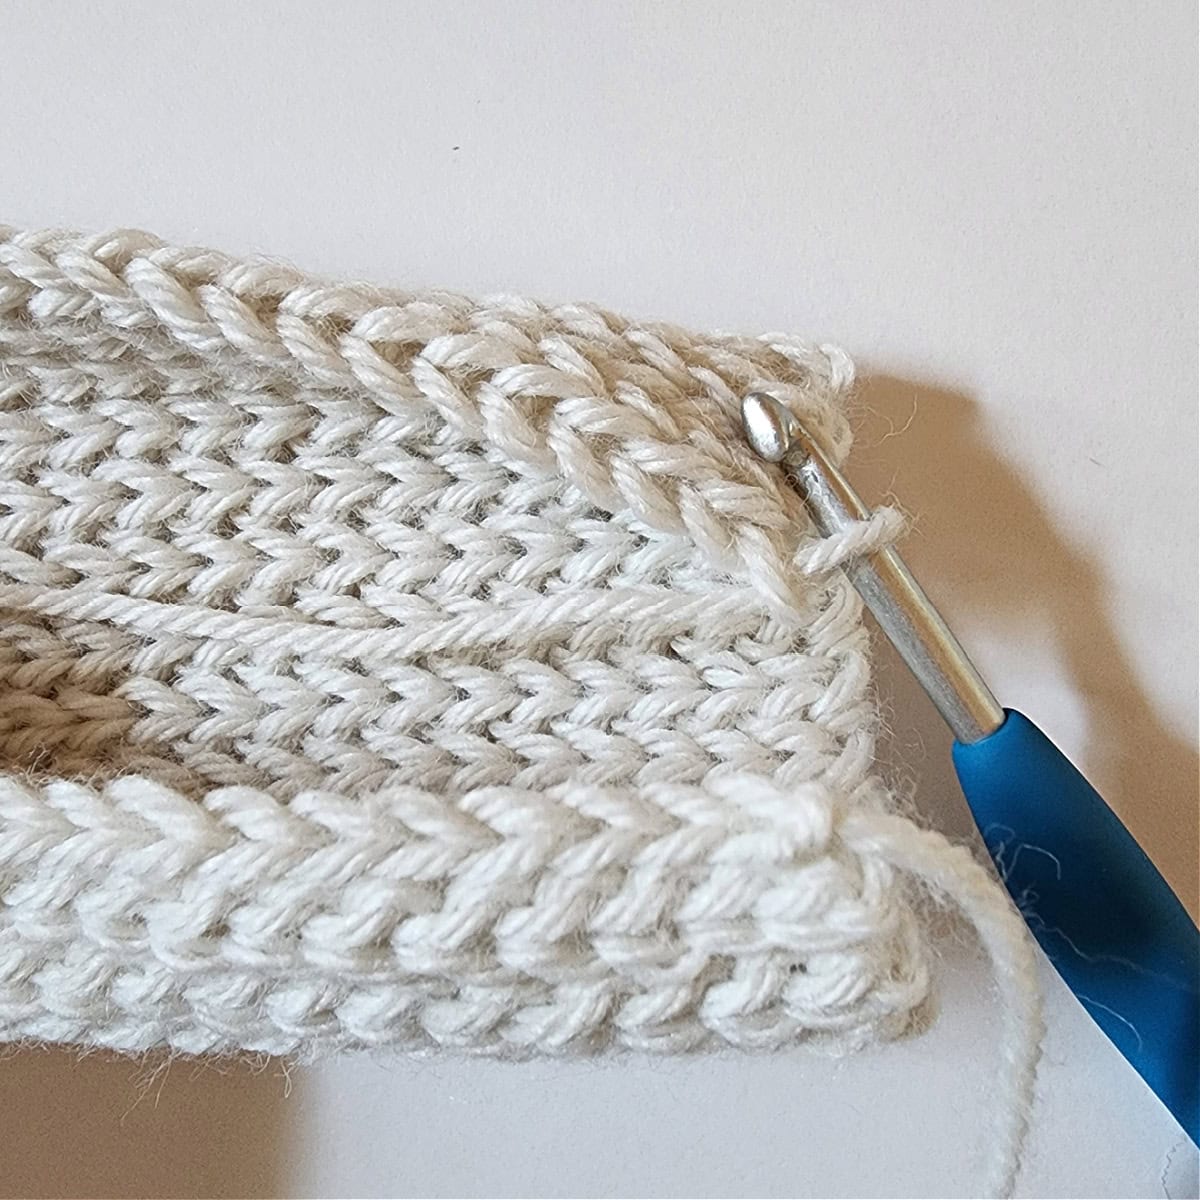
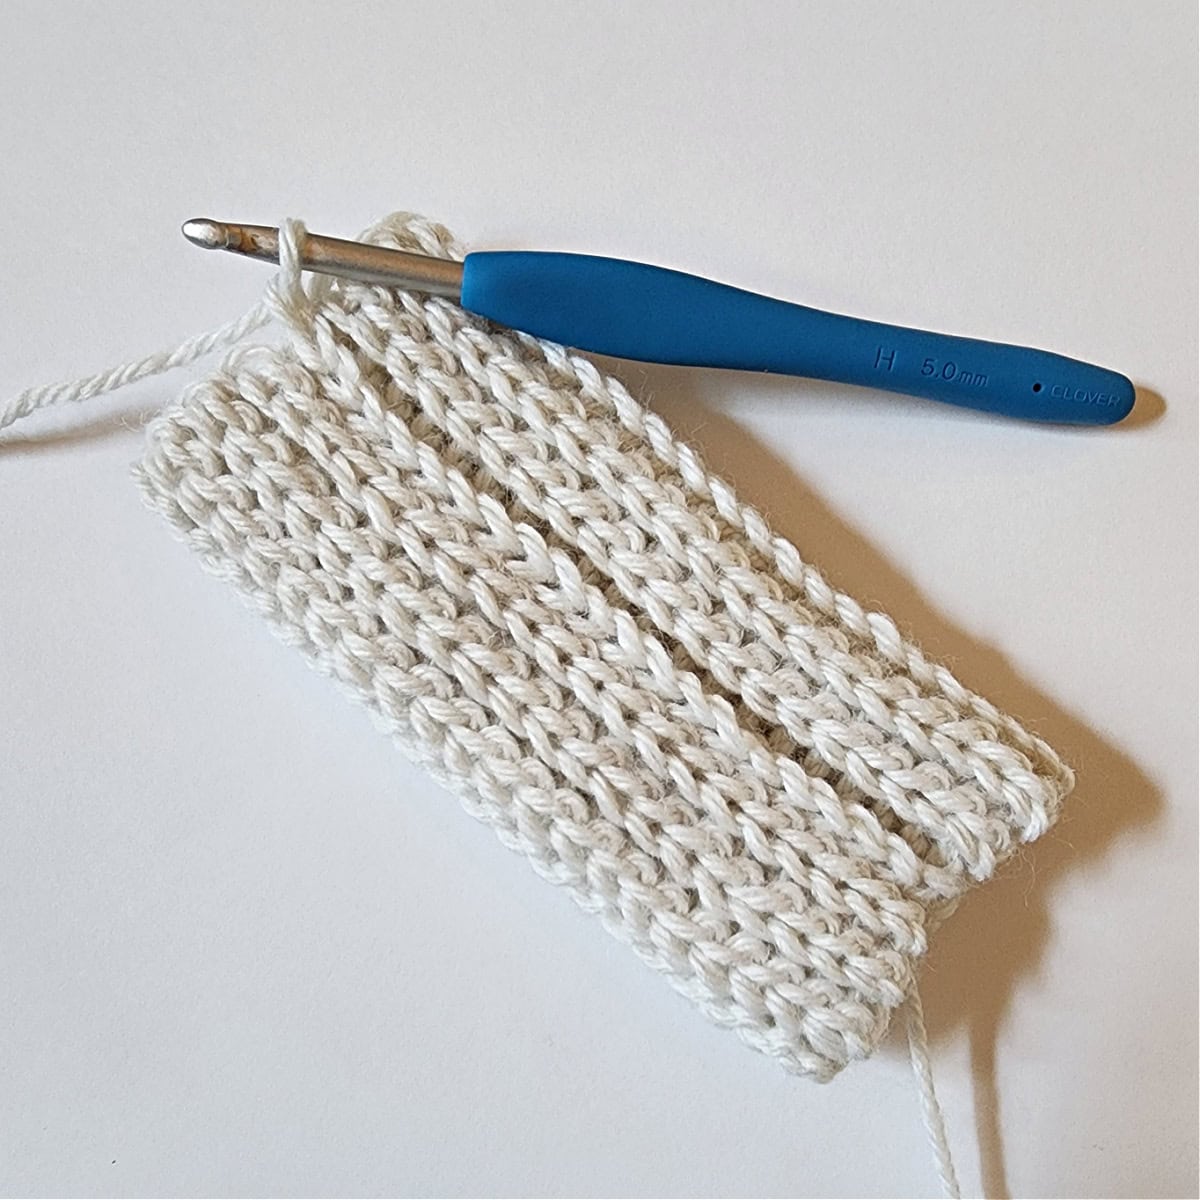
Create the Cuff: You’ll begin by crocheting a cuff with slip stitches worked in the back loops. After working it to size, you’ll slip stitch join the first and last row together to form a tube. Then, fold the tube in half to make a double layer crochet ribbed cuff.
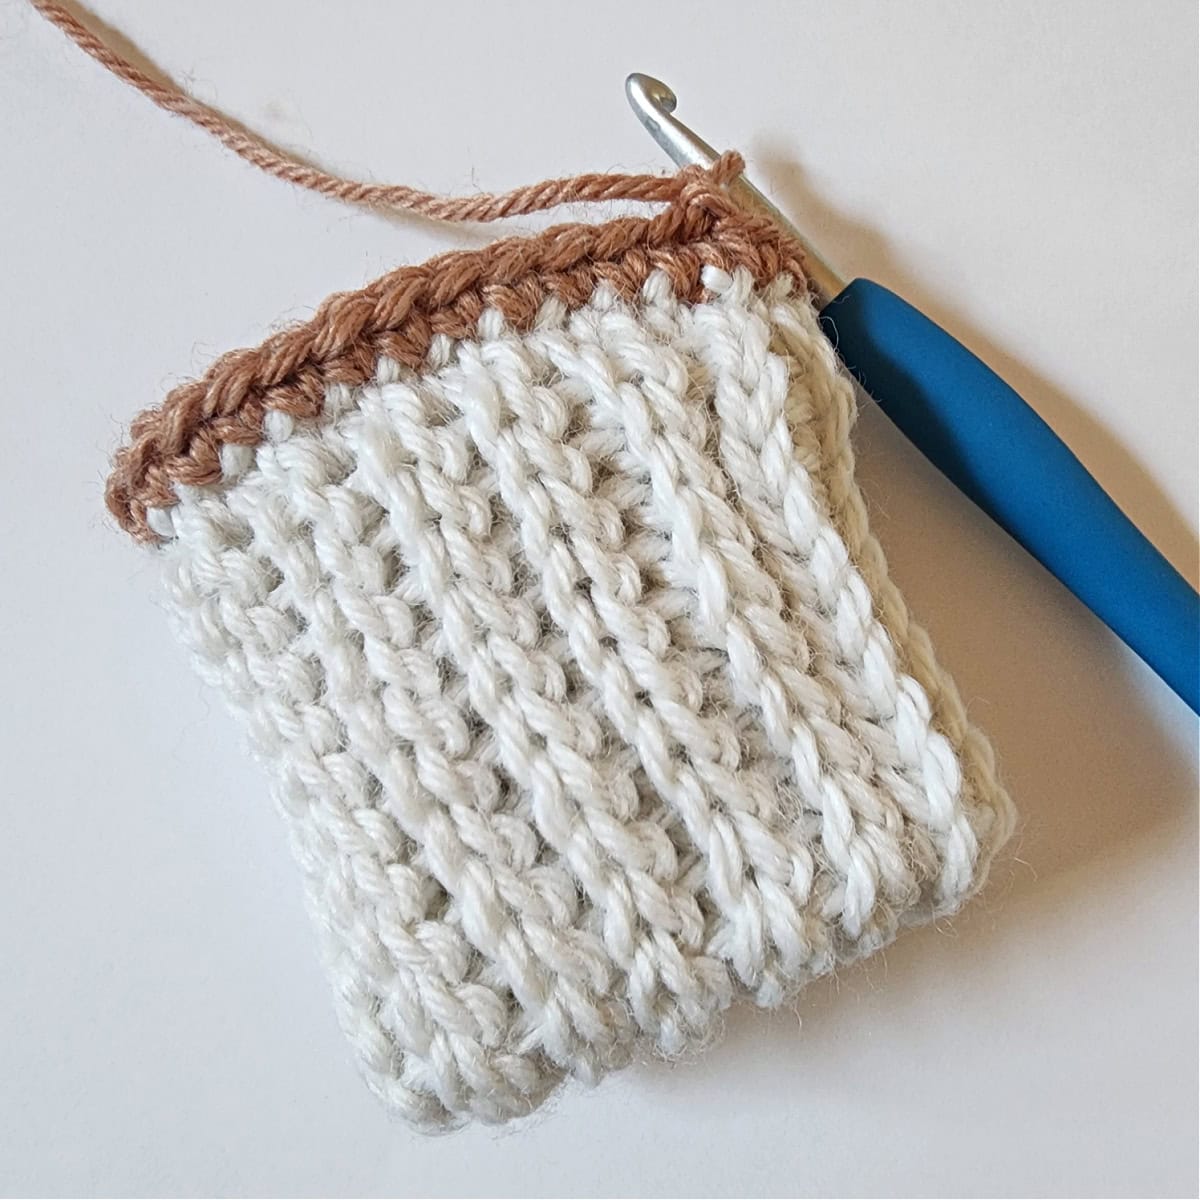
Work the Body: After the cuff, you’ll start working in rounds, using basic crochet stitches such as single crochet (sc), you will work through both layers of the cuff to join the edges. Then you’ll use extended single crochet (ext sc) stitches to form the textured portion of the body of the mitten.
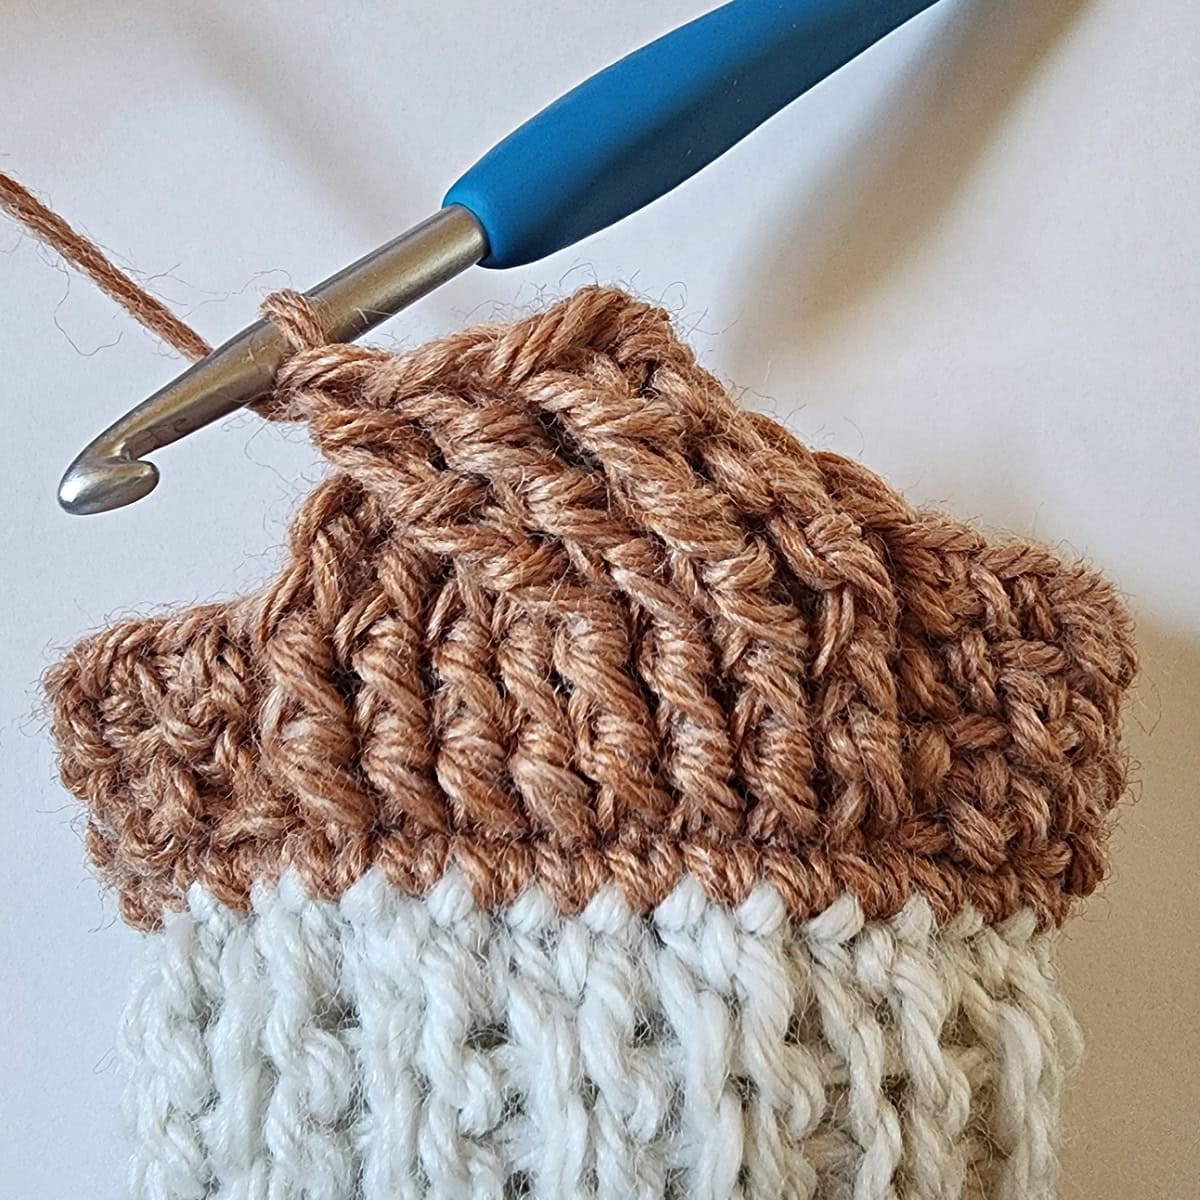
Crochet the Cable: The crochet cables pattern is created using front post double crochet (fpdc) stitches and front post double treble crochet (FPdbltr), which are worked around the posts of previous stitches to form the braided look. There is a crochet cables tutorial included that shows how to crochet cables in the round.
Shape the Thumb and Top: Once you reach the thumb area, you’ll create a thumb hole by chaining a set number of stitches and skipping the same. Then complete the body of mitten and finish it off by shaping the top of the mitten near the fingertips.
Finish the Thumb: Finally, go back to the thumb area and crochet around the hole to form the thumb.
Yarn
I chose a worsted weight yarn because I wanted to make sure my handmade mittens were warm enough to wear while playing in the snow. Crochet mittens made with worsted weight yarn are warm and cozy, but not bulky.
I used Lion Brand Yarns Wool Ease for this crochet mitten pattern. It is, hands down, one of my favorite worsted weight yarns and the wool in it adds to the overall warmth of the mittens.
Wool Ease is a worsted weight / 4, acrylic wool blend yarn and it’s currently available in 31 fabulous colors! You’re sure to find the perfect colors for your cable crochet mittens.
There are several other worsted weight yarns that would make great substitutions. Lion Brand Wool Ease Recycled, Lion Brand Heartland, Lion Brand Pound of Love, Lion Brand Vanna’s Choice… just to name a few.
I think this cable crochet mitten pattern would look great in an ombre yarn too!
Self-Striping Yarn: If you choose a self-striping yarn, your stripes will run vertically on the mitten cuff and horizontally on the hand section of the mitten.
Tips for Perfect Cable Crochet Mittens
- Use stitch markers: Keeping track of your stitches is key, especially when crocheting cables. Stitch markers will help you stay organized. A scrap piece of yarn will also work.
- Practice front post stitches: If you’re new to cable crochet, spend some time practicing front post double crochet (FPdc) and front post double treble crochet (FPdbltr) stitches before starting the project.
- Block your mittens: Once finished, blocking your mittens can help the stitches relax and the cables stand out more clearly.
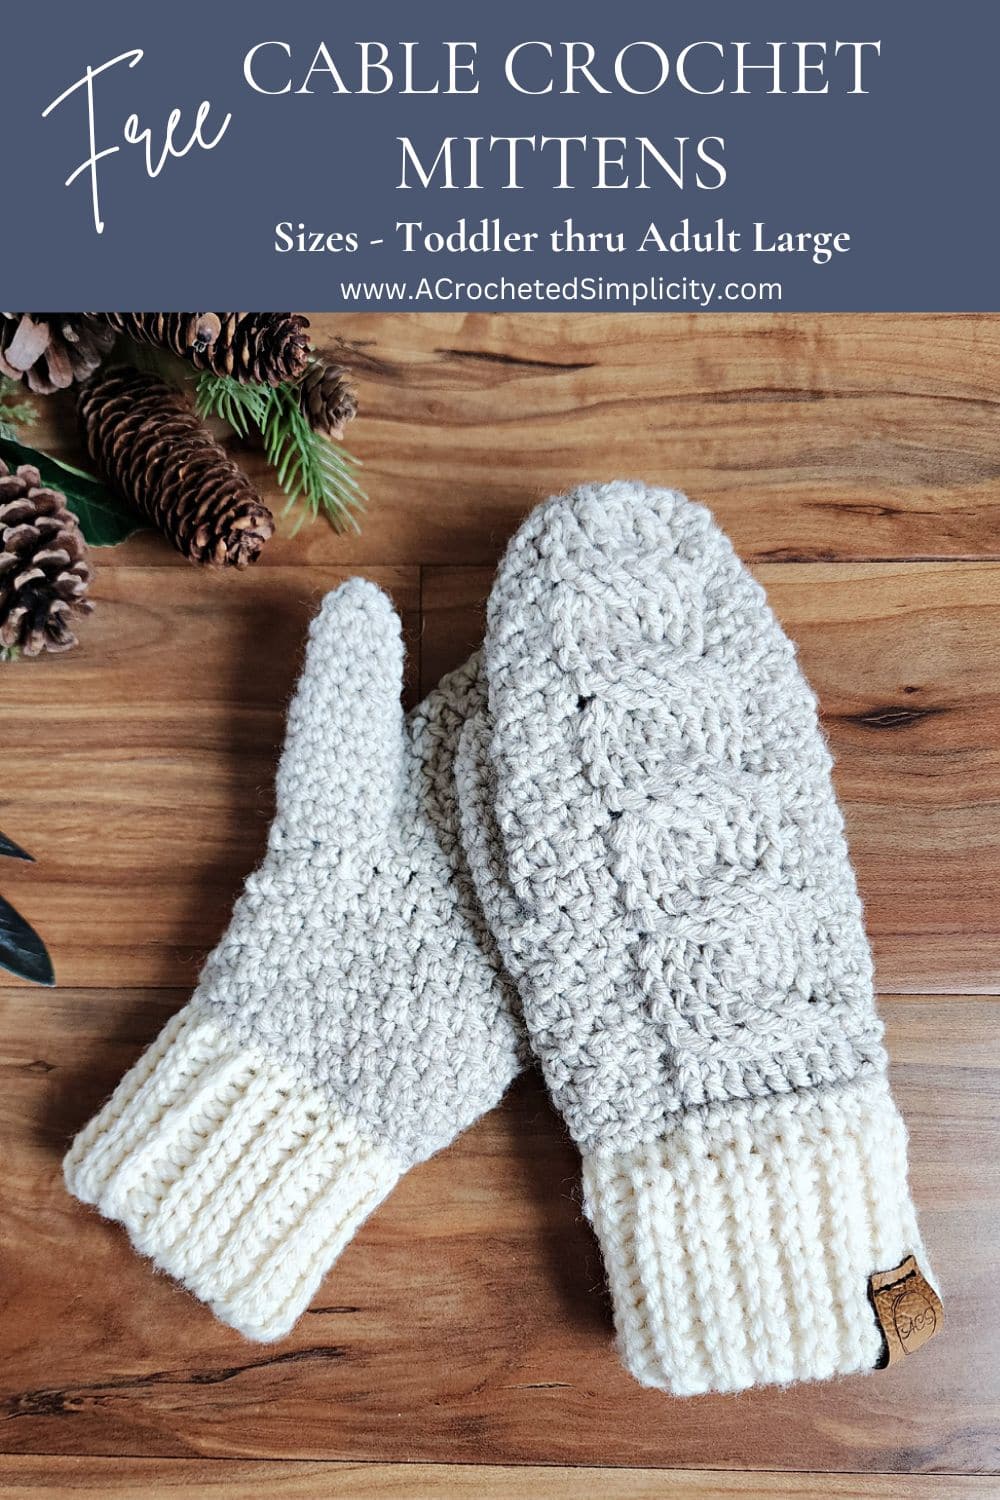
Cable Crochet Mittens Pattern
The crochet mittens pattern is free below, but if you love to work offline, I’ve got a couple other great options for you.
Purchase the ad-free, printable PDF, including all photo tutorials, on Ravelry, or on Etsy (aff).
This post contains affiliate links.
Materials
- Yarn: Worsted Weight / 4; Lion Brand Wool Ease was used for the mittens shown in the photos.
- Refer to the Size Chart below for exact yardage for the size you’re making.
- Main Color (linen): 125 – 195 yards
- CC (fisherman / cream): 44 – 70 yards
- Crochet Hook: H/8/5.00mm; or size needed to obtain gauge
- Scissors
- Yarn Needle
Experience Level
- Easy / Intermediate
Gauge
- Cuff in BLO sl st: 8 sts = 2″; 8 rows = 2″
- Body of Mitten in alternating FLO / BLO ext sc: 14 sts = 3.75″; 7 rows = 2.5″
Sizes
- Toddler, Child, Women (Adult Small), Men (Adult Large)
- See Size & Yardage Chart below.
Abbreviations (U.S. Terms)
- ch(s): chain(s)
- st(s): stitch(es)
- sl st(s): slip stitch(es)
- sc: single crochet
- ext sc: extended single crochet
- fpdc: front post double crochet
- FPdbltr: front post double treble crochet
- fpdc2tog: front post double crochet decrease
- extsc2tog: extended single crochet decrease
- invsc2tog: invisible single crochet decrease
- yo: yarn over
- rep: repeat
- Rnd: round
- BLO: back loop only
- FLO: front loop only
- RS: right side
- WS: wrong side
- MC: Main Color
- CC: Contrasting Color
- See Special Stitches below
- Join yarn with a standing single crochet
Special Stitches
- Extended Single Crochet (ext sc): Insert hook into stitch indicated, yo, pull up a loop, yo, pull thru 1 loop on hook, yo, pull thru remaining two loops on hook.
- Extended Single Crochet Decrease (extsc2tog): Insert hook into stitch indicated, yo, pull up a loop, yo, pull thru 1 loop on hook, insert hook into next st, yo, pull up a loop, yo, pull thru 1 loop on hook, yo, pull thru remaining loops on hook.
- Front Post Double Crochet (fpdc): Yo, insert hook from front to back to front around the post of the indicated stitch, yo, pull up a loop, yo, pull thru 2 loops, yo, pull thru remaining 2 loops.
- Front Post Double Treble Crochet (FPdbltr): Yo 3 times, insert hook from front to back around post of indicated st, yo, pull up a loop (5 loops on hook), (yo, pull thru 2 loops) 4 times.
- Front Post Double Crochet Decrease (fpdc2tog): (yo, insert your hook from front to back to front around the post of the next stitch, yo, pull up a loop, yo, pull thru 2 loops on your hook) twice, yo, pull thru remaining loops on your hook.
- Invisible Single Crochet Decrease (invsc2tog): Insert hook into the FLO of stitch indicated, insert hook into FLO of next stitch, yo, pull up a loop, yo, pull thru all loops on hook.
- Join yarn with a standing single crochet: Begin with a slip knot on your hook, insert your hook into the stitch or space indicated, yo, pull up a loop, yo and draw thru both loops on hook.
Size & Yardage Chart

Pattern Notes
- Turning chains are not included in stitch count.
- The first stitch of each row is worked into the same stitch as the turning chain.
- I tend to crochet on the tighter side. You may need to go down a hook size (or two) to meet gauge if you crochet on the looser side.
- Yarn Notes: Lion Brand Yarns Wool Ease was used for the sample. Other comparable yarns may be used as long as gauge is met.
- Lion Brand Yarns Wool Ease, worsted weight / 4 yarn, 80% Acrylic / 20% Wool (197 yards / 180 m / 85 g / 3 oz)
- Yarn (See Size & Yardage Chart Above for yardage per size)
- MC / Linen: 125 – 195 yards
- CC / Fisherman (cream): 44 – 70 yards
- Sizes are Written Separately: Toddler, Child, Women (Adult Small), Men (Adult Large)
- This mitten pattern includes two sizes for childrens crochet mittens and two sizes for adult crochet mittens.
- Crochet Mitten Construction: The slip stitch mitten cuff is worked flat and then seamed and folded down. A round of single crochet is worked around the cuff to join the two layers. The body of mitten is then worked from cuff to fingertip. A thumb is added last.
- Find Personalized Tags for your handmade mittens.
Crochet Mitten Pattern
Mitten sizes are written out separately. Scroll down to the size you’ll be crocheting.
Toddler Crochet Mittens
Toddler Stretchy Mitten Cuff
Row 1 (RS): With CC yarn & a 5.00mm crochet hook, ch 17, working into the back hump of the foundation ch, sl st in the 2nd ch from your hook and in each ch across. Turn. (16 sts)
Rows 2 – 21: Ch 1, BLO sl st in each st across. Turn. (16 sts)
Row 22 – Seam Row: With RS facing out, bring the first row up to meet the last row (the first row should be in front if you kept the RS facing out). Position your working yarn so that it’s on the inside of the cuff. Ch 1, slip stitch the rows together using the following method: insert your hook (from front to back) into the FLO of the 1st stitch of Row 1, insert your hook (from back to front) into the BLO of the 1st stitch of the last row, yo, pull thru all loops on your hook. Continue in this way across the cuff to complete the seam. (16 sts) – See All Tutorial Photos for the cuff and the cables at the end of the crochet pattern.
Do not fasten off. Continue on to Prepare Cuff for Body of Mitten.
Prepare Cuff for Body of Mitten
Step 1: The side of the cuff facing out right now is the RS. Fold the cuff in half so that the RS is facing out and the two edges are lined up.
Rnd 1 (RS): With CC yarn & a 5.00mm crochet hook, work into the sides of the rows of the cuff, ch 1, work 1 sc into each st around. Join with a sl st to the 1st st. (22 sts)
Switch colors to MC. Fasten off CC and weave in ends. Continue on to Body of Mitten for the hand that you’re making.
Toddler Right Hand – Body of Mitten
Rnd 1 (RS): With MC yarn & a 5.00mm crochet hook, ch 1, sc in each st around. Join with a sl st to the 1st st. (22 sts)
Rnd 2: Ch 1, (FLO ext sc in the next st, BLO ext sc in the next st) 4 times, fpdc around each of the next 6 sts, (FLO ext sc in the next st, BLO ext sc in the next st) 4 times. Join. (22 sts)
Rnd 3: Ch 1, (BLO ext sc in the next st, FLO ext sc in the next st) 4 times, fpdc around each of the next 6 post sts, (BLO ext sc in the next st, FLO ext sc in the next st) 4 times. Join. (22 sts)
Rnd 4: Ch 1, (FLO ext sc in the next st, BLO ext sc in the next st) 4 times, skip each of the first 3 post sts, FPdbltr around each of the next 3 post sts, FPdbltr around each of the 3 skipped post sts, (FLO ext sc in the next st, BLO ext sc in the next st) 4 times. Join. (22 sts)
Rnd 5: Ch 1, (BLO ext sc in the next st, FLO ext sc in the next st) 4 times, fpdc around each of the next 6 post sts, (BLO ext sc in the next st, FLO ext sc in the next st) 4 times. Join. (22 sts)
Rnd 6: Ch 1, (FLO ext sc in the next st, BLO ext sc in the next st) 4 times, fpdc around each of the next 6 post sts, FLO ext sc in the next st, BLO ext sc in the next st, ch 4, skip each of the next 4 sts, FLO ext sc in the next st, BLO ext sc in the last st. Join with a sl st to the 2nd ch. (22 sts)
Rnd 7: Ch 1, (BLO ext sc in the next st, FLO ext sc in the next st) 4 times, fpdc around each of the next 6 post sts, BLO ext sc in the next st, FLO ext sc in the next st, ext sc in each of the next 4 chs, BLO ext sc in the next st, FLO ext sc in the next st. Join. (22 sts)
Rnds 8 – 10: Rep Rnds 4 – 6.
Rnd 11: Ch 1, (BLO ext sc in the next st, FLO ext sc in the next st) 4 times, fpdc around each of the next 6 post sts, (BLO ext sc in the next st, FLO ext sc in the next st) 4 times. Join. (22 sts)
Rnd 12: Ch 1, FLO extsc2tog, BLO extsc2tog, (FLO ext sc in the next st, BLO ext sc in the next st) 2 times, skip each of the first 3 post sts, FPdbltr around each of the next 3 post sts, FPdbltr around each of the 3 skipped post sts, (FLO ext sc in the next st, BLO ext sc in the next st) 4 times. Join. (20 sts)
Rnd 13: Ch 1, (BLO ext sc in the next st, FLO ext sc in the next st) 3 times, fpdc around each of the next 6 post sts, (BLO ext sc in the next st, FLO ext sc in the next st) 4 times. Join. (20 sts)
Rnd 14: Ch 1, (FLO ext sc in the next st, BLO ext sc in the next st) 3 times, fpdc2tog 3 times, (FLO ext sc in the next st, BLO ext sc in the next st) 4 times. Join. (17 sts)
Rnd 15: Ch 1, (BLO ext sc in the next st, FLO ext sc in the next st) 3 times, fpdc around each of the next 3 post sts, (BLO ext sc in the next st, FLO ext sc in the next st) 4 times. Join. (17 sts)
Rnd 16: Ch 1, (FLO ext sc in the next st, BLO ext sc in the next st) 3 times, fpdc around each of the next 3 post sts, (FLO ext sc in the next st, BLO ext sc in the next st) 4 times. Join. (17 sts)
Fasten off leaving a 6 – 8″ tail of yarn. Continue on to the Thumb.
Toddler Left Hand – Body of Mitten
Rnd 1 (RS): With MC yarn & a 5.00mm crochet hook, ch 1, sc in each st around. Join with a sl st to the 1st st. (22 sts)
Rnd 2: Ch 1, (FLO ext sc in the next st, BLO ext sc in the next st) 4 times, fpdc around each of the next 6 sts, (FLO ext sc in the next st, BLO ext sc in the next st) 4 times. Join. (22 sts)
Rnd 3: Ch 1, (BLO ext sc in the next st, FLO ext sc in the next st) 4 times, fpdc around each of the next 6 post sts, (BLO ext sc in the next st, FLO ext sc in the next st) 4 times. Join. (22 sts)
Rnd 4: Ch 1, (FLO ext sc in the next st, BLO ext sc in the next st) 4 times, skip each of the first 3 post sts, FPdbltr around each of the next 3 post sts, FPdbltr around each of the 3 skipped post sts, (FLO ext sc in the next st, BLO ext sc in the next st) 4 times. Join. (22 sts)
Rnd 5: Ch 1, (BLO ext sc in the next st, FLO ext sc in the next st) 4 times, fpdc around each of the next 6 post sts, (BLO ext sc in the next st, FLO ext sc in the next st) 4 times. Join. (22 sts)
Rnd 6: Ch 1, FLO ext sc in the next st, BLO ext sc in the next st, ch 4, skip each of the next 4 sts, FLO ext sc in the next st, BLO ext sc in the next st, fpdc around each of the next 6 post sts, (FLO ext sc in the next st, BLO ext sc in the next st) 4 times. Join with a sl st to the 2nd ch. (22 sts)
Rnd 7: Ch 1, BLO ext sc in the first st, FLO ext sc in the next st, ext sc in each of the first 4 chs, BLO ext sc in the next st, FLO ext sc in the next st, fpdc around each of the next 6 post sts, (BLO ext sc in the next st, FLO ext sc in the next st) 4 times. Join. (22 sts)
Rnds 8 – 10: Rep Rnds 4 – 6.
Rnd 11: Ch 1, (BLO ext sc in the next st, FLO ext sc in the next st) 4 times, fpdc around each of the next 6 post sts, (BLO ext sc in the next st, FLO ext sc in the next st) 4 times. Join. (22 sts)
Rnd 12: Ch 1, (FLO ext sc in the next st, BLO ext sc in the next st) 4 times, skip each of the first 3 post sts, FPdbltr around each of the next 3 post sts, FPdbltr around each of the 3 skipped post sts, (FLO ext sc in the next st, BLO ext sc in the next st) 2 times, FLO extsc2tog, BLO extsc2tog. Join. (20 sts)
Rnd 13: Ch 1, (BLO ext sc in the next st, FLO ext sc in the next st) 4 times, fpdc around each of the next 6 post sts, (BLO ext sc in the next st, FLO ext sc in the next st) 3 times. Join. (20 sts)
Rnd 14: Ch 1, (BLO ext sc in the next st, FLO ext sc in the next st) 4 times, fpdc2tog 3 times, (BLO ext sc in the next st, FLO ext sc in the next st) 3 times. Join. (17 sts)
Rnd 15: Ch 1, (FLO ext sc in the next st, BLO ext sc in the next st) 4 times, fpdc around each of the next 3 post sts, (FLO ext sc in the next st, BLO ext sc in the next st) 3 times. Join. (17 sts)
Rnd 16: Ch 1, (BLO ext sc in the next st, FLO ext sc in the next st) 4 times, fpdc around each of the next 3 post sts, (BLO ext sc in the next st, FLO ext sc in the next st) 3 times. Join. (17 sts)
Fasten off leaving a 6 – 8″ tail of yarn. Continue on to the Thumb.
Toddler Thumb
Note: Thumb is worked in continuous rounds (spiral). I suggest using a scrap of yarn as a stitch marker to help keep track of rounds.
Rnd 1: With a 5.00mm crochet hook, join MC yarn with a standing sc in the 1st skipped st of the thumbhole opening, sc in the next 3 sts, sc into the side of the exposed ext sc from the thumbhole opening rnd, (sc in the next st, 2 sc in the next st) 2 times, sc into the side of the exposed ext sc from the thumbhole opening rnd. (12 sts)
Tip! If you’re left with a small gap at each corner of the thumb where you work into the side of the exposed sc’s, use a scrap piece of yarn and stitch the gap closed after completing Rnd 2.
Rnds 2 – 6: Sc in each st around. (12 sts)
Rnd 7: (FLO inv sc2tog, sc in each of the next 2 sts) 3 times. (9 sts)
Rnds 8 – 9: Sc in each st around. (9 sts)
Rnd 10: FLO invsc2tog 4 times, sc in the last st. (5 sts)
Fasten off leaving a 6″ tail of yarn. Continue on to Finishing.
Finishing
Turn mitten inside out. Using a yarn needle and yarn tails, whipstitch both the tip of the mitten and thumb closed. Weave in ends. Repeat instructions to make the second mitten.
Child Crochet Mittens
Child Stretchy Mitten Cuff
Row 1 (RS): With CC yarn & a 5.00mm crochet hook, ch 17, working into the back hump of the foundation ch, sl st in the 2nd ch from your hook and in each ch across. Turn. (16 sts)
Rows 2 – 25: Ch 1, BLO sl st in each st across. Turn. (16 sts)
Row 26 – Seam Row: With RS facing out, bring the first row up to meet the last row (the first row should be in front if you kept the RS facing out). Position your working yarn so that it’s on the inside of the cuff. Ch 1, slip stitch the rows together using the following method: insert your hook (from front to back) into the FLO of the 1st stitch of Row 1, insert your hook (from back to front) into the BLO of the 1st stitch of the last row, yo, pull thru all loops on your hook. Continue in this way across the cuff to complete the seam. (16 sts) – See All Tutorial Photos for the cuff and the cables at the end of the crochet pattern.
Do not fasten off. Continue on to Prepare Cuff for Body of Mitten.
Prepare Cuff for Body of Mitten
Step 1: The side of the cuff facing out right now is the RS. Fold the cuff in half so that the RS is facing out and the two edges are lined up.
Rnd 1 (RS): With CC yarn & a 5.00mm crochet hook, work into the sides of the rows of the cuff, ch 1, work 1 sc into each st around. Join with a sl st to the 1st st. (26 sts)
Switch colors to MC. Fasten off CC and weave in ends. Continue on to Body of Mitten for the hand that you’re making.
Child Right Hand – Body of Mitten
Rnd 1 (RS): With MC yarn & a 5.00mm crochet hook, ch 1, sc in each st around. Join with a sl st to the 1st st. (26 sts)
Rnd 2: Ch 1, (FLO ext sc in the next st, BLO ext sc in the next st) 6 times, fpdc around each of the next 8 sts, (FLO ext sc in the next st, BLO ext sc in the next st) 3 times. Join. (26 sts)
Rnd 3: Ch 1, (BLO ext sc in the next st, FLO ext sc in the next st) 6 times, fpdc around each of the next 8 post sts, (BLO ext sc in the next st, FLO ext sc in the next st) 3 times. Join. (26 sts)
Rnd 4: Ch 1, (FLO ext sc in the next st, BLO ext sc in the next st) 6 times, skip each of the first 4 post sts, FPdbltr around each of the next 4 post sts, FPdbltr around each of the 4 skipped post sts, (FLO ext sc in the next st, BLO ext sc in the next st) 3 times. Join. (26 sts)
Rnd 5: Ch 1, (BLO ext sc in the next st, FLO ext sc in the next st) 6 times, fpdc around each of the next 8 post sts, (BLO ext sc in the next st, FLO ext sc in the next st) 3 times. Join. (26 sts)
Rnd 6: Ch 1, (FLO ext sc in the next st, BLO ext sc in the next st) 6 times, fpdc around each of the next 8 post sts, (FLO ext sc in the next st, BLO ext sc in the next st) 3 times. Join. (26 sts)
Rnd 7: Ch 1, (BLO ext sc in the next st, FLO ext sc in the next st) 6 times, fpdc around each of the next 8 post sts, BLO ext sc in the next st, FLO ext sc in the next st, ch 4, skip each of the last 4 sts. Join. (26 sts)
Rnd 8: Ch 1, (FLO ext sc in the next st, BLO ext sc in the next st) 6 times, skip each of the first 4 post sts, FPdbltr around each of the next 4 post sts, FPdbltr around each of the 4 skipped post sts, FLO ext sc in the next st, BLO ext sc in the next st, ext sc in each of the last 4 chs. Join. (26 sts)
Rnds 9 – 10: Rep Rnds 5 – 6.
Rnds 11 – 13: Rep Rnds 3 – 5.
Rnd 14: Ch 1, FLO extsc2tog, BLO extsc2tog, (FLO ext sc in the next st, BLO ext sc in the next st) 4 times, fpdc around each of the next 8 post sts, (FLO ext sc in the next st, BLO ext sc in the next st) 3 times. Join. (24 sts)
Rnd 15: Ch 1, (BLO ext sc in the next st, FLO ext sc in the next st) 5 times, fpdc around each of the next 8 post sts, (BLO ext sc in the next st, FLO ext sc in the next st) 3 times. Join. (24 sts)
Rnd 16: Ch 1, (FLO ext sc in the next st, BLO ext sc in the next st) 5 times, fpdc2tog 4 times, (FLO ext sc in the next st, BLO ext sc in the next st) 3 times. Join. (20 sts)
Rnd 17: Ch 1, (BLO ext sc in the next st, FLO ext sc in the next st) 5 times, fpdc around each of the next 4 post sts, (BLO ext sc in the next st, FLO ext sc in the next st) 3 times. Join. (20 sts)
Rnd 18: Ch 1, (FLO ext sc in the next st, BLO ext sc in the next st) 5 times, fpdc2tog 2 times, (FLO ext sc in the next st, BLO ext sc in the next st) 3 times. Join. (18 sts)
Fasten off leaving a 6 – 8″ tail of yarn. Continue on to the Thumb.
Child Left Hand – Body of Mitten
Rnd 1 (RS): With MC yarn & a 5.00mm crochet hook, ch 1, sc in each st around. Join with a sl st to the 1st st. (26 sts)
Rnd 2: Ch 1, (FLO ext sc in the next st, BLO ext sc in the next st) 3 times, fpdc around each of the next 8 sts, (FLO ext sc in the next st, BLO ext sc in the next st) 6 times. Join. (26 sts)
Rnd 3: Ch 1, (BLO ext sc in the next st, FLO ext sc in the next st) 3 times, fpdc around each of the next 8 post sts, (BLO ext sc in the next st, FLO ext sc in the next st) 6 times. Join. (26 sts)
Rnd 4: Ch 1, (FLO ext sc in the next st, BLO ext sc in the next st) 3 times, skip each of the first 4 post sts, FPdbltr around each of the next 4 post sts, FPdbltr around each of the 4 skipped post sts, (FLO ext sc in the next st, BLO ext sc in the next st) 6 times. Join. (26 sts)
Rnd 5: Ch 1, (BLO ext sc in the next st, FLO ext sc in the next st) 3 times, fpdc around each of the next 8 post sts, (BLO ext sc in the next st, FLO ext sc in the next st) 6 times. Join. (26 sts)
Rnd 6: Ch 1, (FLO ext sc in the next st, BLO ext sc in the next st) 3 times, fpdc around each of the next 8 post sts, (FLO ext sc in the next st, BLO ext sc in the next st) 6 times. Join. (26 sts)
Rnd 7: Ch 5 (counts as turning ch & 4 ch-1’s), skip each of the next 4 sts, BLO ext sc in the next st, FLO ext sc in the next st, fpdc around each of the next 8 post sts, (BLO ext sc in the next st, FLO ext sc in the next st) 6 times. Join with a sl st to the 2nd ch. (26 sts)
Rnd 8: Ch 1, ext sc in each of the first 4 chs, FLO ext sc in the next st, BLO ext sc in the next st, fpdc around each of the next 8 post sts, (FLO ext sc in the next st, BLO ext sc in the next st) 6 times. Join. (26 sts)
Rnds 9 – 10: Rep Rnds 5 – 6.
Rnds 11 – 13: Rep Rnds 3 – 5.
Rnd 14: Ch 1, (FLO ext sc in the next st, BLO ext sc in the next st) 3 times, fpdc around each of the next 8 post sts, (FLO ext sc in the next st, BLO ext sc in the next st) 4 times, FLO extsc2tog, BLO extsc2tog. Join. (24 sts)
Rnd 15: Ch 1, (BLO ext sc in the next st, FLO ext sc in the next st) 3 times, fpdc around each of the next 8 post sts, (BLO ext sc in the next st, FLO ext sc in the next st) 5 times. Join. (24 sts)
Rnd 16: Ch 1, (BLO ext sc in the next st, FLO ext sc in the next st) 3 times, fpdc2tog 4 times, (BLO ext sc in the next st, FLO ext sc in the next st) 5 times. Join. (20 sts)
Rnd 17: Ch 1, (FLO ext sc in the next st, BLO ext sc in the next st) 3 times, fpdc around each of the next 4 post sts, (FLO ext sc in the next st, BLO ext sc in the next st) 5 times. Join. (20 sts)
Rnd 18: Ch 1, (BLO ext sc in the next st, FLO ext sc in the next st) 3 times, fpdc2tog 2 times, (BLO ext sc in the next st, FLO ext sc in the next st) 5 times. Join. (18 st)
Fasten off leaving a 6 – 8″ tail of yarn. Continue on to the Thumb.
Child Thumb
Note: Thumb is worked in continuous rounds (spiral). I suggest using a scrap of yarn as a stitch marker to help keep track of rounds.
Rnd 1: With a 5.00mm crochet hook, join MC yarn with a standing sc in the 1st skipped st of the thumbhole opening, sc in the next 2 sts, 2 sc in the next st, sc into the side of the exposed ext sc from the thumbhole opening rnd, (sc in the next st, 2 sc in the next st) 2 times, sc into the side of the exposed ext sc from the thumbhole opening rnd. (13 sts)
Tip! If you’re left with a small gap at each corner of the thumb where you work into the side of the exposed sc’s, use a scrap piece of yarn and stitch the gap closed after completing Rnd 2.
Rnds 2 – 7: Sc in each st around. (13 sts)
Rnd 8: (FLO inv sc2tog, sc in each of the next 2 sts) 3 times, sc in the last st. (10 sts)
Rnds 9 – 10: Sc in each st around. (10 sts)
Rnd 11: FLO invsc2tog 5 times. (5 sts)
Fasten off leaving a 6″ tail of yarn. Continue on to Finishing.
Finishing
Turn mitten inside out. Using a yarn needle and yarn tails, whipstitch both the tip of the mitten and thumb closed. Weave in ends. Repeat instructions to make the second mitten.
Women’s (Adult Small) Size Crochet Mittens
Women’s Stretchy Mitten Cuff
Row 1 (RS): With CC yarn & a 5.00mm crochet hook, ch 21, working into the back hump of the foundation ch, sl st in the 2nd ch from your hook and in each ch across. Turn. (20 sts)
Rows 2 – 29: Ch 1, BLO sl st in each st across. Turn. (20 sts)
Row 30 – Seam Row: With RS facing out, bring the first row up to meet the last row (the first row should be in front if you kept the RS facing out). Position your working yarn so that it’s on the inside of the cuff. Ch 1, slip stitch the rows together using the following method: insert your hook (from front to back) into the FLO of the 1st stitch of Row 1, insert your hook (from back to front) into the BLO of the 1st stitch of the last row, yo, pull thru all loops on your hook. Continue in this way across the cuff to complete the seam. (20 sts) – See All Tutorial Photos for the cuff and the cables at the end of the crochet pattern.
Do not fasten off. Continue on to Prepare Cuff for Body of Mitten.
Prepare Cuff for Body of Mitten
Step 1: The side of the cuff facing out right now is the RS. Fold the cuff in half so that the RS is facing out and the two edges are lined up.
Rnd 1 (RS): With CC yarn & a 5.00mm crochet hook, work into the sides of the rows of the cuff, ch 1, work 1 sc into each st around. Join with a sl st to the 1st st. (30 sts)
Switch colors to MC. Fasten off CC and weave in ends. Continue on to Body of Mitten for the hand that you’re making.
Women’s Right Hand – Body of Mitten
Rnd 1 (RS): With MC yarn & a 5.00mm crochet hook, ch 1, sc in each st around. Join with a sl st to the 1st st. (30 sts)
Rnd 2: Ch 1, (FLO ext sc in the next st, BLO ext sc in the next st) 7 times, fpdc around each of the next 8 sts, (FLO ext sc in the next st, BLO ext sc in the next st) 4 times. Join. (30 sts)
Rnd 3: Ch 1, (BLO ext sc in the next st, FLO ext sc in the next st) 7 times, fpdc around each of the next 8 post sts, (BLO ext sc in the next st, FLO ext sc in the next st) 4 times. Join. (30 sts)
Rnd 4: Ch 1, (FLO ext sc in the next st, BLO ext sc in the next st) 7 times, skip each of the first 4 post sts, FPdbltr around each of the next 4 post sts, FPdbltr around each of the 4 skipped post sts, (FLO ext sc in the next st, BLO ext sc in the next st) 4 times. Join. (30 sts)
Rnd 5: Ch 1, (BLO ext sc in the next st, FLO ext sc in the next st) 7 times, fpdc around each of the next 8 post sts, (BLO ext sc in the next st, FLO ext sc in the next st) 4 times. Join. (30 sts)
Rnd 6: Ch 1, (FLO ext sc in the next st, BLO ext sc in the next st) 7 times, fpdc around each of the next 8 post sts, (FLO ext sc in the next st, BLO ext sc in the next st) 4 times. Join. (30 sts)
Rnds 7 – 8: Rep Rnds 3 – 4.
Rnd 9: Ch 1, (BLO ext sc in the next st, FLO ext sc in the next st) 7 times, fpdc around each of the next 8 post sts, (BLO ext sc in the next st, FLO ext sc in the next st) 2 times, ch 4, skip each of the last 4 sts. Join. (30 sts)
Rnd 10: Ch 1, (FLO ext sc in the next st, BLO ext sc in the next st) 7 times, fpdc around each of the next 8 post sts, (FLO ext sc in the next st, BLO ext sc in the next st) 2 times, ext sc in each of the last 4 chs. Join. (30 sts)
Rnds 11 – 14: Rep Rnds 3 – 6.
Rnd 15: Ch 1, BLO extsc2tog, FLO extsc2tog, (BLO ext sc in the next st, FLO ext sc in the next st) 5 times, fpdc around each of the next 8 post sts, (BLO ext sc in the next st, FLO ext sc in the next st) 4 times. Join. (28 sts)
Rnd 16: Ch 1, (FLO ext sc in the next st, BLO ext sc in the next st) 6 times, skip each of the first 4 post sts, FPdbltr around each of the next 4 post sts, FPdbltr around each of the 4 skipped post sts, (FLO ext sc in the next st, BLO ext sc in the next st) 4 times. Join. (28 sts)
Rnd 17: Ch 1, (BLO ext sc in the next st, FLO ext sc in the next st) 6 times, fpdc around each of the next 8 post sts, (BLO ext sc in the next st, FLO ext sc in the next st) 4 times. Join. (28 sts)
Rnd 18: Ch 1, (FLO ext sc in the next st, BLO ext sc in the next st) 6 times, fpdc around each of the next 8 post sts, (FLO ext sc in the next st, BLO ext sc in the next st) 4 times. Join. (28 sts)
Rnd 19: Ch 1, BLO extsc2tog, FLO extsc2tog, (BLO ext sc in the next st, FLO ext sc in the next st) 4 times, fpdc around each of the next 8 post sts, (BLO ext sc in the next st, FLO ext sc in the next st) 4 times. Join. (26 sts)
Rnd 20: Ch 1, (FLO ext sc in the next st, BLO ext sc in the next st) 5 times, skip each of the first 4 post sts, FPdbltr around each of the next 4 post sts, FPdbltr around each of the 4 skipped post sts, (FLO ext sc in the next st, BLO ext sc in the next st) 4 times. Join. (26 sts)
Rnd 21: Ch 1, (BLO ext sc in the next st, FLO ext sc in the next st) 5 times, fpdc around each of the next 8 post sts, (BLO ext sc in the next st, FLO ext sc in the next st) 4 times. Join. (26 sts)
Rnd 22: Ch 1, (FLO ext sc in the next st, BLO ext sc in the next st) 5 times, fpdc2tog 4 times, (FLO ext sc in the next st, BLO ext sc in the next st) 4 times. Join. (22 sts)
Rnd 23: Ch 1, (BLO ext sc in the next st, FLO ext sc in the next st) 5 times, fpdc around each of the next 4 post sts, (BLO ext sc in the next st, FLO ext sc in the next st) 4 times. Join. (22 sts)
Fasten off leaving a 6 – 8″ tail of yarn. Continue on to the Thumb.
Women’s Left Hand – Body of Mitten
Rnd 1 (RS): With MC yarn & a 5.00mm crochet hook, ch 1, sc in each st around. Join with a sl st to the 1st st. (30 sts)
Rnd 2: Ch 1, (FLO ext sc in the next st, BLO ext sc in the next st) 4 times, fpdc around each of the next 8 sts, (FLO ext sc in the next st, BLO ext sc in the next st) 7 times. Join. (30 sts)
Rnd 3: Ch 1, (BLO ext sc in the next st, FLO ext sc in the next st) 4 times, fpdc around each of the next 8 post sts, (BLO ext sc in the next st, FLO ext sc in the next st) 7 times. Join. (30 sts)
Rnd 4: Ch 1, (FLO ext sc in the next st, BLO ext sc in the next st) 4 times, skip each of the first 4 post sts, FPdbltr around each of the next 4 post sts, FPdbltr around each of the 4 skipped post sts, (FLO ext sc in the next st, BLO ext sc in the next st) 7 times. Join. (30 sts)
Rnd 5: Ch 1, (BLO ext sc in the next st, FLO ext sc in the next st) 4 times, fpdc around each of the next 8 post sts, (BLO ext sc in the next st, FLO ext sc in the next st) 7 times. Join. (30 sts)
Rnd 6: Ch 1, (FLO ext sc in the next st, BLO ext sc in the next st) 4 times, fpdc around each of the next 8 post sts, (FLO ext sc in the next st, BLO ext sc in the next st) 7 times. Join. (30 sts)
Rnds 7 – 8: Rep Rnds 3 – 4.
Rnd 9: Ch 5 (counts as turning ch & 4 ch-1’s), skip each of the next 4 sts, (BLO ext sc in the next st, FLO ext sc in the next st) 2 times, fpdc around each of the next 8 post sts, (BLO ext sc in the next st, FLO ext sc in the next st) 7 times. Join with a sl st to the 2nd ch. (30 sts)
Rnd 10: Ch 1, ext sc in each of the first 4 chs, (FLO ext sc in the next st, BLO ext sc in the next st) 2 times, fpdc around each of the next 8 post sts, (FLO ext sc in the next st, BLO ext sc in the next st) 7 times. Join. (30 sts)
Rnds 11 – 14: Rep Rnds 3 – 6.
Rnd 15: Ch 1, (BLO ext sc in the next st, FLO ext sc in the next st) 4 times, fpdc around each of the next 8 post sts, (BLO ext sc in the next st, FLO ext sc in the next st) 5 times, BLO extsc2tog, FLO extsc2tog. Join. (28 sts)
Rnd 16: Ch 1, (FLO ext sc in the next st, BLO ext sc in the next st) 4 times, skip each of the first 4 post sts, FPdbltr around each of the next 4 post sts, FPdbltr around each of the 4 skipped post sts, (FLO ext sc in the next st, BLO ext sc in the next st) 6 times. Join. (28 sts)
Rnd 17: Ch 1, (BLO ext sc in the next st, FLO ext sc in the next st) 4 times, fpdc around each of the next 8 post sts, (BLO ext sc in the next st, FLO ext sc in the next st) 6 times. Join. (28 sts)
Rnd 18: Ch 1, (FLO ext sc in the next st, BLO ext sc in the next st) 4 times, fpdc around each of the next 8 post sts, (FLO ext sc in the next st, BLO ext sc in the next st) 6 times. Join. (28 sts)
Rnd 19: Ch 1, (BLO ext sc in the next st, FLO ext sc in the next st) 4 times, fpdc around each of the next 8 post sts, (BLO ext sc in the next st, FLO ext sc in the next st) 4 times, BLO extsc2tog, FLO extsc2tog. Join. (26 sts)
Rnd 20: Ch 1, (FLO ext sc in the next st, BLO ext sc in the next st) 4 times, skip each of the first 4 post sts, FPdbltr around each of the next 4 post sts, FPdbltr around each of the 4 skipped post sts, (FLO ext sc in the next st, BLO ext sc in the next st) 5 times. Join. (26 sts)
Rnd 21: Ch 1, (BLO ext sc in the next st, FLO ext sc in the next st) 4 times, fpdc around each of the next 8 post sts, (BLO ext sc in the next st, FLO ext sc in the next st) 5 times. Join. (26 sts)
Rnd 22: Ch 1, (FLO ext sc in the next st, BLO ext sc in the next st) 4 times, fpdc2tog 4 times, (FLO ext sc in the next st, BLO ext sc in the next st) 5 times. Join. (22 sts)
Rnd 23: Ch 1, (BLO ext sc in the next st, FLO ext sc in the next st) 4 times, fpdc around each of the next 4 post sts, (BLO ext sc in the next st, FLO ext sc in the next st) 5 times. Join. (22 sts)
Fasten off leaving a 6 – 8″ tail of yarn. Continue on to the Thumb.
Women’s Thumb
Note: Thumb is worked in continuous rounds (spiral). I suggest using a scrap of yarn as a stitch marker to help keep track of rounds.
Rnd 1: With a 5.00mm crochet hook, join MC yarn with a standing sc in the 1st skipped st of the thumbhole opening, 2 sc in the next st, sc in the next st, 2 sc in the next st, sc into the side of the exposed ext sc from the thumbhole opening rnd, (sc in the next st, 2 sc in the next st) 2 times, sc into the side of the exposed ext sc from the thumbhole opening rnd. (14 sts)
Tip! If you’re left with a small gap at each corner of the thumb where you work into the side of the exposed sc’s, use a scrap piece of yarn and stitch the gap closed after completing Rnd 2.
Rnds 2 – 8: Sc in each st around. (14 sts)
Rnd 9: (FLO inv sc2tog, sc in each of the next 2 sts) 3 times, sc in each of the last 2 sts. (11 sts)
Rnds 10 – 11: Sc in each st around. (11 sts)
Rnd 12: FLO invsc2tog 5 times, sc in the last st. (6 sts)
Fasten off leaving a 6″ tail of yarn. Continue on to Finishing.
Finishing
Turn mitten inside out. Using a yarn needle and yarn tails, whipstitch both the tip of the mitten and thumb closed. Weave in ends. Repeat instructions to make the second mitten.
Men’s (Adult Large) Size Crochet Mittens
Men’s Stretchy Mitten Cuff
Row 1 (RS): With CC yarn & a 5.00mm crochet hook, ch 21, working into the back hump of the foundation ch, sl st in the 2nd ch from your hook and in each ch across. Turn. (20 sts)
Rows 2 – 35: Ch 1, BLO sl st in each st across. Turn. (20 sts)
Row 36 – Seam Row: With RS facing out, bring the first row up to meet the last row (the first row should be in front if you kept the RS facing out). Position your working yarn so that it’s on the inside of the cuff. Ch 1, slip stitch the rows together using the following method: insert your hook (from front to back) into the FLO of the 1st stitch of Row 1, insert your hook (from back to front) into the BLO of the 1st stitch of the last row, yo, pull thru all loops on your hook. Continue in this way across the cuff to complete the seam. (20 sts) – See All Tutorial Photos for the cuff and the cables at the end of the crochet pattern.
Do not fasten off. Continue on to Prepare Cuff for Body of Mitten.
Prepare Cuff for Body of Mitten
Step 1: The side of the cuff facing out right now is the RS. Fold the cuff in half so that the RS is facing out and the two edges are lined up.
Rnd 1 (RS): With CC yarn & a 5.00mm crochet hook, work into the sides of the rows of the cuff, ch 1, work 1 sc into each st around. Join with a sl st to the 1st st. (36 sts)
Switch colors to MC. Fasten off CC and weave in ends. Continue on to Body of Mitten for the hand that you’re making.
Men’s Right Hand – Body of Mitten
Rnd 1 (RS): With MC yarn & a 5.00mm crochet hook, ch 1, sc in each st around. Join with a sl st to the 1st st. (36 sts)
Rnd 2: Ch 1, (FLO ext sc in the next st, BLO ext sc in the next st) 8 times, fpdc around each of the next 8 sts, (FLO ext sc in the next st, BLO ext sc in the next st) 6 times. Join. (36 sts)
Rnd 3: Ch 1, (BLO ext sc in the next st, FLO ext sc in the next st) 8 times, fpdc around each of the next 8 post sts, (BLO ext sc in the next st, FLO ext sc in the next st) 6 times. Join. (36 sts)
Rnd 4: Ch 1, (FLO ext sc in the next st, BLO ext sc in the next st) 8 times, skip each of the first 4 post sts, FPdbltr around each of the next 4 post sts, FPdbltr around each of the 4 skipped post sts, (FLO ext sc in the next st, BLO ext sc in the next st) 6 times. Join. (36 sts)
Rnd 5: Ch 1, (BLO ext sc in the next st, FLO ext sc in the next st) 8 times, fpdc around each of the next 8 post sts, (BLO ext sc in the next st, FLO ext sc in the next st) 6 times. Join. (36 sts)
Rnd 6: Ch 1, (FLO ext sc in the next st, BLO ext sc in the next st) 8 times, fpdc around each of the next 8 post sts, (FLO ext sc in the next st, BLO ext sc in the next st) 6 times. Join. (36 sts)
Rnds 7 – 8: Rep Rnds 3 – 4.
Rnd 9: Ch 1, (BLO ext sc in the next st, FLO ext sc in the next st) 8 times, fpdc around each of the next 8 post sts, (BLO ext sc in the next st, FLO ext sc in the next st) 3 times, ch 6, skip each of the last 6 sts. Join. (36 sts)
Rnd 10: Ch 1, (FLO ext sc in the next st, BLO ext sc in the next st) 8 times, fpdc around each of the next 8 post sts, (FLO ext sc in the next st, BLO ext sc in the next st) 3 times, ext sc in each of the last 6 chs. Join. (36 sts)
Rnds 11 – 20: Rep Rnds 3 – 6, ending with a Rnd 4.
Rnd 21: Ch 1, BLO extsc2tog, FLO extsc2tog, (BLO ext sc in the next st, FLO ext sc in the next st) 6 times, fpdc around each of the next 8 post sts, (BLO ext sc in the next st, FLO ext sc in the next st) 6 times. Join. (34 sts)
Rnd 22: Ch 1, (FLO ext sc in the next st, BLO ext sc in the next st) 7 times, fpdc around each of the next 8 post sts, (FLO ext sc in the next st, BLO ext sc in the next st) 6 times. Join. (34 sts)
Rnd 23: Ch 1, (BLO ext sc in the next st, FLO ext sc in the next st) 7 times, fpdc around each of the next 8 post sts, (BLO ext sc in the next st, FLO ext sc in the next st) 6 times. Join. (34 sts)
Rnd 24: Ch 1, (FLO ext sc in the next st, BLO ext sc in the next st) 7 times, skip each of the next 4 post sts, FPdbltr around each of the next 4 post sts, FPdbltr around each of the 4 skipped post sts, (FLO ext sc in the next st, BLO ext sc in the next st) 6 times. Join. (34 sts)
Rnd 25: Ch 1, BLO extsc2tog, FLO extsc2tog, (BLO ext sc in the next st, FLO ext sc in the next st) 5 times, fpdc around each of the next 8 post sts, (BLO ext sc in the next st, FLO ext sc in the next st) 6 times. Join. (32 sts)
Rnd 26: Ch 1, (FLO ext sc in the next st, BLO ext sc in the next st) 6 times, fpdc2tog 4 times, (FLO ext sc in the next st, BLO ext sc in the next st) 6 times. Join. (28 sts)
Rnd 27: Ch 1, (BLO ext sc in the next st, FLO ext sc in the next st) 6 times, fpdc around each of the next 4 post sts, (BLO ext sc in the next st, FLO ext sc in the next st) 6 times. Join. (28 sts)
Fasten off leaving a 6 – 8″ tail of yarn. Continue on to the Thumb.
Men’s Left Hand – Body of Mitten
Rnd 1 (RS): With MC yarn & a 5.00mm crochet hook, ch 1, sc in each st around. Join with a sl st to the 1st st. (36 sts)
Rnd 2: Ch 1, (FLO ext sc in the next st, BLO ext sc in the next st) 6 times, fpdc around each of the next 8 sts, (FLO ext sc in the next st, BLO ext sc in the next st) 8 times. Join. (36 sts)
Rnd 3: Ch 1, (BLO ext sc in the next st, FLO ext sc in the next st) 6 times, fpdc around each of the next 8 post sts, (BLO ext sc in the next st, FLO ext sc in the next st) 8 times. Join. (36 sts)
Rnd 4: Ch 1, (FLO ext sc in the next st, BLO ext sc in the next st) 6 times, skip each of the first 4 post sts, FPdbltr around each of the next 4 post sts, FPdbltr around each of the 4 skipped post sts, (FLO ext sc in the next st, BLO ext sc in the next st) 8 times. Join. (36 sts)
Rnd 5: Ch 1, (BLO ext sc in the next st, FLO ext sc in the next st) 6 times, fpdc around each of the next 8 post sts, (BLO ext sc in the next st, FLO ext sc in the next st) 8 times. Join. (36 sts)
Rnd 6: Ch 1, (FLO ext sc in the next st, BLO ext sc in the next st) 6 times, fpdc around each of the next 8 post sts, (FLO ext sc in the next st, BLO ext sc in the next st) 8 times. Join. (36 sts)
Rnds 7 – 8: Rep Rnds 3 – 4.
Rnd 9: Ch 7 (counts as turning ch & 6 ch-1’s), skip each of the next 6 sts, (BLO ext sc in the next st, FLO ext sc in the next st) 3 times, fpdc around each of the next 8 post sts, (BLO ext sc in the next st, FLO ext sc in the next st) 8 times. Join with a sl st to the 2nd ch. (36 sts)
Rnd 10: Ch 1, ext sc in each of the first 6 chs, (FLO ext sc in the next st, BLO ext sc in the next st) 3 times, fpdc around each of the next 8 post sts, (FLO ext sc in the next st, BLO ext sc in the next st) 8 times. Join. (36 sts)
Rnds 11 – 20: Rep Rnds 3 – 6, ending with a Rnd 4.
Rnd 21: Ch 1, (BLO ext sc in the next st, FLO ext sc in the next st) 6 times, fpdc around each of the next 8 post sts, (BLO ext sc in the next st, FLO ext sc in the next st) 6 times, BLO extsc2tog, FLO extsc2tog. Join. (34 sts)
Rnd 22: Ch 1, (FLO ext sc in the next st, BLO ext sc in the next st) 6 times, fpdc around each of the next 8 post sts, (FLO ext sc in the next st, BLO ext sc in the next st) 7 times. Join. (34 sts)
Rnd 23: Ch 1, (BLO ext sc in the next st, FLO ext sc in the next st) 6 times, fpdc around each of the next 8 post sts, (BLO ext sc in the next st, FLO ext sc in the next st) 7 times. Join. (34 sts)
Rnd 24: Ch 1, (FLO ext sc in the next st, BLO ext sc in the next st) 6 times, skip each of the first 4 post sts, FPdbltr around each of the next 4 post sts, FPdbltr around each of the 4 skipped post sts, (FLO ext sc in the next st, BLO ext sc in the next st) 7 times. Join. (34 sts)
Rnd 25: Ch 1, (BLO ext sc in the next st, FLO ext sc in the next st) 6 times, fpdc around each of the next 8 post sts, (BLO ext sc in the next st, FLO ext sc in the next st) 5 times, BLO extsc2tog, FLO extsc2tog. Join. (32 sts)
Rnd 26: Ch 1, (FLO ext sc in the next st, BLO ext sc in the next st) 6 times, fpdc2tog 4 times, (FLO ext sc in the next st, BLO ext sc in the next st) 6 times. Join. (28 sts)
Rnd 27: Ch 1, (BLO ext sc in the next st, FLO ext sc in the next st) 6 times, fpdc around each of the next 4 post sts, (BLO ext sc in the next st, FLO ext sc in the next st) 6 times. Join. (28 sts)
Fasten off leaving a 6 – 8″ tail of yarn. Continue on to the Thumb.
Men’s Thumb
Rnd 1: With a 5.00mm crochet hook, join MC yarn with a standing sc in the 1st skipped st of the thumbhole opening, 2 sc in the next st, (sc in the next st, 2 sc in the next st) 2 times, sc into the side of the exposed ext sc from thumbhole rnd, (sc in the next st, 2 sc in the next st) 3 times, sc into the side of the exposed ext sc from thumbhole rnd. (20 sts)
Tip! If you’re left with a small gap at each corner of the thumb where you work into the side of the exposed sc’s, use a scrap piece of yarn and stitch the gap closed after completing Rnd 2.
Rnds 2 – 10: Sc in each st around. (20 sts)
Rnd 11: (FLO inv sc2tog, sc in each of the next 3 sts) 4 times. (16 sts)
Rnds 12 – 13: Sc in each st around. (16 sts)
Rnd 14 : FLO invsc2tog 8 times. (8 sts)
Fasten off leaving a 6″ tail of yarn. Continue on to Finishing.
Finishing
Turn mitten inside out. Using a yarn needle and yarn tails, whipstitch both the tip of the mitten and thumb closed. Weave in ends. Repeat instructions to make the second mitten.
Mitten Progression Photos & Tutorials
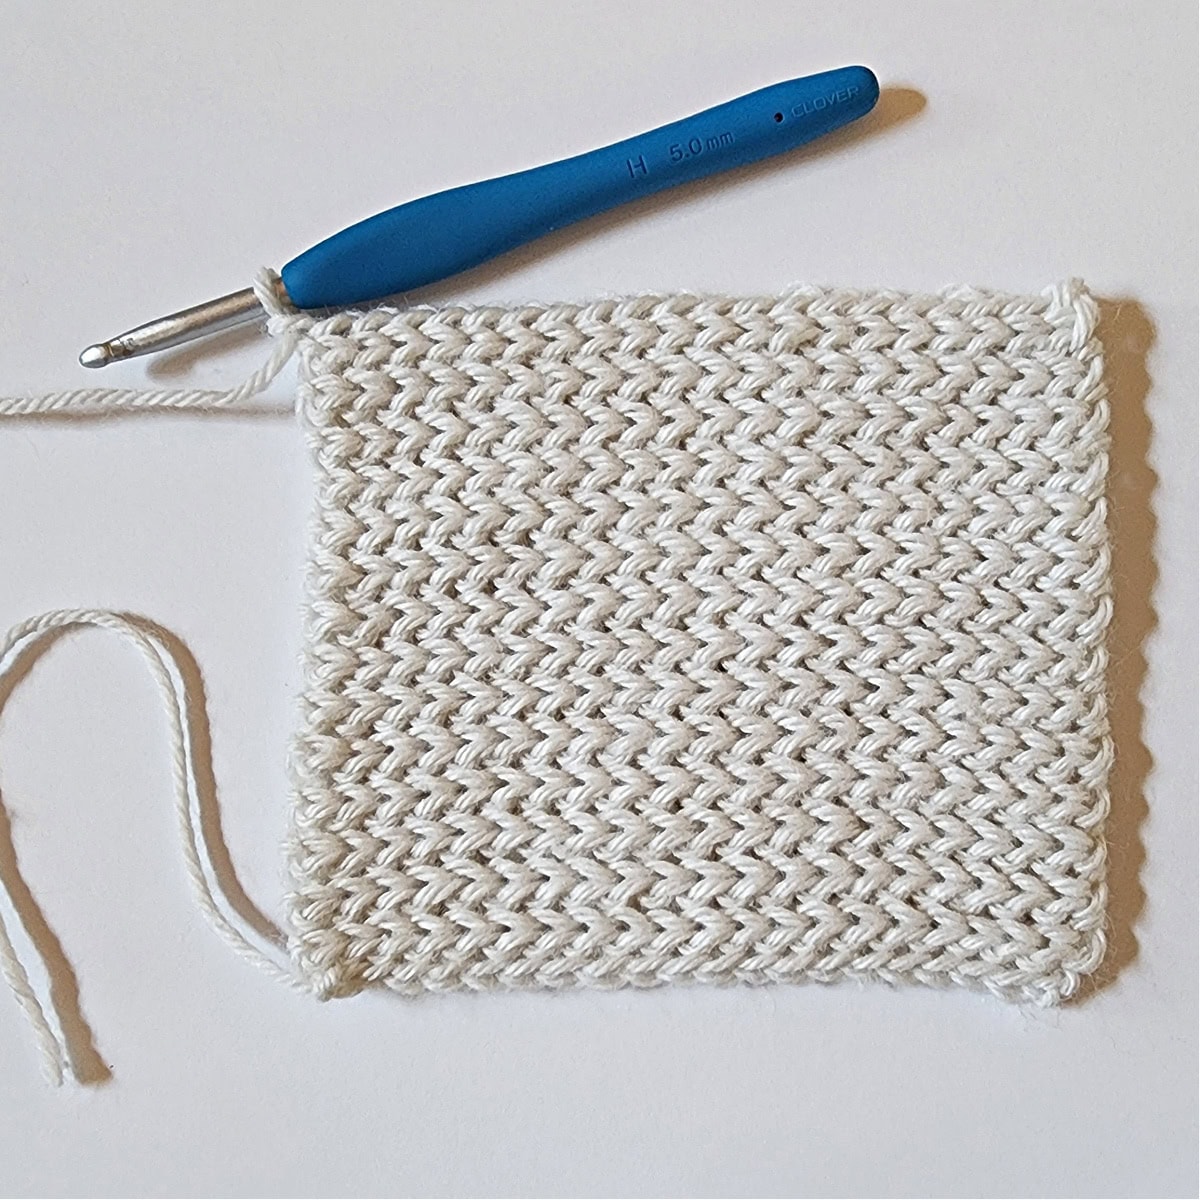
the working yarn on the inside.
the seam tutorial on the last page.

two edges are lined up as in the photo above.

to join both edges of the cuff together.
Crochet Cables Tutorial
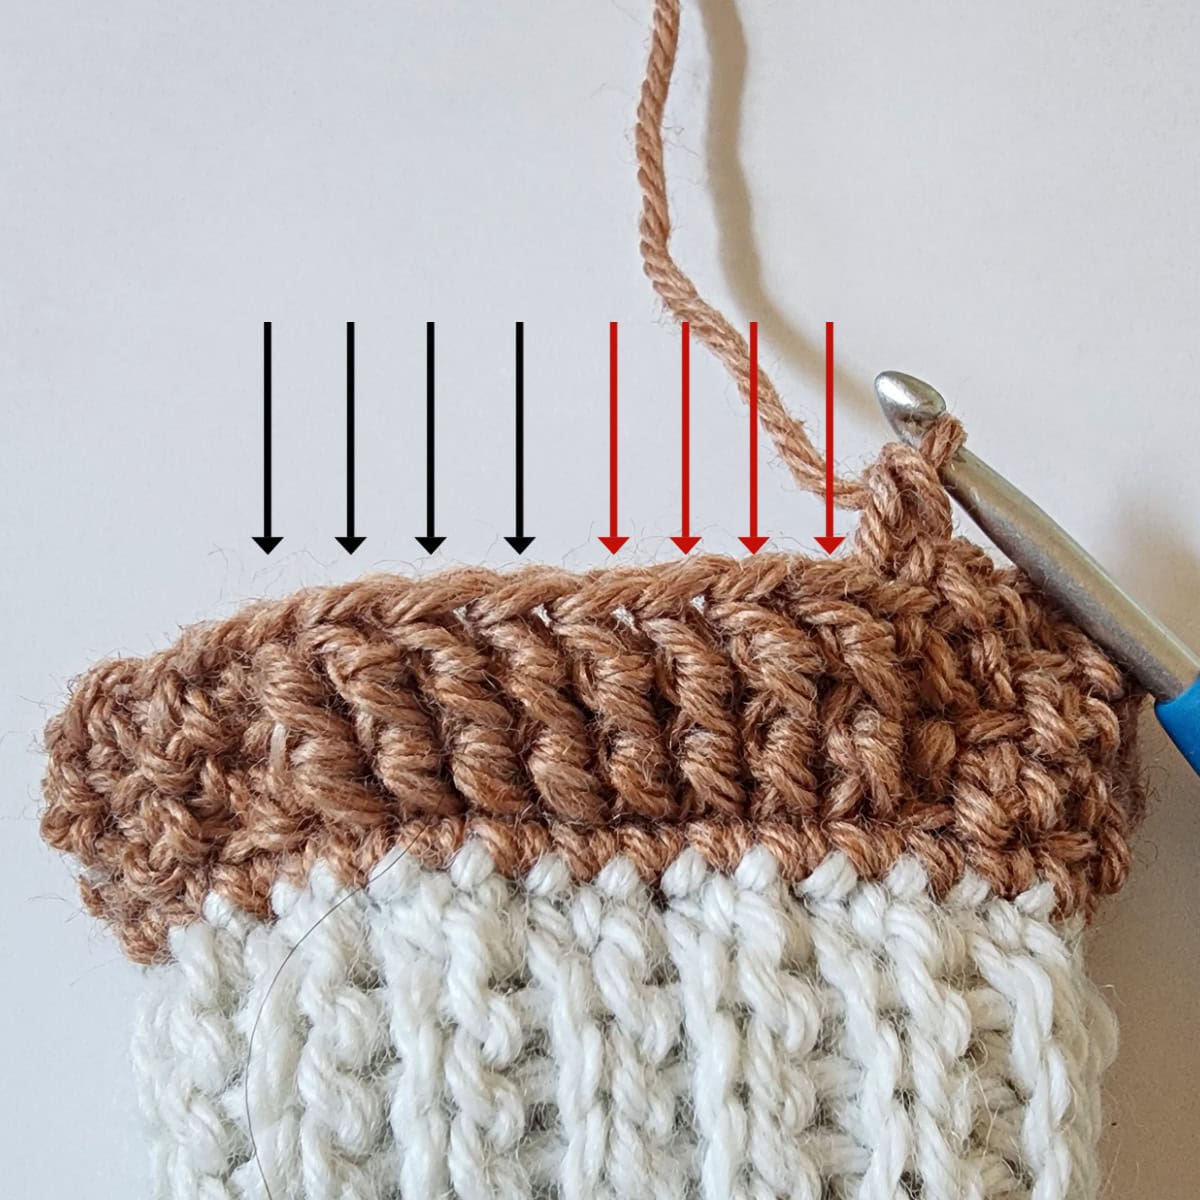
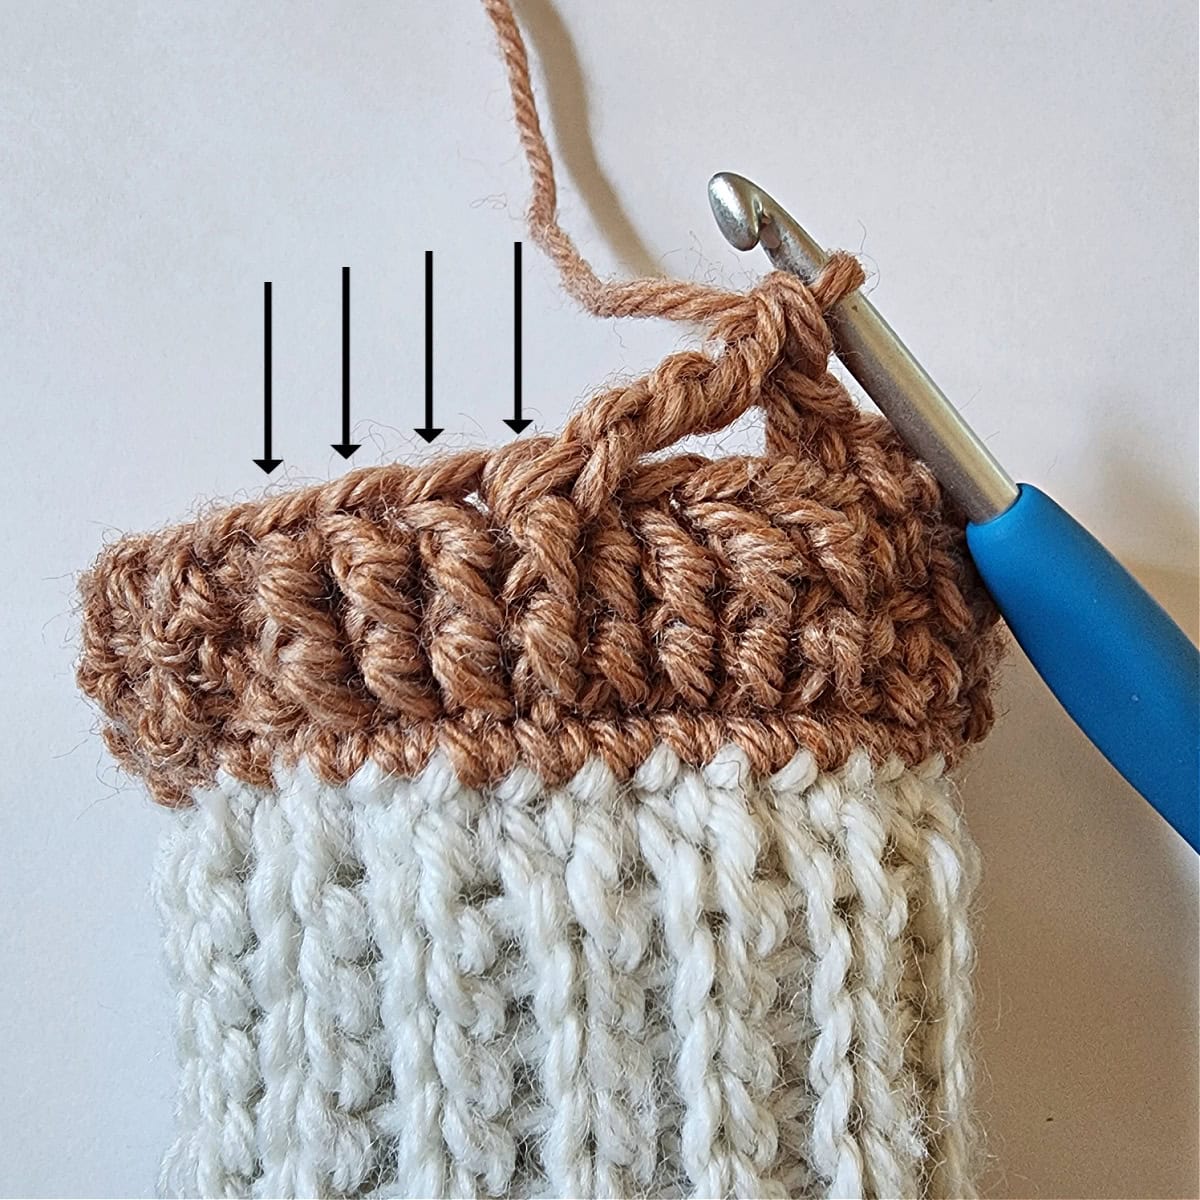
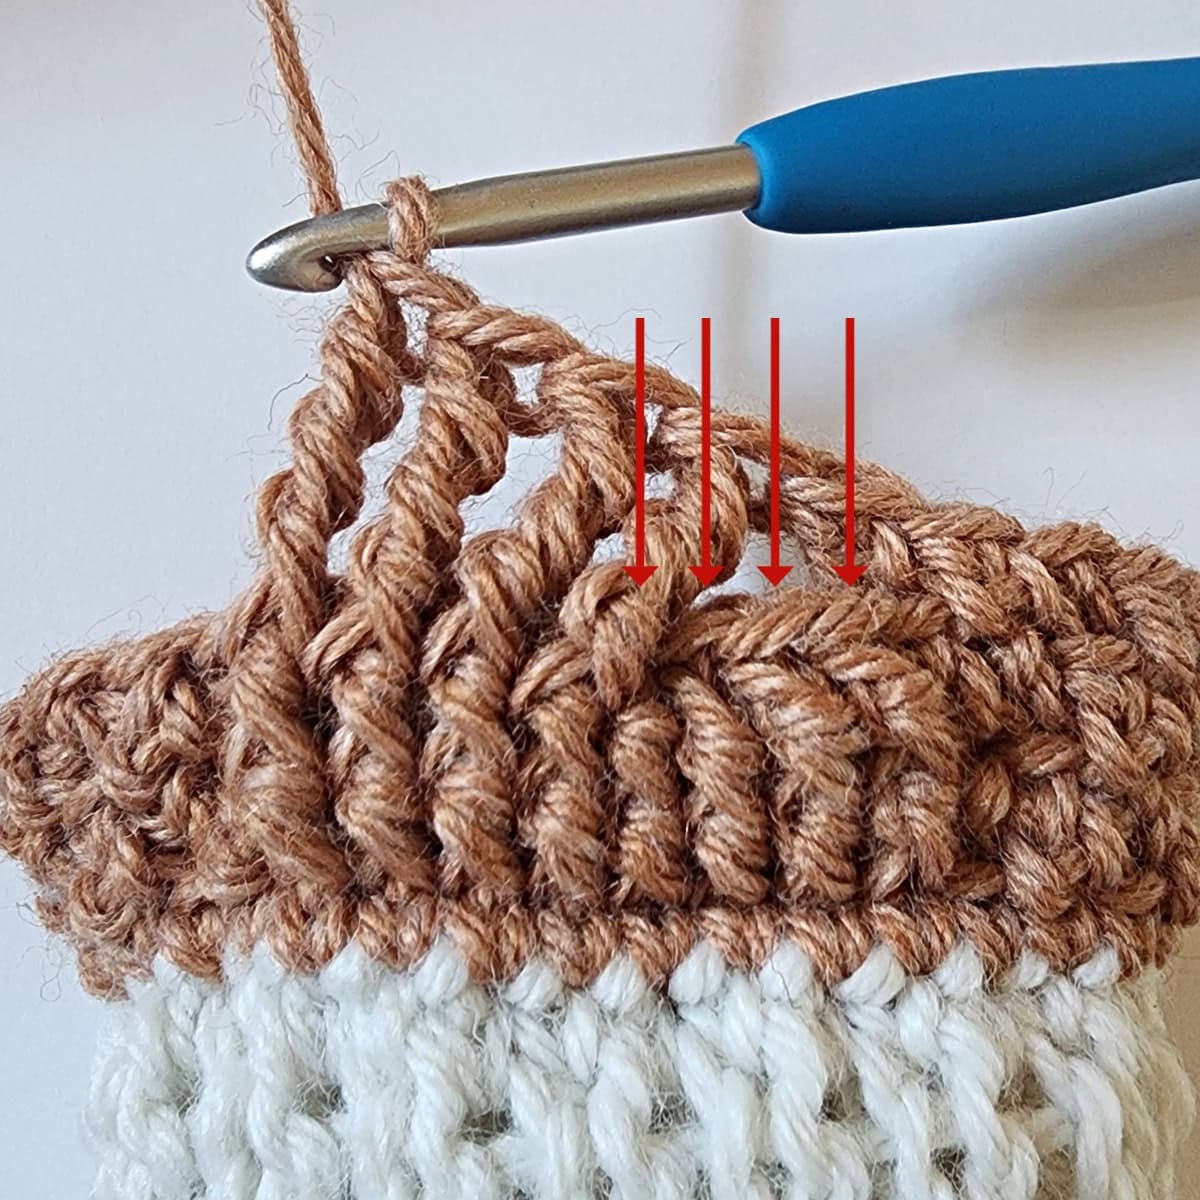
post stitches that you will next work a FPdbltr around. Work around the skipped stitches from right to left.
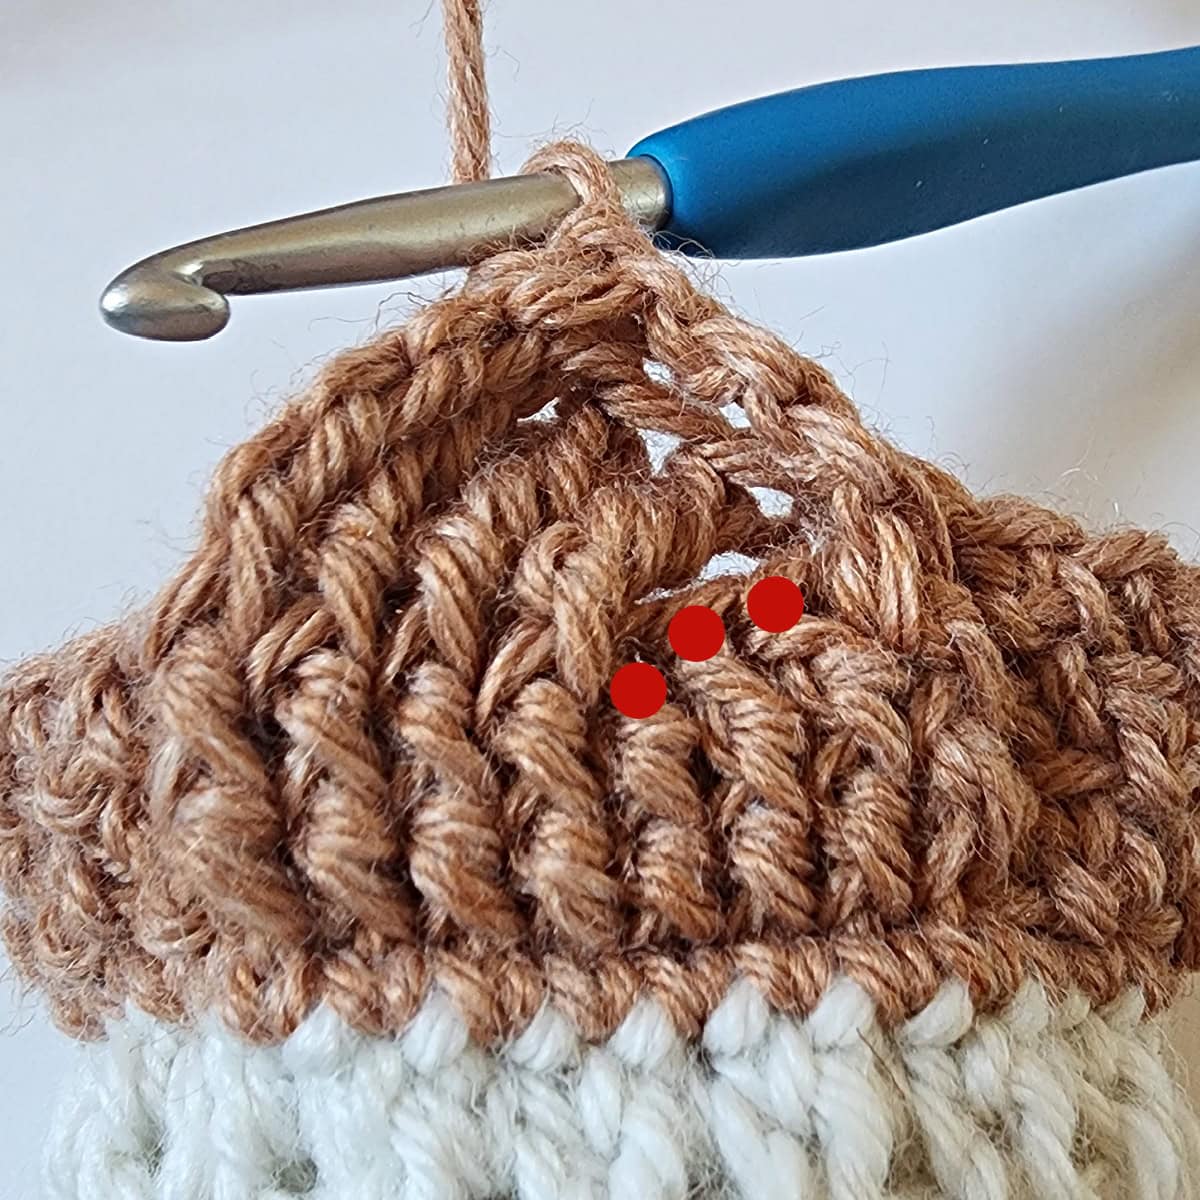
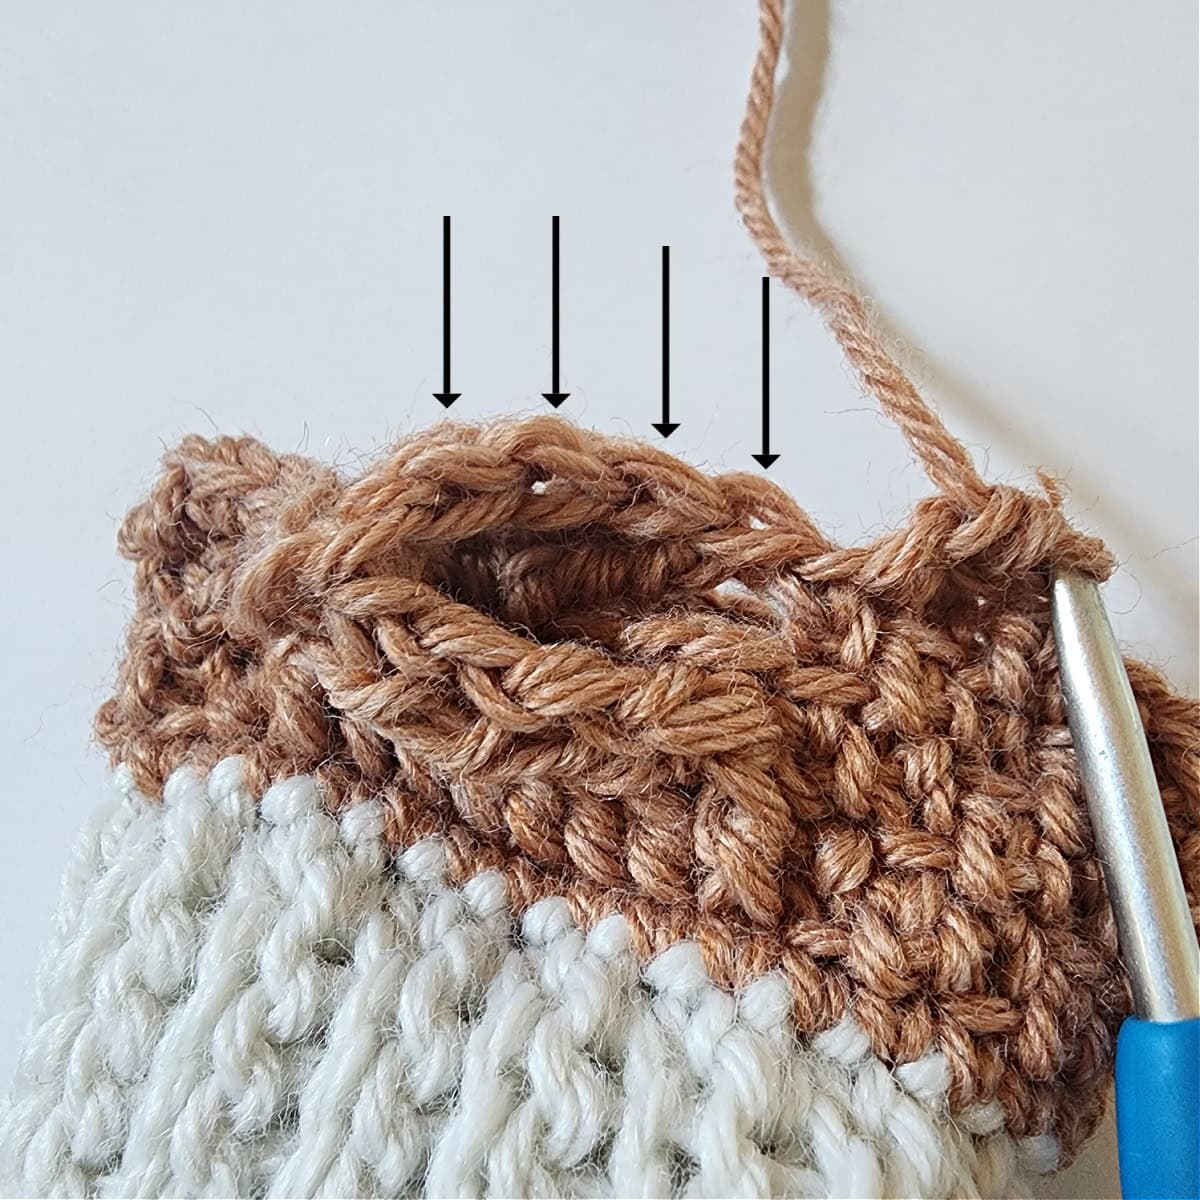
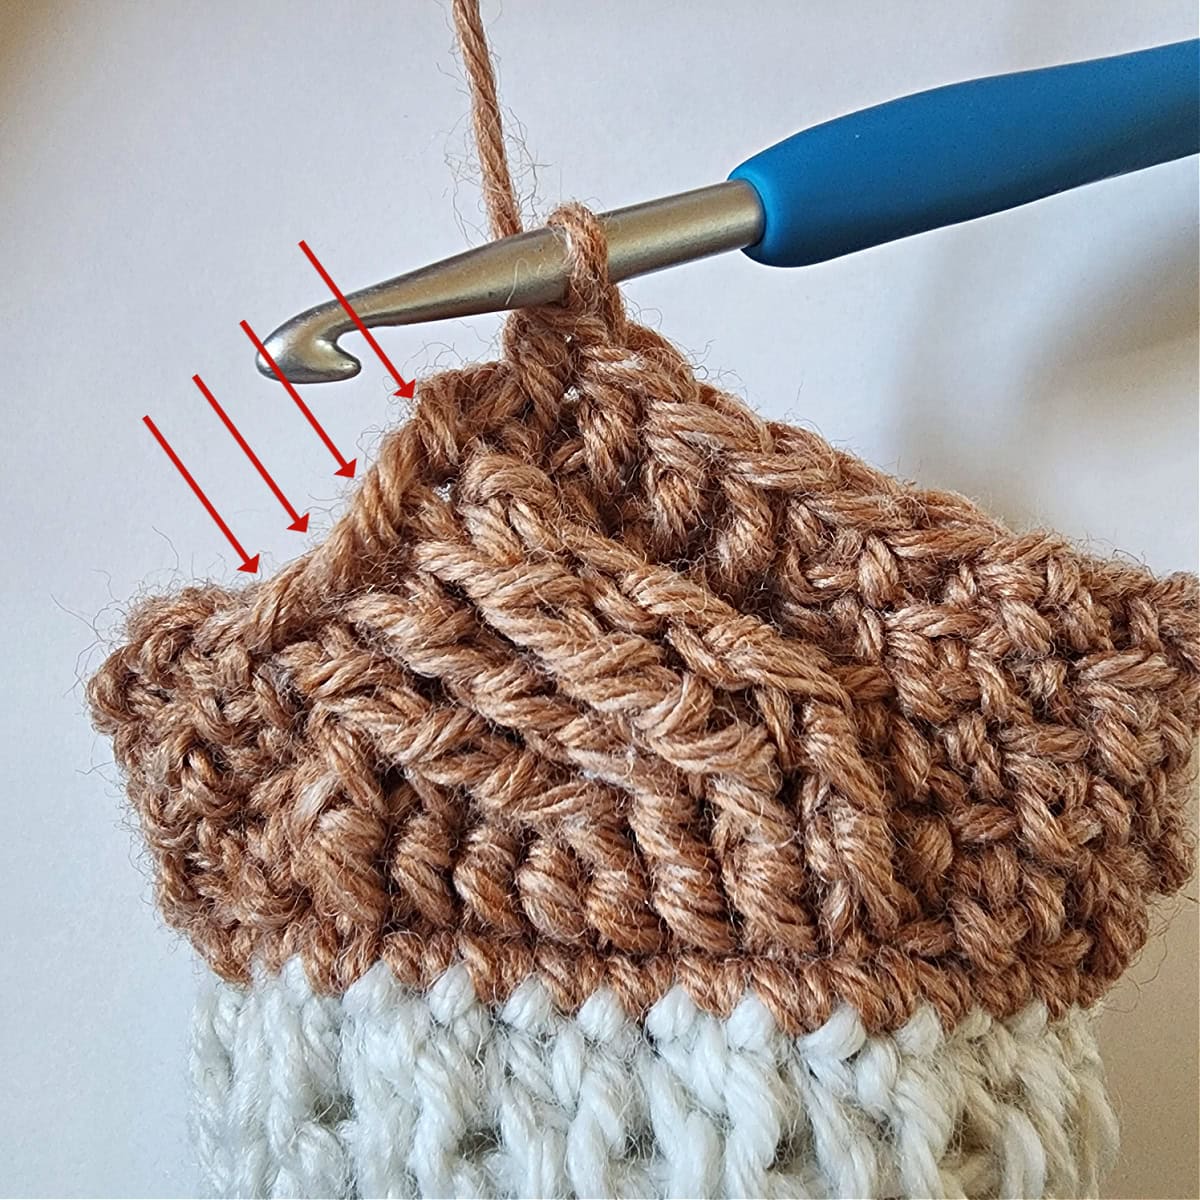

See how the red arrows are now pointing to the post stitches on the left and the black arrows are pointing to the post stitches on the right? This is simply to show how they change position with each cable twist. After the next cable twist, they will switch position again.
I Made It! Now What?
Pin this post! Save this free crochet mittens pattern to your Pinterest boards so that you can come back and make it again.
Leave a comment below: We love to hear your feedback.
Share Your Finished Projects on Facebook or Instagram: I love to see your finished projects! Share with us on social media and tag me @acrochetedsimplicity or use the hashtag #ACrochetedSimplicity so I can find your posts.
Free – 5 Cozy Crochet Patterns eBook
Already subscribed? No worries! Filling out the form will NOT result in you receiving duplicate newsletters and you will still receive your Free eBook!
Join us in The Facebook Community Group!
Come share your finished projects with us in the A Crocheted Simplicity Crochet Community Group on Facebook. Join us for fun community events such as crochet alongs, join in on crochet conversations, ask questions, get advice, and share your love for crochet!

More Free Patterns with Crochet Cables
If you love cables and are looking for another crochet cables pattern, we have several more free crochet patterns we think you’ll love! We have larger projects such as cable sweaters, cardigans, and blankets to smaller crochet projects such as beanies, cowls, and wine cozies.
Excited to try these mittens.
Thank you Jennifer
Xoxo
Joan