Cable Crochet Sweater
When it comes to cozy winter fashion, nothing beats the warmth and timeless appeal of a cable crochet sweater.
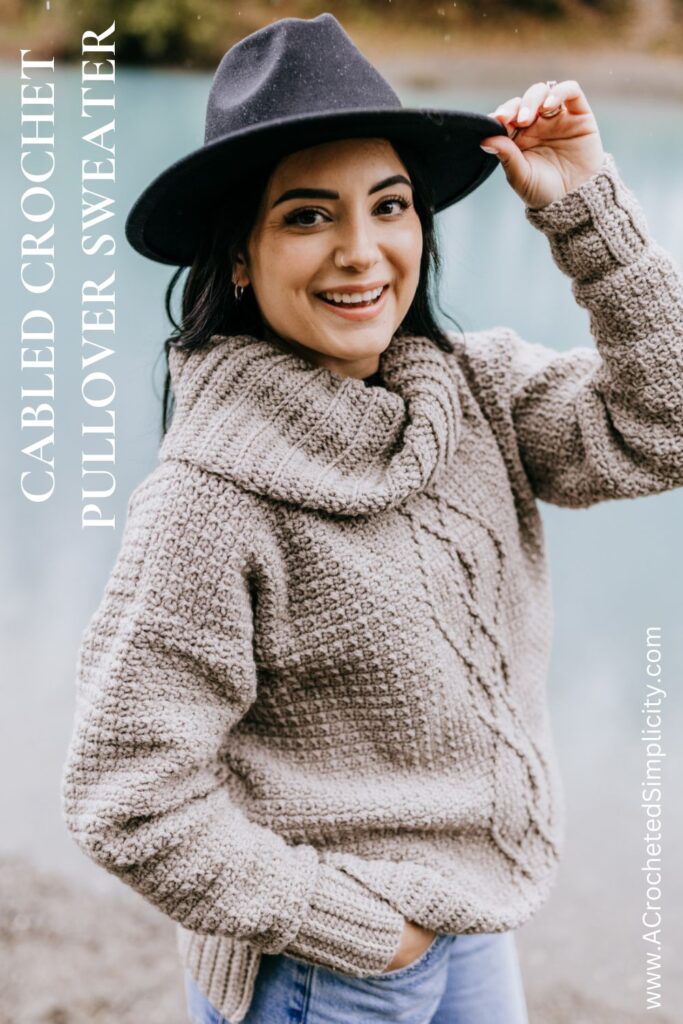
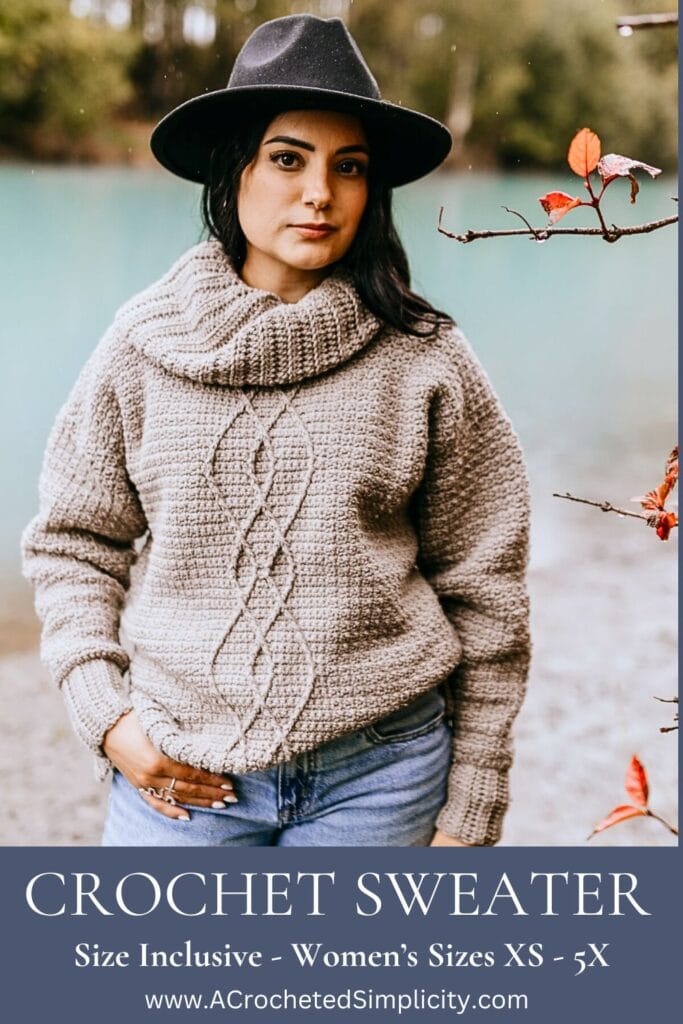
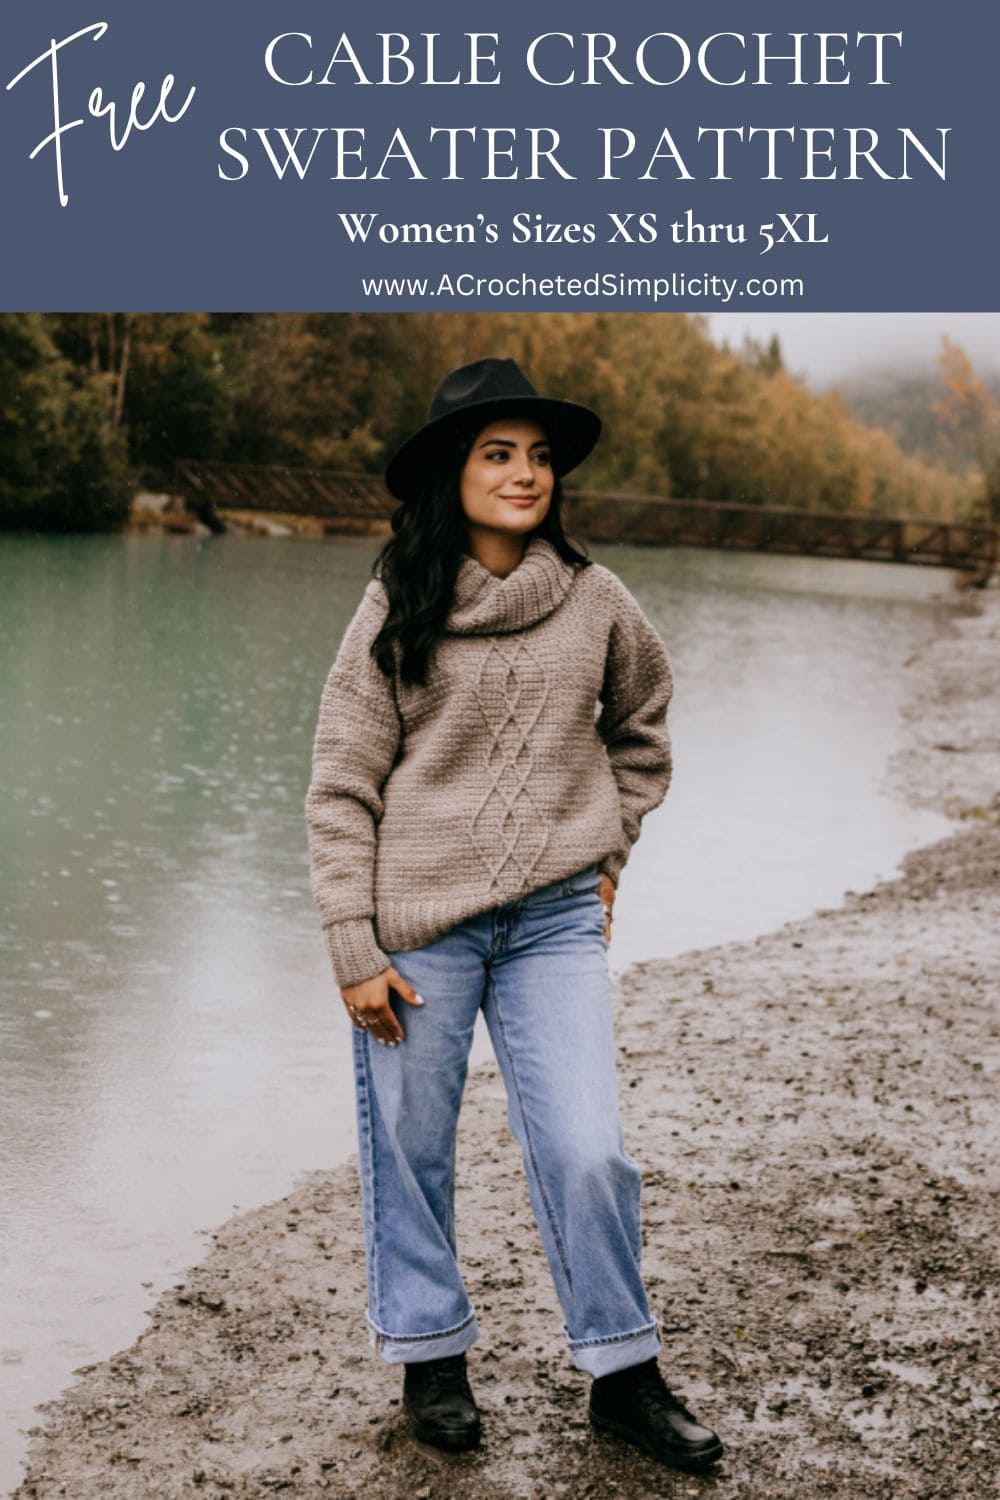
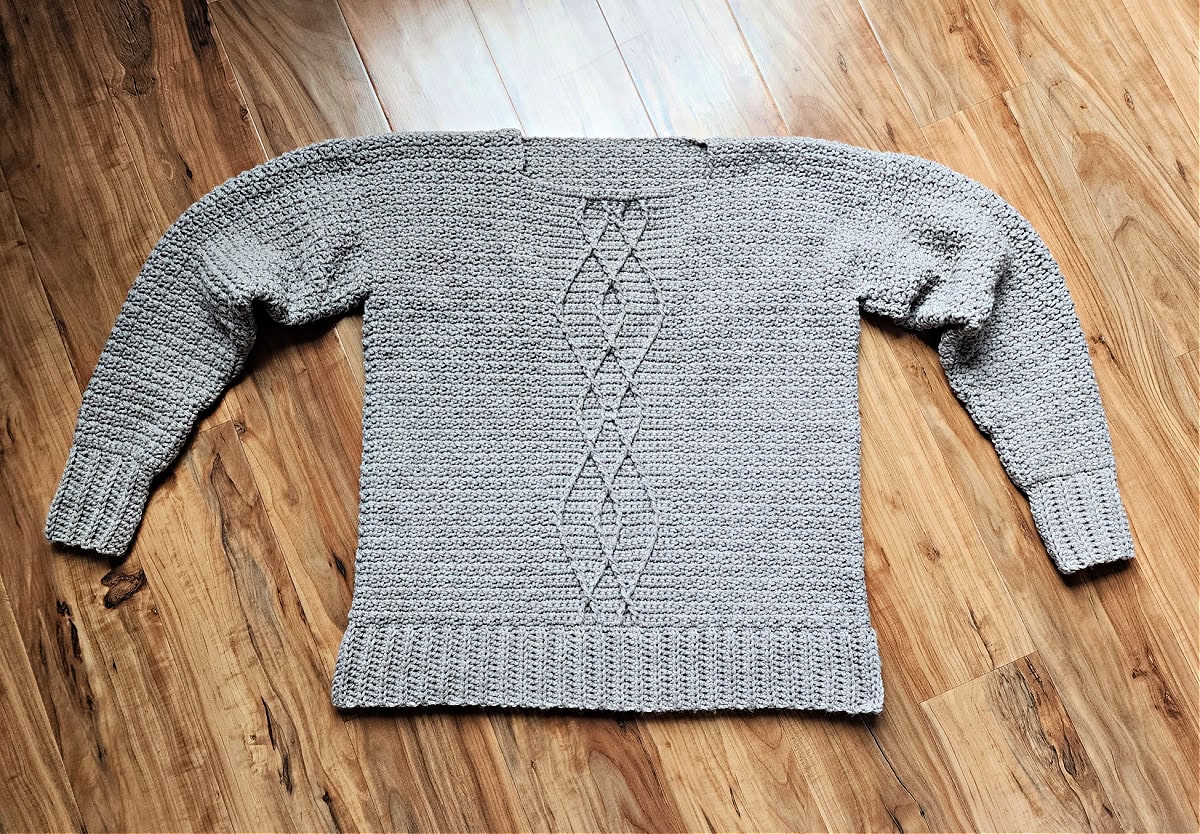
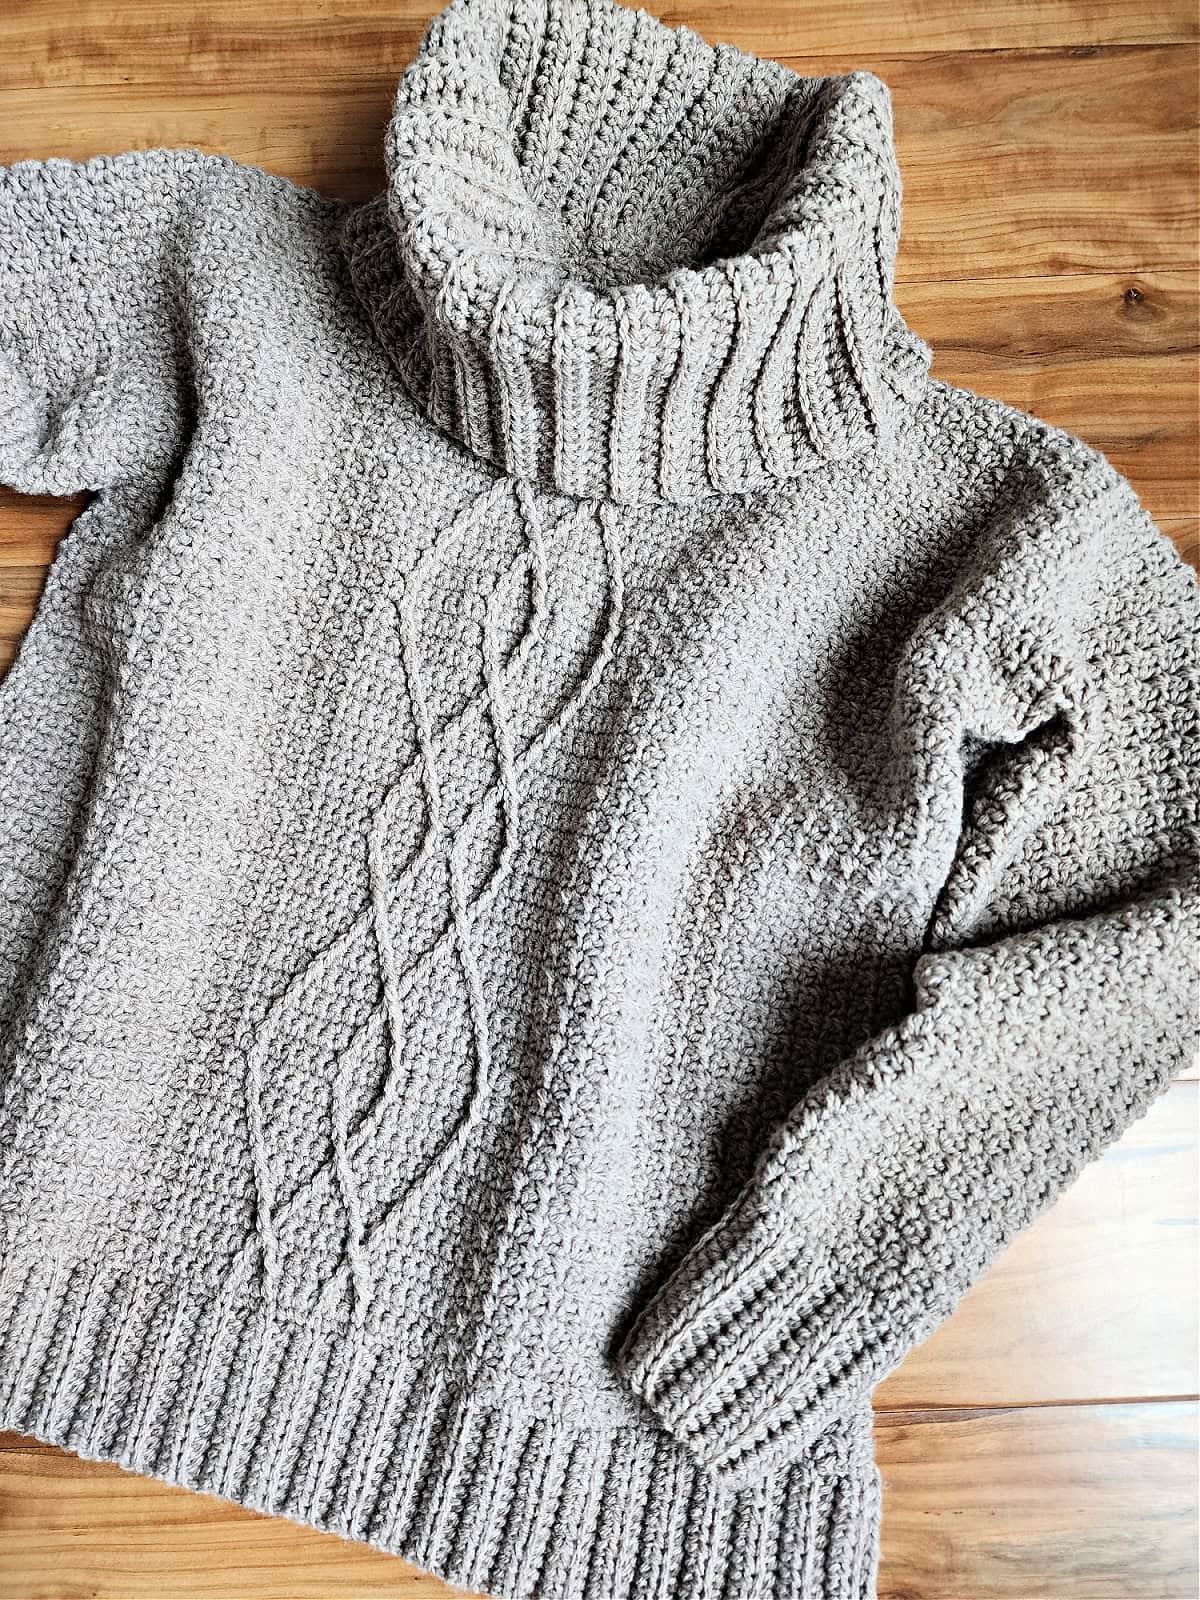
The Aelia Cable Crochet Sweater features beautifully textured cables to create a warm, chunky look, perfect for colder seasons. The relaxed cowl neck adds an extra layer of comfort and style, draping loosely around the neck for a flattering fit.
The cable crochet sweater pattern is free below, or you’ll find an ad-free printable PDF (including all photo tutorials + a BONUS garment schematic + a BONUS crochet cable stitch chart) on Ravelry, or on Etsy (aff).

Cowl neck sweaters stand out not only for their intricate patterns but also for their ability to keep you stylish and snug during the colder months. Whether you’re a seasoned crocheter or simply looking for a new addition to your wardrobe, cable crochet sweaters are a perfect choice.
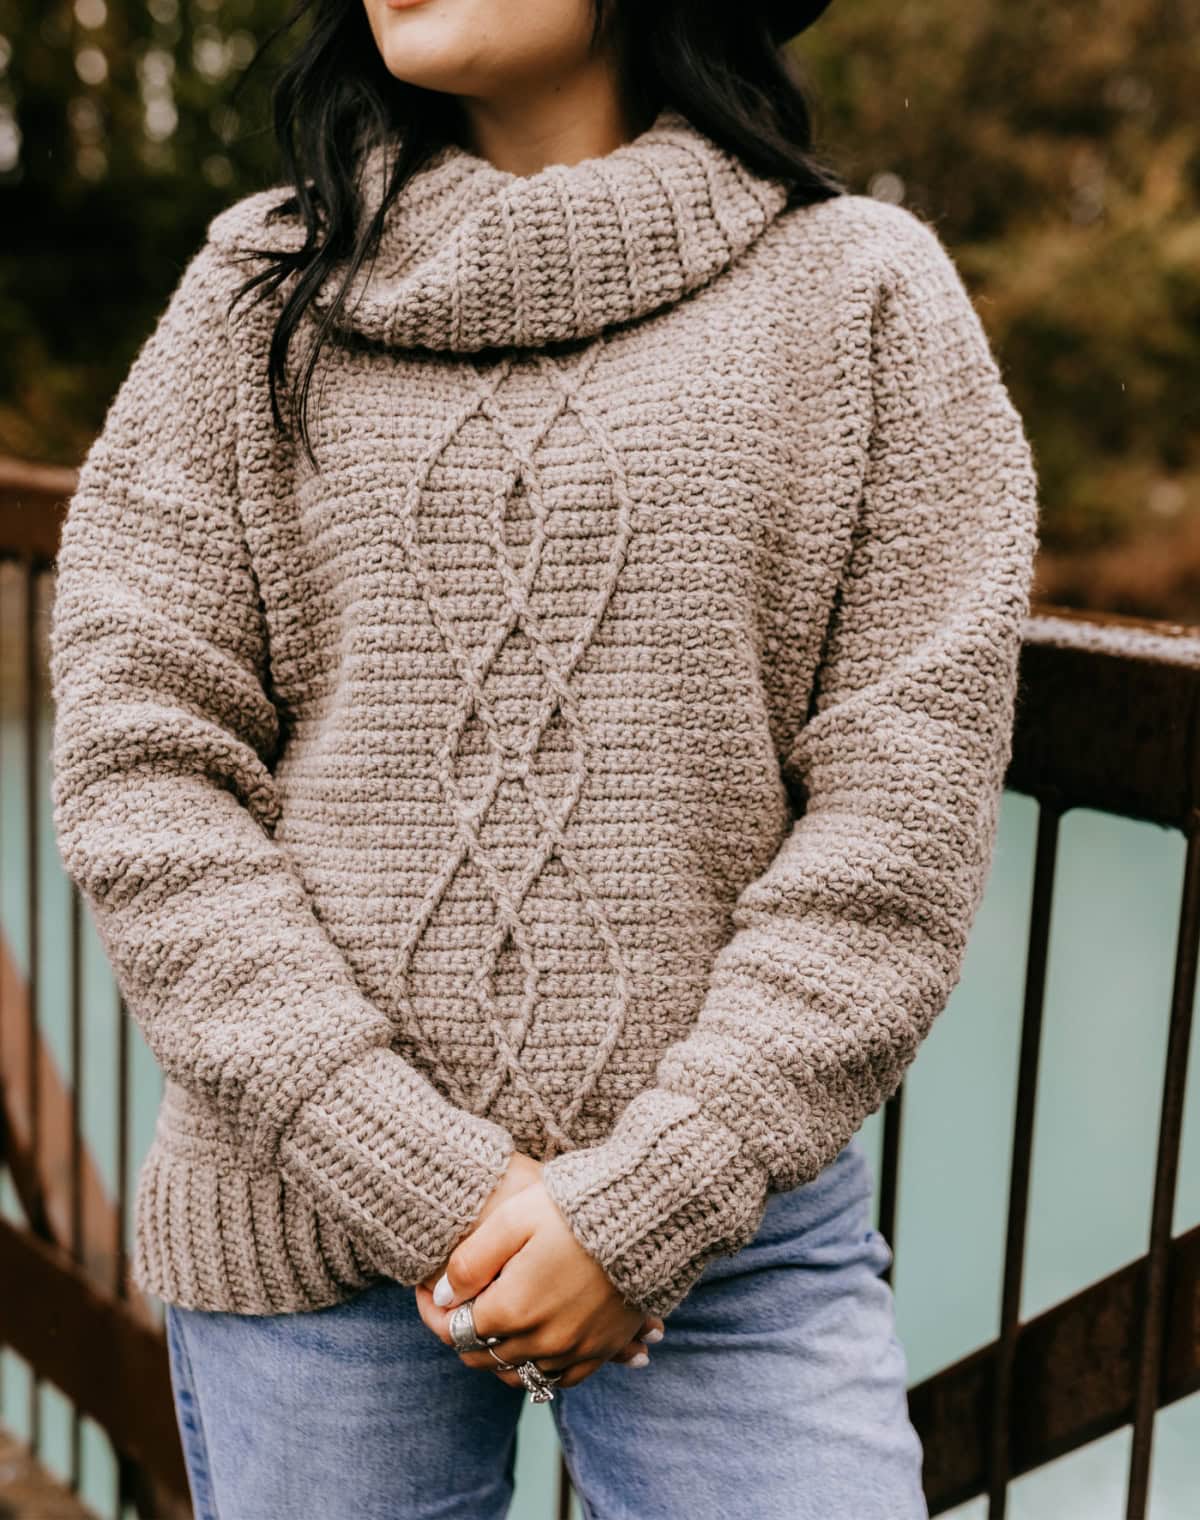
This crochet pullover for women has a slightly oversized fit, tapered sleeves, a split hem, and last, but not least, a loosely draped cowl neck! The size inclusive pullover sweater crochet pattern includes women’s sizes XS through 5X.
What is a Cable Crochet Sweater?
A cable crochet sweater is a garment that features raised, interwoven cable patterns created through crochet stitches. These cables are often intricate and textured, offering a visually striking alternative to the smoother, flatter appearance of standard crochet designs. Cable stitching is typically associated with knitting, but skilled crocheters have adapted this technique to produce beautifully detailed and warm sweaters.
Unlike other types of crochet garments, cable crochet sweaters have a three-dimensional quality that adds depth and complexity to the design. The result is a rich, textured pattern that looks both luxurious and cozy.
How to Crochet a Cowl Neck Sweater
This crochet sweater is worked in panels from the bottom up. You’ll begin by working the bottom ribbing, then rotate to work the body of sweater into the side of the rows of ribbing.
For the body of sweater, you’ll work the single crochet mesh stitch back and forth in rows. As you crochet the front panel, you will crochet a cabled accent panel in the center of the panel.
Next, you’ll crochet the sleeves. First, you’ll make the sleeve cuff ribbing, then rotate to work into the side of the rows of the ribbing to begin the body of sleeve. The sleeve is worked in rows from the cuff to the top of the sleeve using the single crochet mesh stitch.
After completing the sleeves, you’ll seam the shoulders of the front and back panels. After seaming the shoulders, you’ll line up and attach the top of the sleeves to the sweater. Then you’ll seam the underside of the sleeves and the sides of the pullover.
Lastly, the cowl neck is crocheted right onto the neck opening of the sweater.
What Makes a Cable Crochet Sweater with Cowl Neck So Special?
1. Warmth and Comfort
Cable crochet sweaters are perfect for cooler weather due to their dense, layered stitches. The cable patterns often make the sweater thicker and more insulating than other crochet styles, ensuring you stay warm while looking stylish.
These sweaters are typically made with yarns like wool, cotton, or acrylic, which provide the softness and warmth you need during fall and winter. The added texture from the cables also traps heat, keeping you extra cozy when temperatures drop.
2. Unique Texture and Design
The hallmark of a cable crochet sweater is its intricate cable stitch pattern. Unlike traditional crochet stitches, the cable stitch creates a raised, braided effect that adds depth and texture. This sweater design draws inspiration from classic knitwear but uses crochet techniques, making it unique and visually appealing.
Pair that with the cowl neck, and you’ve got a piece that not only keeps you warm but also adds a layer of chic, modern style. The draped neckline of a cowl neck provides extra warmth and a relaxed, flattering look. It’s perfect for those chilly days when you want to stay warm but look effortlessly stylish.
3. Timeless Fashion
A cable crochet cowl neck sweater with a cable design is a classic look that never goes out of style. Whether you’re opting for a fitted sweater or a more oversized, relaxed fit, the timeless nature of cable crochet ensures that your sweater will look fashionable season after season. The intricate stitchwork of the cables gives the sweater an artisanal, handmade look that stands out from mass-produced garments.
Choose neutral colors like beige, grey, or cream for a versatile piece that can be paired with anything, or go bold with vibrant hues like mustard yellow, forest green, or rich burgundy to make a statement.
Versatility for Any Occasion
One of the best things about a cable crochet sweater is how versatile it is. This type of sweater can be dressed up or down depending on the occasion:
- Casual Day Out: Pair your cable crochet sweater with jeans and boots for a comfortable, laid-back look that’s perfect for running errands or meeting friends for coffee.
- Work-Ready Style: Layer a fitted cable crochet sweater over a collared shirt and wear it with tailored pants or a pencil skirt for a professional yet cozy office ensemble.
- Evening Elegance: Opt for a darker-colored cable crochet sweater and style it with a statement necklace, leather pants, and heels for a chic, evening look.
Materials and Yarn Choices
When making a cable crochet sweater, the yarn choice plays a significant role in the overall look and feel of the garment. Here are some popular options:
- Wool or Wool Blends: Wool is the top choice for warmth and durability. Wool blends, often mixed with acrylic or alpaca, offer the same cozy texture with added softness.
- Acrylic Yarn: This is an affordable, easy-care option that’s ideal for those looking for something less expensive but still warm and stylish.
- Cotton Yarn: Great for slightly milder climates, cotton yarn offers breathability and comfort, making it a lighter option that still showcases the cable crochet design beautifully.
Yarn
This crochet pullover sweater was designed using Lion Brand Yarn Wool Ease in the colorway Oatmeal. Wool Ease is my go-to worsted weight yarn for garments. It’s the best of both worlds with the feel, warmth and softness of wool, and the easy care of an acrylic worsted weight yarn.
Yarn Substitutions
You can substitute another worsted weight yarn as long as you’re able to meet gauge and you’re happy with the drape of the crochet fabric of the cabled sweater.
I personally recommend a light worsted weight yarn that is similar to Wool Ease. When I say light worsted weight yarn, it’s not to be confused with a DK or double knit yarn that is often referred to as a light worsted. What I mean is a worsted weight 4 yarn that is lighter than others in the same category.

Choosing Which Size to Crochet
Model wears a women’s size medium and is modeling a size medium cowl neck sweater.
To choose your size, look over the size chart below.
- ‘Fits Bust’ measurement is the measurement of the intended wearer, not the garment’s finished measurement.
- Finished Bust, Sleeve Length, and Sweater Length are measurements of the finished garment.
- This pullover has 4-6″+ of positive ease built in for a slightly oversized fit.
- If you prefer a more classic fitting sweater, I would suggest making a size smaller than your actual bust size, (as long as your actual bust size is within the range of the smaller size’s finished bust).
- Sweater length is measured from the nape of the neck down and includes the bottom ribbing.
- Sleeve length is measured from the underarm of the sweater to edge of the cuff.
- Adjusting Sweater Length: See the notes in the Body of Sweater – Back Panel for adjusting length. If you add length to your pullover, you will need more yarn than what is shown in the chart below.
- Lengthening Sleeves: If you need to adjust the length of your sleeves, follow the instructions at the end of each size.
Size & Yardage Chart
The notes above refer to this size chart.

Aelia Cable Crochet Sweater – Free Crochet Sweater Pattern
The pullover sweater crochet pattern is below, but if you love to work offline, I’ve got a couple other great options for you.
Purchase the ad-free, printable PDF, including all photo tutorials + BONUS crochet garment schematic + BONUS crochet cable stitch chart, on Ravelry, or on Etsy (aff).
Purchase this cable crochet sweater kit! (aff): Lion Brand has a full crochet kit of the Aelia Cable Crochet Sweater, available on their website. The crochet sweater kit includes your choice of colors and a digital copy of the crochet sweater pattern.
Save this pattern to your Ravelry favorites.
Subscribe to my YouTube Channel!
This post contains affiliate links.
Materials
- Yarn: Worsted Weight / 4 / Yarn, (Lion Brand Yarn Wool Ease in Oatmeal was used for the sample in the photos) (80% Acrylic / 20% Wool (197 yds / 180 m / 85 g / 3 oz).
- Yardage: See Size Chart Above
- Crochet Hooks: J/10/6.00mm; H/8/5.00mm; or size needed to obtain gauge (My favorite crochet hooks are the Clover Amour Crochet Hooks, I’ve never had an ache in my hand since switching).
- Locking Stitch Markers
- Scissors
- Yarn Needle
Abbreviations (US Terms)
- ch(s): chain(s)
- sl st(s): slip stitch(es)
- st(s): stitch(es)
- yo: yarn over
- sc: single crochet
- hdc: half double crochet
- hdc2tog: half double crochet two together
- fpdc: front post double crochet
- fptr: front post treble crochet
- Join with a standing single crochet
- SM: stitch marker
- Rep: repeat
- Rnd: round
- RS: Right Side
- WS: Wrong Side
- BLO: back loop only
Experience Level
- Intermediate
Gauge
- See individual sections for gauge.
Sizes
- Women’s XS through 5XL
- See size chart above.
Special Stitches
- Front Post Double Crochet (fpdc): Yo, insert hook from front to back to front around the post of the indicated stitch, yo, pull up a loop, yo, pull thru 2 loops, yo, pull thru remaining 2 loops.
- Front Post Treble Crochet (fptr): Yo 2 twice, insert hook from front to back to front around the post of the designated stitch, yo, pull up a loop, (yo, pull thru 2 loops) 3 times.
- Half Double Crochet Decrease (hdc2tog): (Yo, insert hook into next stitch, yo, pull up a loop) twice, yo, pull through all loops on your hook.
- Join yarn with a standing single crochet: Begin with a slip knot on your hook, insert your hook into the stitch or space indicated, yo, pull up a loop, yo and draw thru both loops on hook.
Pattern Notes
- Turning chains are not counted as stitches, unless noted otherwise.
- The first stitch of each row is worked into the same stitch as the beginning chain, unless noted otherwise.
- Yarn Notes: Lion Brand Yarns Wool Ease was used for the samples. Another comparable worsted weight yarn may be used as long as gauge is met.
- Lion Brand Yarns Wool Ease: 80% Acrylic / 20% Wool (197 yds / 180 m / 85 g / 3 oz)
- Colorway & Yardage
- Oatmeal: #620-024A (see yardage in chart above)
- Changes for Sizes are written as follows: XS (S, M, L, XL, 2XL, 3XL, 4XL, 5XL) unless noted otherwise.
- Stitch Counts are written at the end of the rows as follows: (XS, S, M, L, XL, 2XL, 3XL, 4XL, 5XL sts) unless noted otherwise.
- Model wears a women’s medium and is wearing a medium sample.
- Sweater Construction Notes: This cable crochet sweater is worked in panels from the bottom up. You’ll begin by working the bottom ribbing, then rotate to work the body of sweater into the side of the rows of ribbing. For the body of sweater, you’ll work the single crochet mesh stitch in rows. You will crochet a cable accent panel on the front panel. Next, work the sleeves. First, you’ll make the sleeve cuff ribbing, then rotate to work into the side of the rows of ribbing to begin the body of sleeve. The sleeve is worked in rows from the cuff to the top of the sleeve. After completing the sleeves, you’ll seam the shoulders. After seaming the shoulders, you’ll attach the top of the sleeves to the sweater, then seam the sleeves and sides of the pullover. Lastly, you’ll crochet the cowl around the neck opening.
Cable Crochet Sweater Instructions
Panel Construction Notes
- Front Panel: Work in the following order: Bottom Ribbing, Front Panel – Prepare Long Edge of Ribbing for Body of Sweater, Body of Sweater – Front Panel, Front Right Shoulder, Front Left Shoulder.
- Back Panel: Work in the following order: Bottom Ribbing, Back Panel – Prepare Long Edge of Ribbing for Body of Sweater, Body of Sweater – Back Panel.
Changes for Sizes as Follows: XS (S, M, L, XL, 2XL, 3XL, 4XL, 5XL)
Stitch Counts as Follows: (XS, S, M, L, XL, 2XL, 3XL, 4XL, 5XL sts)
Bottom Ribbing
Gauge: With a 5.00mm crochet hook, in BLO hdc: 12 sts = 2.75″; 8 rows = 3″.
Row 1: With yarn & a 5.00mm crochet hook, ch 13, working into the back humps of the ch, hdc in the 2nd ch from your hook and in each ch across. Turn. (12 sts)
Rows 2 – 46 (51, 56, 62, 67, 72, 78, 83, 88) : Ch 1, BLO hdc in each st across. Turn. (12 sts)
Do not fasten off. Continue on to either Front or Back Panel – Prepare Long Edge of Ribbing for Body of Sweater, depending on the panel you’re making.
Back Panel – Prepare Long Edge of Ribbing for Body of Sweater
Gauge: With a 5.00mm crochet hook, in sc: 16 sts = 4″.
Note: The stitch counts for the back panel are one more stitch than the front panel. This is intentional.
Sizes XS, L, 3XL
Row 1 (RS): After completing the last row of the bottom ribbing, rotate to work along the long edge of the ribbing, ch 1, work (2 sc in the next st, sc in the next st) work from ( to ) 23, 31, 39 times. Turn. (69, 93, 117 sts)
Do not fasten off. Continue on to Body of Sweater – Back Panel.
Sizes S, XL, 4XL
Row 1 (RS): After completing the last row of the bottom ribbing, rotate to work along the long edge of the ribbing, ch 1, work 2 sc into the first st, then (2 sc in the next st, sc in the next st) work from ( to ) 25, 33, 41 times. Turn. (77, 101, 125 sts)
Do not fasten off. Continue on to Body of Sweater – Back Panel.
Sizes M, 2XL, 5XL
Row 1 (RS): After completing the last row of the bottom ribbing, rotate to work along the long edge of the ribbing, ch 1, work 2 sc into each of the first 2 sts, then (2 sc in the next st, sc in the next st) work from ( to ) 27, 35, 43 times. Turn. (85, 109, 133 sts)
Do not fasten off. Continue on to Body of Sweater – Back Panel.
Body of Sweater – Back Panel
Gauge: With a 5.00mm crochet hook, in sc mesh stitch: 16 sts = 4″; 10 rows = 2.5″.
Row 1: Ch 1, sc in the first st, (ch 1, skip the next st, sc in the next st) rep from ( to ) across. Turn. (69, 77, 85, 93, 101, 109, 117, 125, 133 sts) Row 1 should be approximately 17″ (19″, 21″, 23″, 25″, 27″, 29″, 31″, 33″) wide.
Row 2: Ch 1, sc in the first st, (ch 1, skip the next ch-1, sc in the next sc) rep from ( to ) across. Turn. (69, 77, 85, 93, 101, 109, 117, 125, 133 sts)
Rep Row 2 until your panel measures approximately 23″ (23-1/2″, 23-1/2″, 24-1/2″, 24-1/2″, 24-1/2″, 25-1/2″, 25-1/2″, 25-1/2″) (including bottom ribbing).
Fasten off. Weave in ends. Continue on to make the ribbing for the Front Panel.
Note: Make note of how many rows you worked. You will need this number later for the Front Panel.
Adjusting Length: If you prefer a longer or shorter sweater, here is where you’ll want to make the adjustment. The length stated in the size chart above is measured from the top of the shoulder to the bottom edge of the sweater (including the bottom ribbing).
- Longer: If you’d like a longer sweater, repeat Row 2 until your sweater is the desired length.
- Shorter: If you’d like a shorter sweater, work fewer repeats of Row 2.
Front Panel – Prepare Long Edge of Ribbing for Body of Sweater
Gauge: With a 5.00mm crochet hook, in sc: 16 sts = 4″.
Note: The stitch counts for the front panel are one less stitch than the back panel. This is intentional.
Sizes XS, L, 3XL
Row 1 (RS): After completing the last row of the bottom ribbing, rotate to work along the long edge of the ribbing, ch 1, work 1 sc into each of the first 2 sts, then (2 sc in the next st, sc in the next st) work from ( to ) 22, 30, 38 times. Turn. (68, 92, 116 sts)
Do not fasten off. Continue on to Body of Sweater – Front Panel.
Sizes S, XL, 4XL
Row 1 (RS): After completing the last row of the bottom ribbing, rotate to work along the long edge of the ribbing, ch 1, work 1 sc into the first st, then (2 sc in the next st, sc in the next st) work from ( to ) 25, 33, 41 times. Turn. (76, 100, 124 sts)
Do not fasten off. Continue on to Body of Sweater – Front Panel.
Sizes M, 2XL, 5XL
Row 1 (RS): After completing the last row of the bottom ribbing, rotate to work along the long edge of the ribbing, ch 1, work (2 sc in the next st, sc in the next st) work from ( to ) 28, 36, 44 times. Turn. (84, 108, 132 sts)
Do not fasten off. Continue on to Body of Sweater – Front Panel.
Body of Sweater – Front Panel
Gauge: With a 5.00mm crochet hook, in sc mesh stitch: 16 sts = 4″; 10 rows = 2.5″.
Row 1: Ch 1, (sc in the next st, ch 1, skip the next st) 12 (14, 16, 18, 20, 22, 24, 26, 28) times, sc in each of the next 20 sts, (ch 1, skip the next st, sc in the next st) 12 (14, 16, 18, 20, 22, 24, 26, 28) times. Turn. (68, 76, 84, 92, 100, 108, 116, 124, 132 sts)
Row 1 should be approximately 17″ (19″, 21″, 23″, 25″, 27″, 29″, 31″, 33″) wide.
Important Row 2 Tips
Row 2 is the cable set-up row. You will work the post stitches in Row 2, two rows down, around the posts of the stitches from the Prepare Long Edge of Ribbing for Body of Sweater row.
If you’re struggling with finding exactly where the post of the stitch is that you need to work a Row 2 post stitch around, make sure to check out my 2 Tips for Proper Post Stitch Placement. There is a quick video and a photo tutorial that will not only help you with the Aelia Cable Crochet Sweater, it will help you with all other crochet cable patterns.
Even though you’re working two rows down and working on the right side of a stitch, you can use the same “important tip for rows” that I shared in the above linked crochet tutorial.
Row 2 (RS): Ch 1, (sc in the first st, ch 1, skip the next ch-1) 12 (14, 16, 18, 20, 22, 24, 26, 28) times, sc in each of the next 5 sts, (fpdc around the next st from 2 rows below, sc in each of the next 2 sts) 3 times, fpdc around the next st from 2 rows below, sc in each of the next 5 sts, (ch 1, skip the next ch-1, sc in the next sc) 12 (14, 16, 18, 20, 22, 24, 26, 28) times. Turn. (68, 76, 84, 92, 100, 108, 116, 124, 132 sts)
Row 3: Ch 1, (sc in the first st, ch 1, skip the next ch-1) 12 (14, 16, 18, 20, 22, 24, 26, 28) times, sc in each of the next 20 sts, (ch 1, skip the next ch-1, sc in the next sc) 12 (14, 16, 18, 20, 22, 24, 26, 28) times. Turn. (68, 76, 84, 92, 100, 108, 116, 124, 132 sts)
Row 4: Ch 1, (sc in the first st, ch 1, skip the next ch-1) 12 (14, 16, 18, 20, 22, 24, 26, 28) times, sc in each of the next 6 sts, fpdc around each of the next 2 post sts from 2 rows below, sc in each of the next 4 sts, fpdc around each of the next 2 post sts from 2 rows below, sc in each of the next 6 sts, (ch 1, skip the next ch-1, sc in the next sc) 12 (14, 16, 18, 20, 22, 24, 26, 28) times. Turn. (68, 76, 84, 92, 100, 108, 116, 124, 132 sts)
Row 5: Rep Row 3.
Row 6: Ch 1, (sc in the first st, ch 1, skip the next ch-1) 12 (14, 16, 18, 20, 22, 24, 26, 28) times, sc in each of the next 6 sts, skip the next post st 2 rows below, fptr around the next post st 2 rows below, fptr around the skipped post st 2 rows below, sc in each of the next 4 sts, skip the next post st 2 rows below, fptr around the next post st 2 rows below, fptr around the skipped post st 2 rows below, sc in each of the next 6 sts, (ch 1, skip the next ch-1, sc in the next sc) 12 (14, 16, 18, 20, 22, 24, 26, 28) times. Turn. (68, 76, 84, 92, 100, 108, 116, 124, 132 sts)
Row 7: Rep Row 3.
Row 8: Ch 1, (sc in the first st, ch 1, skip the next ch-1) 12 (14, 16, 18, 20, 22, 24, 26, 28) times, sc in each of the next 5 sts, (fpdc around the next post st 2 rows below, sc in each of the next 2 sts) 3 times, fpdc around the next post st 2 rows below, sc in each of the next 5 sts, (ch 1, skip the next ch-1, sc in the next sc) 12 (14, 16, 18, 20, 22, 24, 26, 28) times. Turn. (68, 76, 84, 92, 100, 108, 116, 124, 132 sts)
Row 9: Rep Row 3.
Row 10: Ch 1, (sc in the first st, ch 1, skip the next ch-1) 12 (14, 16, 18, 20, 22, 24, 26, 28) times, sc in each of the next 4 sts, fpdc around the next post st 2 rows below, sc in each of the next 4 sts, fpdc around each of the next 2 post sts 2 rows below, sc in each of the next 4 sts, fpdc around the next post st 2 rows below, sc in each of the next 4 sts, (ch 1, skip the next ch-1, sc in the next sc) 12 (14, 16, 18, 20, 22, 24, 26, 28) times. Turn. (68, 76, 84, 92, 100, 108, 116, 124, 132 sts)
Row 11: Rep Row 3.
Row 12: Ch 1, (sc in the first st, ch 1, skip the next ch-1) 12 (14, 16, 18, 20, 22, 24, 26, 28) times, sc in each of the next 3 sts, fpdc around the next post st 2 rows below, sc in each of the next 5 sts, skip the next post st 2 rows below, fptr around the next post st 2 rows below, fptr around the skipped post st 2 rows below, sc in each of the next 5 sts, fpdc around the next post st 2 rows below, sc in each of the next 3 sts, (ch 1, skip the next ch-1, sc in the next sc) 12 (14, 16, 18, 20, 22, 24, 26, 28) times. Turn. (68, 76, 84, 92, 100, 108, 116, 124, 132 sts)
Row 13: Rep Row 3.
Row 14: Ch 1, (sc in the first st, ch 1, skip the next ch-1) 12 (14, 16, 18, 20, 22, 24, 26, 28) times, sc in each of the next 2 sts, (fpdc around the next post st 2 rows below, sc in each of the next 5 sts, fpdc around the next post st 2 rows below, sc in each of the next 2 sts) 2 times, (ch 1, skip the next ch-1, sc in the next sc) 12 (14, 16, 18, 20, 22, 24, 26, 28) times. Turn. (68, 76, 84, 92, 100, 108, 116, 124, 132 sts)
Row 15: Rep Row 3.
Row 16: Ch 1, (sc in the first st, ch 1, skip the next ch-1) 12 (14, 16, 18, 20, 22, 24, 26, 28) times, sc in the next st, fpdc around the next post st 2 rows below, sc in each of the next 5 sts, fpdc around the next post st 2 rows below, sc in each of the next 4 sts, fpdc around the next post st 2 rows below, sc in each of the next 5 sts, fpdc around the next post st 2 rows below, sc in the next st, (ch 1, skip the next ch-1, sc in the next sc) 12 (14, 16, 18, 20, 22, 24, 26, 28) times. Turn. (68, 76, 84, 92, 100, 108, 116, 124, 132 sts)
Row 17: Rep Row 3.
Row 18: Rep Row 16.
Row 19: Rep Row 3.
Row 20: Rep Row 14.
Row 21: Rep Row 3
Row 22: Ch 1, (sc in the first st, ch 1, skip the next ch-1) 12 (14, 16, 18, 20, 22, 24, 26, 28) times, sc in each of the next 3 sts, fpdc around the next post st 2 rows below, sc in each of the next 5 sts, fpdc around each of the next 2 post sts 2 rows below, sc in each of the next 5 sts, fpdc around the next post st 2 rows below, sc in each of the next 3 sts, (ch 1, skip the next ch-1, sc in the next sc) 12 (14, 16, 18, 20, 22, 24, 26, 28) times. Turn. (68, 76, 84, 92, 100, 108, 116, 124, 132 sts)
Row 23: Rep Row 3.
Row 24: Ch 1, (sc in the first st, ch 1, skip the next ch-1) 12 (14, 16, 18, 20, 22, 24, 26, 28) times, sc in each of the next 4 sts, fpdc around the next post st 2 rows below, sc in each of the next 4 sts, skip the next post st 2 rows below, fptr around the next post st 2 rows below, fptr around the skipped post st 2 rows below, sc in each of the next 4 sts, fpdc around the next post st 2 rows below, sc in each of the next 4 sts, (ch 1, skip the next ch-1, sc in the next sc) 12 (14, 16, 18, 20, 22, 24, 26, 28) times. Turn. (68, 76, 84, 92, 100, 108, 116, 124, 132 sts)
Row 25: Rep Row 3.
Row 26: Ch 1, (sc in the first st, ch 1, skip the next ch-1) 12 (14, 16, 18, 20, 22, 24, 26, 28) times, sc in each of the next 5 sts, (fpdc around the next post st 2 rows below, sc in each of the next 2 sts) 3 times, fpdc around the next post st 2 rows below, sc in each of the next 5 sts, (ch 1, skip the next ch-1, sc in the next sc) 12 (14, 16, 18, 20, 22, 24, 26, 28) times. Turn. (68, 76, 84, 92, 100, 108, 116, 124, 132 sts)
Row 27: Rep Row 3.
Row 28: Ch 1, (sc in the first st, ch 1, skip the next ch-1) 12 (14, 16, 18, 20, 22, 24, 26, 28) times, sc in each of the next 6 sts, fpdc around each of the next 2 post sts 2 rows below, sc in each of the next 4 sts, fpdc around each of the next 2 post sts 2 rows below, sc in each of the next 6 sts, (ch 1, skip the next ch-1, sc in the next sc) 12 (14, 16, 18, 20, 22, 24, 26, 28) times. Turn. (68, 76, 84, 92, 100, 108, 116, 124, 132 sts)
Row 29: Rep Row 3.
Row 30: Ch 1, (sc in the first st, ch 1, skip the next ch-1) 12 (14, 16, 18, 20, 22, 24, 26, 28) times, sc in each of the next 6 sts, skip the next post st 2 rows below, fptr around the next post st 2 rows below, fptr around the skipped post st 2 rows below, sc in each of the next 4 sts, skip the next post st 2 rows below, fptr around the next post st 2 rows below, fptr around the skipped post st 2 rows below, sc in each of the next 6 sts, (ch 1, skip the next ch-1, sc in the next sc) 12 (14, 16, 18, 20, 22, 24, 26, 28) times. Turn. (68, 76, 84, 92, 100, 108, 116, 124, 132 sts)
Row 31: Rep Row 3.
Row 32: Ch 1, (sc in the first st, ch 1, skip the next ch-1) 12 (14, 16, 18, 20, 22, 24, 26, 28) times, sc in each of the next 5 sts, (fpdc around the next post st 2 rows below, sc in each of the next 2 sts) 3 times, fpdc around the next post st 2 rows below, sc in each of the next 5 sts, (ch 1, skip the next ch-1, sc in the next sc) 12 (14, 16, 18, 20, 22, 24, 26, 28) times. Turn. (68, 76, 84, 92, 100, 108, 116, 124, 132 sts)
Row 33: Rep Row 3.
Row 34: Ch 1, (sc in the first st, ch 1, skip the next ch-1) 12 (14, 16, 18, 20, 22, 24, 26, 28) times, sc in each of the next 4 sts, fpdc around the next post st 2 rows below, sc in each of the next 4 sts, fpdc around each of the next 2 post sts 2 rows below, sc in each of the next 4 sts, fpdc around the next post st 2 rows below, sc in each of the next 4 sts, (ch 1, skip the next ch-1, sc in the next sc) 12 (14, 16, 18, 20, 22, 24, 26, 28) times. Turn. (68, 76, 84, 92, 100, 108, 116, 124, 132 sts)
Row 35: Rep Row 3.
Row 36: Rep Row 34.
Row 37: Rep Row 3.
Row 38: Ch 1, (sc in the first st, ch 1, skip the next ch-1) 12 (14, 16, 18, 20, 22, 24, 26, 28) times, sc in each of the next 5 sts, (fpdc around the next post st 2 rows below, sc in each of the next 2 sts) 3 times, fpdc around the next post st 2 rows below, sc in each of the next 5 sts, (ch 1, skip the next ch-1, sc in the next sc) 12 (14, 16, 18, 20, 22, 24, 26, 28) times. Turn. (68, 76, 84, 92, 100, 108, 116, 124, 132 sts)
Rep Rows 3 – 38 until your front panel is the same number of rows as the back panel, minus 8 (8, 8, 8, 8, 10, 10, 12, 12) rows. It does not matter if you end on a wrong or right side row.
Example: My size medium back panel has 83 rows. 83 – 8 = 75, so my front panel is 75 rows (before I work the shoulders).
Do not fasten off. Continue on to Shoulder #1.
Shoulder #1
Row 1: Ch 1, sc in the first st, (ch 1, skip the next ch-1, sc in the next sc) 11 (12, 13, 15, 17, 19, 20, 22, 24) times. (23, 25, 27, 31, 35, 39, 41, 45, 49 sts) Row 1 should be approximately 5.75″ (6.25″, 6.75″, 7.75″, 8.75″, 9.75″, 10.25″, 11.25″, 12.25″) wide.
Place Stitch Marker: Before you turn to begin Row 2, skip 22 (26, 30, 30, 30, 30, 34, 34, 34) stitches and place a locking stitch marker into the 23rd (26th, 31st, 31st, 31st, 31st, 35th, 35th, 35th) stitch to mark where you will later begin Shoulder #2. Turn to begin Row 2 of Shoulder #1.
Row 2: Ch 1, sc in the first st, (ch 1, skip the next ch-1, sc in the next sc) 11 (12, 13, 15, 17, 19, 20, 22, 24) times. Turn. (23, 25, 27, 31, 35, 39, 41, 45, 49 sts)
Rep Row 2 until Shoulder #1 is 8 (8, 8, 8, 8, 10, 10, 12, 12) rows high. Shoulder #1 should be approximately 2″ (2″, 2″, 2″, 2″, 2.5″, 2.5″, 3″, 3″) high.
Fasten off. Weave in ends. Continue on to Shoulder #2.
Shoulder #2
Row 1: With yarn & a 5.00mm crochet hook, join yarn with a standing sc in the stitch marked with a SM, (ch 1, skip the next ch-1, sc in the next sc) 11 (12, 13, 15, 17, 19, 20, 22, 24) times. Turn. (23, 25, 27, 31, 35, 39, 41, 45, 49 sts) Row 1 should be approximately 5.75″ (6.25″, 6.75″, 7.75″, 8.75″, 9.75″, 10.25″, 11.25″, 12.25″) wide.
Row 2: Ch 1, sc in the first st, (ch 1, skip the next ch-1, sc in the next sc) 11 (12, 13, 15, 17, 19, 20, 22, 24) times. Turn. (23, 25, 27, 31, 35, 39, 41, 45, 49 sts)
Rep Row 2 until Shoulder #2 is 8 (8, 8, 8, 8, 10, 10, 12, 12) rows high. Shoulder #1 should be approximately 2″ (2″, 2″, 2″, 2″, 2.5″, 2.5″, 3″, 3″) high.
Fasten off. Weave in ends. Continue on to Sleeve Cuffs..
The width of your neck opening should be approximately 5.5″ (6.5″, 7.5″, 7.5″, 7.5″, 7.5″, 8.5″, 8.5″, 8.5″).
Sleeve Cuffs (Make 2)
Gauge: With a 5.00mm crochet hook, in BLO hdc: 14 sts = 3.5″; 8.5 rows = 3.5″
Row 1: With yarn & a 5.00mm crochet hook, ch 15, working into the back humps of the ch, hdc in the 2nd ch from your hook and in each ch across. Turn. (14 sts)
Rows 2 – 15 (16, 16, 17, 17, 20, 20, 22, 22) : Ch 1, BLO hdc in each st across. Turn. (14 sts)
Do not fasten off. Continue on to Prepare Long Edge of Sleeve Cuff for Sleeve.
Prepare Long Edge of Sleeve Cuff for Sleeve
Gauge: With a 5.00mm crochet hook, in sc: 16 sts = 4″.
Size XS
Row 1 (RS): After completing the last row of the sleeve cuff, rotate to work along the long edge of the ribbing, ch 1, work 2 sc into each of the first 3 sts, then (sc in the next st, 2 sc in the next st) 6 times. Turn. (24 sts)
Row 2: Ch 1, sc in the first st, 2 sc in each of the next 2 sts, (sc in each of the next 2 sts, 2 sc in the next st) 7 times. Turn. (33 sts)
Do not fasten off. Continue on to Sleeve.
Size S
Row 1 (RS): After completing the last row of the sleeve cuff, rotate to work along the long edge of the ribbing, ch 1, work 2 sc into each of the first 4 sts, then (sc in the next st, 2 sc in the next st) 6 times. Turn. (26 sts)
Row 2: Ch 1, sc in the first st, 2 sc in each of the next 4 sts, (sc in each of the next 2 sts, 2 sc in the next st) 7 times. Turn. (37 sts)
Do not fasten off. Continue on to Sleeve.
Size M
Row 1 (RS): After completing the last row of the sleeve cuff, rotate to work along the long edge of the ribbing, ch 1, work 2 sc into each of the first 4 sts, then (sc in the next st, 2 sc in the next st) 6 times. Turn. (26 sts)
Row 2: Ch 1, sc in the first st, 2 sc in each of the next 4 sts, (sc in each of the next 2 sts, 2 sc in the next st) 7 times. Turn. (37 sts)
Do not fasten off. Continue on to Sleeve.
Size L
Row 1 (RS): After completing the last row of the sleeve cuff, rotate to work along the long edge of the ribbing, ch 1, work 2 sc into each of the first 5 sts, then (sc in the next st, 2 sc in the next st) 6 times. Turn. (28 sts)
Row 2: Ch 1, sc in each of the first 3 sts, 2 sc in the next st, (sc in each of the next 2 sts, 2 sc in the next st) 8 times. Turn.(37 sts)
Do not fasten off. Continue on to Sleeve.
Size XL
Row 1 (RS): After completing the last row of the sleeve cuff, rotate to work along the long edge of the ribbing, ch 1, work 2 sc into each of the first 5 sts, then (sc in the next st, 2 sc in the next st) 6 times. Turn. (28 sts)
Row 2: Ch 1, sc in the first st, 2 sc in each of the next 6 sts, (sc in each of the next 2 sts, 2 sc in the next st) 7 times. Turn. (41 sts)
Do not fasten off. Continue on to Sleeve.
Size 2XL
Row 1 (RS): After completing the last row of the sleeve cuff, rotate to work along the long edge of the ribbing, ch 1, work 2 sc into each of the first 4 sts, then (sc in the next st, 2 sc in the next st) 8 times. Turn. (32 sts)
Row 2: Ch 1, sc in each of the first 5 sts, (sc in each of the next 2 sts, 2 sc in the next st) 9 times. Turn. (41 sts)
Do not fasten off. Continue on to Sleeve.
Size 3XL
Row 1 (RS): After completing the last row of the sleeve cuff, rotate to work along the long edge of the ribbing, ch 1, work 2 sc into each of the first 4 sts, then (sc in the next st, 2 sc in the next st) 8 times. Turn. (32 sts)
Row 2: Ch 1, sc in the first st, 2 sc in each of the next 4 sts, (sc in each of the next 2 sts, 2 sc in the next st) 9 times. Turn. (45 sts)
Do not fasten off. Continue on to Sleeve.
Sizes 4XL, 5XL
Row 1 (RS): After completing the last row of the sleeve cuff, rotate to work along the long edge of the ribbing, ch 1, work 2 sc into each of the first 6 sts, then (sc in the next st, 2 sc in the next st) 8 times. Turn. (36, 36 sts)
Row 2: Ch 1, sc in each of the first 9 sts, (sc in each of the next 2 sts, 2 sc in the next st) 9 times. Turn. (45, 45 sts)
Do not fasten off. Continue on to Sleeve.
Sleeve
Gauge: With a 5.00mm crochet hook, in sc mesh stitch: 16 sts = 4″; 10 rows = 2.5″.
Row 1: Ch 1, sc in the first st, (ch 1, skip the next st, sc in the next st) rep from ( to ) across. Turn. (33, 37, 37, 37, 41, 41, 45, 45, 45 sts) Row 1 should be approximately 8″ (9″, 9″, 9″, 10″, 10″, 11″, 11″, 11″) wide.
Rows 2 – 10: Ch 1, sc in the first st, (ch 1, skip the next ch-1, sc in the next sc) rep from ( to ) across. Turn. (33, 37, 37, 37, 41, 41, 45, 45, 45 sts)
Do not fasten off. Continue below with the size you’re making.
Sleeve Size XS
Row 11: Ch 1, (sc, ch 1, sc) in the first st, (ch 1, skip the next ch-1, sc in the next sc) rep from ( to ) across to the last 2 sts, ch 1, skip the next ch-1, (sc, ch 1, sc) in the last st. Turn. (37 sts)
Rows 12 – 18: Ch 1, sc in the first st, (ch 1, skip the next ch-1, sc in the next sc) rep from ( to ) across. Turn. (37 sts)
Row 19: Ch 1, (sc, ch 1, sc) in the first st, (ch 1, skip the next ch-1, sc in the next sc) rep from ( to ) across to the last 2 sts, ch 1, skip the next ch-1, (sc, ch 1, sc) in the last st. Turn. (41 sts)
Rows 20 – 26: Ch 1, sc in the first st, (ch 1, skip the next ch-1, sc in the next sc) rep from ( to ) across. Turn. (41 sts)
Row 27: Ch 1, (sc, ch 1, sc) in the first st, (ch 1, skip the next ch-1, sc in the next sc) rep from ( to ) across to the last 2 sts, ch 1, skip the next ch-1, (sc, ch 1, sc) in the last st. Turn. (45 sts)
Rows 28 – 34: Ch 1, sc in the first st, (ch 1, skip the next ch-1, sc in the next sc) rep from ( to ) across. Turn. (45 sts)
Row 35: Ch 1, (sc, ch 1, sc) in the first st, (ch 1, skip the next ch-1, sc in the next sc) rep from ( to ) across to the last 2 sts, ch 1, skip the next ch-1, (sc, ch 1, sc) in the last st. Turn. (49 sts)
Row 36: Ch 1, sc in the first st, (ch 1, skip the next ch-1, sc in the next sc) rep from ( to ) across. Turn. (49 sts)
Rep Row 36 until your sleeve measures 17.5″ L, or desired length (including sleeve cuff). Upper Sleeve width should be approximately 12″ W.
* Make note of how many rows you worked. Make sure to make the second sleeve the same number of rows.
Fasten off. Weave in ends. Crochet a second sleeve, then continue on to the Seaming Instructions.
Sleeve Size S
Row 11: Ch 1, (sc, ch 1, sc) in the first st, (ch 1, skip the next ch-1, sc in the next sc) rep from ( to ) across to the last 2 sts, ch 1, skip the next ch-1, (sc, ch 1, sc) in the last st. Turn. (41 sts)
Rows 12 – 18: Ch 1, sc in the first st, (ch 1, skip the next ch-1, sc in the next sc) rep from ( to ) across. Turn. (41 sts)
Row 19: Ch 1, (sc, ch 1, sc) in the first st, (ch 1, skip the next ch-1, sc in the next sc) rep from ( to ) across to the last 2 sts, ch 1, skip the next ch-1, (sc, ch 1, sc) in the last st. Turn. (45 sts)
Rows 20 – 26: Ch 1, sc in the first st, (ch 1, skip the next ch-1, sc in the next sc) rep from ( to ) across. Turn. (45 sts)
Row 27: Ch 1, (sc, ch 1, sc) in the first st, (ch 1, skip the next ch-1, sc in the next sc) rep from ( to ) across to the last 2 sts, ch 1, skip the next ch-1, (sc, ch 1, sc) in the last st. Turn. (49 sts)
Rows 28 – 34: Ch 1, sc in the first st, (ch 1, skip the next ch-1, sc in the next sc) rep from ( to ) across. Turn. (49 sts)
Row 35: Ch 1, (sc, ch 1, sc) in the first st, (ch 1, skip the next ch-1, sc in the next sc) rep from ( to ) across to the last 2 sts, ch 1, skip the next ch-1, (sc, ch 1, sc) in the last st. Turn. (53 sts)
Row 36: Ch 1, sc in the first st, (ch 1, skip the next ch-1, sc in the next sc) rep from ( to ) across. Turn. (53 sts)
Rep Row 36 until your sleeve measures 18.5″ L, or desired length (including sleeve cuff). Upper Sleeve width should be approximately 13″ W.
* Make note of how many rows you worked. Make sure to make the second sleeve the same number of rows.
Fasten off. Weave in ends. Crochet a second sleeve, then continue on to the Seaming Instructions.
Sleeve Sizes M, L, XL
Row 11: Ch 1, (sc, ch 1, sc) in the first st, (ch 1, skip the next ch-1, sc in the next sc) rep from ( to ) across to the last 2 sts, ch 1, skip the next ch-1, (sc, ch 1, sc) in the last st. Turn. (41, 41, 45 sts)
Rows 12 – 16: Ch 1, sc in the first st, (ch 1, skip the next ch-1, sc in the next sc) rep from ( to ) across. Turn. (41, 41, 45 sts)
Row 17: Ch 1, (sc, ch 1, sc) in the first st, (ch 1, skip the next ch-1, sc in the next sc) rep from ( to ) across to the last 2 sts, ch 1, skip the next ch-1, (sc, ch 1, sc) in the last st. Turn. (45, 45, 49 sts)
Rows 18 – 22: Ch 1, sc in the first st, (ch 1, skip the next ch-1, sc in the next sc) rep from ( to ) across. Turn. (45, 45, 49 sts)
Row 23: Ch 1, (sc, ch 1, sc) in the first st, (ch 1, skip the next ch-1, sc in the next sc) rep from ( to ) across to the last 2 sts, ch 1, skip the next ch-1, (sc, ch 1, sc) in the last st. Turn. (49, 49, 53 sts)
Rows 24 – 30: Ch 1, sc in the first st, (ch 1, skip the next ch-1, sc in the next sc) rep from ( to ) across. Turn. (49, 49, 53 sts)
Row 31: Ch 1, (sc, ch 1, sc) in the first st, (ch 1, skip the next ch-1, sc in the next sc) rep from ( to ) across to the last 2 sts, ch 1, skip the next ch-1, (sc, ch 1, sc) in the last st. Turn. (53, 53, 57 sts)
Rows 32 – 38: Ch 1, sc in the first st, (ch 1, skip the next ch-1, sc in the next sc) rep from ( to ) across. Turn. (53, 53, 57 sts)
Row 39: Ch 1, (sc, ch 1, sc) in the first st, (ch 1, skip the next ch-1, sc in the next sc) rep from ( to ) across to the last 2 sts, ch 1, skip the next ch-1, (sc, ch 1, sc) in the last st. Turn. (57, 57, 61 sts)
Row 40: Ch 1, sc in the first st, (ch 1, skip the next ch-1, sc in the next sc) rep from ( to ) across. Turn. (57, 57, 61 sts)
Rep Row 40 until your sleeve measures 18.5″ L, or desired length (including sleeve cuff). Upper Sleeve width should be approximately 14″ ,14″, 15″ W.
* Make note of how many rows you worked. Make sure to make the second sleeve the same number of rows.
Fasten off. Weave in ends. Crochet a second sleeve, then continue on to the Seaming Instructions.
Sleeve Sizes 2XL, 3XL
Row 11: Ch 1, (sc, ch 1, sc) in the first st, (ch 1, skip the next ch-1, sc in the next sc) rep from ( to ) across to the last 2 sts, ch 1, skip the next ch-1, (sc, ch 1, sc) in the last st. Turn. (45, 49 sts)
Rows 12 – 14: Ch 1, sc in the first st, (ch 1, skip the next ch-1, sc in the next sc) rep from ( to ) across. Turn. (45, 49 sts)
Row 15: Ch 1, (sc, ch 1, sc) in the first st, (ch 1, skip the next ch-1, sc in the next sc) rep from ( to ) across to the last 2 sts, ch 1, skip the next ch-1, (sc, ch 1, sc) in the last st. Turn. (49, 53 sts)
Rows 16 – 18: Ch 1, sc in the first st, (ch 1, skip the next ch-1, sc in the next sc) rep from ( to ) across. Turn. (49, 53 sts)
Row 19: Ch 1, (sc, ch 1, sc) in the first st, (ch 1, skip the next ch-1, sc in the next sc) rep from ( to ) across to the last 2 sts, ch 1, skip the next ch-1, (sc, ch 1, sc) in the last st. Turn. (53, 57 sts)
Rows 20 – 22: Ch 1, sc in the first st, (ch 1, skip the next ch-1, sc in the next sc) rep from ( to ) across. Turn. (53, 57 sts)
Row 23: Ch 1, (sc, ch 1, sc) in the first st, (ch 1, skip the next ch-1, sc in the next sc) rep from ( to ) across to the last 2 sts, ch 1, skip the next ch-1, (sc, ch 1, sc) in the last st. Turn. (57, 61 sts)
Rows 24 – 28: Ch 1, sc in the first st, (ch 1, skip the next ch-1, sc in the next sc) rep from ( to ) across. Turn. (57, 61 sts)
Row 29: Ch 1, (sc, ch 1, sc) in the first st, (ch 1, skip the next ch-1, sc in the next sc) rep from ( to ) across to the last 2 sts, ch 1, skip the next ch-1, (sc, ch 1, sc) in the last st. Turn. (61, 65 sts)
Rows 30 – 34: Ch 1, sc in the first st, (ch 1, skip the next ch-1, sc in the next sc) rep from ( to ) across. Turn. (61, 65 sts)
Row 35: Ch 1, (sc, ch 1, sc) in the first st, (ch 1, skip the next ch-1, sc in the next sc) rep from ( to ) across to the last 2 sts, ch 1, skip the next ch-1, (sc, ch 1, sc) in the last st. Turn. (65, 69 sts)
Rows 36 – 40: Ch 1, sc in the first st, (ch 1, skip the next ch-1, sc in the next sc) rep from ( to ) across. Turn. (65, 69 sts)
Row 41: Ch 1, (sc, ch 1, sc) in the first st, (ch 1, skip the next ch-1, sc in the next sc) rep from ( to ) across to the last 2 sts, ch 1, skip the next ch-1, (sc, ch 1, sc) in the last st. Turn. (69, 73 sts)
Row 42: Ch 1, sc in the first st, (ch 1, skip the next ch-1, sc in the next sc) rep from ( to ) across. Turn. (69, 73 sts)
Rep Row 42 until your sleeve measures 19″ L, or desired length (including sleeve cuff). Upper Sleeve width should be approximately 17″ ,18″ W.
* Make note of how many rows you worked. Make sure to make the second sleeve the same number of rows.
Fasten off. Weave in ends. Crochet a second sleeve, then continue on to the Seaming Instructions.
Sleeve Sizes 4XL, 5XL
Row 11: Ch 1, (sc, ch 1, sc) in the first st, (ch 1, skip the next ch-1, sc in the next sc) rep from ( to ) across to the last 2 sts, ch 1, skip the next ch-1, (sc, ch 1, sc) in the last st. Turn. (49, 49 sts)
Rows 12 – 14: Ch 1, sc in the first st, (ch 1, skip the next ch-1, sc in the next sc) rep from ( to ) across. Turn. (49, 49 sts)
Row 15: Ch 1, (sc, ch 1, sc) in the first st, (ch 1, skip the next ch-1, sc in the next sc) rep from ( to ) across to the last 2 sts, ch 1, skip the next ch-1, (sc, ch 1, sc) in the last st. Turn. (53, 53 sts)
Rows 16 – 18: Ch 1, sc in the first st, (ch 1, skip the next ch-1, sc in the next sc) rep from ( to ) across. Turn. (53, 53 sts)
Row 19: Ch 1, (sc, ch 1, sc) in the first st, (ch 1, skip the next ch-1, sc in the next sc) rep from ( to ) across to the last 2 sts, ch 1, skip the next ch-1, (sc, ch 1, sc) in the last st. Turn. (57, 57 sts)
Rows 20 – 22: Ch 1, sc in the first st, (ch 1, skip the next ch-1, sc in the next sc) rep from ( to ) across. Turn. (57, 57 sts)
Row 23: Ch 1, (sc, ch 1, sc) in the first st, (ch 1, skip the next ch-1, sc in the next sc) rep from ( to ) across to the last 2 sts, ch 1, skip the next ch-1, (sc, ch 1, sc) in the last st. Turn. (61, 61 sts)
Rows 24 – 26: Ch 1, sc in the first st, (ch 1, skip the next ch-1, sc in the next sc) rep from ( to ) across. Turn. (61, 61 sts)
Row 27: Ch 1, (sc, ch 1, sc) in the first st, (ch 1, skip the next ch-1, sc in the next sc) rep from ( to ) across to the last 2 sts, ch 1, skip the next ch-1, (sc, ch 1, sc) in the last st. Turn. (65, 65 sts)
Rows 28 – 30: Ch 1, sc in the first st, (ch 1, skip the next ch-1, sc in the next sc) rep from ( to ) across. Turn. (65, 65 sts)
Row 31: Ch 1, (sc, ch 1, sc) in the first st, (ch 1, skip the next ch-1, sc in the next sc) rep from ( to ) across to the last 2 sts, ch 1, skip the next ch-1, (sc, ch 1, sc) in the last st. Turn. (69, 69 sts)
Rows 32 – 34: Ch 1, sc in the first st, (ch 1, skip the next ch-1, sc in the next sc) rep from ( to ) across. Turn. (69, 69 sts)
Row 35: Ch 1, (sc, ch 1, sc) in the first st, (ch 1, skip the next ch-1, sc in the next sc) rep from ( to ) across to the last 2 sts, ch 1, skip the next ch-1, (sc, ch 1, sc) in the last st. Turn. (73, 73 sts)
Rows 36 – 38: Ch 1, sc in the first st, (ch 1, skip the next ch-1, sc in the next sc) rep from ( to ) across. Turn. (73, 73 sts)
Row 39: Ch 1, (sc, ch 1, sc) in the first st, (ch 1, skip the next ch-1, sc in the next sc) rep from ( to ) across to the last 2 sts, ch 1, skip the next ch-1, (sc, ch 1, sc) in the last st. Turn. (77, 77 sts)
Row 40: Ch 1, sc in the first st, (ch 1, skip the next ch-1, sc in the next sc) rep from ( to ) across. Turn. (77, 77 sts)
Rep Row 40 until your sleeve measures 19″ L, or desired length (including sleeve cuff). Upper Sleeve width should be approximately 19″ ,19″ W.
* Make note of how many rows you worked. Make sure to make the second sleeve the same number of rows.
Fasten off. Weave in ends. Crochet a second sleeve, then continue on to the Seaming Instructions.
Seaming Instructions
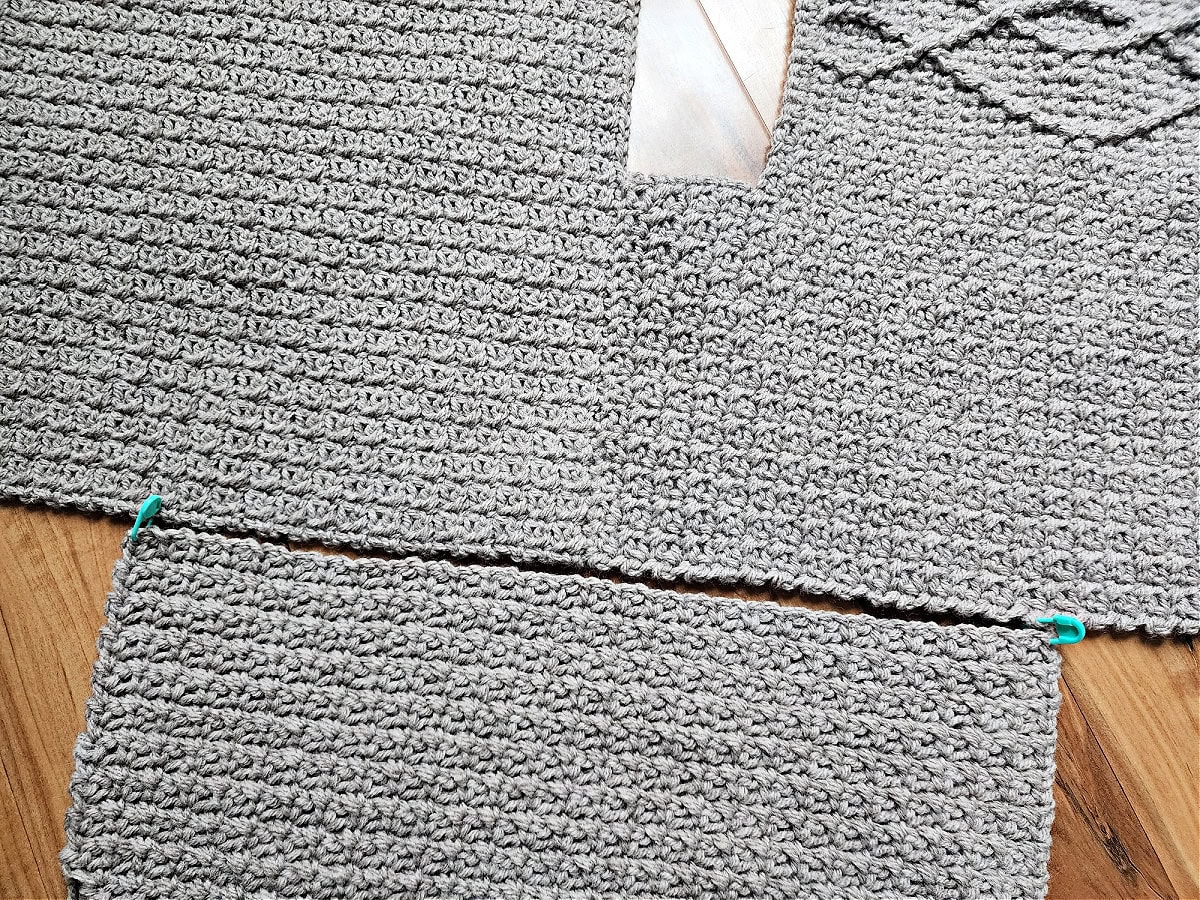
Tip: Use stitch markers to help line up your work and hold it in place while seaming.
Check out my Mattress Stitch Seam Tutorial, if you’ve never used this crochet technique before.
First, Seam Shoulders: Line up the last rows of the front and back panels and seam the shoulders of the front panel to the coordinating stitches of the back panel using the mattress stitch.
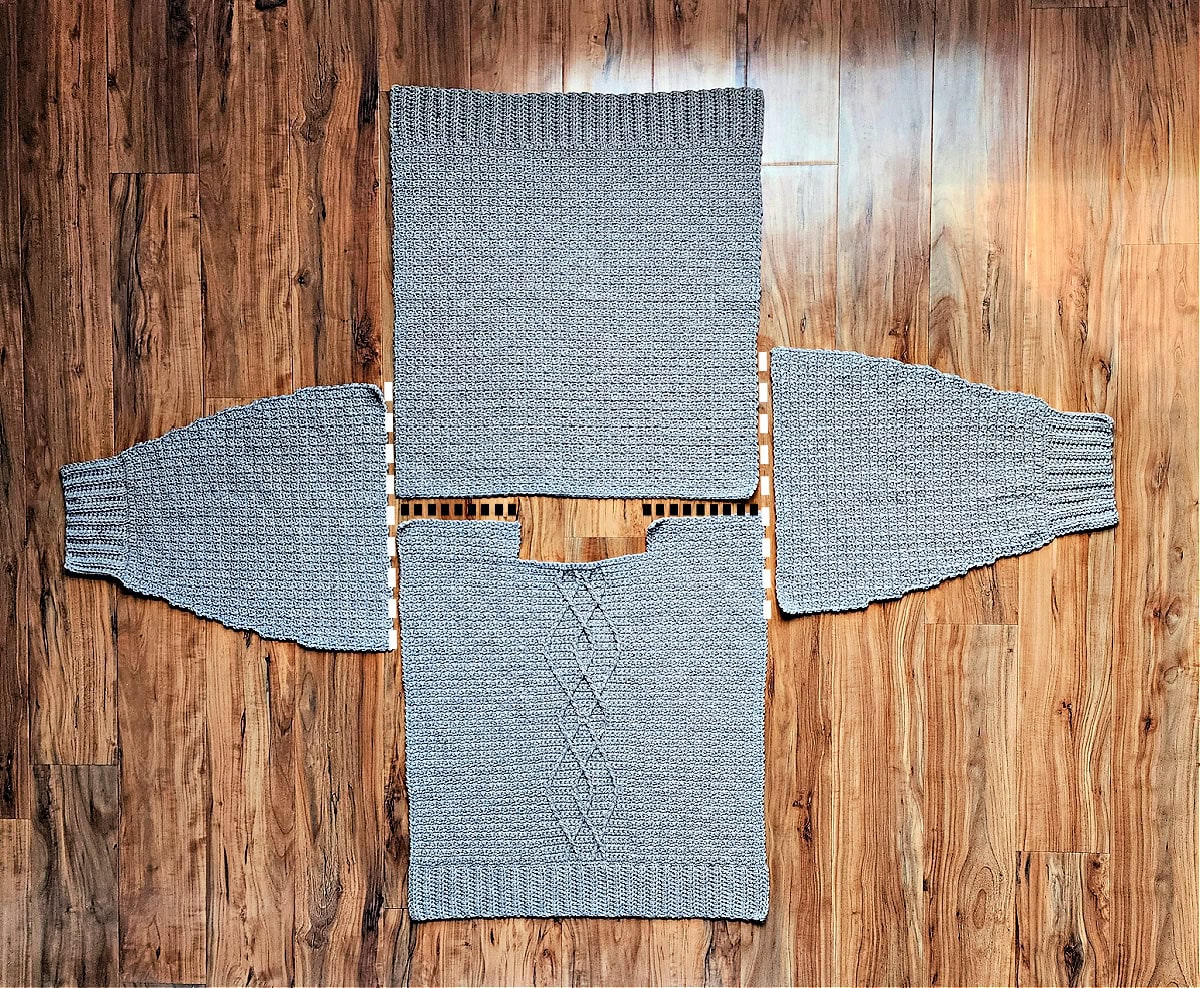
Next, Attach Sleeves: Find the center of the last row of a sleeve and line it up with the shoulder seam. Attach the last row of the sleeve to the sweater using the mattress stitch.
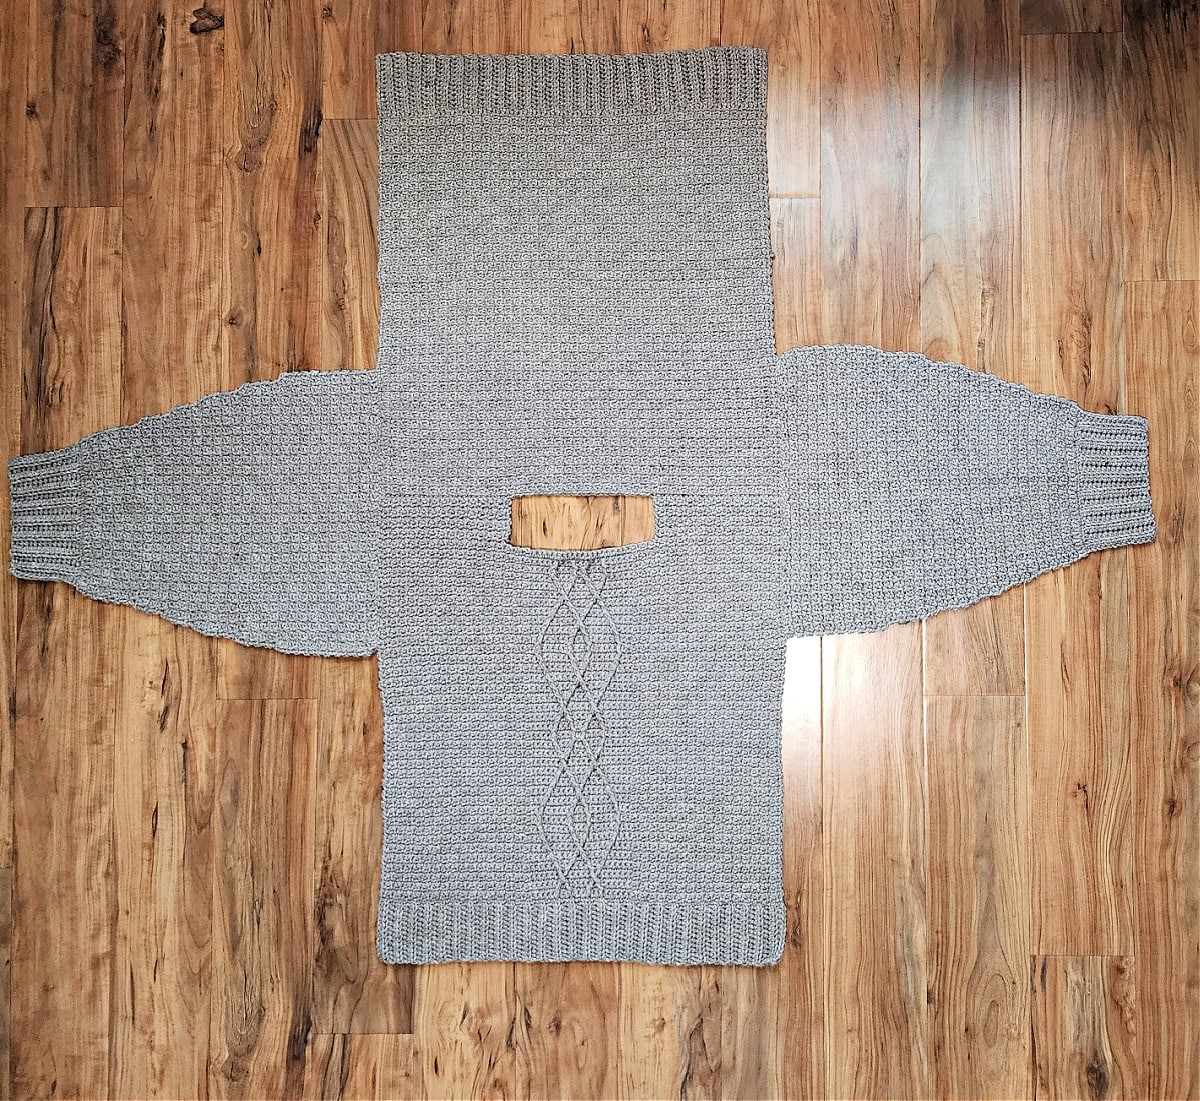
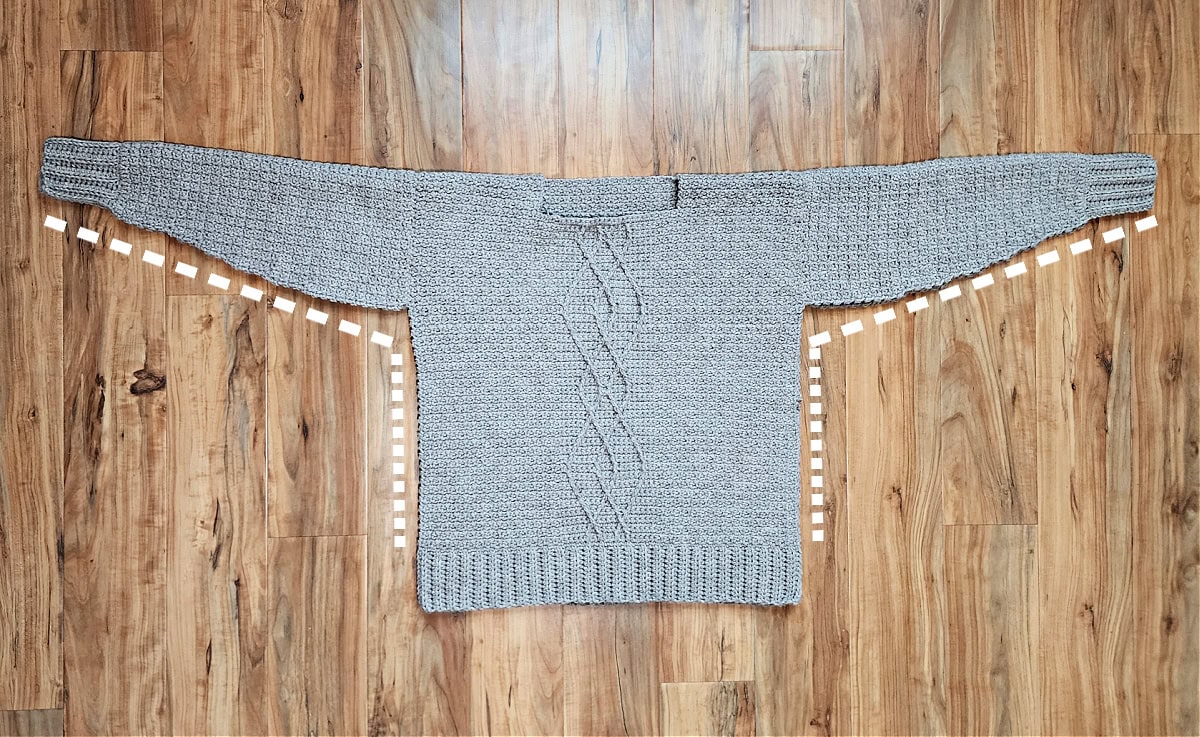
Lastly, Seam Sleeves & Sides: Beginning with a Sleeve Cuff, seam the cuff, sleeve, and side of sweater until you reach the top of the bottom ribbing of the front and back panels. The bottom ribbing of my sweater is not seamed at the sides. If you prefer to seam yours, then continue your seam all the way to the bottom edge of the front and back panels.
Continue to Prepare Neck Opening for Cowl.
Prepare Neck Opening for Cowl
Gauge: With a 5.00mm crochet hook, in sc: 16 sts = 4″.
Rnd 1 (RS): With yarn & a 5.00mm crochet hook, join yarn with a standing sc at the center back of neck, sc in each stitch around the neck opening. Join with a sl st to the 1st st. Make stitch count a multiple of 3. Exact stitch count is not crucial.
Looser Cowl: If you prefer a looser fitting cowl than what’s shown in the modeled photos, work another round of single crochet and increase your stitch count by 12 stitches. Then continue on to the Cowl.
Do not fasten off. Continue on to the Cowl.
Cowl
Gauge: With a 6.00mm crochet hook, in BLO hdc: 12 sts = 3.5″; 7 rows = 3″
Note: Cowl is worked perpendicular to the body and attached on odd numbered rows with a hdc2tog.
Cowl Neck Photo Tutorial: Scroll down to see a complete photo tutorial for how to work the cowl directly onto the neck opening of the sweater.
Row 1: Switch to a 6.00mm crochet hook, ch 35, working in the back humps of the ch, hdc in the 2nd ch from your hook, hdc in each of the next 32 chs, hdc2tog in the next ch & same st as ch 35. Do not turn. (34 sts) Length of Row 1 should be approximately 10″.
Row 2: Sl st into each of the next 2 sts along the neck opening (these 2 sl sts do not count as sts), TURN, BLO hdc in each st across the previous row. Turn. (34 sts)
Row 3: Ch 1, BLO hdc in the first st, BLO hdc in each of the next 32 sts, hdc2tog in the BLO of the next st and both loops of the next st along the neck opening. Do not turn. (34 sts)
Row 4: Sl st into each of the next 2 sts along the neck opening (these 2 sl sts do not count as sts), TURN, BLO hdc in each st across the previous row. Turn. (34 sts)
Rep Rows 3 – 4 around the entire neck opening.
Fasten off leaving a 30″ tail of yarn. Use a yarn needle and the tail of yarn to whipstitch the last row to the first row.
Weave in ends. Block it to add a nice finishing touch, then your pullover is ready to wear!
Cowl Photo Tutorial
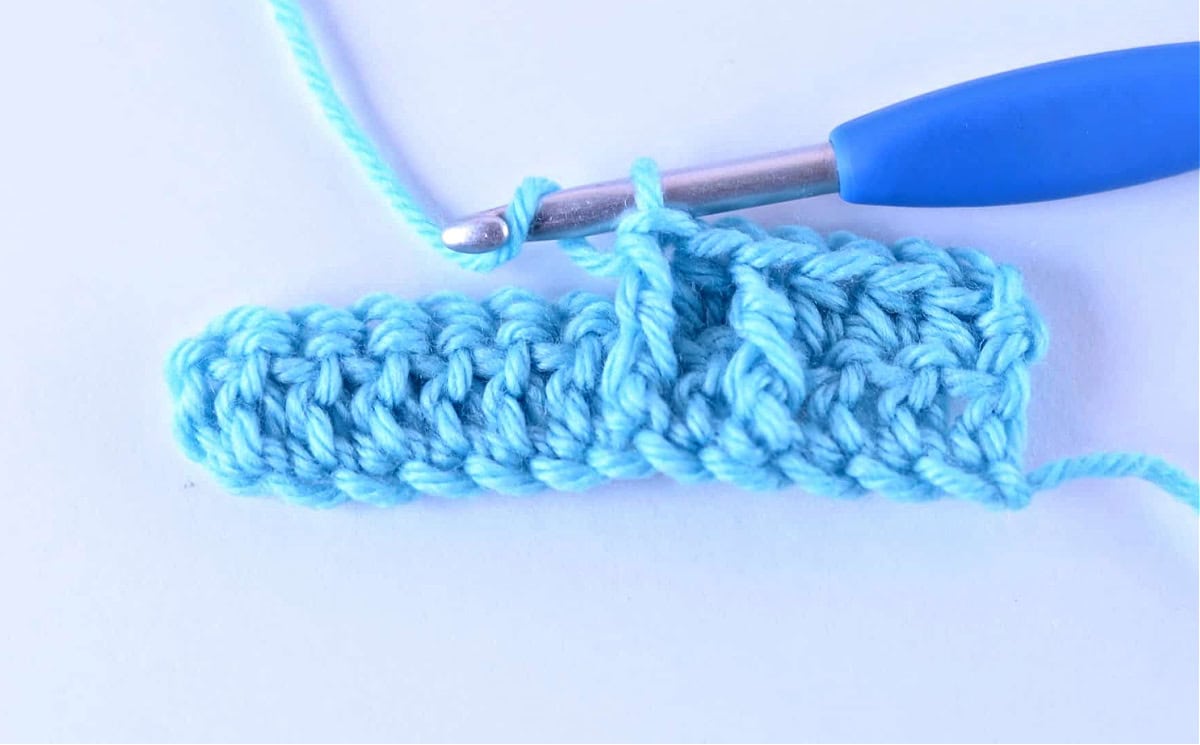
The photos for the cowl tutorial are of a smaller swatch to make it easier to show stitch placement.
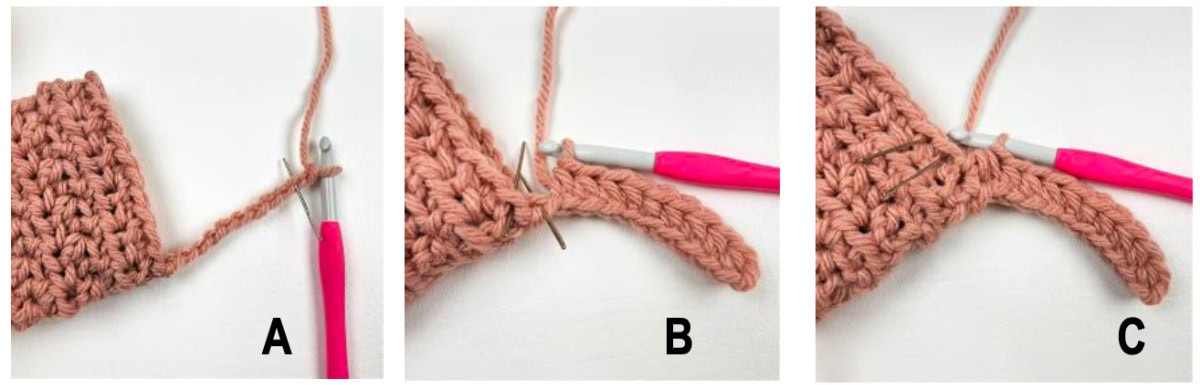
Photo A: This photo shows the beginning of Row 1 of the cowl.
Photo B: Photo shows Row 1 complete to the hdc2tog. The yarn needles are showing where to work the hdc2tog.
Photo C: This photo shows the hdc2tog complete. The yarn needles are inserted into the next 2 sts along the edge of the neck opening where you will work the 2 sl sts at the beginning of Row 2.
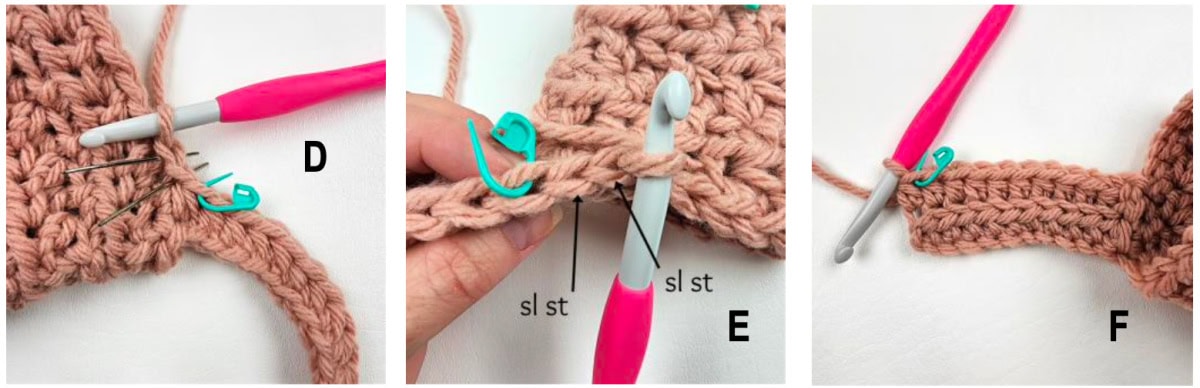
Photo D: This photo shows the beginning of Row 2 of the cowl. The yarn needles are showing the first 2 sl sts of Row 2 that you will work before turning. I also placed a SM in the hdc2tog to help locate the first st to work into after we turn to work the next row.
Photo E: After turning to work the rest of Row 2, you can see the 2 sl sts and the stitch marker where you will work the first hdc.
Photo F: This photo shows Row 2 of the cowl complete. I placed a SM in the FLO of the last stitch of the row to mark the loop where I need to begin the next row.
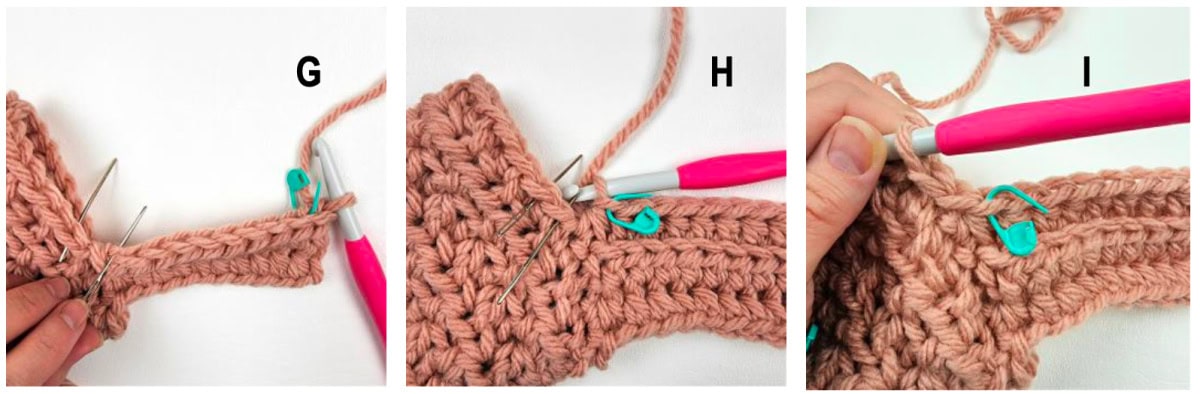
Photo G: The SM in this photo shows where to work the first stitch of Row 3. The yarn needles show where to work the hdc2tog at the end of the row.
Photo H: The yarn needles are showing the 2 sts along the edge of the neck opening where you will work the first two sl sts of Row 4. The SM is placed in the FLO of the hdc2tog to mark where to work the first hdc in the next row.
Photo I: Begin Row 4 by sl st in the next 2 stitches along the neck opening.
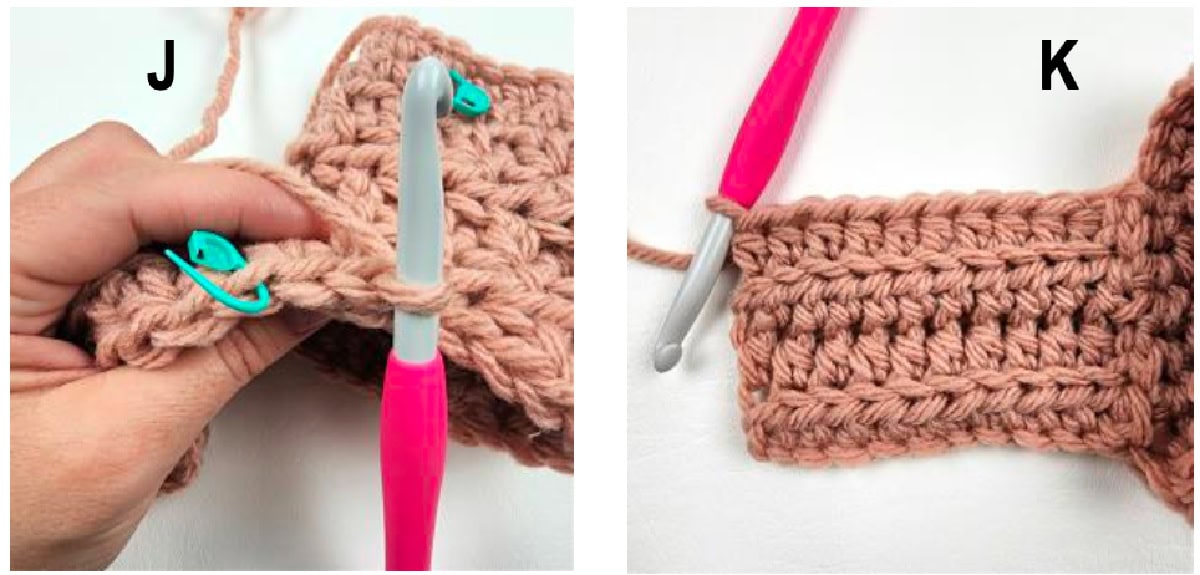
Photo J: In this photo, you can see the 2 sl sts you worked before turning and the SM that’s marking where to work the first hdc.
Photo K: This photo shows Rows 1 – 4 complete.
Rep Rows 3 – 4 around the entire neck opening.
Related: If you need to learn how to block a crochet sweater, check out my post on 3 blocking methods!
A cable crochet sweater with a cowl neck is the perfect addition to any winter wardrobe, offering a mix of comfort, warmth, and timeless fashion. Whether you’re styling it for a casual outing or a dressier occasion, this versatile piece will keep you looking chic while staying cozy.
So this winter, stay warm and stylish by embracing the beauty of a cable crochet sweater—your new go-to piece for both casual and dressier occasions.
I Made It! Now What?
Pin this post!: Save this cable crochet sweater pattern to your Pinterest boards so that you can come back and make it again.
Leave a comment below: We love to hear your feedback.
Share Your Finished Projects on Facebook or Instagram: I love to see your finished projects! Share with us on social media and tag me @acrochetedsimplicity or use the hashtag #ACrochetedSimplicity so I can find your posts.
Join us in the Facebook Community Group!
Come share your finished projects with us in the A Crocheted Simplicity Crochet Community Group on Facebook. Join us for fun community events such as crochet alongs, join in on crochet conversations, ask questions, get advice, and share your love for crochet!

More Free Crochet Patterns for Sweaters I Think You’ll Love
More Crochet Sweater Patterns
Are you looking for more crochet sweater patterns? We have several more patterns for crochet clothes, including matching sweaters for mothers and daughters and even for fathers and sons.
good day, first let me thank you for sharing such a beautiful piece. I’ve began but require some clarification please. row 2 of the body starts with a chain and a single crochet, but row 1 ended with a chain and single crochet..I have 76 sts first row. following the pattern I would be putting the single crochet in the previous single and the chain over the chain.. is that how the mesh St is intended? I appreciate your help and hopefully I explained it ok. thank you so much for all you do.
Hi Julie,
Yes, that is correct. You will work a sc in a sc from the previous row and the ch-1 will be worked over a ch-1 from the previous row.
Happy Crocheting,
Jennifer