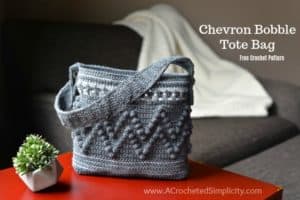
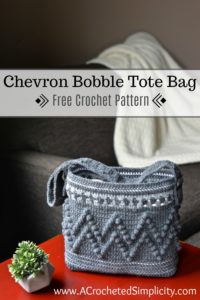
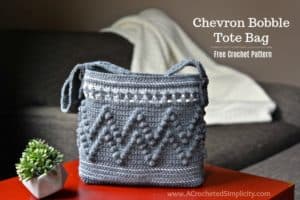
Chevron Bobble Tote Bag – Free Crochet Pattern
Today we are kicking off the Bobble Blog Hop of 2018! This fantastic blog hop is the 2nd annual blog hop curated by Michele from Stitch & Hustle. You may have guessed it already, but this year’s blog hop theme is the crochet BOBBLE! Bobbles are a hot stitch this year so the theme is very fitting.
Come join us and hop from blog to blog to check out all of the new crochet designs, meet new-to-you designers, visit some of your all-time favorites, and ENTER TO WIN an awesome prize pack sponsored by our friends at Lion Brand Yarn!! You DON’T want to miss this!!! Enter to Giveaway at the bottom of this post.
>Click HERE to sign-up to receive our newsletter!<
I was very honored to receive an invite to join Michele & the talented group of designers/bloggers she put together for this event…. there’s a whole lot of talent in one place!
The following is the line-up of the participating designers. Please make sure to “HOP” around and visit each designer. Just click on their name below to be taken to the Free Crochet Pattern they designed for you. (scroll down for my free Chevron Bobble Tote Bag pattern)
Divine Debris | Stitch & Hustle | Evelyn & Peter | Mama In A Stitch | Rescued Paw Designs
A BIG THANK YOU to Lion Brand for supplying the yarn for this project.
> Don’t lose it, add It To Your Ravelry Favorites or Queue. <
> Don’t forget to Pin It too! <
>> Purchase an ad-free PDF of this pattern on Craftsy or Ravelry <<
> PDF includes a Bonus Chart <
This post contains affiliate links.
Materials
- Yarn: Lion Brand Wool Ease Yarn (See Yarn Note Below) in the colors Oxford Grey (3 balls) & Grey Heather (1 ball) & ZZ Twist Yarn in White (1 ball).
- Crochet Hook: H/8/5.00mm; G/6/4.00mm, or size needed to obtain gauge (My favorite crochet hooks are the Clover Amour Crochet Hooks, I’ve never had an ache in my hand since switching).
- Scissors
- Yarn Needle
- Locking Stitch Markers
- Metal Slides (2) 1.5″ (click HERE to see the ones I used) (Optional)
Many of these materials are available for purchase through our affiliates below:


Stitch Abbreviations
- ch: chain
- sl st: slip stitch
- st(s): stitch(es)
- sp(s): space(s)
- sc: single crochet
- dc: double crochet
- bobble st: 5 dc bobble stitch
- linked double crochet: click HERE for tutorial
- RS/WS: right side / wrong side
- Rep: repeat
- Rnd: round
- yo: yarn over
- MC: Dark Grey
- CC1: Light Grey
- CC2: White
One Size
-
One Size: 10″ W x 2.5″ D x 10″ H (not including strap)
Gauge
- In sc: 10 sts = 2.5″
Notes
- Beginning chain(s) are not included in stitch count, unless noted otherwise.
- First stitch of each row is worked in the same stitch as the turning chain, unless otherwise specified.
- Lion Brand Wool Ease – 80% Acrylic / 20% wool (3.5 oz / 185g / 197 yds / 200 m)
- (MC) Oxford Grey (440 yards) / (CC1) Grey Heather (60 yards) / (CC2) White (20 yards)
- Pattern repeats are written using brackets [ to ]. What’s written inside the brackets from [ to ] is one full repeat. There are also partial repeats and they are noted inside brackets within * to *. Instructions are clearly written and note which to work.
Crochet Tote Bag Instructions
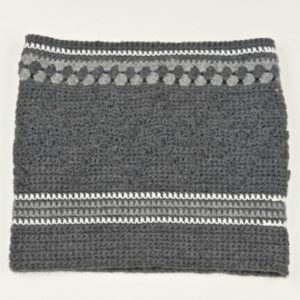
Rnd 1 (RS): Using a 5mm crochet hook & MC yarn, ch 100, being careful not to twist the chain, join w/ a sl st to the back hump of the 1st ch, ch 1, working into the back hump of the ch, sc in each st around. Join w/ a sl st to the 1st st. Turn. (100 sts)
Rnds 2 – 10: Ch 1, sc in each st around. Join. Turn. (100 sts)
Rnd 11 (CC2) (RS): Ch 1, sc in each st around. Join. Turn. (100 sts)
Rnd 12 (MC): Ch 1, sc in each st around. Join. Turn. (100 sts)
Rnd 13 (CC1): Ch 1, sc in each st around. Join. Turn. (100 sts)
Rnd 14 (MC): Ch 1, sc in each st around. Join. Turn. (100 sts)
Rnd 15 (CC1): Ch 1, sc in each st around. Join. Turn. (100 sts)
Rnd 16 (MC): Ch 1, sc in each st around. Join. Turn. (100 sts)
Rnd 17 (CC2): Ch 1, sc in each st around. Join. Turn. (100 sts)
Rnds 18 – 20 (MC): Ch 1, sc in each st around. Join. Turn. (100 sts)
Do not fasten off. Continue on to Chevron Bobble Section.
Chevron Bobble Section
Note: The Ad-Free PDF includes a Bonus Chart for this section.
Rnd 1(MC) (RS): Ch 1, [ bobble st in the next st, sc in each of the next 9 sts ] rep from [ to ] around. Join. Turn. (100 sts)
Rnd 2: Ch 1, sc in each st around. Turn. (100 sts)
Rnd 3: Ch 1, sc in the first st, [* bobble st in the next st, sc in each of the next 7 sts, bobble st in the next st *, sc in the next st ] rep from [ to ] around to the last 9 sts, then work from * to *. Join. Turn. (100 sts)
Rnd 4: Rep Rnd 2.
Rnd 5: Ch 1, sc in the first st, sc in the next st, [ bobble st in the next st, sc in each of the next 5 sts, bobble st in the next st , sc in each of the next 3 sts ] rep from [ to ] around to the last 8 sts, then work bobble st in the next st, sc in each of the next 5 sts, bobble st in the next st , sc in the next st . Join. Turn. (100 sts)
Rnd 6: Rep Rnd 2.
Rnd 7: Ch 1, sc in the first st, sc in each of the next 2 sts, [ bobble st in the next st, sc in each of the next 3 sts, bobble st in the next st, sc in each of the next 5 sts ] rep from [ to ] around to the last 7 sts, then work bobble st in the next st, sc in each of the next 3 sts, bobble st in the next st, sc in each of the next 2 sts. Join. Turn. (100 sts)
Rnd 8: Rep Rnd 2.
Rnd 9: Ch 1, [ bobble st in the next st, sc in each of the next 3 sts, bobble st in the next st, sc in the next st, bobble st in the next st, sc in each of the next 3 sts ] rep from [ to ] around. Join. Turn. (100 sts)
Rnd 10: Rep Rnd 2.
Rnd 11: Ch 1, [ sc in the next st, bobble st in the next st, sc in each of the next 3 sts, bobble st in the next st , sc in each of the next 3 sts, bobble st in the next st ] rep from [ to ] around. Join. Turn. (100 sts)
Rnd 12: Rep Rnd 2.
Rnds 13 – 16: Rep Rnd 5 – 8.
Rnd 17: Ch 1, sc in the first st, sc in each of the next 3 sts, [ bobble st in the next st, sc in the next st, bobble st in the next st, sc in each of the next 7 sts ] rep from [ to ] around to the last 6 sts, bobble st in the next st, sc in the next st, bobble st in the next st, sc in each of the next 3 sts. Join. Turn. (100 sts)
Rnd 18: Rep Rnd 2.
Rnd 19: Ch 1, sc in the first st, sc in each of the next 4 sts, [ bobble st in the next st, sc in each of the next 9 sts ] rep from [ to ] around to the last 5 sts, bobbles st in the next st, sc in each of the next 4 sts. Join. Turn. (100 sts)
Rnd 20: Rep Rnd 2.
Do not fasten off. Continue on to Upper Section.
Upper Section
Rnds 1 – 2 (MC): Ch 1, sc in each st around. Turn. (100 sts)
Rnd 3 (CC1) (RS): Ch 3 (counts as a st), turn [ skip each of the next 2 sts, 3 dc in the next st ] work from [ to ] around to the last 4 sts, skip each of the next 3 sts, 2 dc in the last st (same st as ch 3). Join w/ a sl st to the top of ch 3. (99 sts)
Rnd 4 (MC): Ch 3 (counts as a st), 2 dc in same sp as ch 3, 3 dc in each sp around. Join w/ a sl st to the top of ch 3. (99 sts)
Rnd 5 (CC1): Ch 3, 3 dc in each sp around to the last sp, 2 dc in the last sp (same sp as ch 3). Join w/ a sl st to the top of ch 3. (99 sts)
Rnd 6 (MC) (RS): Ch 1, sc in each st around to the last st, 2 sc in the last st. Join. Turn. (100 sts)
Rnd 7 (MC): Ch 1, sc in each st around. Join. Turn. (100 sts)
Rnd 8 (CC2): Ch 1, sc in each st around. Join. Turn. (100 sts)
Rnds 9 – 10 (MC): Ch 1, sc in each st around. Join. Turn. (100 sts)
Rnd 11: Sl st in each st around. Join using Special Join Technique (click HERE for tutorial). (100 sts)
Fasten off. Weave in ends. Continue on to Strap.
Strap
Row 1: Using a 4mm crochet hook & MC, ch 8, linked dc in the 3rd ch from your hook, linked dc in each ch across. Turn. (6 sts)
Row 2: Ch 2, linked dc in each st across. Turn.
Rep Row 2 until strap measures 29″, or desired length.
Do not fasten off. Continue on to Edging.
Edging
Rnd 1: Continuing on from the strap, rotate to work into the sides of the rows along a long edge, work (2 sc into the side of the next st, 1 sc into the side of the next st) rep along the long edge, rotate and work 1 sc into the bottom of each foundation ch, rotate to work into the sides of the rows along the next long edge, work (2 sc into the side of the next st, 1 sc into the side of the next st) rep along the long edge, rotate and work 1 sc into each st across the last row.
Do not join. Continue on to Slip Stitch Edging.
Slip Stitch Edging
Note: Adding the slip stitch edging will help keep your strap from stretching out.
Rnd 1: Continuing on from the Edging, slip stitch in each st around the perimeter of the strap. Adjust your hook size as needed to keep the tension even. Stitch count isn’t crucial. Use Special Join Technique (click HERE for tutorial).
Fasten off. Weave in ends. Continue on Attaching the Strap. Finished size of the strap is approximately 2″ W x 29″ L.
Attaching the Strap.
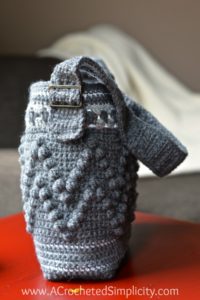
- If you’re using the metal slides, slide one end of the strap through 1 slide. Repeat for the opposite end.
- Sew each end of the strap to the upper portion of the bag. I sewed my strap onto the bag by stitching both above and below the slide. Weave in ends.
Seaming the Bottom of the Bag
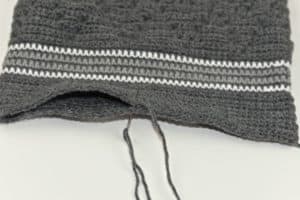
Step 2: Using a yarn needle and length of MC approximately 3 times the width of the bag, whipstitch the bottom of the bag closed making sure to work into every stitch. Weave in ends. (see photo below)
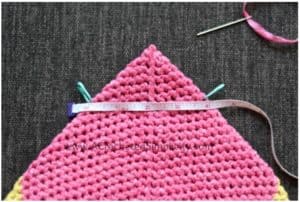
Step 3: Keep your bag inside out and position it so that one corner of the seam becomes the tip of the triangle (shown in the photo to the right). Note that the seam is centered vertically in the triangle. (see photo below)
Step 4: Use a measuring tape and find the points on the triangle where it measures 2.5″ across. Mark both the right and left side with a stitch marker. (see photo below)
Step 5: Use a yarn needle and 12″ piece of yarn and sew from one stitch marker to the next, working thru both layers of the bag. (see photo below)
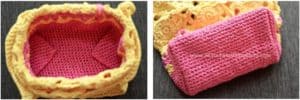
Step 6: Turn your bag right side out. The photo below left shows what the inside of your bag will look like. The photo below right shows what the bottom of your bag will look like. Note: The bag shown in the photos is of the Strawberry Lemonade Tote.
Enter to Win!
Please stop by Lion Brand on Facebook and thank them for sponsoring this awesome giveaway!
Giveaway Details
- Open to readers WORLDWIDE, except void where prohibited by law.
- To Win, enter by 11:59pm CST on October 12, 2018, using the Rafflecopter widget above.
- 3 Winners – Each winner will receive all the yarn needed to make 2 of the blog patterns.
- Winner 1: Pillow & Bag (see graphic above)
- Winner 2: Crop Top & Ear Warmer (see graphic above)
- Winner 3: Pillow & Bag (see graphic above)
Are you intimidated by crocheted cables? Would you love to learn? Take an Annies Video Class with me and let me ease your fears of crocheted cables! Click on the photo below to watch a free preview. You can also see the other 2 classes I have available! (affiliate link)
Please share your finished ACS projects with me in the A Crocheted Simplicity Crochet Community Group on Facebook!
Happy Crocheting!





Hello . If I want to make a bigger bag ,with how many stitches do I increase? Thanxs in advance.
Most of the pattern is a repeat of 10, until you get to the granny section and that’s a number divisible by 3’s.
Hi Dee,
If you go to the Ravelry link https://www.ravelry.com/patterns/library/chevron-bobble-tote-bag you will be able to get a clean copy of the pattern and they also provide yarn suggestions. I hope that helps!
JF
Happy new year! Loved this bag! ❤️
Lovely pattern! I love bobbles.
thank you.
Absolutely love this! I always get scared/intimidated on these types of things though because I have such a tight tension.
I’ve sporadically followed you for years. I look forward to seeing what you come up with in the new year!