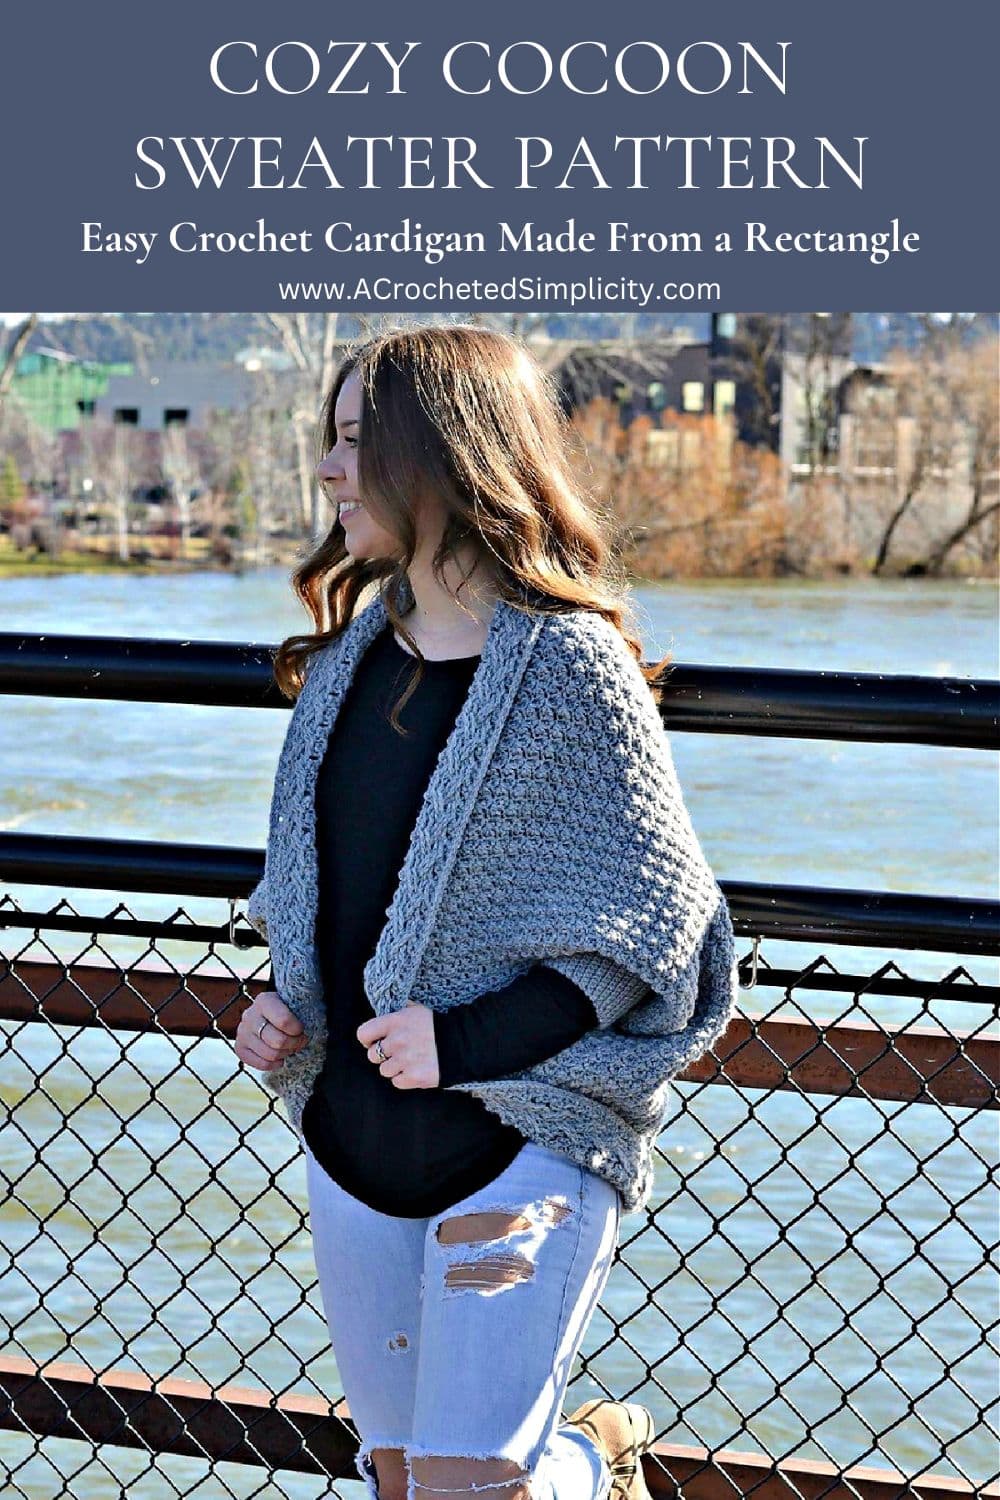
Crochet Cocoon Cardigan

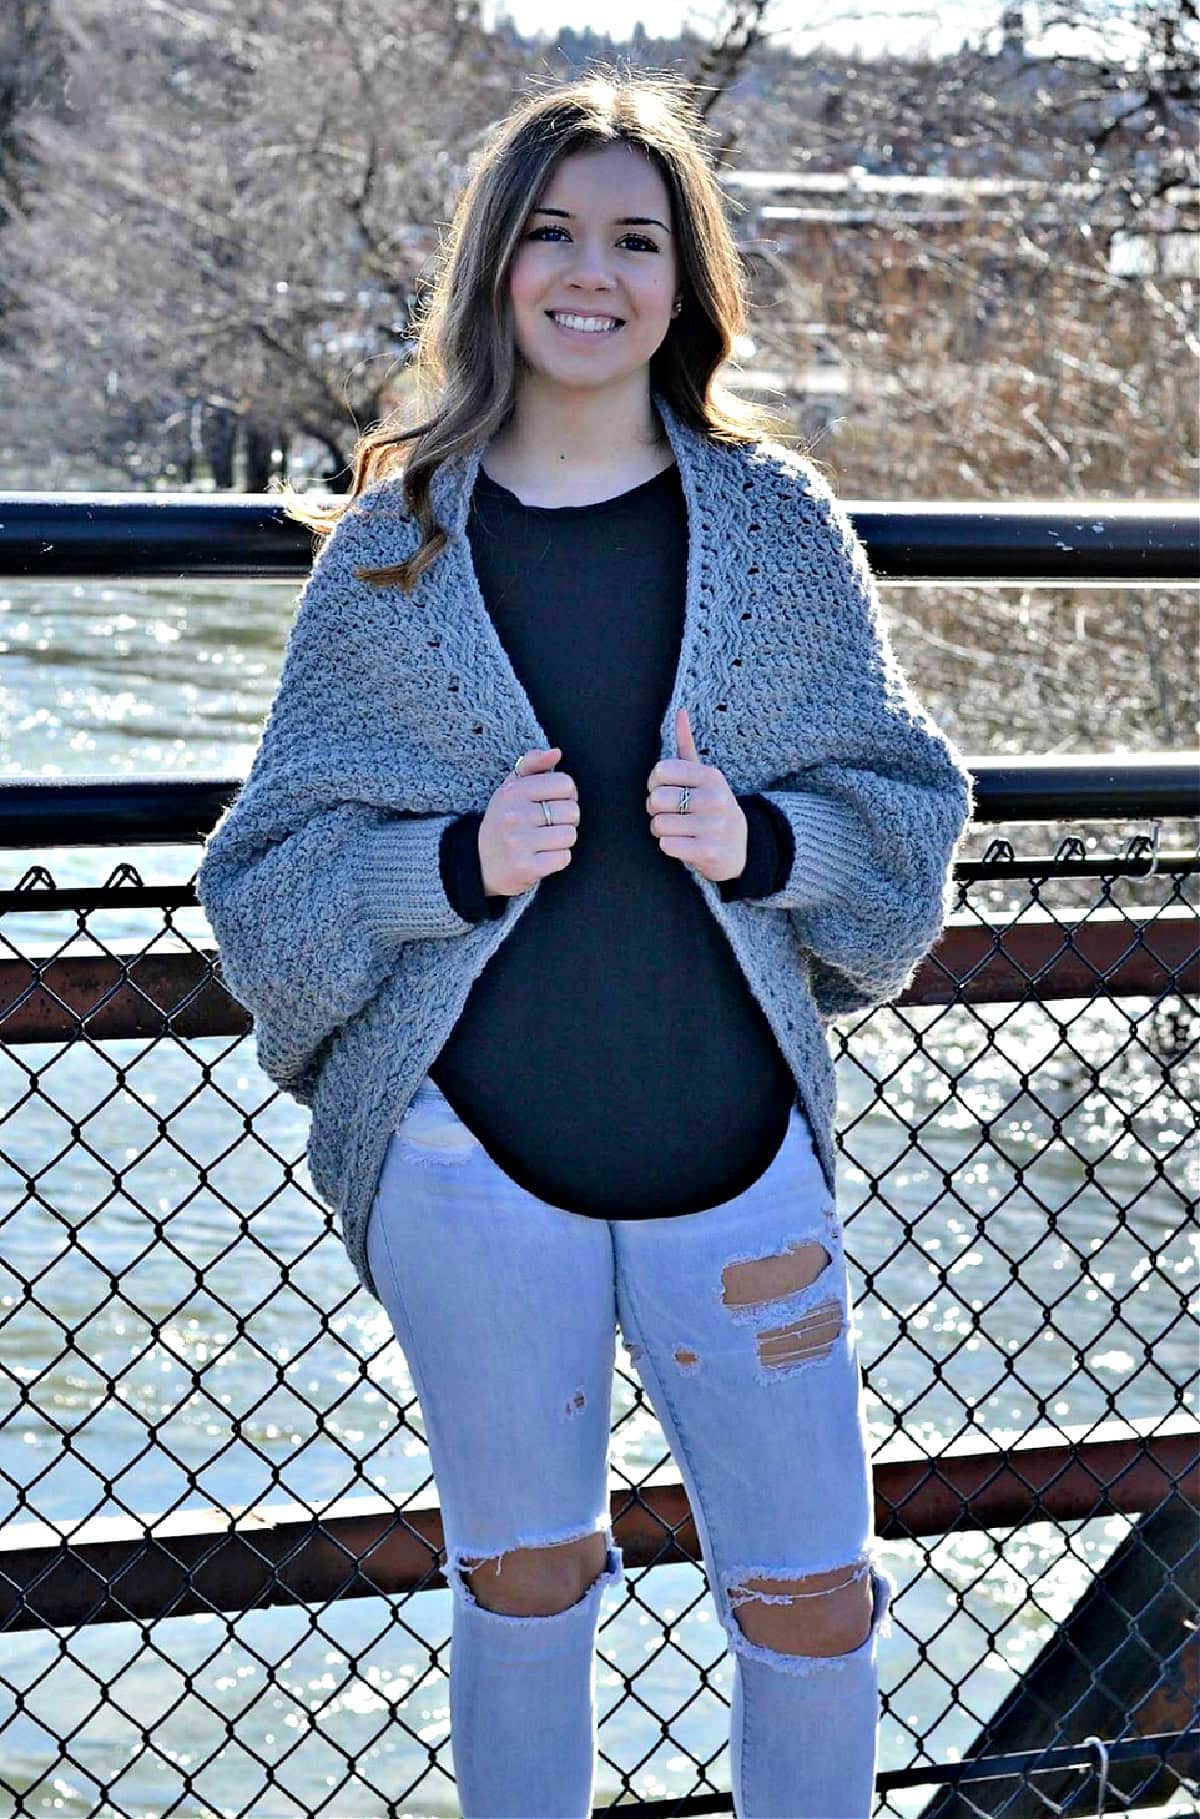
A crochet cocoon cardigan is the perfect blend of comfort, versatility, and style.
This cozy crochet sweater is a wardrobe essential that is sure to become a favorite for layering in cooler weather.
The cocoon cardigan crochet pattern is free below, or you’ll find an ad-free printable PDF (including all photos & schematics shown below) on Ravelry, or Etsy (aff).
What is a Crochet Cocoon Cardigan?
A crochet cocoon cardigan is a loose-fitting, oversized sweater featuring a rounded silhouette that wraps around your body like a cozy cocoon. The cardigan typically has wide, tapering sleeves, a draped back, and an open front that makes it ideal for layering over casual or formal attire. Made with soft yarns and various crochet stitches, this versatile piece offers both warmth and style in equal measure.
Why Crochet Cocoon Cardigans are Trending
- Versatility: Whether you’re lounging at home, running errands, or attending a casual event, crochet cocoon cardigans fit seamlessly into your wardrobe. Pair them with jeans, leggings, or even dresses for a laid-back yet stylish look.
- Comfort: The oversized design and soft yarns make crochet cocoon cardigans exceptionally comfortable. Their cozy fit and gentle drape make them perfect for chilly mornings or cool evenings.
- Boho Vibe: The crochet technique naturally lends a bohemian, handmade feel to the cardigan, giving your outfit an effortlessly chic and artistic edge.
- Customizable: If you enjoy crocheting, creating your own cocoon sweater allows you to experiment with different stitches, colors, and yarn textures. You can tailor the design to your exact preferences, making it a one-of-a-kind wardrobe piece.
How to Style a Crochet Cocoon Cardigan
- Casual Look: Pair your crochet cocoon cardigan with skinny jeans, a simple tee, and ankle boots for a comfortable yet stylish everyday outfit.
- Boho Chic: Wear your cardigan over a flowy dress and add layered necklaces, sandals, or boots for an effortless bohemian ensemble.
- Work-Ready: Opt for a neutral-colored cocoon cardigan to layer over a blouse and tailored pants. It provides a relaxed yet polished look suitable for a business-casual setting.
- Loungewear: For cozy days at home, wear your crochet cardigan with leggings and a tank top for ultimate comfort.
How to Crochet a Cocoon Cardigan
Did you know that you can crochet a cardigan that isn’t much different than crocheting a rectangular blanket? That’s because this crochet cocoon shrug is made with a simple rectangle, there are no increases or decreases involved, making it an ideal project for an advanced beginner.
First, we’ll begin by crocheting our foundation chain. The length of this chain will become the overall length of your crochet cocoon cardigan.
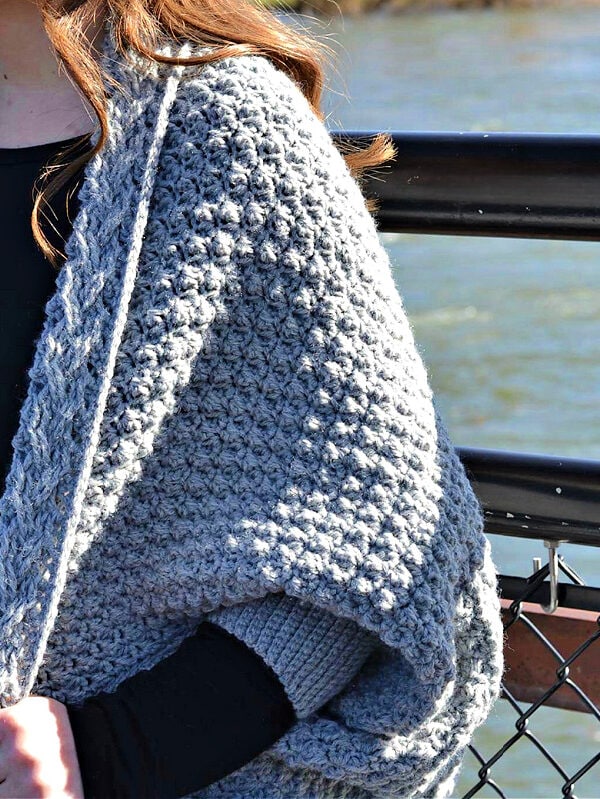
The simple crochet rectangle in this cocoon cardigan pattern has crochet cables along the two long edges. These cables are easy to crochet and add a lot of texture and detail to the crochet cocoon shrug.
Once the rectangle is complete, each of the four corners will be folded as shown in the schematics below. Once folded, you will whipstitch a few stitches together to create the armhole openings.
Next, you will work single crochet stitches around the entire sweater opening edge, followed by a round of slip stitches. This round of slip stitches adds stability to the edge of the crochet cocoon cardigan pattern and helps to keep your cardigan from stretching out as crochet cardigans have a tendency to do.
Lastly, you will crochet around the armhole openings. At this point you can either choose to finish your crochet cardigan without the stretchy sleeve cuffs, or continue on to the stretchy sleeve cuffs.
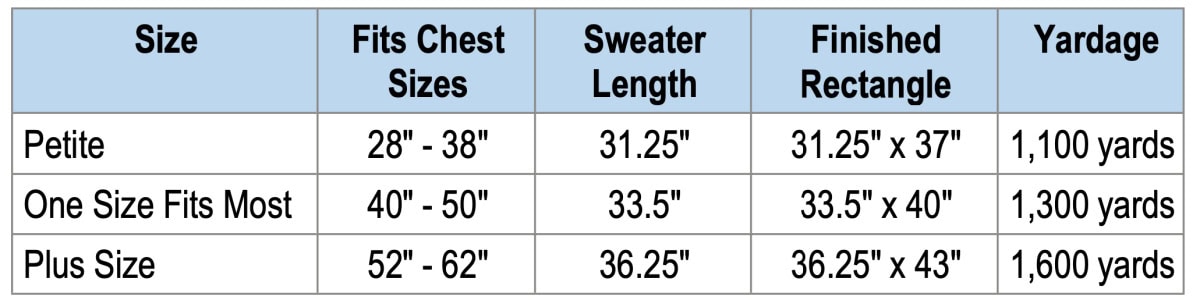
Crochet Cocoon Cardigan Measurements & Yardage Chart
This cocoon cardigan crochet pattern includes written instructions for three sizes: Petite, One Size (fits most), & Plus Size. The cocoon sweater shown in the pictures is a size One Size.
Yarn
I chose a worsted weight 4 yarn because I wanted to make sure my cabled crochet cocoon sweater was warm enough to wear as an overcoat alternative during the spring and fall.
I used Lion Brand Yarns Wool Ease for the cocoon cardigan crochet pattern shown in the photos. This is, hands down, one of my favorite worsted weight yarns!
Wool Ease is a worsted weight / 4, acrylic wool blend yarn and it’s currently available in 31 fabulous colors! You’re sure to find the perfect color for your cable cocoon cardigan.
There are several other worsted weight yarns that would make great substitutes. Lion Brand Wool Ease Recycled, Lion Brand Heartland, Lion Brand Pound of Love, Lion Brand Vanna’s Choice… just to name a few.
Self-Striping Yarn: If you choose a self-striping yarn, your stripes will be vertical on the cocoon sweater and horizontal on the sleeve cuffs.
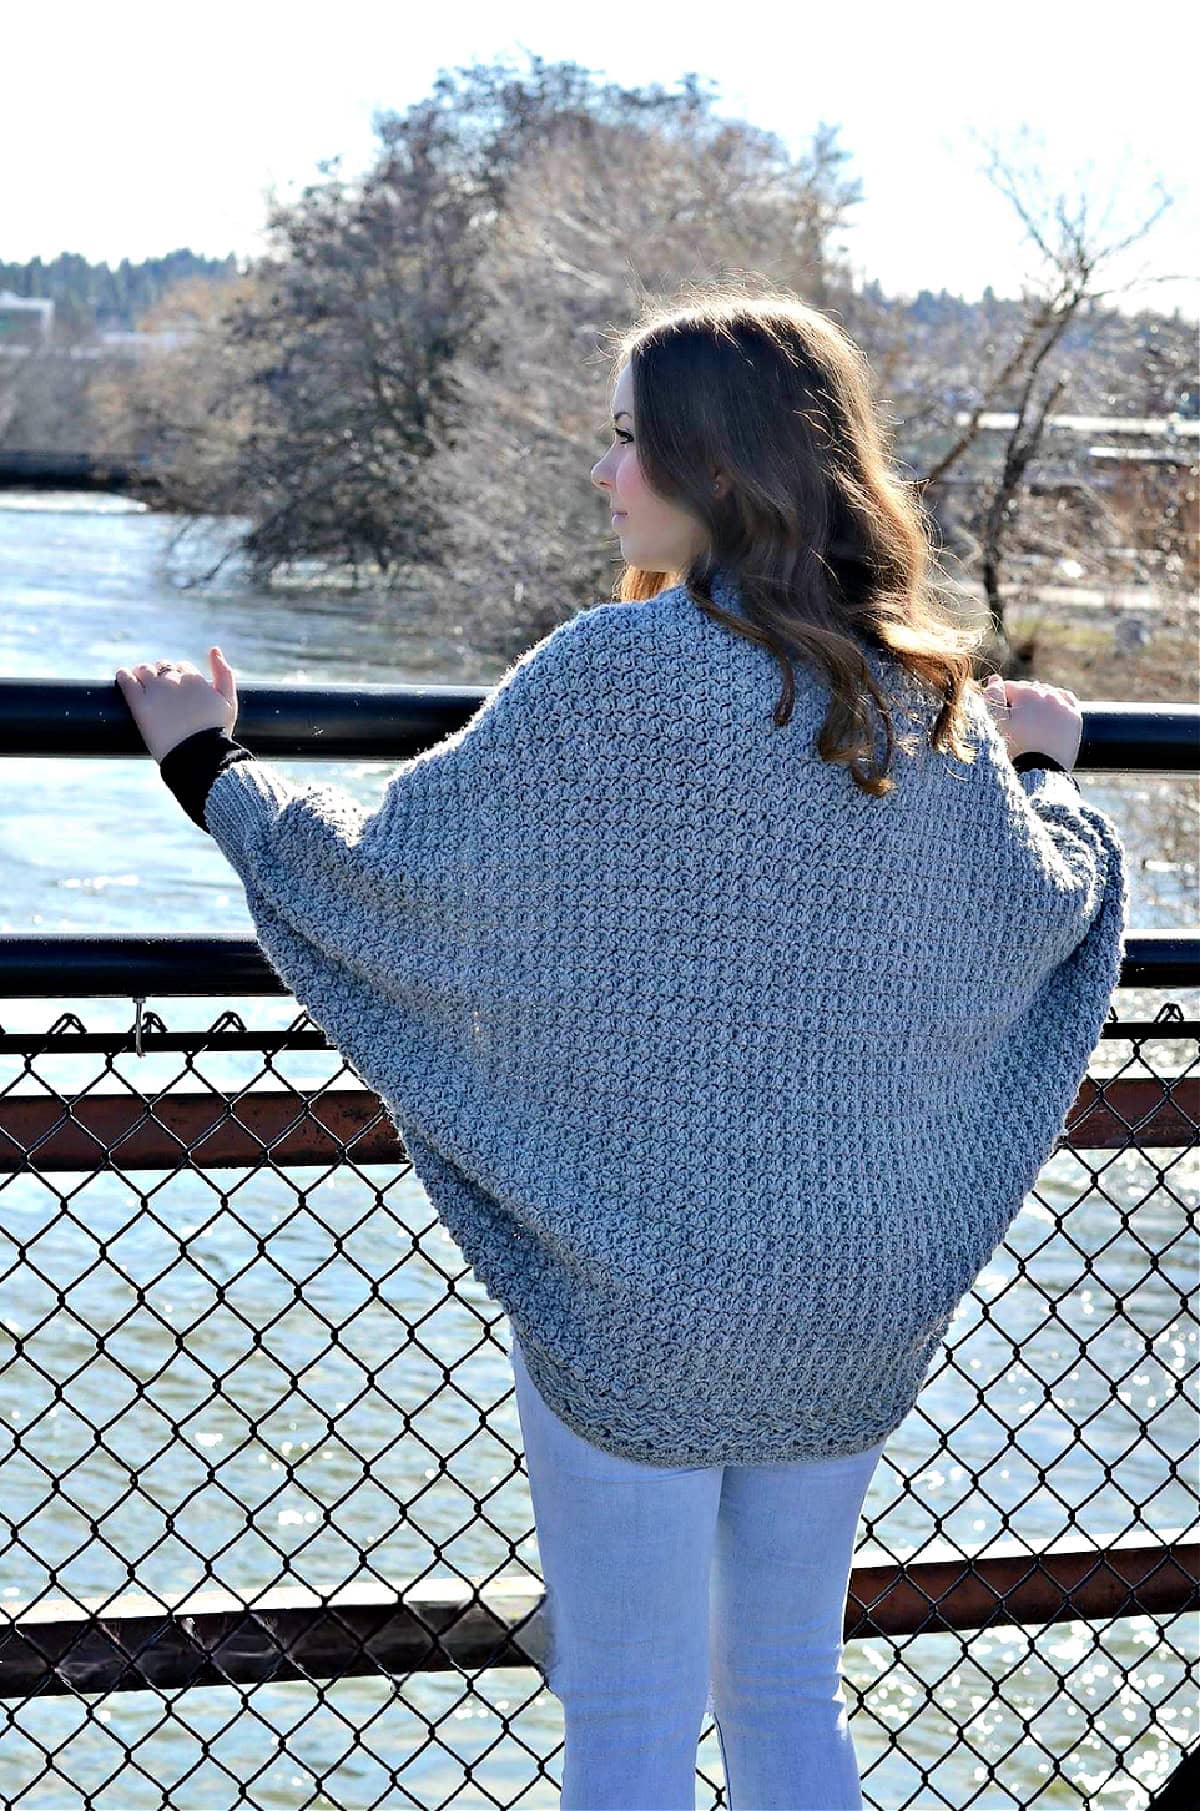
In the photo above, the cocoon crochet cardigan is worn inside out with the crochet cable edges folded down.
Cocoon Cardigan Crochet Pattern Free
The easy crochet cocoon cardigan pattern free is below, but if you love to work offline, I’ve got a couple other great options for you.
Purchase the ad-free, printable PDF, including photos & schematics shown below, on Ravelry, or on Etsy (aff).
Save this pattern to your Ravelry favorites.
Subscribe to my YouTube Channel!
This post contains affiliate links.
Materials
- Yarn: Worsted Weight / 4 / Yarn, (Lion Brand Wool Ease in Grey Heather was used for the sample in the photos) 80% Acrylic / 20% Wool (197 yds / 180 m / 85 g / 3 oz).
- Yardage: See size & yardage chart above.
- Crochet Hooks: H/8/5.00mm; K/10.5/6.50mm; 7.00mm or size needed to obtain gauge (My favorite crochet hooks are the Clover Amour Crochet Hooks, I’ve never had an ache in my hand since switching).
- If you do not have a 7.00mm crochet hook, simply use a 6.50mm hook and chain a little loosely.
- Locking Stitch Markers
- Scissors
- Yarn Needle
Abbreviations (U.S. Terms)
- ch(s): chain(s)
- sl st(s): slip stitch(es)
- st(s): stitch(es)
- sc: single crochet
- ext sc: extended single crochet
- Mext sc: modified extended single crochet
- fpdc: front post double crochet
- fptr: front post treble crochet
- sc2tog: single crochet two together
- yo: yarn over
- SM: stitch marker
- Rep: repeat
- Rnd: round
- RS: Right Side
- BLO: back loop only
- Join yarn with a standing single crochet
Experience Level
- Easy / Intermediate
Gauge
- In ext sc with a 6.50mm crochet hook: 28 sts = 9.75″ W; 13 rows = 4.5″ H
- Stretchy Sleeve Cuff: 10 sts = 2.25″; 14 rows = 2.5″
Sizes
- Petite
- One Size Fits Most
- Plus Size
- See size chart above.
Pattern Notes
- Turning chains are not included in stitch count unless noted otherwise.
- The first stitch of each row is worked into the same stitch as the turning chain, unless noted otherwise.
- I tend to crochet on the tighter side. You may need to go down a hook size (or two) to meet gauge if you crochet on the looser side.
- Yarn Notes: Lion Brand Yarns Wool Ease in Grey Heather was used for the sample. Another comparable worsted weight yarn may be used as long as gauge is met.
- Lion Brand Yarns Wool Ease: 80% Acrylic / 20% Wool (197 yds / 180 m / 85 g / 3 oz)
- Yardage – See Size & Yardage Chart above.
- Changes for Sizes Written as Follows: Petite (One Size Fits Most, Plus Size)
- Changes for Stitch Counts Written as Follows: (Petite, One Size Fits Most, Plus Size)
- Check your gauge: Because this is a garment, I strongly suggest using the gauge swatch instructions below to check your gauge before you begin.
- Cocoon Cardigan Construction: This cable cocoon cardigan is constructed by crocheting a rectangle with a simple cable along each edge. After you crochet the rectangle, you will fold the corners over as shown in the schematics below, then whipstitch short seams to create armhole openings. Next, you’ll add a simple edging to the front cardigan opening. Lastly, edge the armhole openings and add a stretchy sleeve cuff.
- Unwritten Rule of Post Stitches: When working post stitches, you always skip over the top loops of 1 stitch behind each post stitch. If you do not skip over those top loops, you’ll end up increasing your overall stitch count. ** I believe that most of us do this without even thinking about it, but I like to mention it just in case.
Special Stitches
- Extended Single Crochet (ext sc): Insert hook into stitch indicated, yo, pull up a loop, yo, pull thru 1 loop on hook, yo, pull thru remaining two loops on hook.
- Modified Extended Single Crochet (Mextsc): Insert hook into stitch indicated, yo, pull up a loop, (yo, pull thru 1 loop on hook) twice, yo, pull thru remaining two loops on hook.
- Front Post Double Crochet (fpdc): Yo, insert hook from front to back to front around the post of the designated stitch, yo, pull up a loop, yo, pull thru 2 loops, yo, pull thru remaining 2 loops.
- Front Post Treble Crochet (fptr): Yo 2 twice, insert hook from front to back to front around the post of the designated stitch, yo, pull up a loop, (yo, pull thru 2 loops) 3 times.
- Join yarn with a standing single crochet: Begin with a slip knot on your hook, insert your hook into the stitch or space indicated, yo, pull up a loop, yo and draw thru both loops on hook.
Gauge Swatch for Body of Sweater
Gauge: 28 sts = 9.75″ Wide; 13 rows = 4.5″ H
Row 1: WIth yarn & a 6.50mm crochet hook, ch 29, ext sc in the 2nd ch from your hook and in each ch across. Turn. (28 sts)
Rows 2 – 13: Ch 1, ext sc in each st across. Turn. (28 sts)
Your swatch should be approximately 9.75″ W X 4.5″ H.
Crochet Cocoon Cardigan
- Petite Size: You may find it helpful to place a stitch marker in the 1st, 8th, 85th, & 92nd sts and move them up as you work each row.
- One Size Fits Most: You may find it helpful to place a stitch marker in the 1st, 8th, 91st, & 98th sts and move them up as you work each row.
- Plus Size: You may find it helpful to place a stitch marker in the 1st, 8th, 97th, & 104th sts and move them up as you work each row.
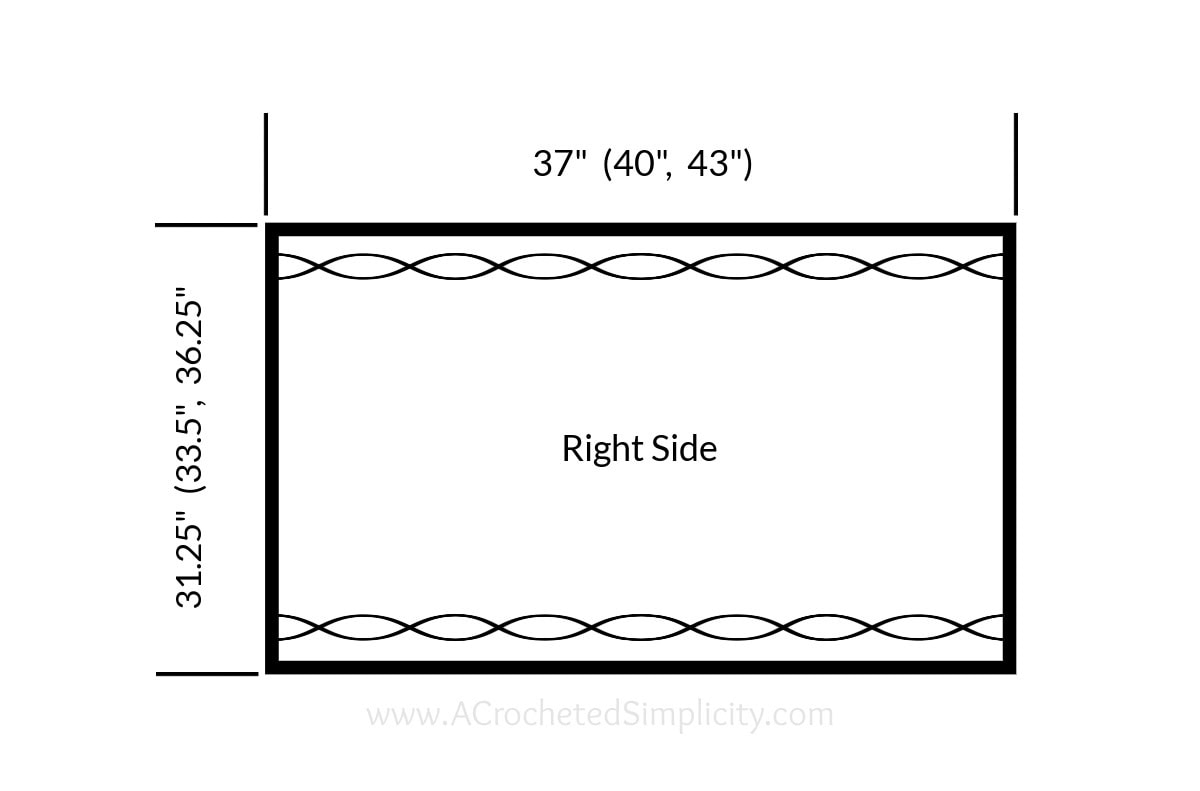
Row 1 (RS): With yarn and a 7.00mm crochet hook, ch 93 (99, 105), switch to a 6.50mm crochet hook, working into the back hump of the foundation ch, ext sc in the 2nd ch from your hook and in each ch across. Turn. (92, 98, 104 sts) Row 1 should be approximately 31.25″ (33.5″, 36.25″) wide.
Row 2: Ch 1, ext sc in each of the next 8 sts, [ skip the next st, (sc, Mextsc) in the next st ] rep from [ to ] across to the last 8 sts, then ext sc in each of the remaining 8 sts. Turn. (92, 98, 104 sts)
Row 3: Ch 1, *ext sc in the next st, work the following post sts around the sts from Row 1, skip the next 2 sts, fptr around each of the next 2 sts from Row 1, working in front of the fptr just made, fptr around each of the 2 skipped stitches from Row 1, fpdc around each of the next 2 sts from Row 1, ext sc in the next st*, [ skip the next st, (sc, Mextsc) in the next sc ] rep from [ to ] across to the last 8 sts, then rep from * to *. Turn. (92, 98, 104 sts)
Row 4: Ch 1, ext sc in each of the next 8 sts, [ skip the next st, (sc, Mextsc) in the next sc ] rep from [ to ] across to the last 8 sts, then ext sc in each of the remaining 8 sts. Turn. (92, 98, 104 sts)
Note: From this point forward, work all post stitches around the post stitches from the previous odd row.
Row 5: Ch 1, *ext sc in the next st, fpdc around each of the next 2 fptr, skip each of the next 2 post sts, fptr around each of the next 2 post sts, working behind the fptr just made, fptr around each of the 2 skipped sts, ext sc in the next st*, [ skip the next st, (sc, Mextsc) in the next sc ] rep from [ to ] across to the last 8 sts, then rep from * to *. Turn. (92, 98, 104 sts)
Row 6: Rep Row 4.
Row 7: Ch 1, *ext sc in the next st, skip the next 2 post sts, fptr around each of the next 2 post sts, working in front of the fptr just made, fptr around each of the 2 skipped post stitches, fpdc around each of the next 2 post sts, ext sc in the next st*, [ skip the next st, (sc, Mextsc) in the next sc ] rep from [ to ] across to the last 8 sts, then rep from * to *. Turn. (92, 98, 104 sts)
Rows 8 – 108 (116, 124): Rep Rows 4- 7, ending with a Row 4 Rep.
Fasten off. Weave in all ends. Your rectangle should be approximately 31.25″ x 37″ (33.5″ x 40″, 36.25″ x 43″). Continue on to Sweater Assembly on the next page.
Sweater Assembly
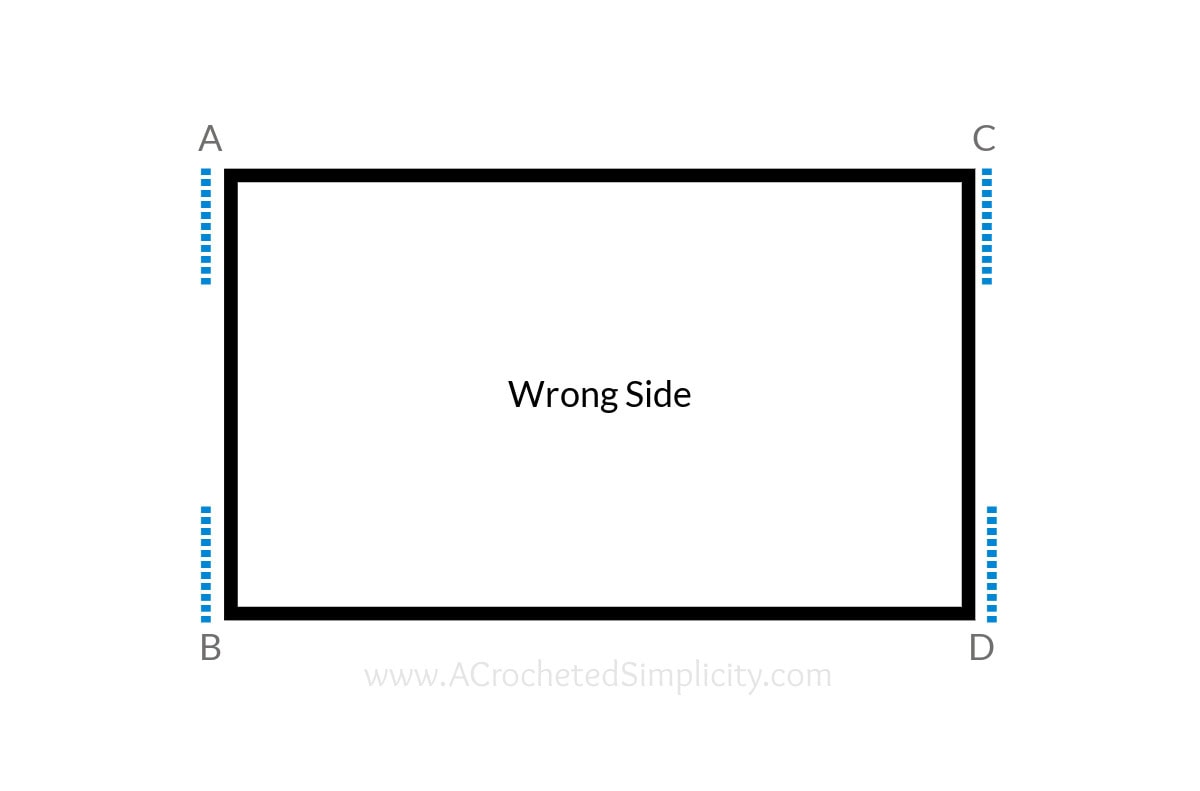
Step 1: The schematic below shows the RS of your sweater facing up with the cables running horizontally.
Flip the panel over so the WS is facing up, with the cables running the same direction as the schematic below. Lay your finished sweater panel out in front of you, wrong side facing up, and the longest edge positioned horizontally (your cables should be running horizontally at this point). The blue dashed lines shown are to show where the seams will be worked after the rectangle is folded.
Step 2: Fold the top and bottom left corners in towards each other (A and B). Pull them in until they meet. Repeat for the top and bottom right corners (C and D) on the opposite side. See the schematic below.
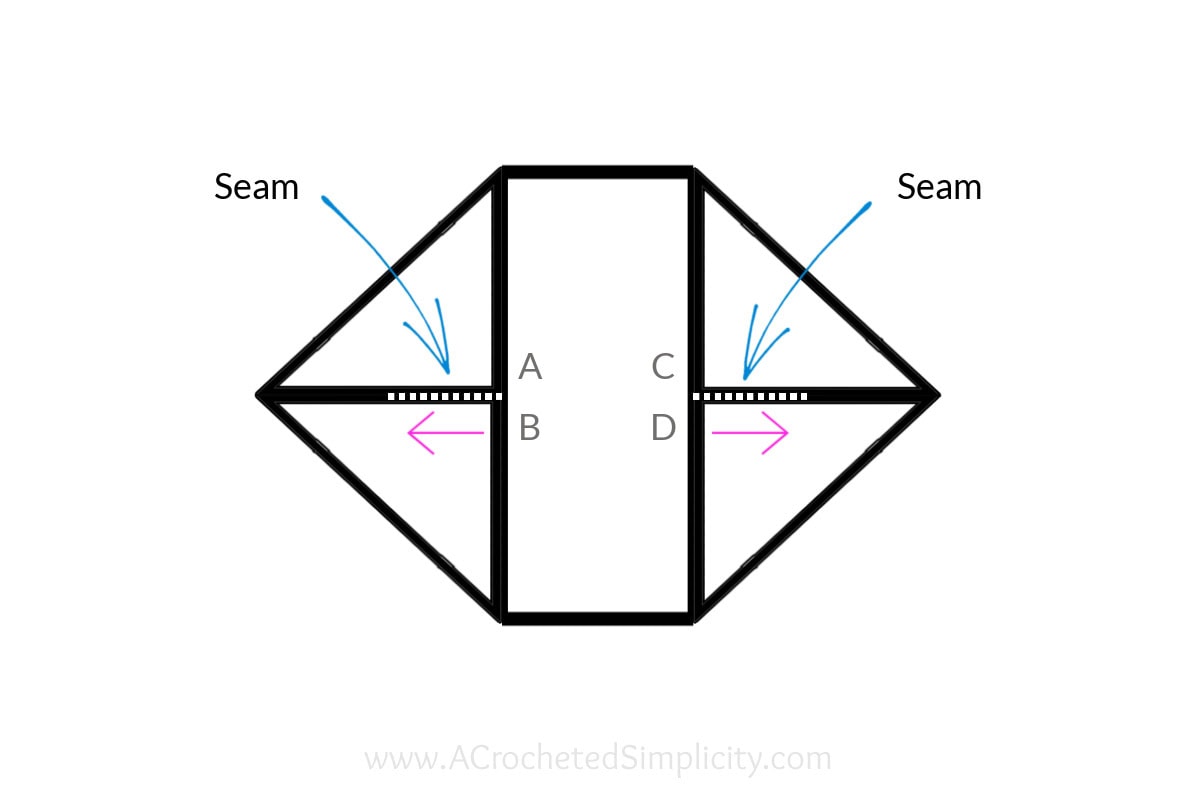
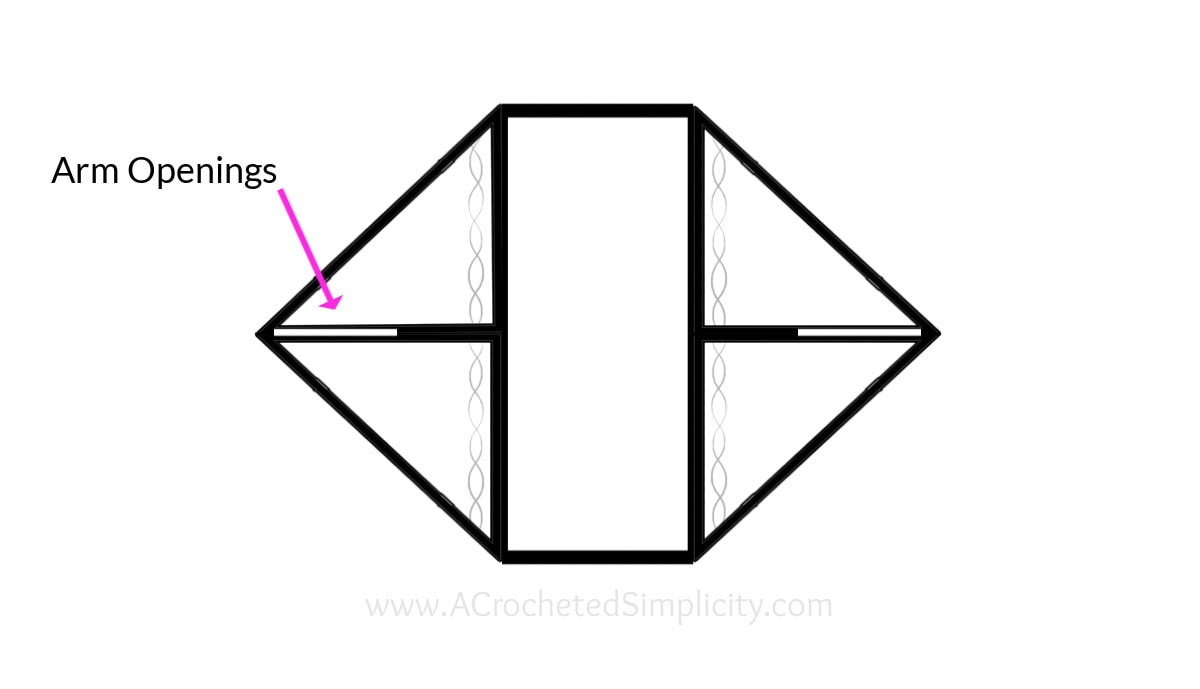
Step 3: Beginning where the corners meet and working towards the armhole opening, whipstitch 22 sts where the edges of the panel touch (white dashed line in the schematic below) (approximately 7.66″). Repeat on the opposite side to create the second armhole. Each armhole opening is approximately 16.75″ (18.75″, 21″) circumference. See the pink arrows in the previous schematic. The arrows show which direction to whipstitch (from the corners towards the armhole openings).
Step 4: Weave in all ends. Continue on to Edging the Sweater Opening.
Edging the Sweater Opening
Here you’re going to add a simple edge to the main opening of the sweater (the part that goes up and around your neck and back).
Tip: As you’re working round 1, if your edge begins to ripple, you may want to go down a hook size or two. Alternately, if your edge begins to cinch or pull inward, you may want to go up a hook size or two. The same applies to round 2.
Rnd 1: With yarn and a 6.50mm crochet hook & working into the sides of the rows of the panel, join the yarn with a standing sc nearest one of the seams for an armhole, work 2 sc into the side of the next row, [ sc into the side of the next row, 2 sc into the side of the next row ] rep from [ to ] around the opening. Join with a sl st to the 1st sc of the rnd. Stitch count isn’t crucial.
Rnd 2: Do not ch-1, sl st into each st around. Special Join Technique: Pull up on the loop on your hook, remove hook from loop, insert your hook (from back to front) under the loops of the 1st sl st of the round, place loop back on your hook, tighten loop and pull it thru to the back side of your work.
Fasten off. Weave in ends. Continue on to the Stretchy Sleeves, if desired.
If you’re not adding sleeves, your sweater is complete!
Stretchy Sleeves
Note: The sleeves will add approximately 4″ to each side of your sweater for an overall width of 45″ (48″, 51″) from cuff to cuff. They are designed to be a 3/4 length that can be pushed up, as desired. If you’d prefer a longer sleeve, simple add on to the beginning chain in Row 1.
Gauge in stitch pattern as written below: 10 sts = 2.25″; 14 rows = 2.5″
Row 1 (RS): At the inside of the armhole opening, with yarn & a 5.00mm crochet hook, join yarn with a sl st in the st to the left of the seam, ch 19, sc in the 2nd ch from your hook, sc in each of the next 16 chs, sc2tog in the next ch and the same st as the ch-19. (18 sts)
Row 2: Sl st into the next st along the edge of the sweater, Turn, working in the BLO sl st in each st across. (18 sts)
Row 3: Ch 1, Turn, working in the BLO, sc in each of the next 17 sts, sc2tog in the next st & the next st along the edge of the sweater. (18 sts)
Rows 4 – 47 (53, 59): Rep Rnds 2 – 3.
Do not fasten off. Continue below to Seaming the Sleeve Cuff.
Seaming the Sleeve Cuff
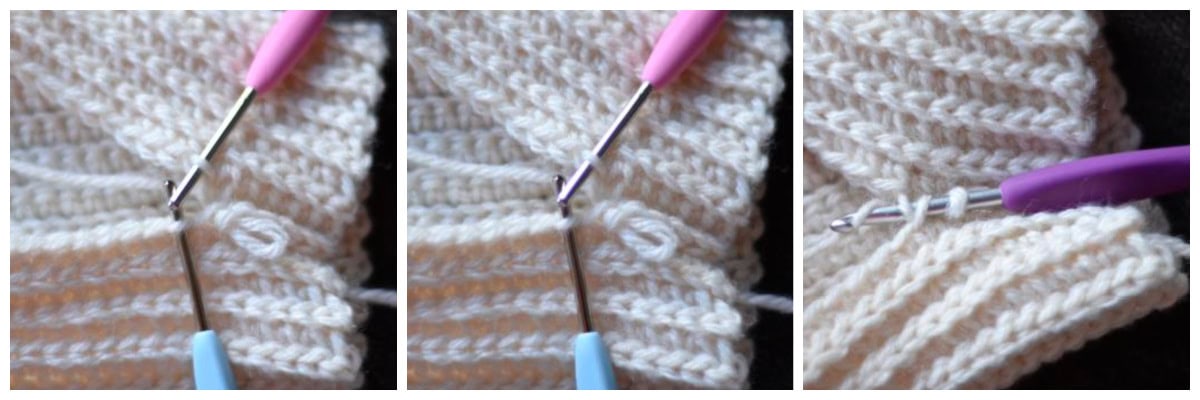
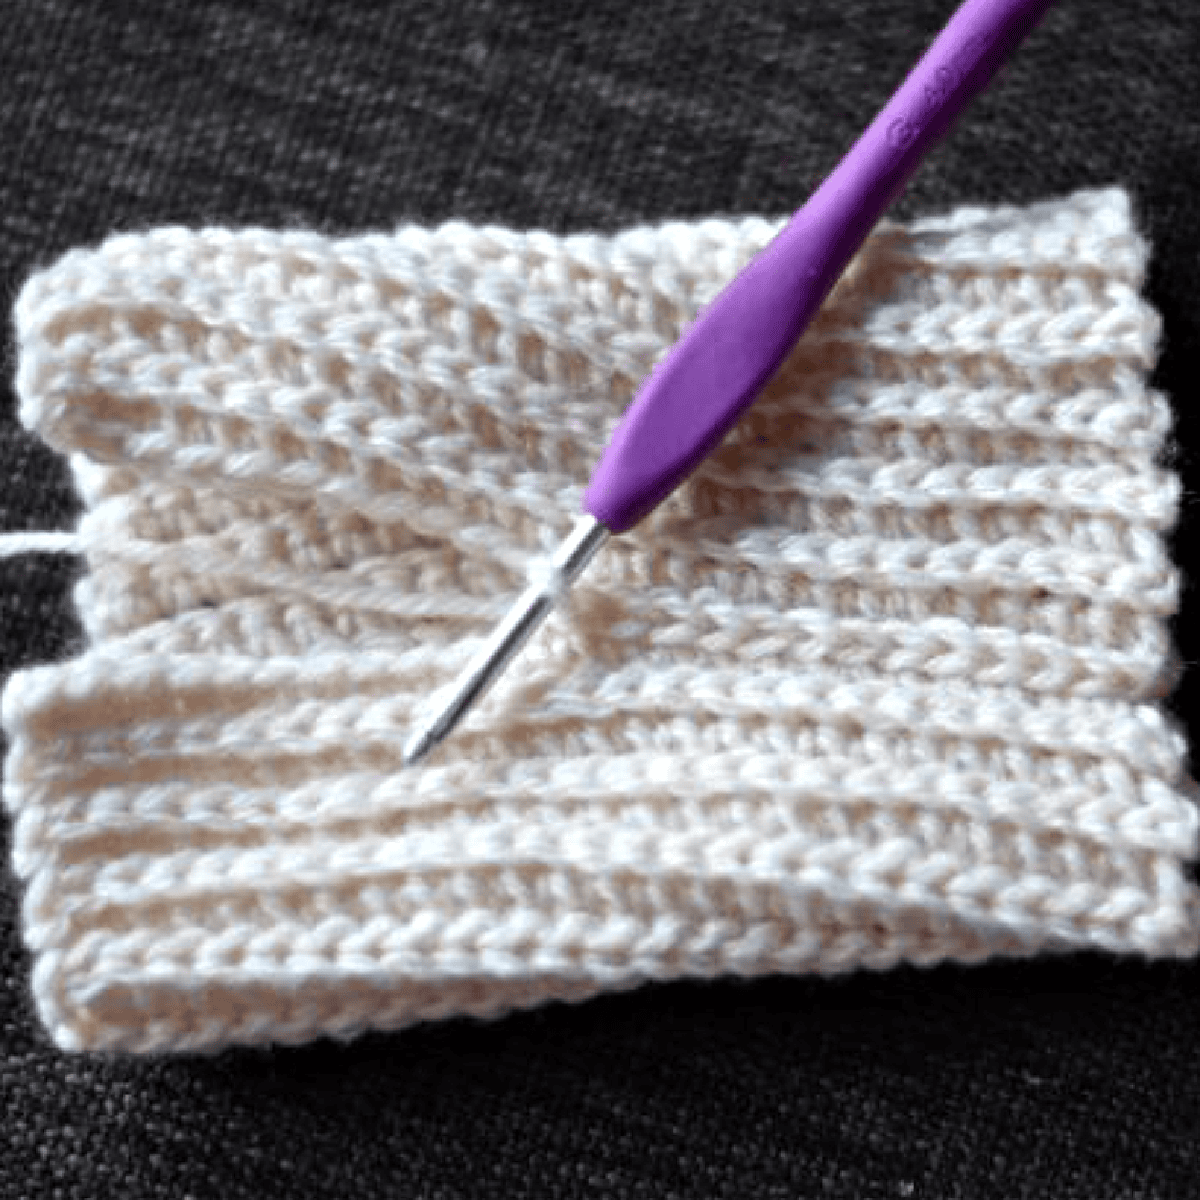
With the Right Side of the stretchy sleeve facing you bring the first row up to meet the last row. Position your working yarn so that it’s on the inside of the sleeve (see photos below). Slip stitch the rows together using the following method: insert your hook (from front to back) into the FLO of the 1st stitch of Row 1 (see light blue hook in photos below), insert your hook (from back to front) into the BLO of the 1st stitch of the last row (see pink hook in photos below), yo, pull thru all loops on your hook (see purple hook in photos below. Continue in this way across the row to complete the seam.
Fasten off, weave in ends. After seaming, repeat instructions for the second sleeve and then weave in all ends. Your crochet cocoon cardigan is complete!
Wear it Two Ways! Wear your cardigan right side out, OR wear it inside out with the cables folded down. The photos above show it modeled both ways!
I MADE IT! NOW WHAT?
Pin this post!: Save this crochet cocoon cardigan pattern to your Pinterest boards so that you can come back and make it again.
Leave a comment below: We love to hear your feedback.
Share Your Finished Projects on Facebook or Instagram: I love to see your finished projects! Share with us on social media and tag me @acrochetedsimplicity or use the hashtag #ACrochetedSimplicity so I can find your posts.
Join us in the Facebook Community Group!
Come share your finished projects with us in the A Crocheted Simplicity Crochet Community Group on Facebook. Join us for fun community events such as crochet alongs, join in on crochet conversations, ask questions, get advice, and share your love for crochet!

More Free Crochet Patterns for Sweaters I Think You’ll Love
More Crochet Sweater Patterns
Are you looking for more crochet sweater patterns? We have several more patterns for crochet clothes, including matching sweaters for mothers and daughters and even for fathers and sons. We also have a sweater wrap that is great for all occasions!