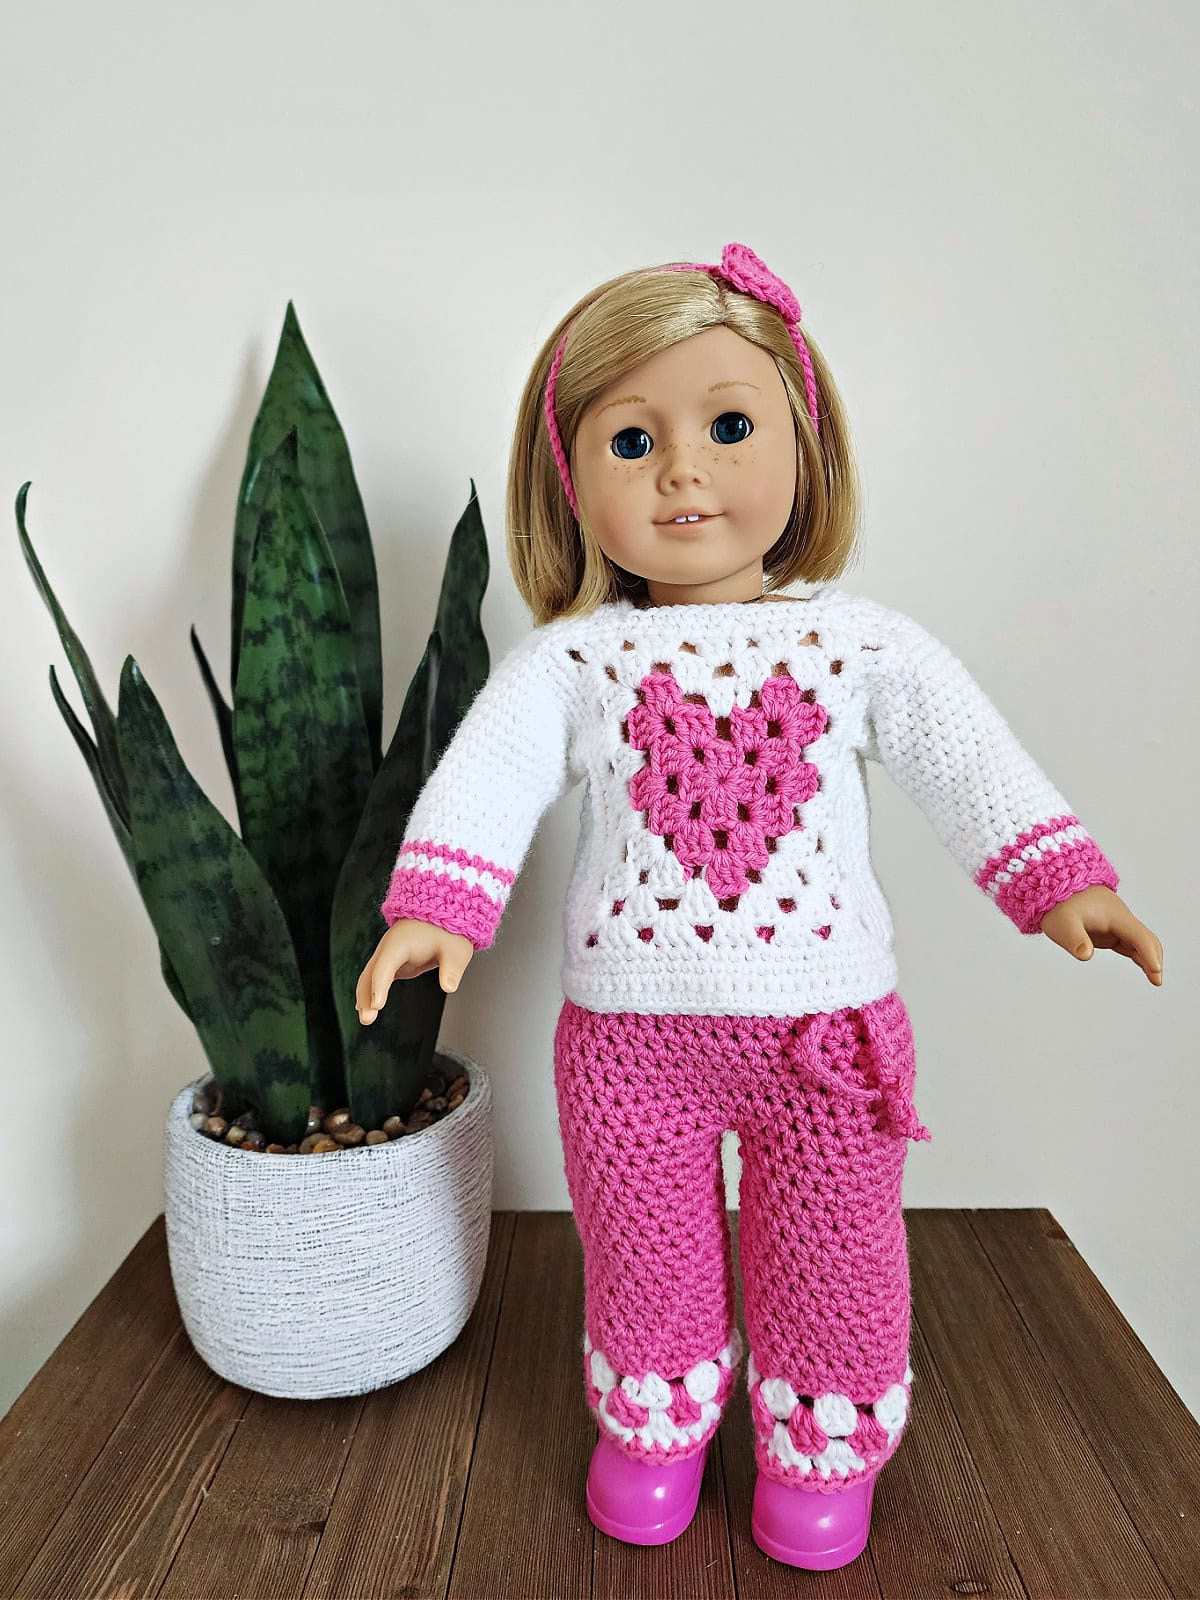
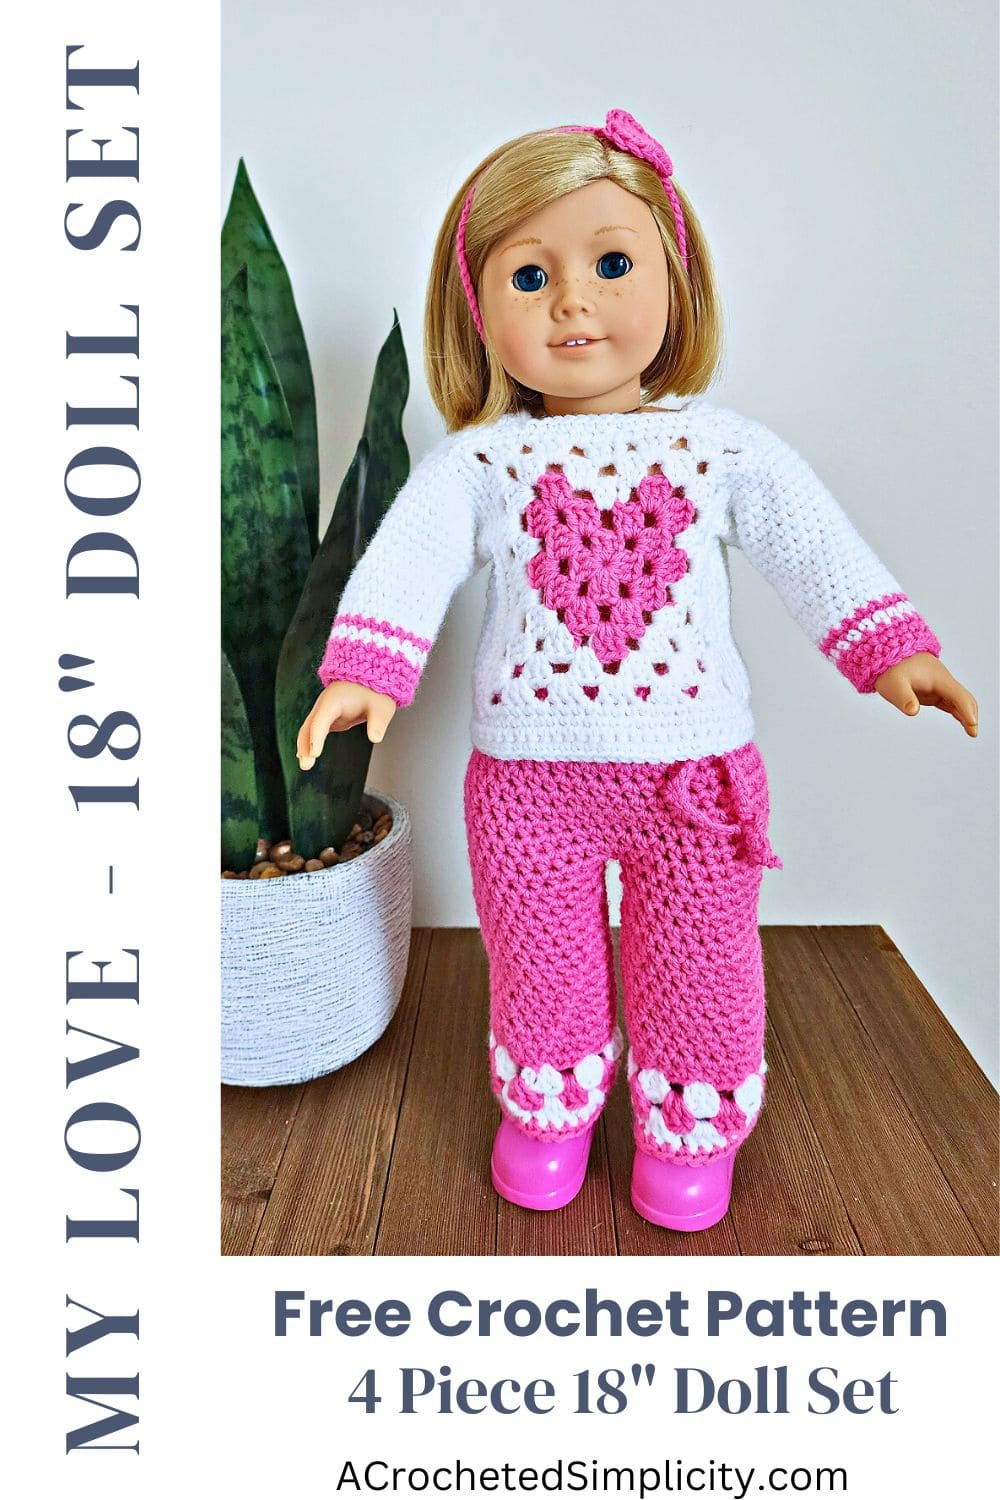
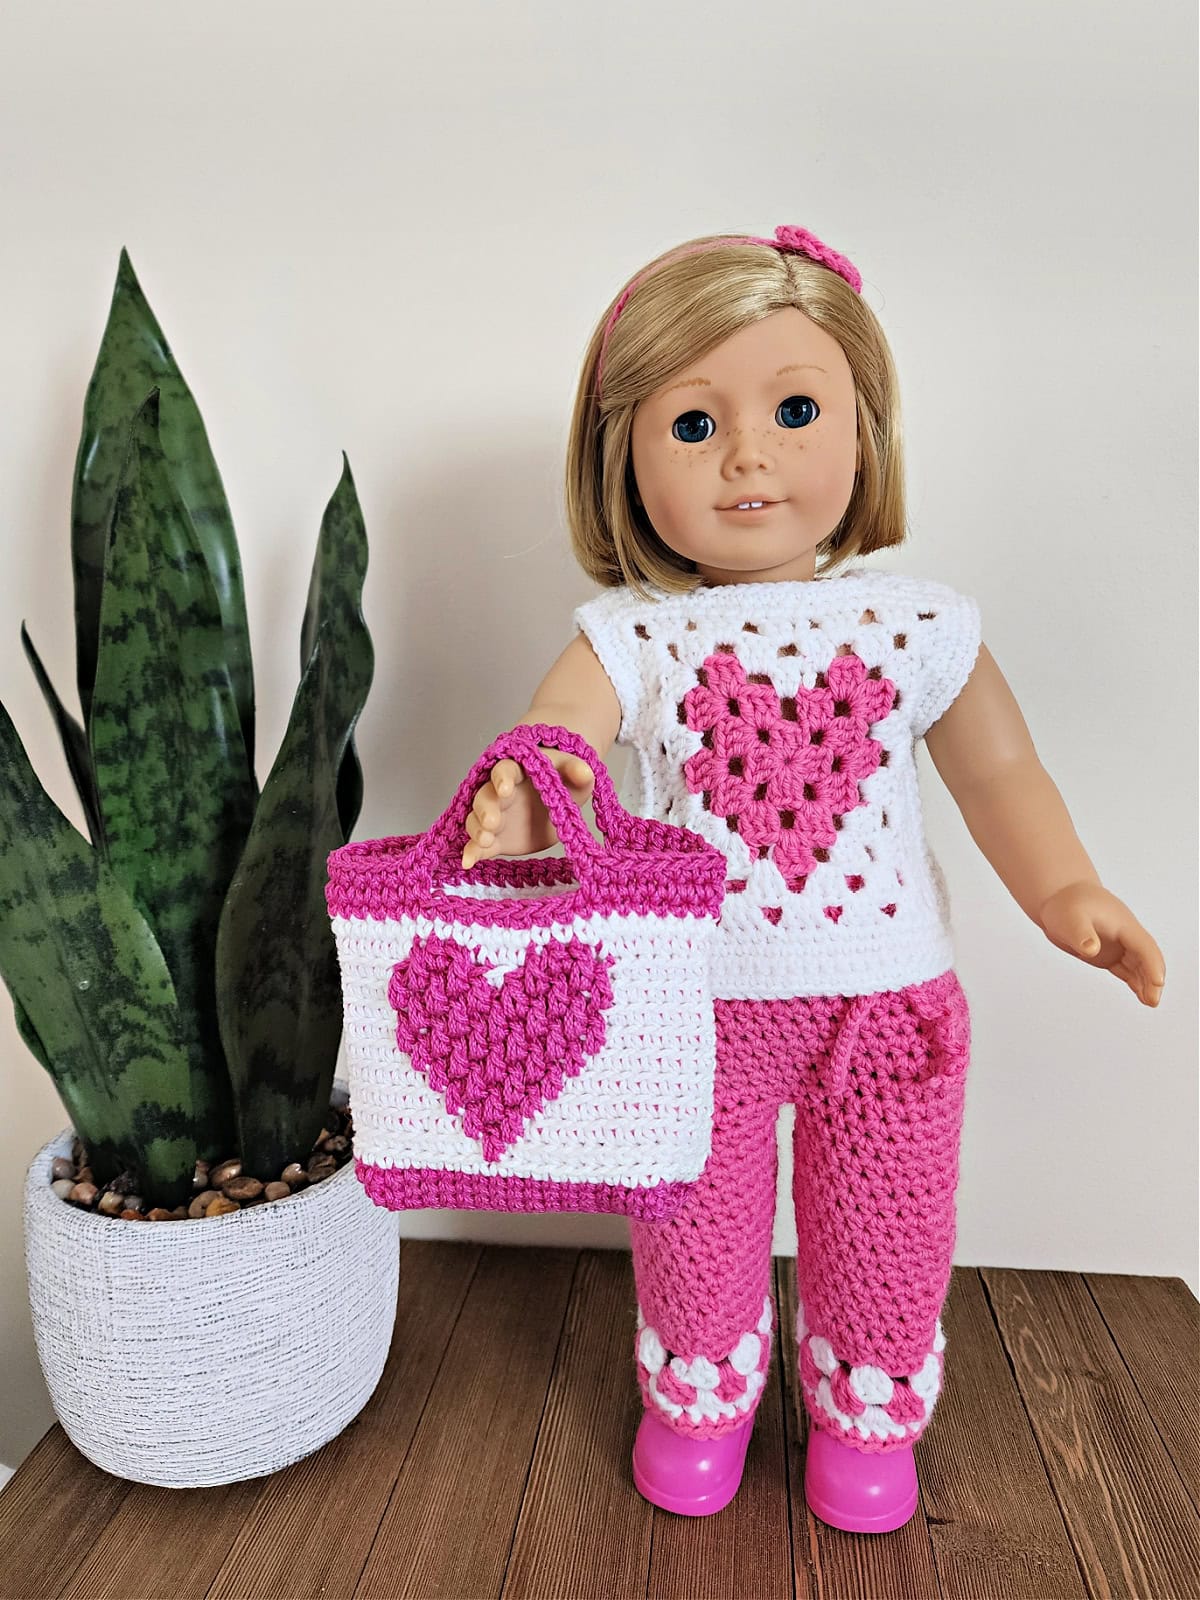
Crochet Doll Clothes – My Love 18″ Doll Set
Crochet doll clothes are tiny garments that are perfect for using up yarn scraps, practicing crochet skills, and creating thoughtful, personalized gifts.
Whether you’re a beginner or an expert, crocheting doll clothes is a fun and rewarding craft with endless creative possibilities.
You’ll find the crochet doll clothes patterns in the post below for free, or you can find an ad-free printable PDF on Ravelry, or Etsy (aff).
Crochet doll clothes are handmade miniature outfits crafted using crochet techniques. They allow for customization, making each doll unique with stylish dresses, sweaters, hats, and accessories. My youngest daughter loved picking out colors for her doll’s new wardrobe additions.
Why Crochet Doll Clothes?
Crocheting doll clothes is a fantastic way to use up leftover yarn, experiment with new stitches, and craft unique outfits. The following are a few reasons why I like making crochet doll clothes:
- Customization – Create one-of-a-kind outfits tailored to your doll’s style, or make matching dolly & me outfits for girls and their dolls.
- Eco-Friendly – Reduce waste by using yarn scraps.
- Perfect Gift Idea – Handmade doll clothes make thoughtful and personalized gifts.
- Great for Practice – Small projects help improve crochet skills without a huge time commitment.

How To Get The
My Love 18″ Doll Outfit
Option 1: Scroll down for the crochet doll clothes patterns free right here in this blog post.
Option 2: Purchase the ad-free printable PDF from one of my shops:
What is the Best Yarn for Doll Clothes?
Acrylic and cotton yarns work best for crochet doll clothes. Not only are they the most economical, but they also hold up to repeated washes.
Wool or wool blends are another great option since the finished pieces will be worn by dolls and you don’t have to worry about, but they are more pricey.
Related: We have a free crochet pattern for a cute matching tote for your doll too!
Yarn
For the My Love 18″ Crochet Doll Clothes Pattern, I chose Lion Brand Yarns Pound of Love. Pound of Love is a premium acrylic yarn that holds up well to many washes, making it the perfect yarn for doll clothes.
Pound of Love is the perfect yarn for so many different crochet projects and the yardage in one ball is incredible at 1,020 yards, making it affordable too!
Free Crochet Doll Clothes Pattern
The free crochet doll clothes pattern is below, but if you love to work offline, I’ve got a couple other great options for you.
Purchase the ad-free, printable PDF, on Ravelry, or on Etsy (aff).
This post contains affiliate links.
Materials
- Yarns: Worsted weight 4 yarn was used for this 4-piece crochet doll clothes pattern.
- Worsted Weight / 4 / Yarn, Lion Brand Yarns Pound of Love, worsted weight yarn, 100% Premium Acrylic, (solids: 1,020 yards / 454 g / 16 oz / 932 m)
- Yardage: See Sizes & Yardage Below
- Crochet Hook: G/6/4.00mm; H/8/5.00mm; or size needed to obtain gauge (My favorite crochet hooks are the Clover Amour Crochet Hooks, I’ve never had an ache in my hand since switching).
- Locking Stitch Markers (can be helpful when seaming)
- Scissors
- Yarn Needle
- Buttons (4) 1/2″ diameter
Abbreviations (U.S. Terms)
- ch(s): chain(s)
- sl st(s): slip stitch(es)
- st(s): stitch(es)
- sp: space
- sc: single crochet
- hdc: half double crochet
- dc: double crochet
- tr: treble crochet
- ext sc: extended single crochet
- sc2tog: single crochet decrease
- BLO: back loop only
- FLO: front loop only
- RS: right side
- WS: wrong side
- Rep: repeat
- Rnd: round
- SM: stitch marker
- yo: yarn over
- MC: main color
- CC: contrasting color
- Join yarn with a standing single crochet
- Join yarn with a standing half double crochet
Experience Level
- Easy
Gauge
- In sc with a 4.00 mm hook: 5 sts = 1″; 4 rows = 1.125″
- In ext sc with a 4.00mm hook: 8 sts = 2″; 5.5 rows = 2″
- In hdc with a 5.00 mm hook: 7.5 sts = 2″; 6 rows = 2″
- Gauge for the granny square is listed in the instructions.
Size
- Fits 18″ Dolls
Special Stitches
- Extended Single Crochet (ext sc): Insert hook into stitch indicated, yo, pull up a loop, yo, pull thru 1 loop on hook, yo, pull thru remaining two loops on hook
- Join yarn with a standing single crochet: Begin with a slip knot on your hook, insert your hook into the stitch or space indicated, yo, pull up a loop, yo and draw thru both loops on hook.
- Join yarn with a standing hdc: Join with a standing hdc is worked in the same technique as a join with a standing sc except you yo before beginning. Begin with a slip knot on your hook. YO, insert your hook into the stitch or space indicated, yo, pull up a loop, yo, pull through all remaining loops on your hook.
Pattern Notes
- Turning chains are not counted as stitches, unless noted otherwise.
- Yarn Notes: Lion Brand Yarns Pound of Love was used for the samples. Other comparable yarns may be used as long as gauge is met.
- Lion Brand Yarns Pound of Love, worsted weight yarn, 100% Premium Acrylic, (solids: 1,020 yards / 454 g / 16 oz / 932 m)
- Yardage
- MC: Bubblegum (pink) 130 yards
- CC: White 140 yards
- Doll Clothes Construction: The doll sweater is made by first making a
heart granny square and then adding sides and sleeves. The pattern includes instructions for both short and long sleeves. The doll pants are worked from the waist down. The doll
headband is made with a small crochet heart and simple crochet chain. - Matching Doll Purse: Make a cute little matching tote bag for your doll with our free crochet doll purse pattern.
My Love 18″ Doll Clothes Patterns – 4 Piece Set
Heart Sweater
Sleeveless or Long Sleeve: Both the short sleeve and long sleeve heart sweater options are worked identically until you reach the sleeves. Once you reach the sleeves, you’ll find instructions for how to continue depending on which sleeve option you’ve chosen.
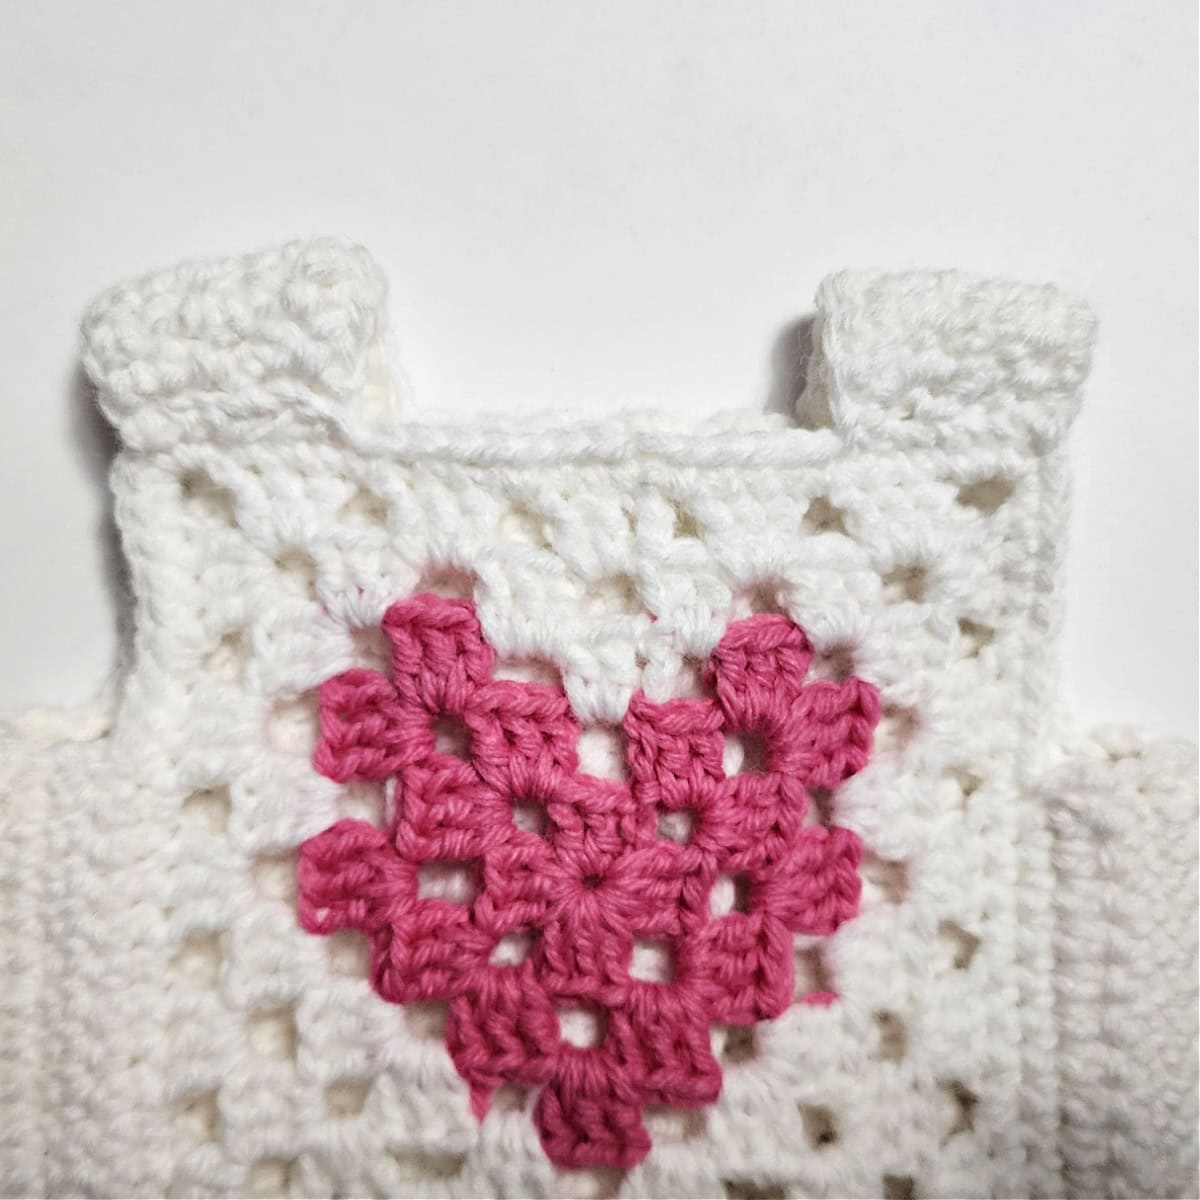
Heart Granny Square
You’ll begin the heart sweater with a heart granny square that becomes the front of the doll sweater.
Rnd 1 (RS): With MC yarn & a 4.00mm crochet hook, ch 4 (counts as a st), 2 dc in the 4th ch from your hook, ch 3, (3 dc in the same ch, ch 3) 3 times. Join with a sl st to the top of the ch 4. (12 sts + 4 ch-3 sps)
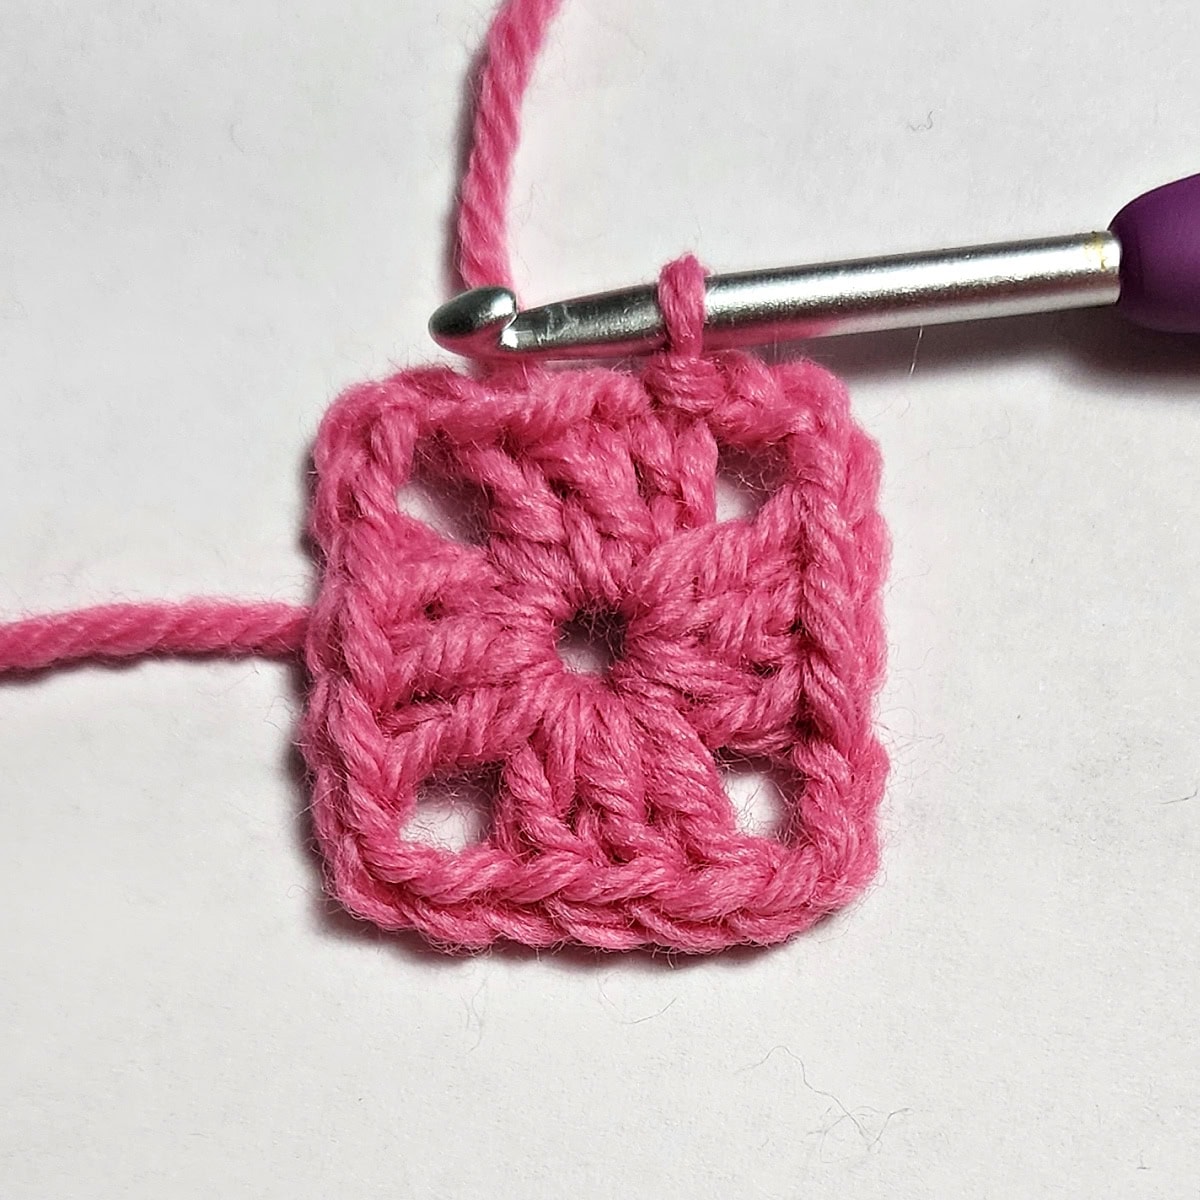
Rnd 2: Ch 4 (counts as 1 dc & a ch-1 sp), [ (3 dc, ch 3, 3 dc) in next ch-3 sp, ch 1 ] work from [ to ] 3 times, (3 dc, ch 3, 2 dc) in last ch-3 sp. Join with a sl st to 3rd ch. (24 sts + 4 ch-3 sps, + 4 ch-1 sps) Size at this point should be approximately 2-1/8″ square.


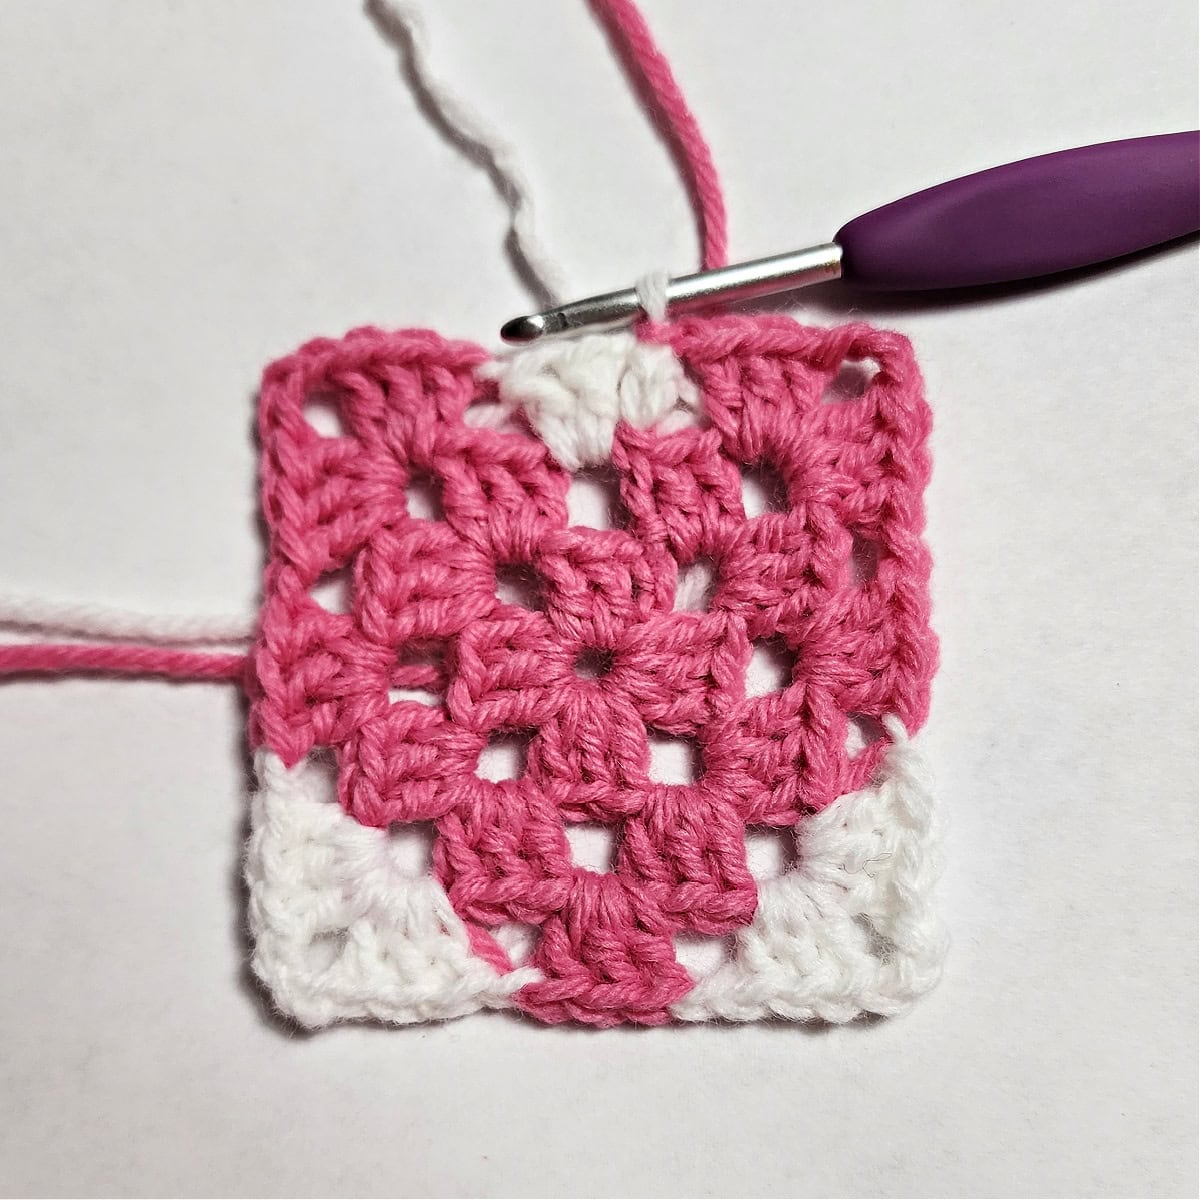
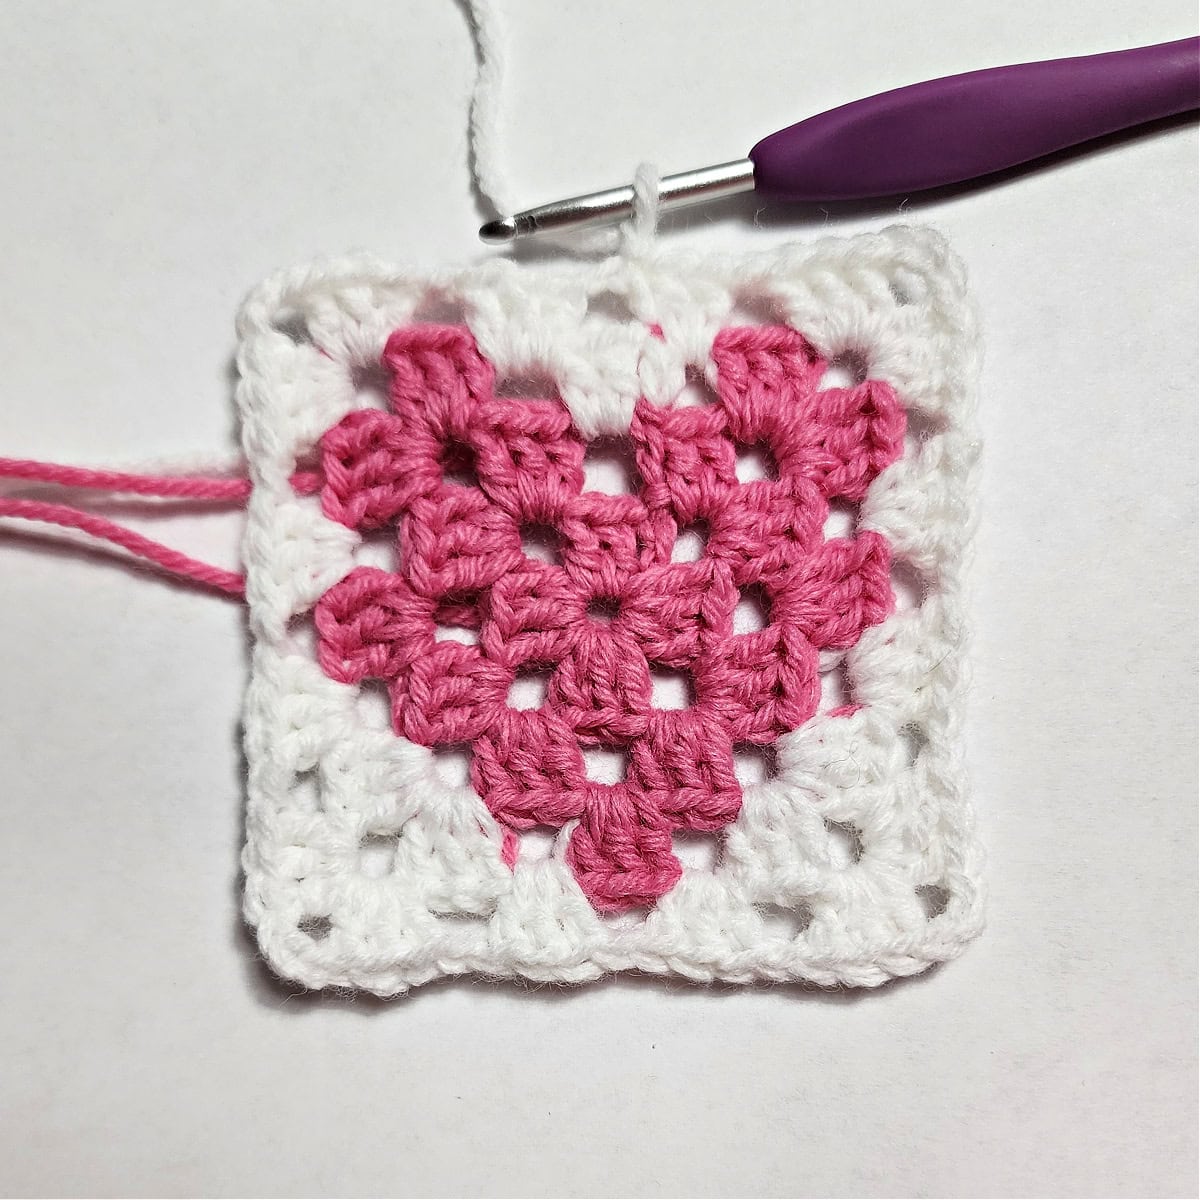
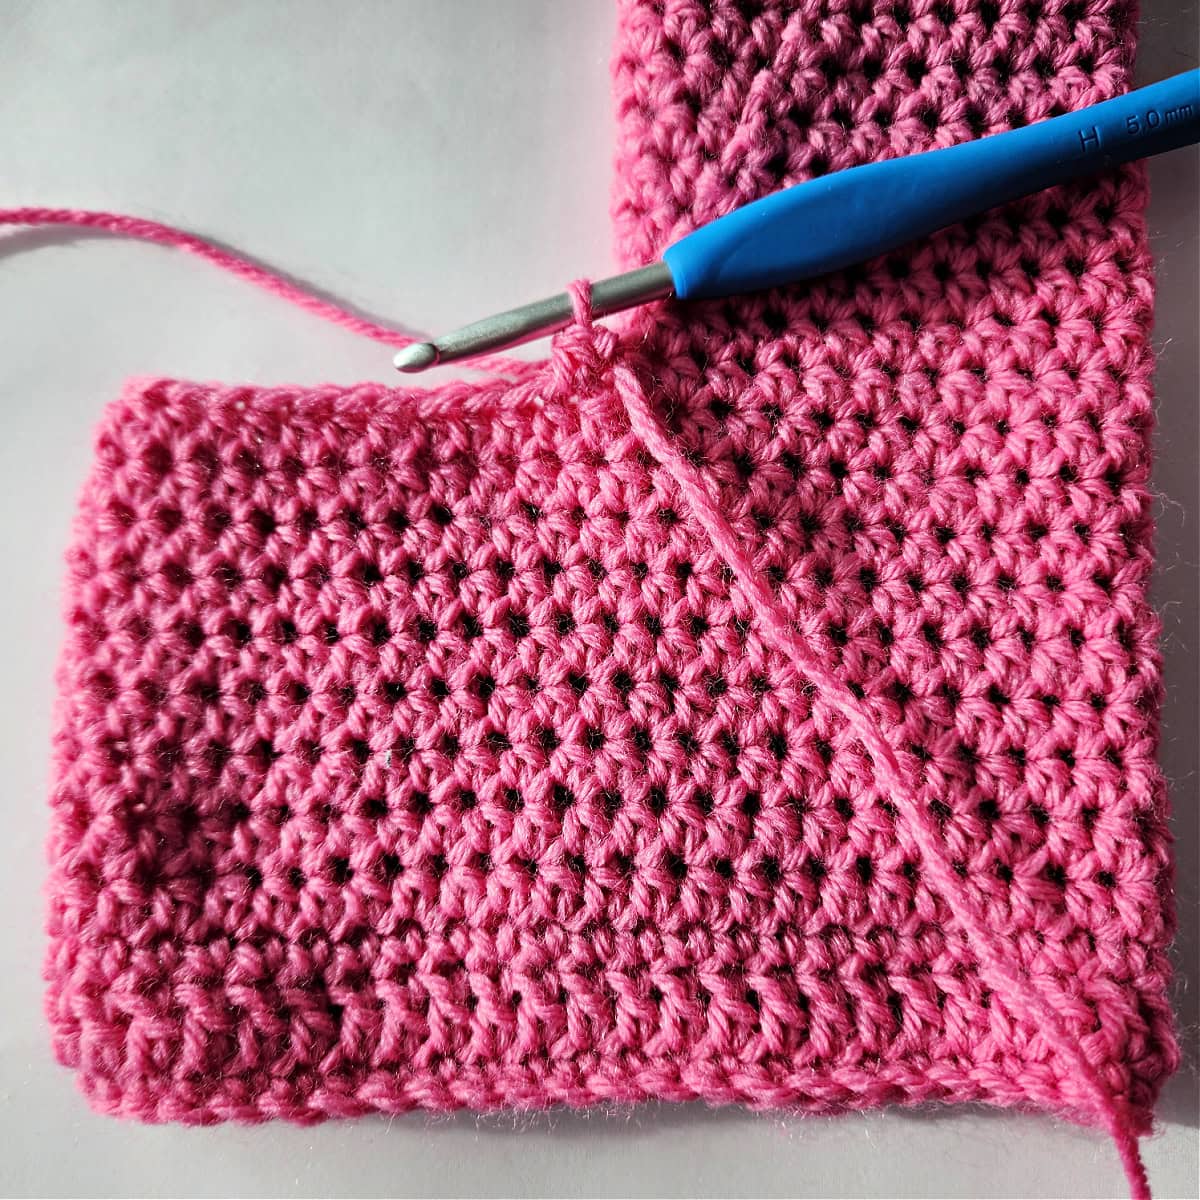
Note: I’ve broken Round 3 apart because of the color changes worked within the round. Carry the unused yarn with you and work over it as you go. Work all color changes on the last pull through of a stitch. See photos below for a visual of the round.
Rnd 3:
- With CC/white: Ch 3 (counts as a st), 2 dc in same ch-1 sp, ch 1,
- With MC/pink: (3 dc, ch 3, 3 dc) in next ch-3 sp, ch 1, 3 dc in next ch-1 sp,
- With CC/white: ch 1, (3 dc, ch 3, 3 dc) in next ch-3 sp, ch 1,
- With MC/pink: 3 dc in next ch-1 sp,
- With CC/white: ch 1, (3 dc, ch 3, 3 dc) in next ch-3 sp, ch 1,
- With MC/pink: 3 dc in next ch-1 sp, ch 1, (3 dc, ch 3, 3 dc) in next ch-3 sp, ch 1.
Join with a sl st to the 3rd ch. (36 sts + 4 ch-3 sps + 8 ch-1 sps) Size at this point should be approximately 3″ square.
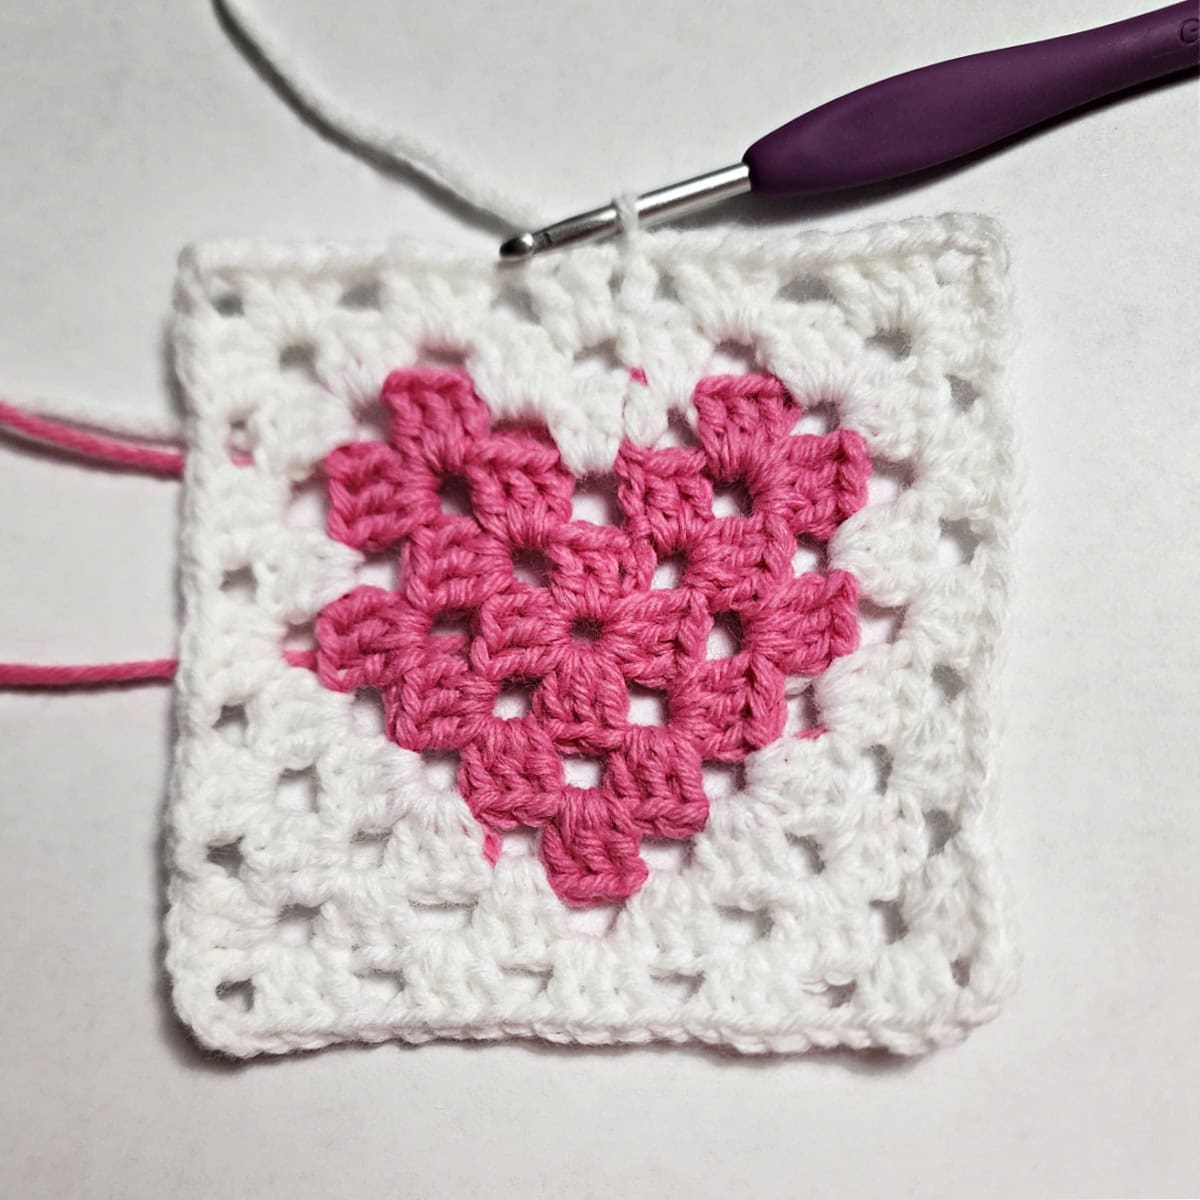
Rnd 4 (CC): Ch 4 (counts as dc ch-1 sp), 3 dc in next ch-1 sp, ch 1, [ (3 dc, ch 3, 3 dc) in next ch-3 sp, ch 1, (3 dc in next ch-1 sp, ch 1) twice ] work from [ to ] 3 times, (3 dc, ch 3, 3 dc) in next ch-3 sp, ch 1, 2 dc in last ch-1 sp. Join with a sl st to the 3rd ch. (48 sts + 4 ch-3 sps + 12 ch-1 sps) Size at this point should be approximately 3-3/4″ square.
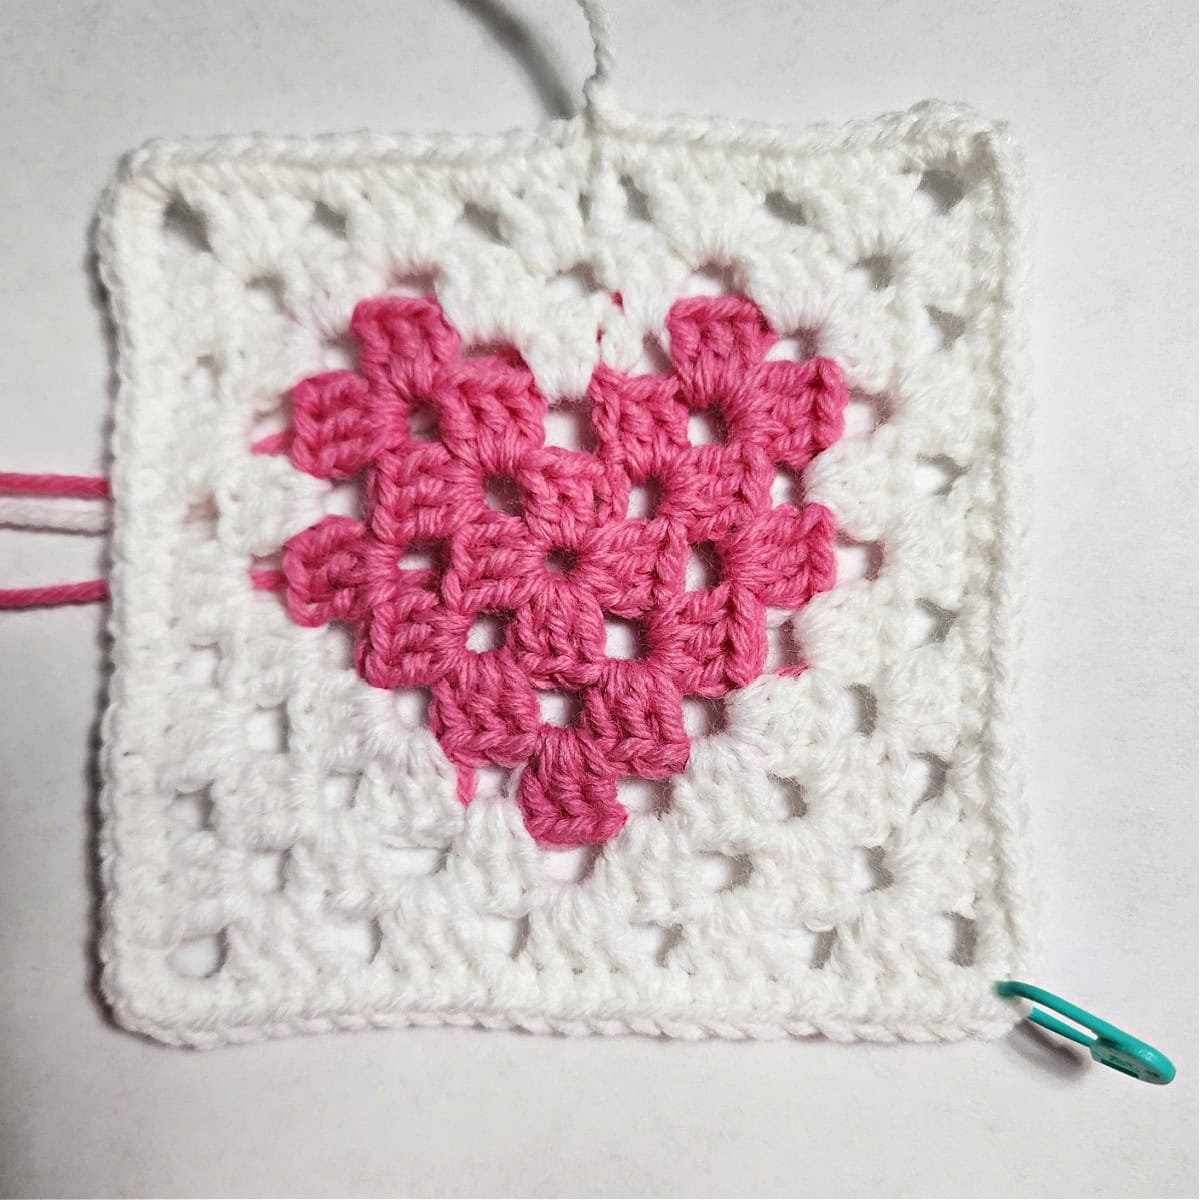
Rnd 5 (CC): Ch 3, 2 dc in same ch-1 sp, ch 1, 3 dc in next ch-1 sp, [ (3 dc, ch 3, 3 dc) in next ch-3 sp, ch 1, (3 dc in next ch-1 sp, ch 1) 3 times ] work from [ to ] 3 times, (3 dc, ch 3, 3 dc) in next ch-3 sp, ch 1, 3 dc in next ch-1 sp, ch 1. Join with a sl st to the 3rd ch. (60 sts + 4 ch-3 sps + 16 ch-1 sps) Size at this point should be approximately 4-1/2″ square.
Rnd 6 (CC): Ch 1, [ sc in each st and ch-1 sp to the next ch-3, (2 sc, ch 1, 2 sc) in the next ch-3 sp] work from [ to ] 4 times, sc in each st and ch-1 sp to the end. Join with a sl st to the 1st sc. (92 sts + 4 ch-1s) Size at this point should be approximately 4-3/4″ square.
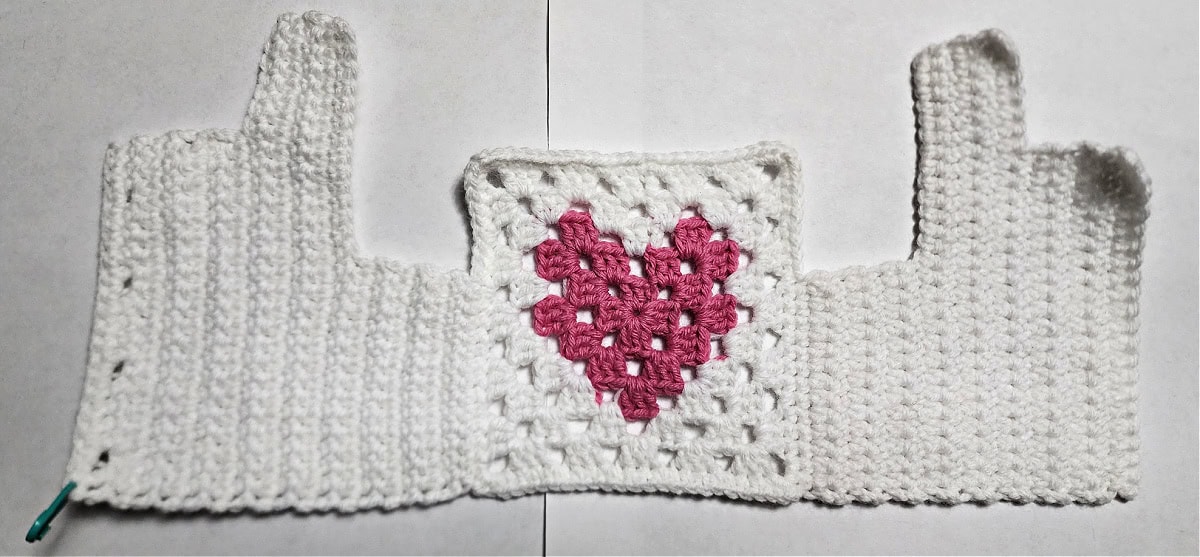
Continue on to the Left Side of Sweater.
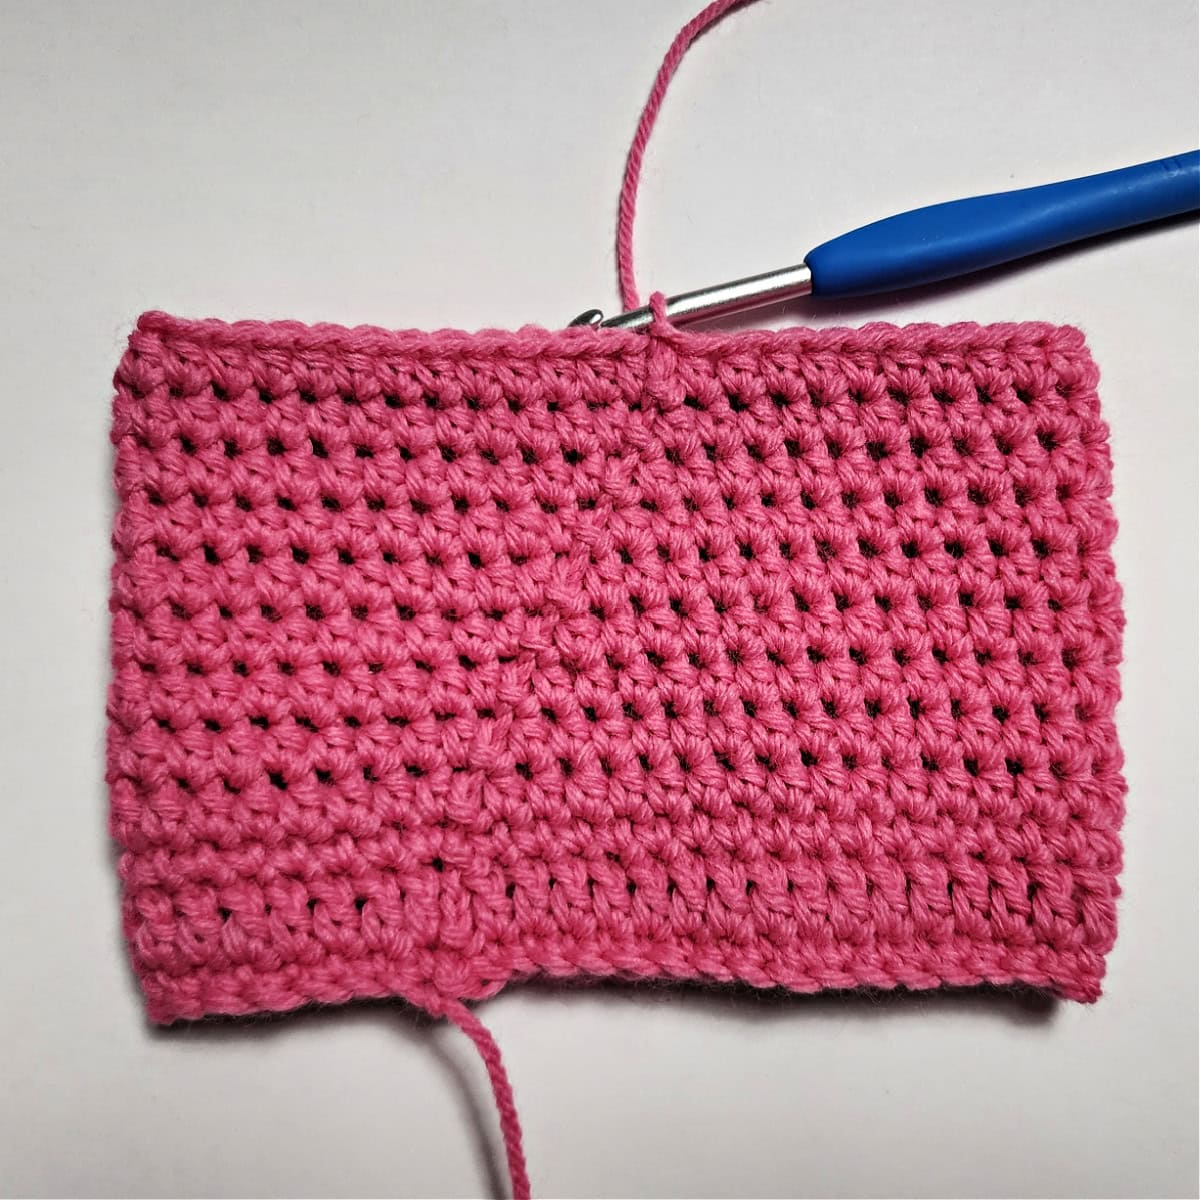
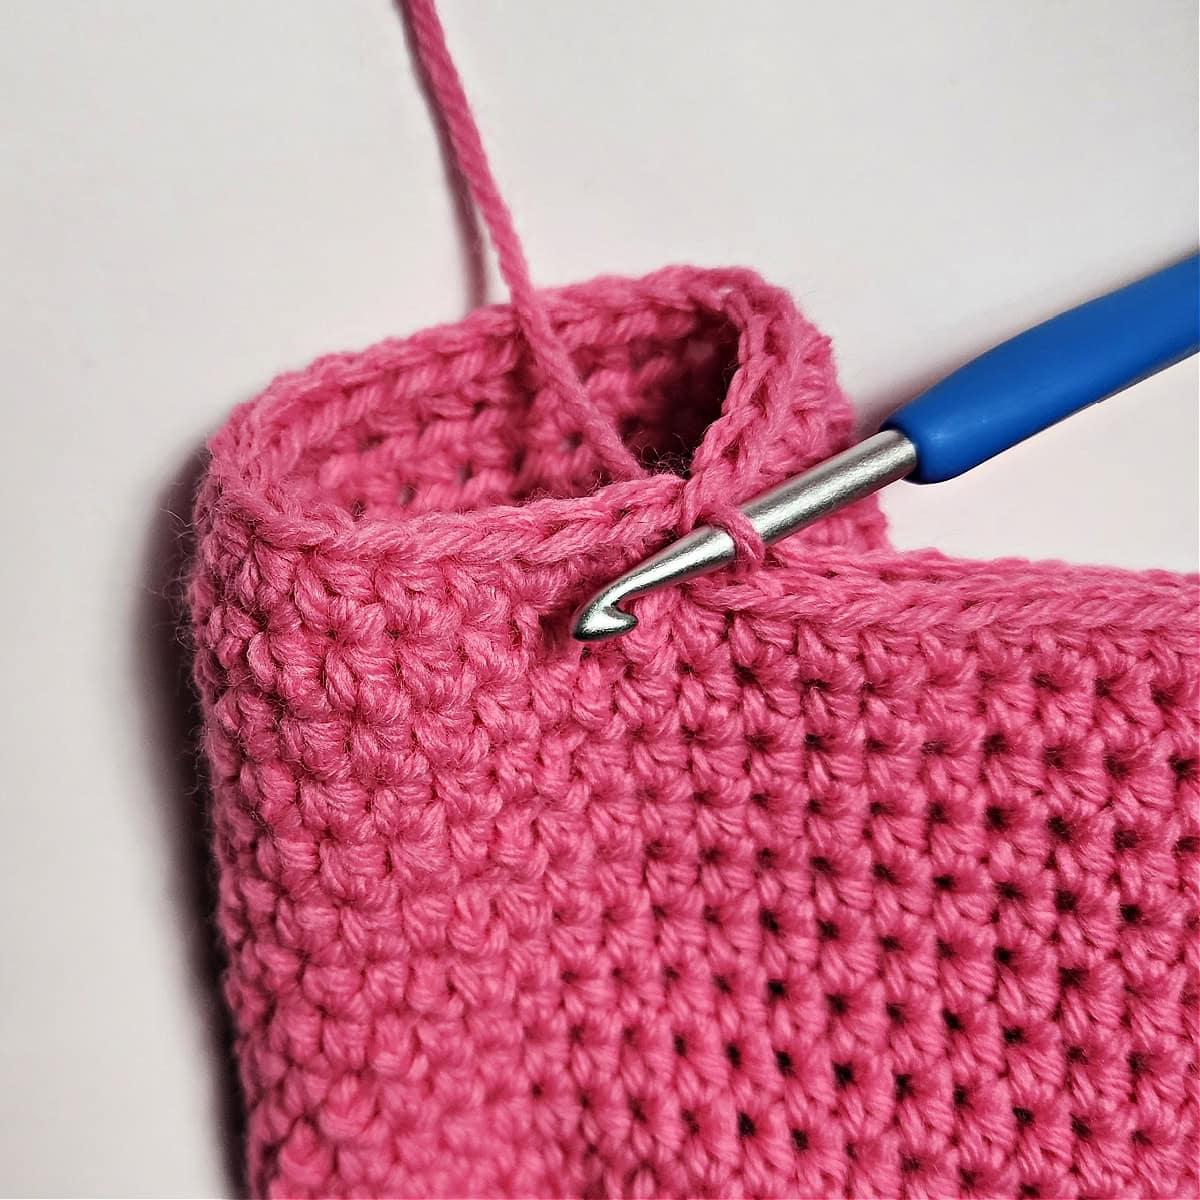
Left Side of Sweater
Row 1 (RS): With CC yarn & a 4.00mm crochet hook, join yarn with a standing sc in the st to the left of the SM at the bottom right corner of the motif, (working up the side of the motif towards the top) sc in each of the next 13 sts. (14 sts)
Rows 2 – 6: Ch 1, ext sc in each st across. Turn. (14 sts)
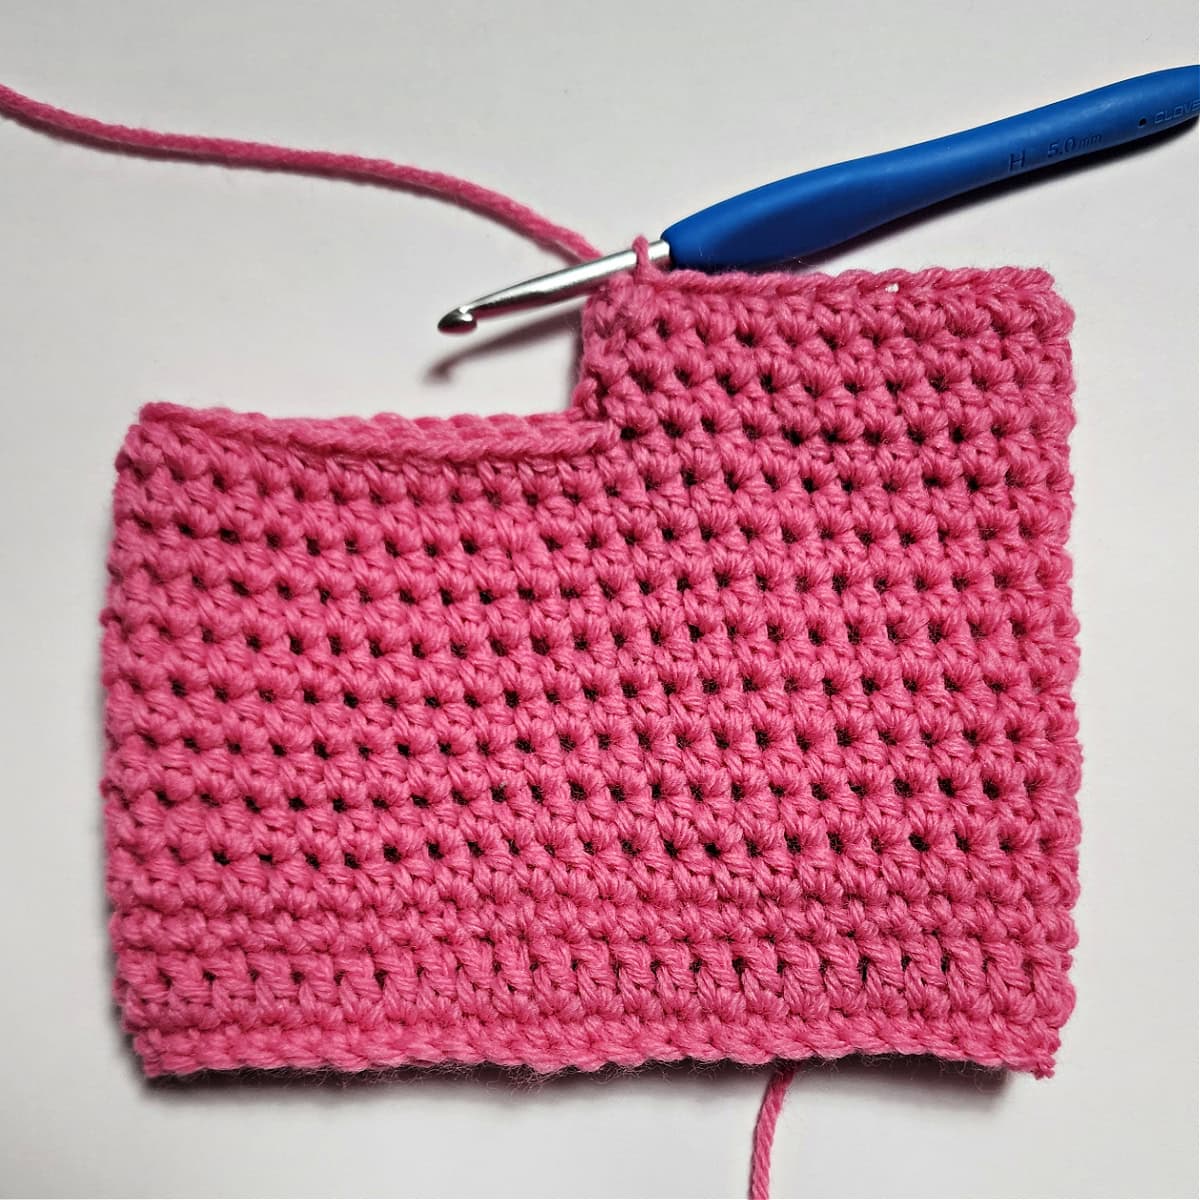
Row 7: Ch 1, ext sc in each st across, ch 15. Turn. (14 sts + ch 15)
Row 8: Ext sc in the 2nd ch from your hook, ext sc in each of the next 13 chs, ext sc in each st from Row 7. Turn. (28 sts)
Rows 9 – 12: Ch 1, ext sc in each st across. Turn. (28 sts)
Row 13: Ch 1, ext sc in each of the next 21 sts, skip the remaining 7 sts. Turn. (21 sts)
Rows 14 – 18: Ch 1, ext sc in each st across. Turn. (21 sts)
Fasten off. Weave in ends. Continue on to the Right Side of Sweater.
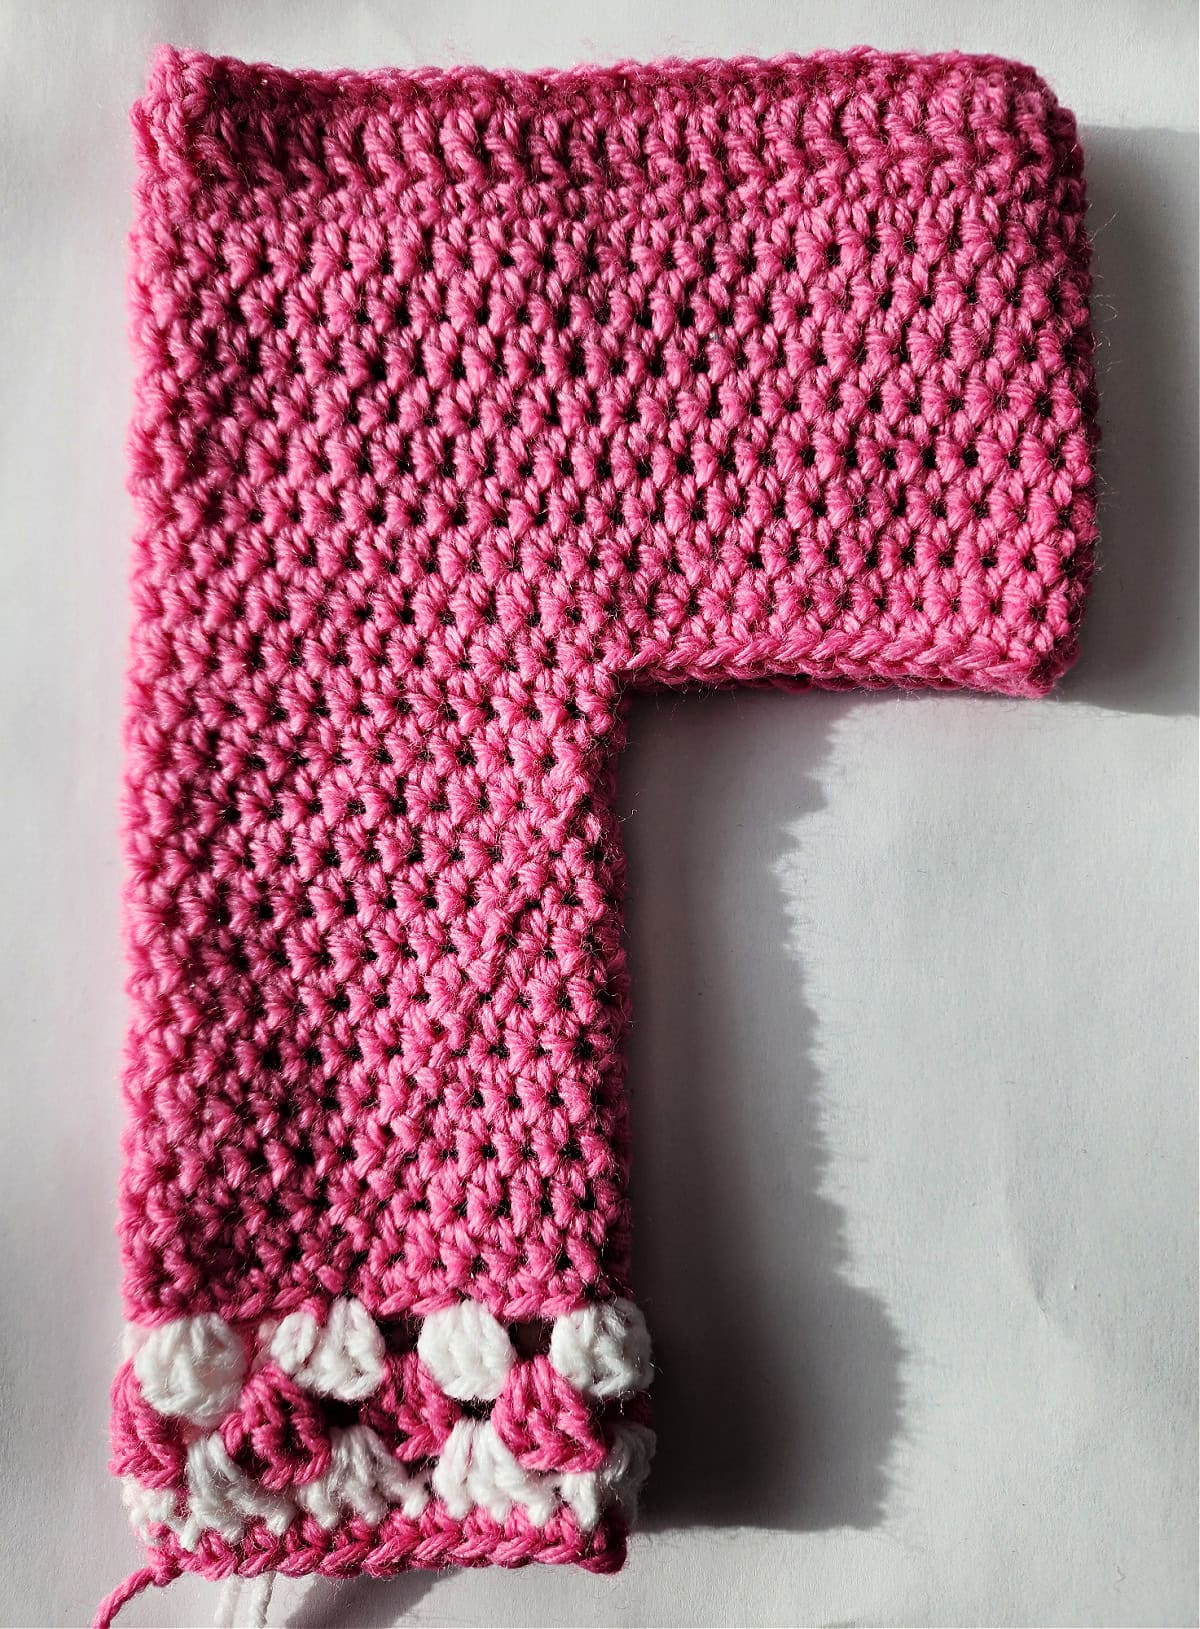
Right Side of Sweater
Row 1 (WS): With the wrong side facing, CC yarn & a 4.00mm crochet hook, join yarn with a standing sc in the st to the left of the SM at the bottom left corner of the motif, (working up the side of the motif towards the top) sc in each of the next 13 sts. (14 sts)
Rows 2 – 6: Ch 1, ext sc in each st across. Turn. (14 sts)
Row 7: Ch 1, ext sc in each st across, ch 15. Turn. (14 sts + ch 15)
Row 8: Ext sc in the 2nd ch from your hook, ext sc in each of the next 13 chs, ext sc in each st from Row 7. Turn. (28 sts)
Rows 9 – 12: Ch 1, ext sc in each st across. Turn. (28 sts)
Row 13: Ch 1, ext sc in each of the next 21 sts, skip the remaining 7 sts. Turn. (21 sts)
Rows 14 – 17: Ch 1, ext sc in each st across. Turn. (21 sts)
Row 18: Ch 1, ext sc in each of the first 3 sts, (ch 1, skip the next st, ext sc in each of the next 4 sts) work from ( to ) 3 times, ch 1, skip the next st, ext sc in each of the last 2 sts. Turn. (17 sts + 4 ch-1’s) Ch-1’s are buttonholes.
Row 19: Ch 1, sc in each st and ch-1 sp across. Turn. (21 sts)
Place Marker: Place a locking stitch marker in the first stitch of Row 19. This stitch marker is to mark where you will later join yarn to begin the Bottom Edge of Sweater.
Fasten off. Weave in ends. Continue on to Seam Shoulders. Overall width of the sweater should measure approximately 14-1/2″ W at this point.
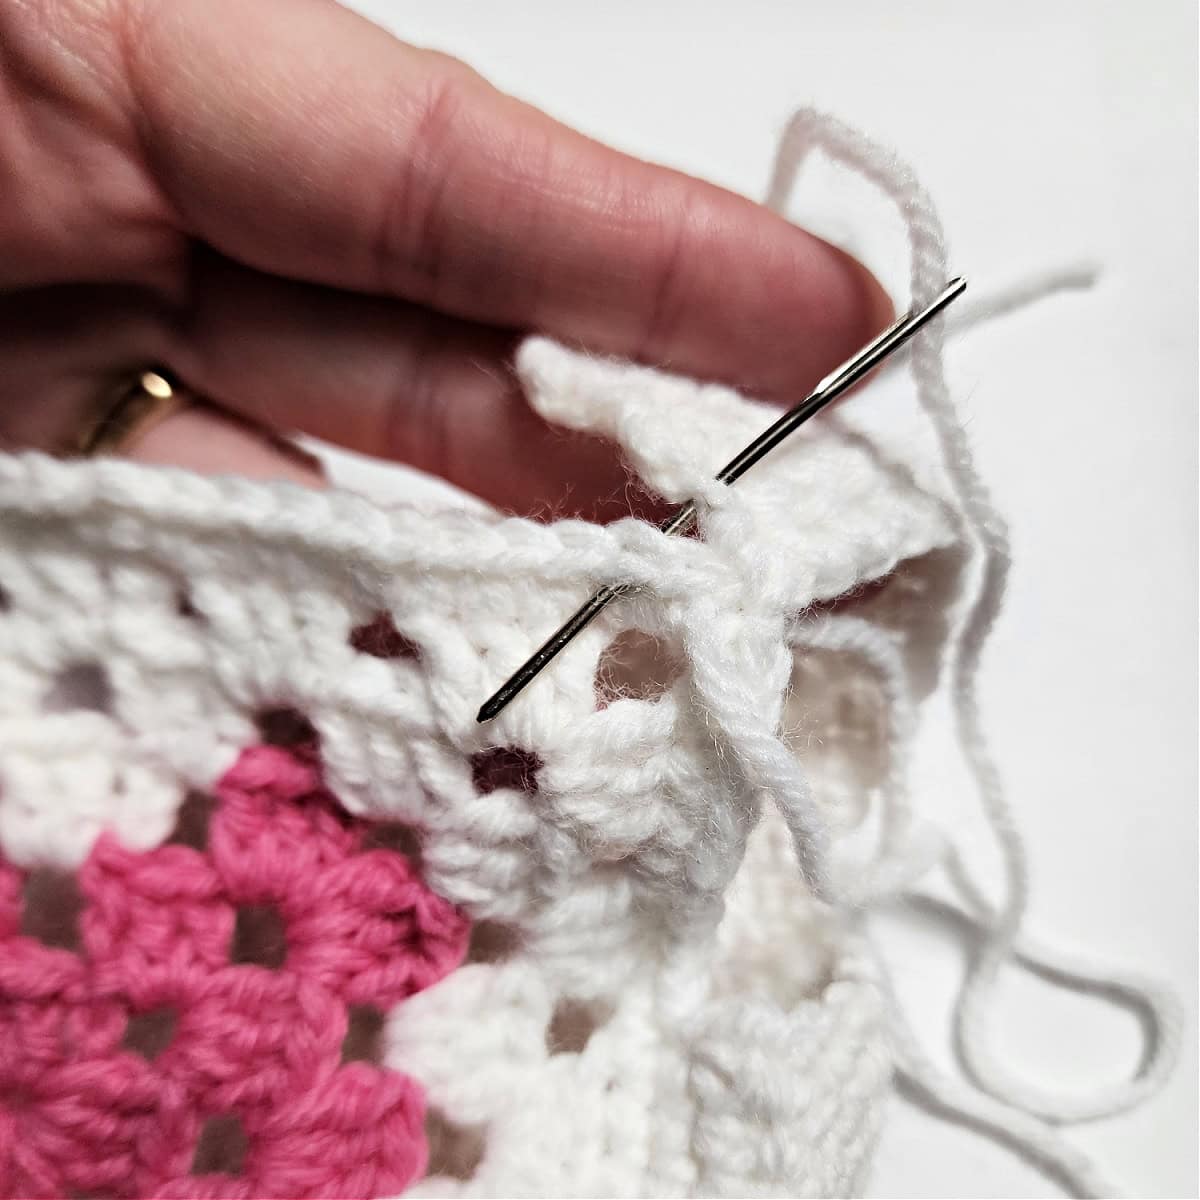
Seam Shoulders
Using an 8″ piece of CC yarn for each shoulder strap and yarn needle, whipstitch the short ends of the straps to the 6 outermost stitches on the top edge of the heart motif.
Bottom Edge of Sweater
Row 1 (RS): With the sweater’s right side facing you, CC yarn & a 4.00mm crochet hook, join yarn with a standing sc in the stitch you marked at the end of the Right Side of Sweater, work 1 sc into each st across the bottom edge of the sweater. Turn. (62 sts) Stitch count is not crucial for this section.
Rows 2 – 3: Ch 1, sc in each st across. Turn. (62 sts)
Do not fasten off. Continue on to Finish Sweater Perimeter.
Finish Sweater Perimeter
Row 1 (RS): Continuing on from the Bottom Edge of Sweater, rotate and work a sc in each st and a ch-1 at each outside corner, around the edges of the sweater until you reach the first stitch from the previous Row 3. Stitch count is not crucial.
Fasten off. Weave in ends. Continue on to the Sleeves.
Sleeves
Short Sleeves: For short sleeves, only work Rounds 1 – 2 below. Then, fasten off and weave in ends.
Long Sleeves: For long sleeves, work Rounds 1 – 22 below.
Rnd 1 (RS): With CC yarn & a 4.00mm crochet hook, join yarn with a standing sc near the center of the bottom of the armhole opening, work 1 sc in each st around. Join. (30 sts)
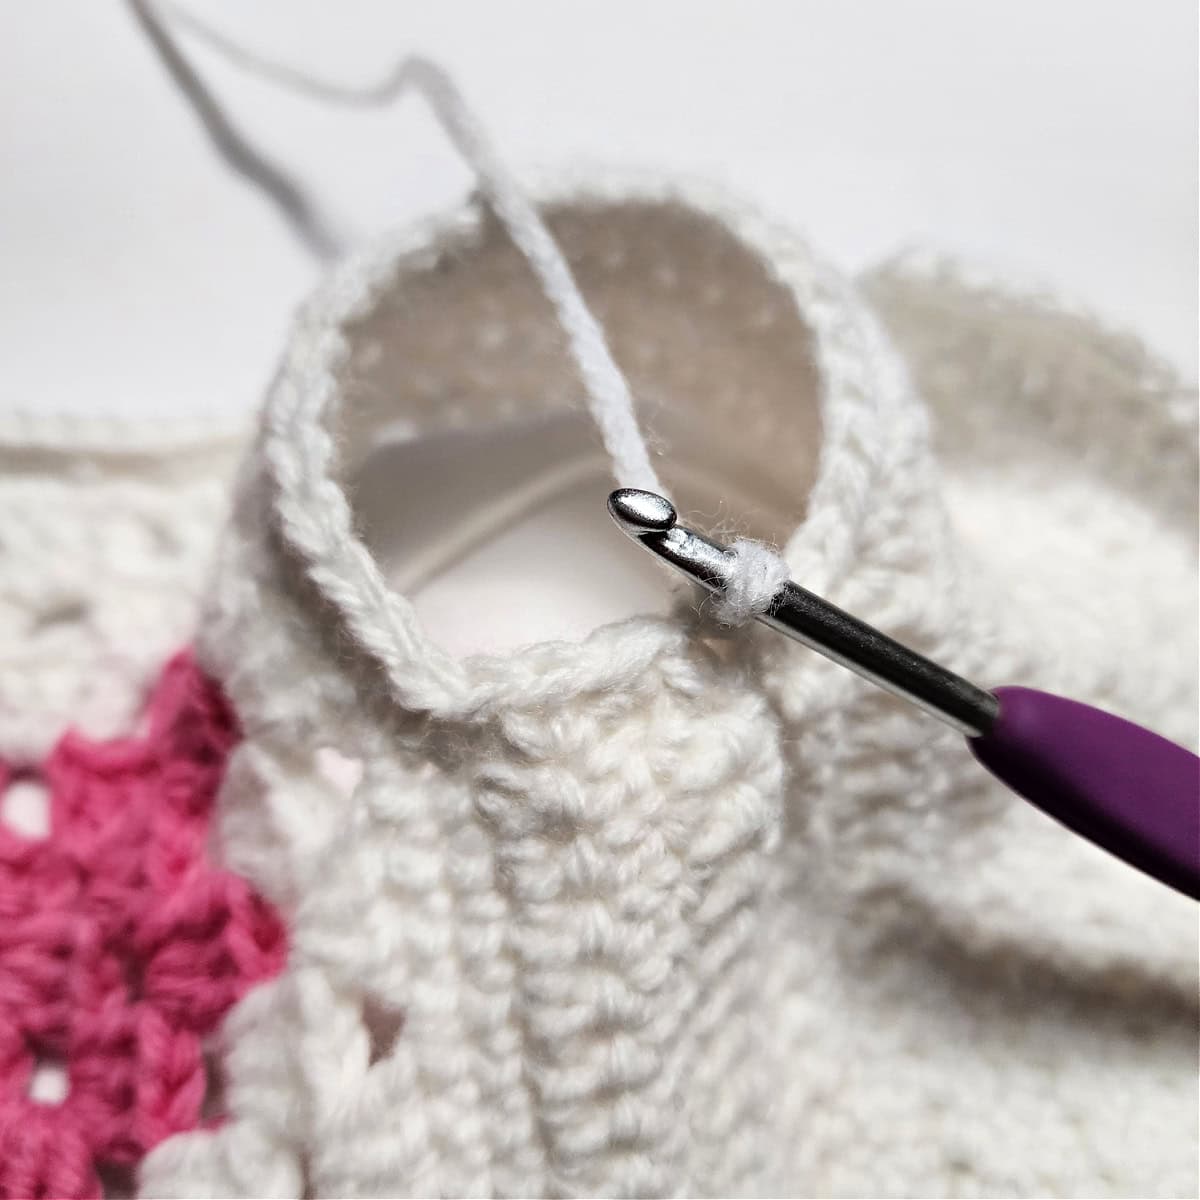
Continuous Rounds: Beginning in Rnd 2, the sleeve is worked in continuous rounds without joining (also known as working in a spiral). I recommend using a scrap piece of yarn to help you keep track of each round. Move the piece of yarn up as you complete each round.
Rnd 2: Switch to a 5.00mm crochet hook, ch 1, sc in each st around. Do not join. (30 sts)
Short Sleeves: Join at the end of Round 2, fasten off and weave in ends. Make second sleeve, then continue on to Adding Buttons.
Long Sleeves: Continue below with Round 3.
Rnd 3: Sc2tog, sc in each st around to the last 2 sts, sc2tog. (28 sts)
Rnd 4: Sc in each st around. (28 sts)
Rnds 5 – 12: Rep Rnds 3 – 4. (20 sts) at the end of Rnd 12.
Rnds 13 – 17: Sc in each st around. (20 sts) Join with a sl st at the end of Rnd 17 and switch to MC yarn.
Rnd 18 (MC): Ch 1, sc in each st around. Join. (20 sts) Switch to CC yarn.
Rnd 19 (CC): Ch 1, sc in each st around. Join. (20 sts) Switch to MC yarn.
Rnds 20 – 22 (MC): Ch 1, sc in each st around. Join. (20 sts)
Fasten off. Weave in ends. Make second sleeve, then continue on to Adding Buttons.
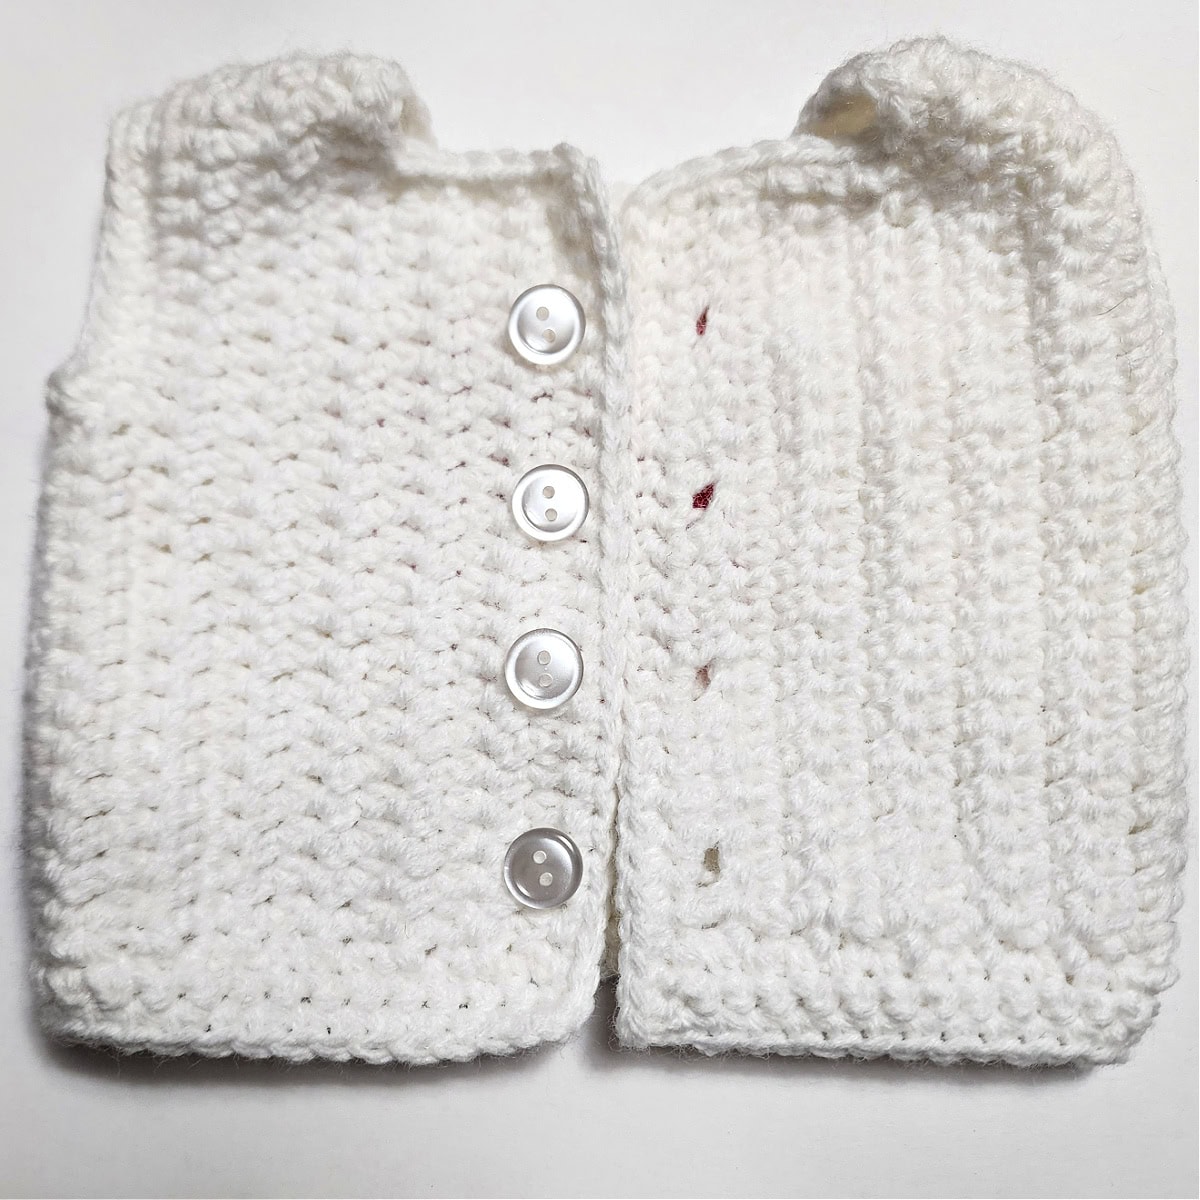
Adding Buttons
Line up the buttonholes on the right side of the sweater with the left side of the sweater. Mark the positions of the buttonholes on the left side and sew a button on each of the 4 spots.
Continue on to the Doll Pants.
Doll Pants
Gauge: In hdc with a 5.00mm hook: 11.5 sts = 3″; 9 rows = 3″
Set-up: With MC yarn & a 5.00mm crochet hook, ch 48, be careful not to twist the chain, join with a sl st to the 1st ch. (48 chs)
Rnd 1: Ch 1, working in the back humps of the foundation chain, sc in each ch around. Join. (48 sts)
Rnd 2: Ch 2 (does not count as a st), dc in each st around. Join. (48 sts)
Rnd 3: Ch 1, sc in each st around. Join.
Rnds 4 – 12: Ch 1, hdc in each st around. Join.
Do not fasten off. Continue on to the Right Leg. Laid flat, at this point, pants should be 6-1/8″ W x 3-3/4″ H.
Right Leg
Rnd 1 (MC): Continuing on from pants with MC yarn, ch 1, hdc in each of the next 24 sts. Join with a sl st to the 1st hdc. (24 sts)
Rnds 2 – 12 (MC): Ch 1, hdc in each st around. Join. (24 sts)
Rnd 13 (MC): Ch 1, sc in each st around. Join. (24 sts) Switch to CC1 yarn.
Rnd 14 (CC): Ch 3 (counts as 1st dc), 2 dc in the first st, skip each of the next 2 sts, (3 dc in the next st, skip the next 2 sts) work from ( to ) 7 times. Join with a sl st in the top of the ch 3. (24 sts) Switch to MC yarn.
Rnd 15 (MC): Ch 3 (counts as 1st dc), work 3 dc in the sp between each 3dc group around to the last sp, 2 dc in last sp. Join with a sl st in the top of the ch 3. (24 sts) Switch to CC1 yarn.
Rnd 16 (CC): Ch 3 (counts as 1st dc), work 3 dc in the sp between each 3dc group around to the last sp, 2 dc in last sp. Join with a sl st in the top of the ch 3. (24 sts) Switch to MC yarn.
Rnd 17 (MC): Ch 1, sc in each st around. Join. (24 sts)
Fasten off. Weave in ends. Continue on to the Left Leg. Length of the right leg should be 5-1/2″ L.
Left leg
Rnd 1: With MC yarn & a 5.00mm crochet hook, join yarn with a standing hdc in 25th st from Rnd 12 of pants, hdc in each of the next 23 sts. Join with a sl st to the 1st st. (24 sts)
Rnds 2 – 12 (MC): Ch 1, hdc in each st around. Join. (24 sts)
Rnd 13 (MC): Ch 1, sc in each st around. Join. (24 sts) Switch to CC1 yarn.
Rnd 14 (CC): Ch 3 (counts as 1st dc), 2 dc in the first st, skip each of the next 2 sts, (3 dc in the next st, skip the next 2 sts) work from ( to ) 7 times. Join with a sl st in the top of the ch 3. (24 sts) Switch to MC yarn.
Rnd 15 (MC): Ch 3 (counts as 1st dc), work 3 dc in the sp between each 3dc group around to the last sp, 2 dc in last sp. Join with a sl st in the top of the ch 3. (24 sts) Switch to CC1 yarn.
Rnd 16 (CC): Ch 3 (counts as 1st dc), work 3 dc in the sp between each 3dc group around to the last sp, 2 dc in last sp. Join with a sl st in the top of the ch 3. (24 sts) Switch to MC yarn.
Rnd 17 (MC): Ch 1, sc in each st around. Join. (24 sts)
Fasten off. Weave in all ends. Use a yarn needle and piece of MC yarn to sew the gap between the legs closed. Continue on to the Belt.
Pants Dimensions: Laid flat, pants should be 6-1/8″ W x 9-1/4″ L.
Belt
With any color yarn & a 4.00mm crochet hook, chain until your belt measures 20″.
Fasten off leaving a 6″ tail for ease in weaving the belt through the pants. Using a yarn needle, weave the belt in and out of every 2 dc of Row 2 of the pants. Trim ends to desired length.
Optional: If you plan to have the belt tie on the outside, add beads to each end of the belt, if desired. Trim ends to desired length.
Continue on to Heart Headband.
Heart Headband Instructions
Headband
Rnd 1: With MC yarn & a 4.00mm crochet hook, ch until you have a chain that is 20″ long.
Fasten off. Trim ends. Continue on to the Tiny Heart.
Tiny Heart
Rnd 1: With MC yarn & a 4.00mm crochet hook, ch 4, work (3 tr, 3 dc) in the 4th ch from your hook, ch 2, sl st in the 2nd ch from your hook (this forms the bottom point of the heart), then (3 dc, 3 tr) in the same ch as the previous tr’s & dc’s, ch 3, sl st in the same ch.
Fasten off. Do not weave in ends. Heart should measure 1-1/2″ W x 1-3/8″ H. Continue on to Headband Assembly.
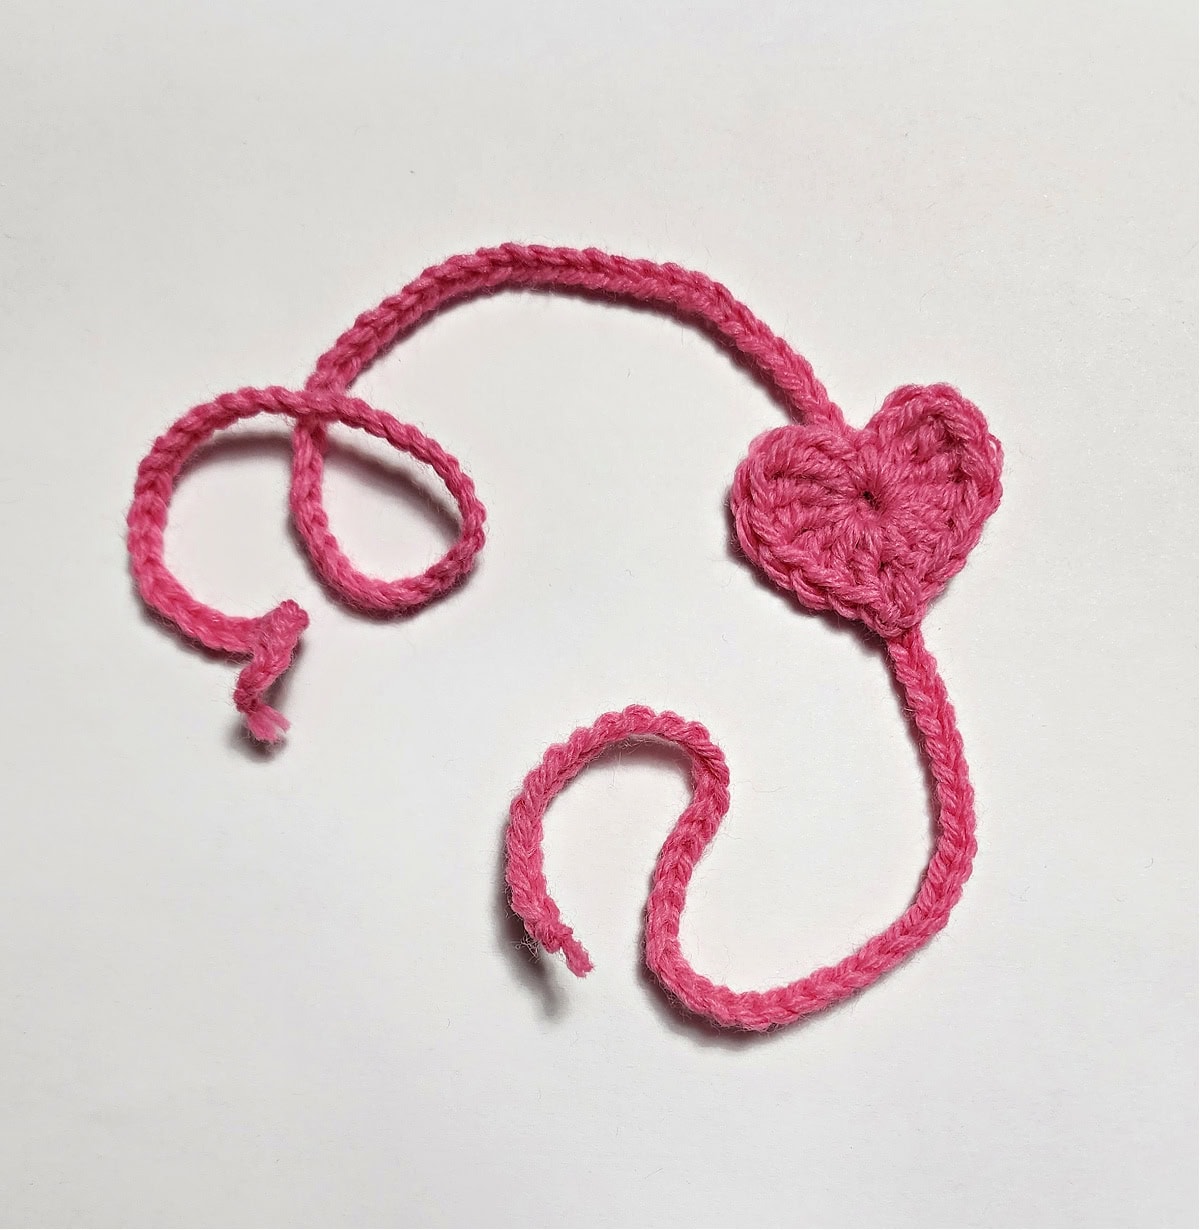
Headband Assembly
Position the tiny crochet heart so that it is 9″ from either end of the chain. With a yarn needle and tails of yarn, attach the crochet heart to the chain.
Weave in ends. Wrap the headband around the doll’s head and tie the ends in a small bow to secure it.

I MADE IT! NOW WHAT?
Pin this post!: Save this free crochet doll clothes pattern to your Pinterest boards so that you can come back and make it again.
Leave a comment below: We love to hear your feedback.
Share Your Finished Projects on Facebook or Instagram: I love to see your finished projects! Share with us on social media and tag me @acrochetedsimplicity or use the hashtag #ACrochetedSimplicity so I can find your posts.
Join us in the Facebook Community Group!
Come share your finished projects with us in the A Crocheted Simplicity Crochet Community Group on Facebook. Join us for fun community events such as crochet alongs, join in on crochet conversations, ask questions, get advice, and share your love for crochet!

More Crochet Dolls Clothes Patterns
We have free crochet doll accessory patterns right here on the blog. We also have several premium crochet patterns for doll clothes on Ravelry and Etsy (aff).