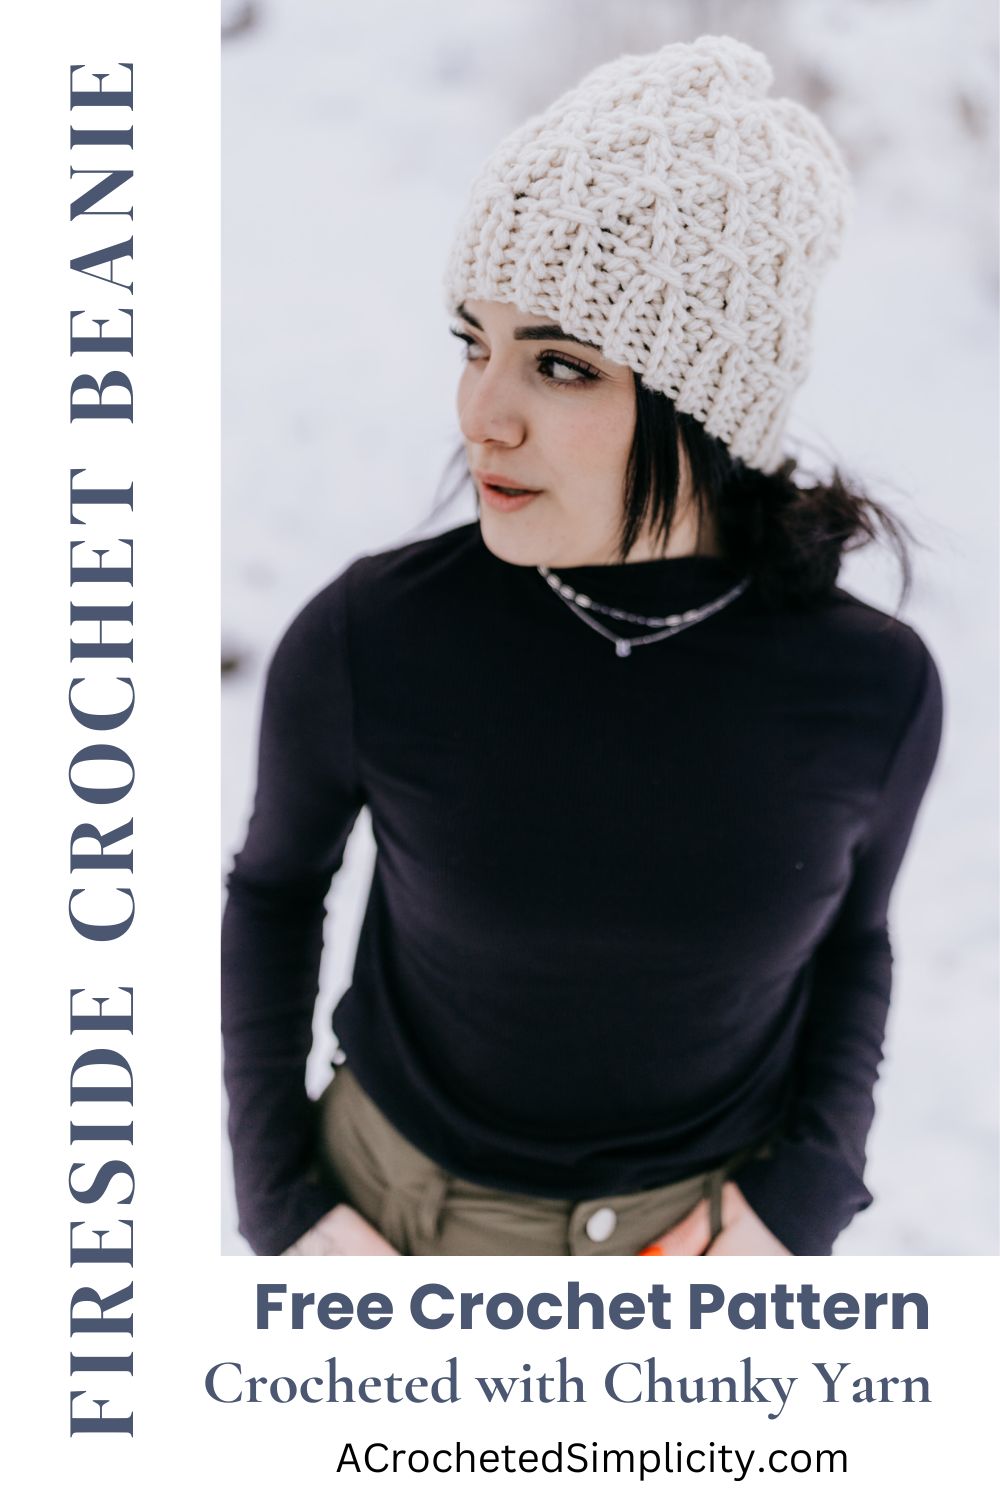
Fireside Crochet Hat Pattern
Love the sleek, stretchy look of knit hats but prefer the ease of crochet? You’re in the right place! This crochet hat pattern mimics the look of knit beanies and is made with a crochet hook!
Perfect for chilly weather, this stylish and cozy design works up quickly, uses less than one ball of yarn, and makes a great gift.
You’ll find the free crochet hat pattern below, or an ad-free print friendly PDF on Ravelry, or Etsy (aff).
If you’re like myself and admire the look of knitting, but cannot knit, this crochet hat pattern made with crochet stitches that look like knitting gives you the best of both worlds!
Made with chunky yarn and basic crochet stitches, this hat works up fast—making it a quick crochet gift or a fun weekend project for yourself.
Projects that use one ball of yarn are among my favorite, for several reasons. I like that they help to use up random balls of leftover yarn from larger projects. They are also the perfect size crochet projects to take with you on long car rides.
Make a Matching Set: Our Fireside Cowl was designed to match this knit look crochet hat for a matching set.
Knit-Look Crochet
I LOVE knit-look crochet and all of the different stitches and techniques we can crochet to create it. I especially love to combine different slip stitches and crochet short rows to make stretchy, crochet hats with nicely fitted crowns.
I’ve used several combinations of crochet stitches and short rows to create many different knit-look crochet hats. In addition to slip stitches and short rows, they all have one more thing in common, the stitches are mainly worked into one loop only, either the back loop only (BLO), or front loop only (FLO).
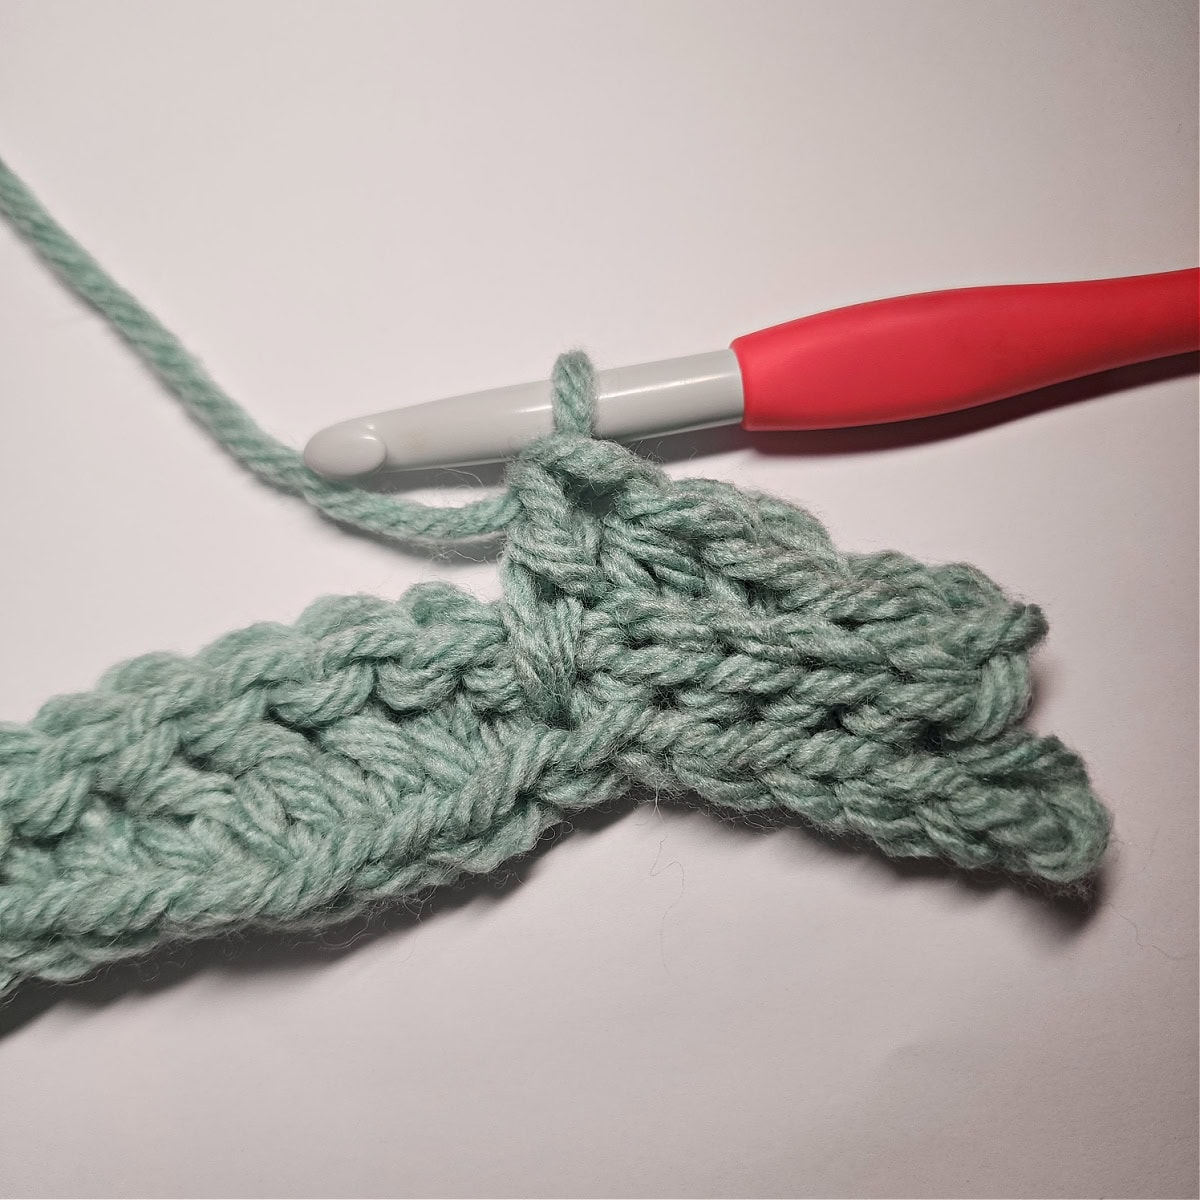
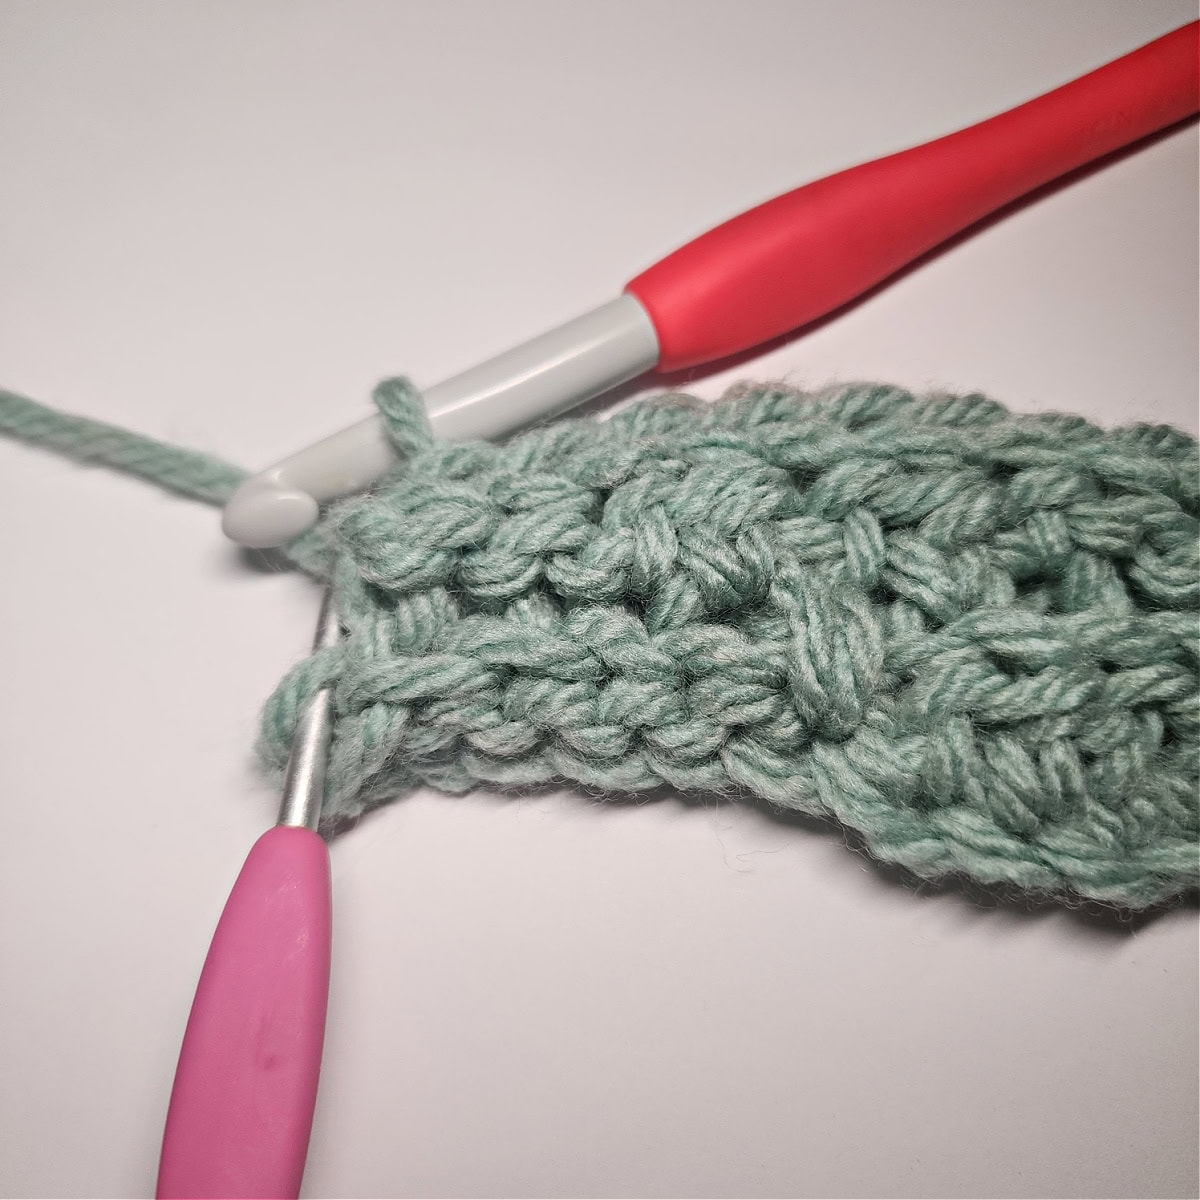
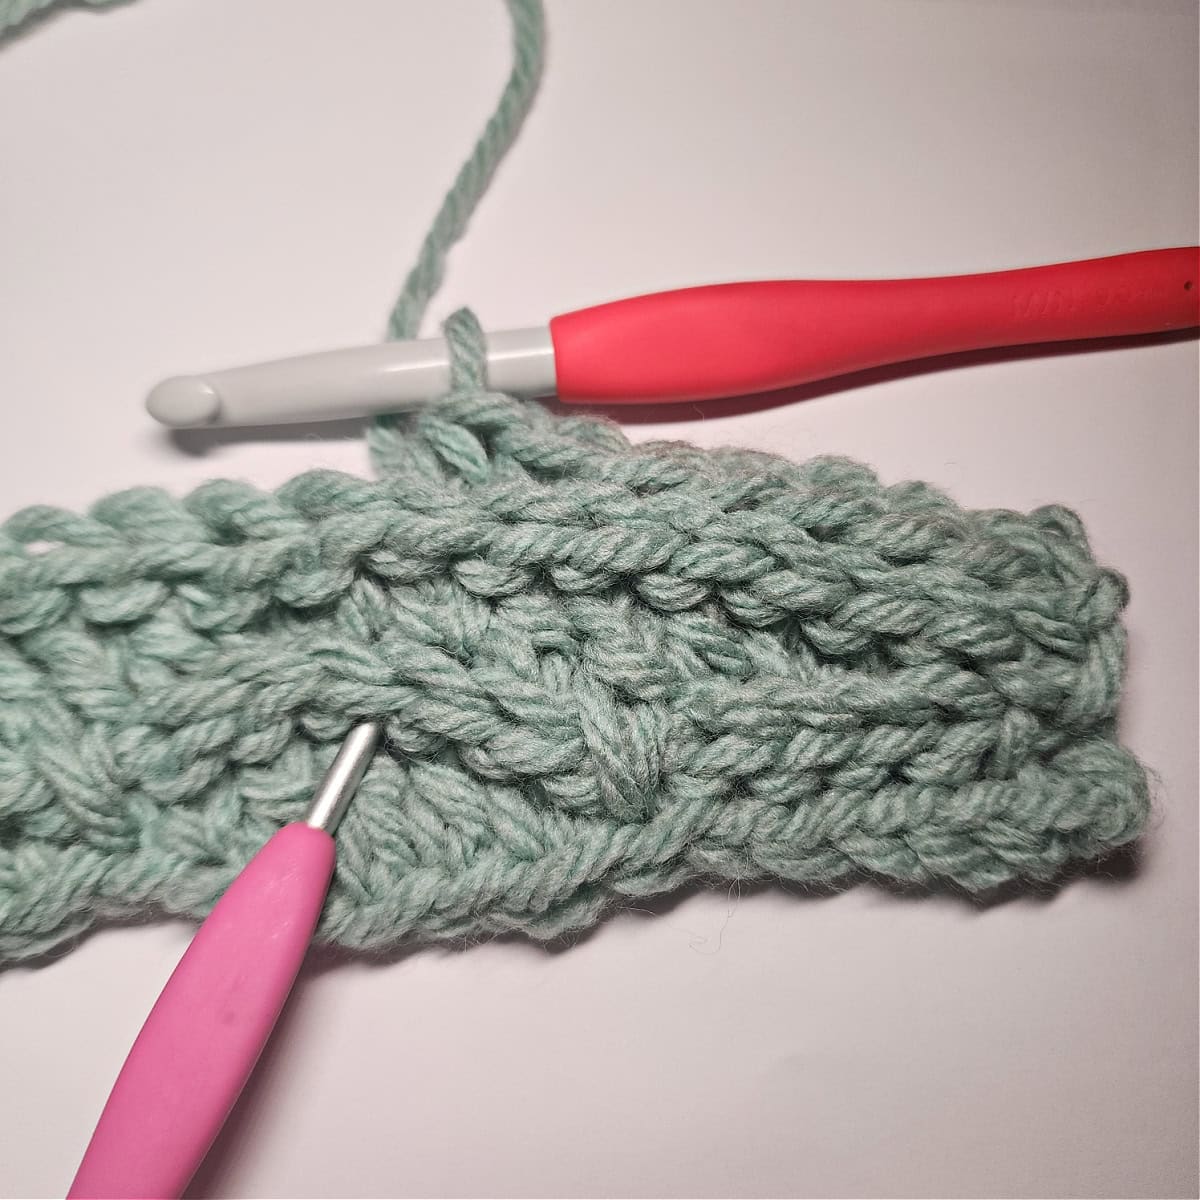
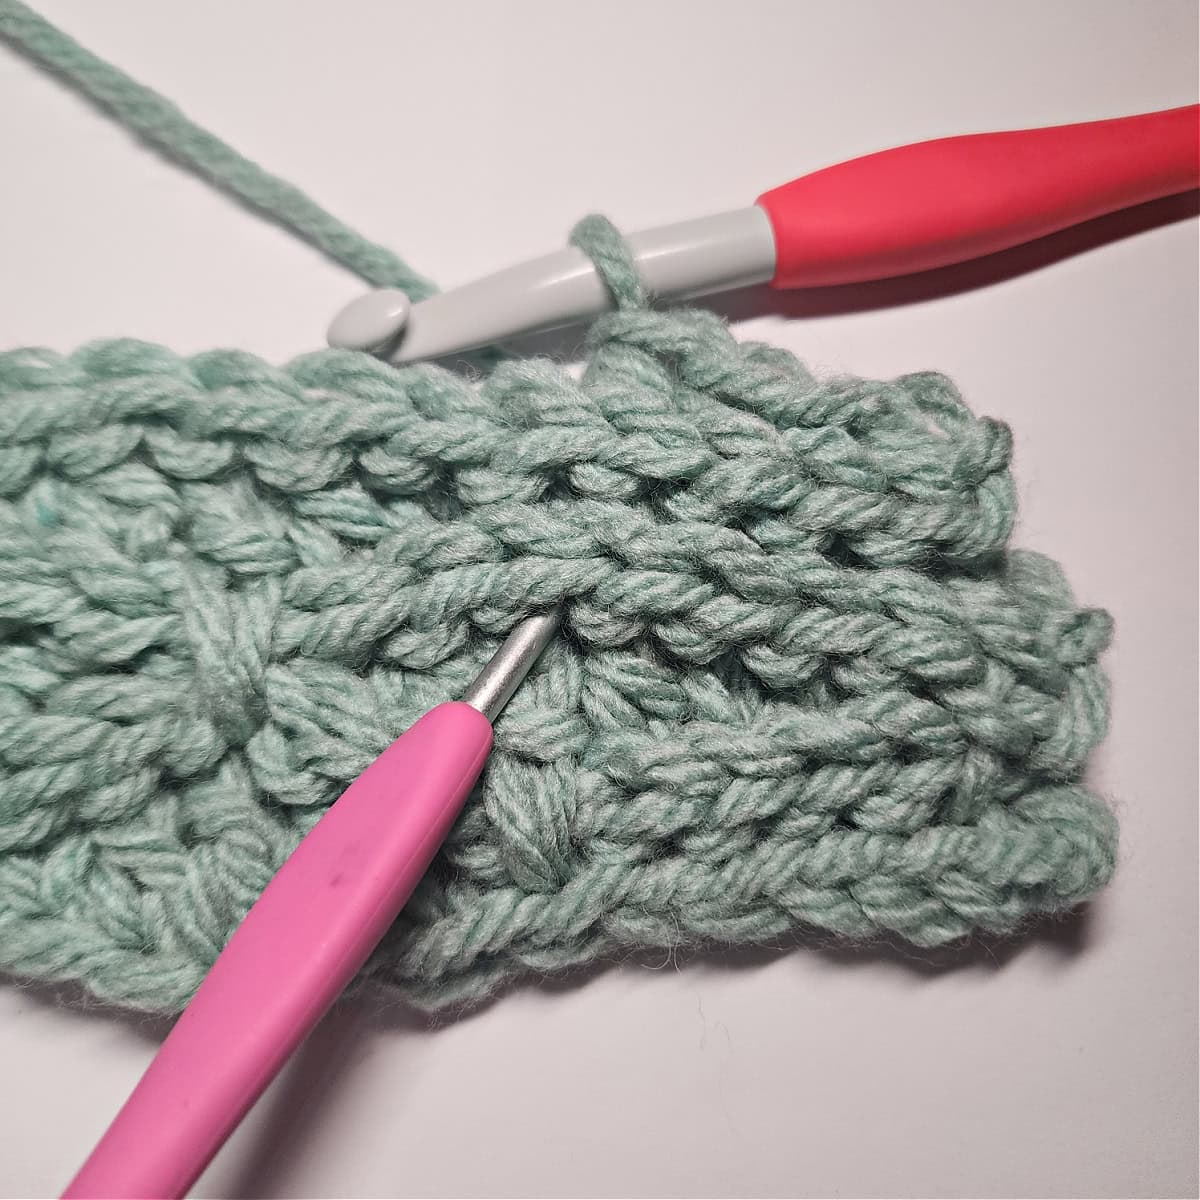
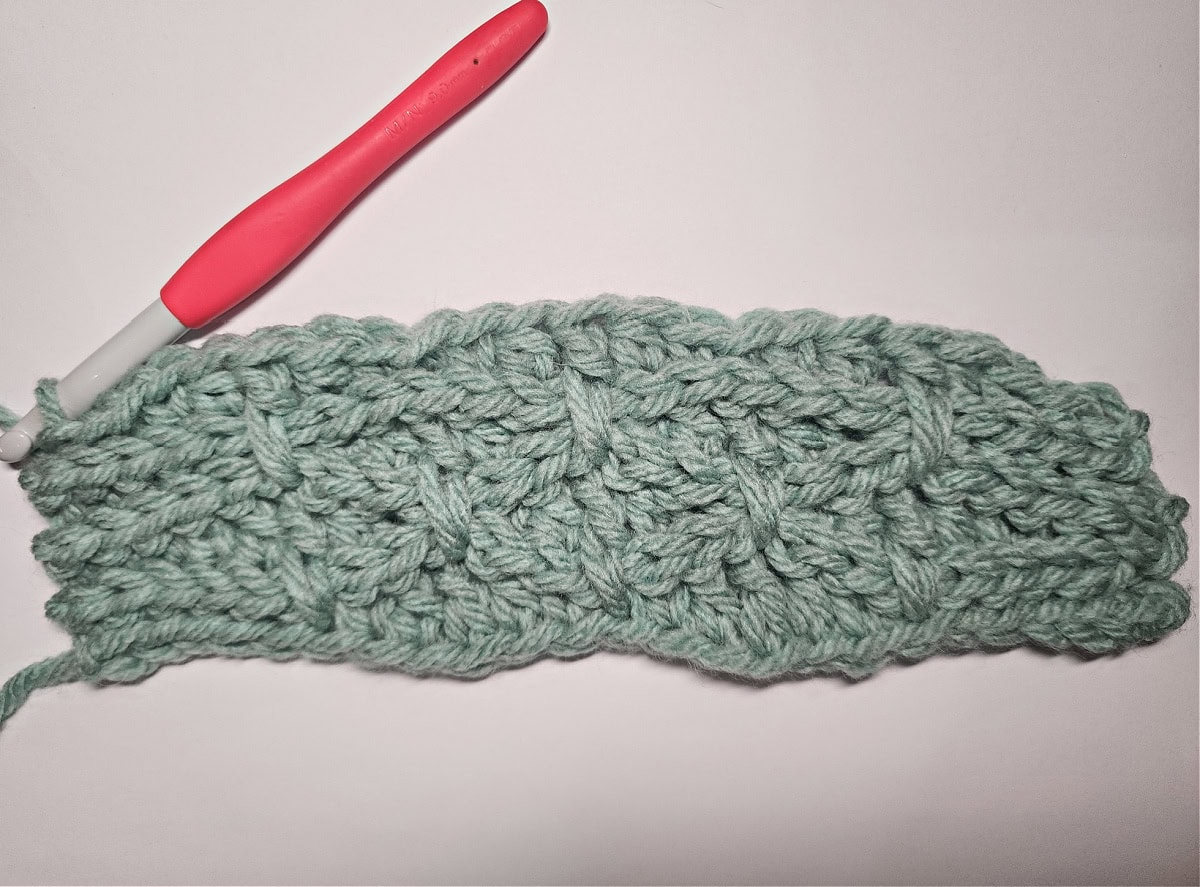
I created the texture of the Fireside Beanie using crochet short rows and slip stitches worked into the back and front loops, and also stitches that drop down and work into other stitches four rows below.
Don’t fret! It sounds much more complicated than it is and I’ve included lots of photos to show you just where to work those stitches!
How to Crochet a Hat
This knit look beanie isn’t constructed like a basic crochet hat that’s worked top down or bottom up. The Fireside Hat is crocheted flat, side to side, then seamed.
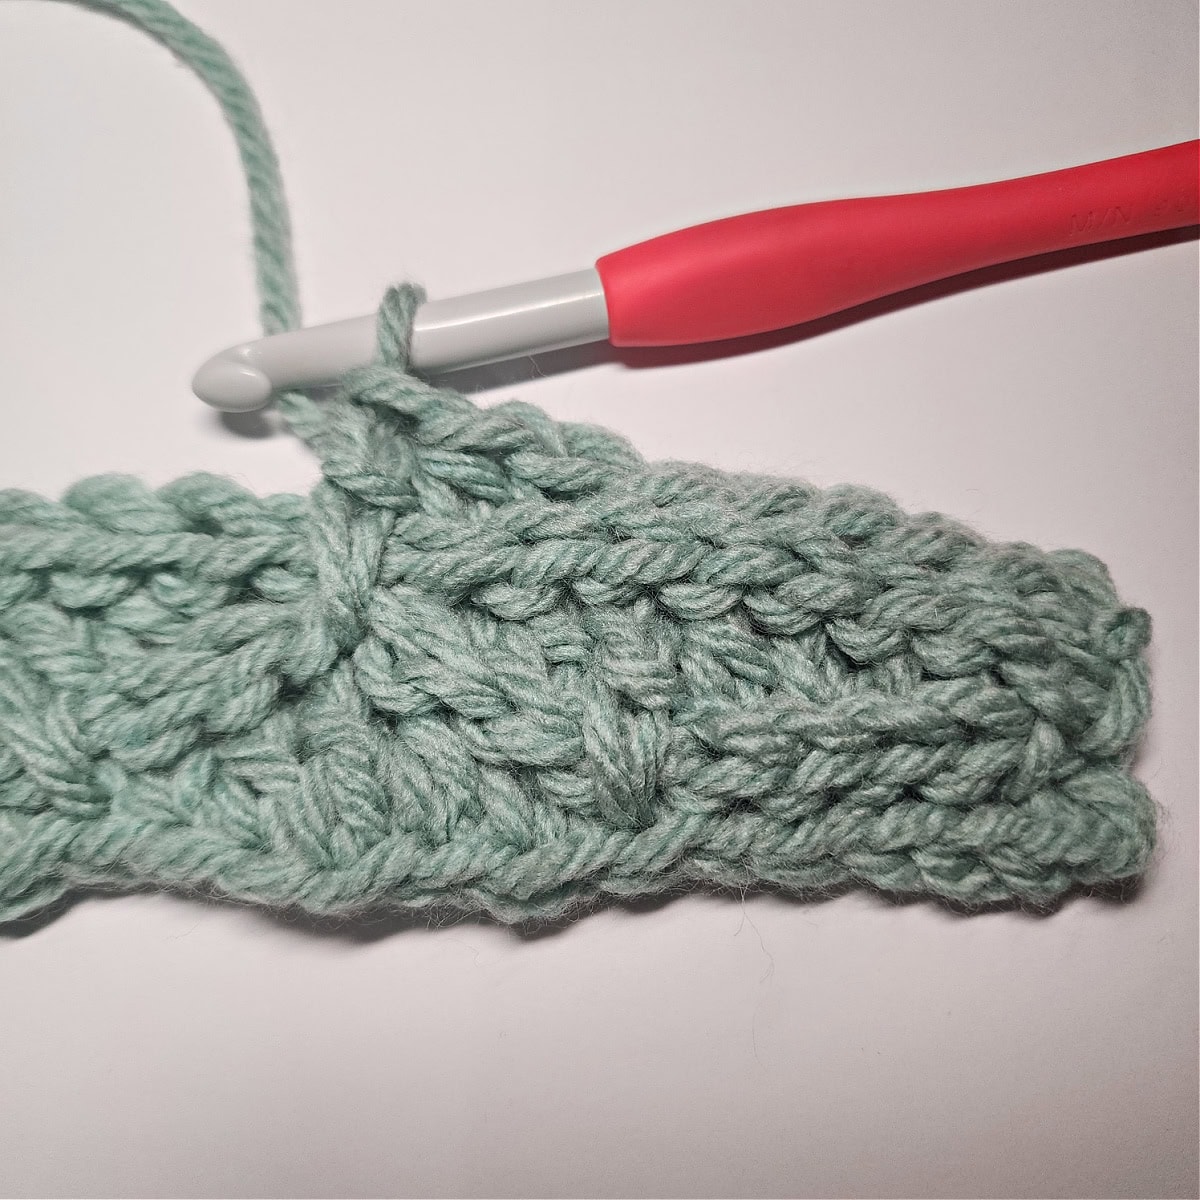
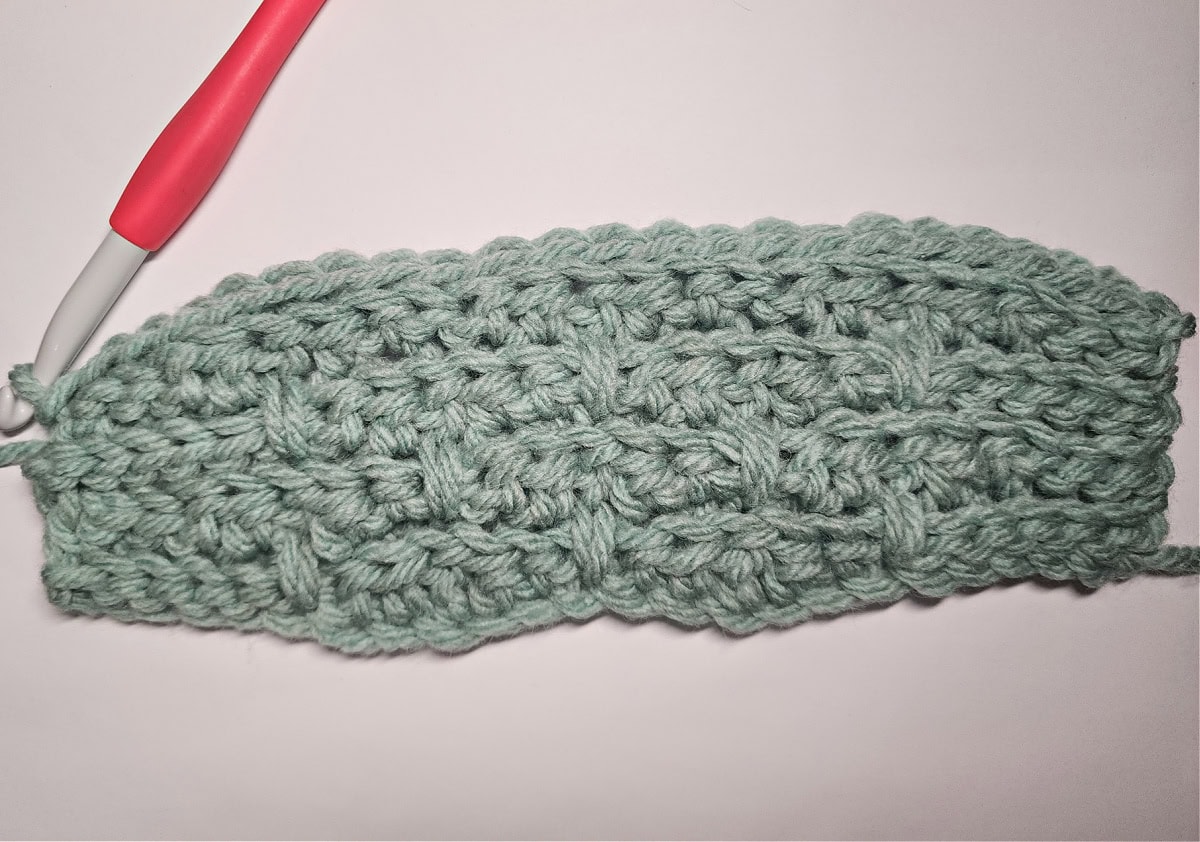
When you crochet a hat with short rows, you’ll crochet the hat back and forth in rows, usually from the crown to the band of the hat. As you crochet, each row will get shorter and shorter until you’ve created a small wedge. You’ll then work a full length row, working into previously unworked stitches, to smooth the short rows and complete a pie shaped section.
You’ll continue to crochet short row sections until your work is tall enough and then whipstitch a nearly seamless seam. Next, you’ll use a yarn needle and piece of yarn to create finishing stitches over the seam to make it blend in almost seamlessly with the rest of the hat.
Lastly, you’ll weave yarn in and out of the rows of the crown, pull yarn tight to cinch the gap closed, and weave in ends.
How To Get The
Fireside Crochet Hat Pattern
Option 1: Scroll down for the free crochet hat pattern right here in this blog post.
Option 2: Purchase the ad-free printable PDF from one of my shops:
Chunky Crochet Yarn
For the Fireside crochet hat pattern, I chose to use Lion Brand Yarns Hue & Me. Hue & Me is a bulky yarn, acrylic and wool blend, that is available in 36 gorgeous colorways! In this carefully curated palette, each color pairs well with the others, so you’ll never have to wonder “will this match?”.
Each ball of Hue & Me yarn comes with 137 yards making it great for a one ball of yarn chunky hat pattern!
If you’ve been looking for one skein crochet projects with bulky yarn, this crochet hat pattern checks the box!
Did you know? Chunky yarn and bulky yarn are one in the same and the terms are used interchangeably.
Yarn Substitutes
If you don’t have access to Lion Brand Hue & Me, but would love to make this crochet hat pattern, no worries! I’ve got a couple great options for you to check out.
When I haven’t used a yarn before and need to find a yarn substitution, the first thing I do is to check YarnSub.com to look for a comparable yarn.
If you’re unable to find a suitable bulky yarn, the next best thing is to hold 2 strands of lighter worsted yarn together (by lighter worsted I mean a 4 weight yarn, not DK 3 weight yarn). For example, I’ve held together 2 strands of Lion Brand Wool Ease or Pound of Love when I’ve needed a chunky yarn.
I highly recommend that when holding 2 strands together, it’s best to do a crochet swatch to make sure that the 2 yarns you’re holding together will work for this crochet hat pattern.
Fireside Crochet Hat Free Pattern
The crochet hat pattern is free below, but if you love to work offline, I’ve got a couple other great options for you.
Purchase the ad-free, printable PDF, on Ravelry, or on Etsy (aff).
Purchase the cowl & beanie crochet kit! (aff): Lion Brand has a full kit of the Fireside Crochet Beanie & Cowl Set, available on their website. The crochet kit includes your choice of colors and a digital copy of BOTH the Fireside Cowl & Beanie patterns!
This post contains affiliate links.
Materials
- Yarn: Chunky / Bulky, 5 weight yarn was used for this crochet hat pattern. Lion Brand Yarns Hue & Me in Salt was used for the cowl in the photos 80% Acrylic / 20% Wool (137 yards / 125 m / 125 g / 4.4 oz)
- Salt #617- 098AS (1 ball / 85 – 115 yards)
- Crochet Hook: MN/9.00mm; or size needed to obtain gauge (My favorite crochet hooks are the Clover Amour Crochet Hooks, I’ve never had an ache in my hand since switching).
- Scissors
- Yarn Needle
Abbreviations (U.S. Terms)
- ch(s): chain(s)
- sl st(s): slip stitch(es)
- st(s): stitch(es)
- yo: yarn over
- sc: single crochet
- hdc: half double crochet
- dc: double crochet
- BLO: back loop only
- FLO: front loop only
- Rep: repeat
Experience Level
- Easy / Intermediate
Gauge
- In BLO sl st: 10 sts = 4.25″
- Row height isn’t crucial.
Fits Head Sizes
- Toddler: 18″ – 19″ circumference (85 yards)
- Child: 19″ – 20-1/2″ circumference (95 yards)
- Teen / Adult Small: 20-1/2″ – 22″ circumference (105 yards)
- Adult Medium / Large: 22-1/2″ – 24″ (115 yards)
Pattern Notes
- Turning chains are not counted as stitches, unless noted otherwise.
- The first stitch of each row is worked into the same stitch as the beginning chain, unless noted otherwise.
- Yarn Notes: Lion Brand Yarns Hue & Me was used for the sample. Other comparable yarns may be used as long as gauge is met.
- Lion Brand Yarns Hue & Me, in Salt, bulky weight / 5 yarn, 80% Acrylic / 20% Wool (137 yards / 125 m / 125 g / 4.4 oz).
- Yardage & Color
- Salt #617- 098AS (1 ball / 85 – 115 yards)
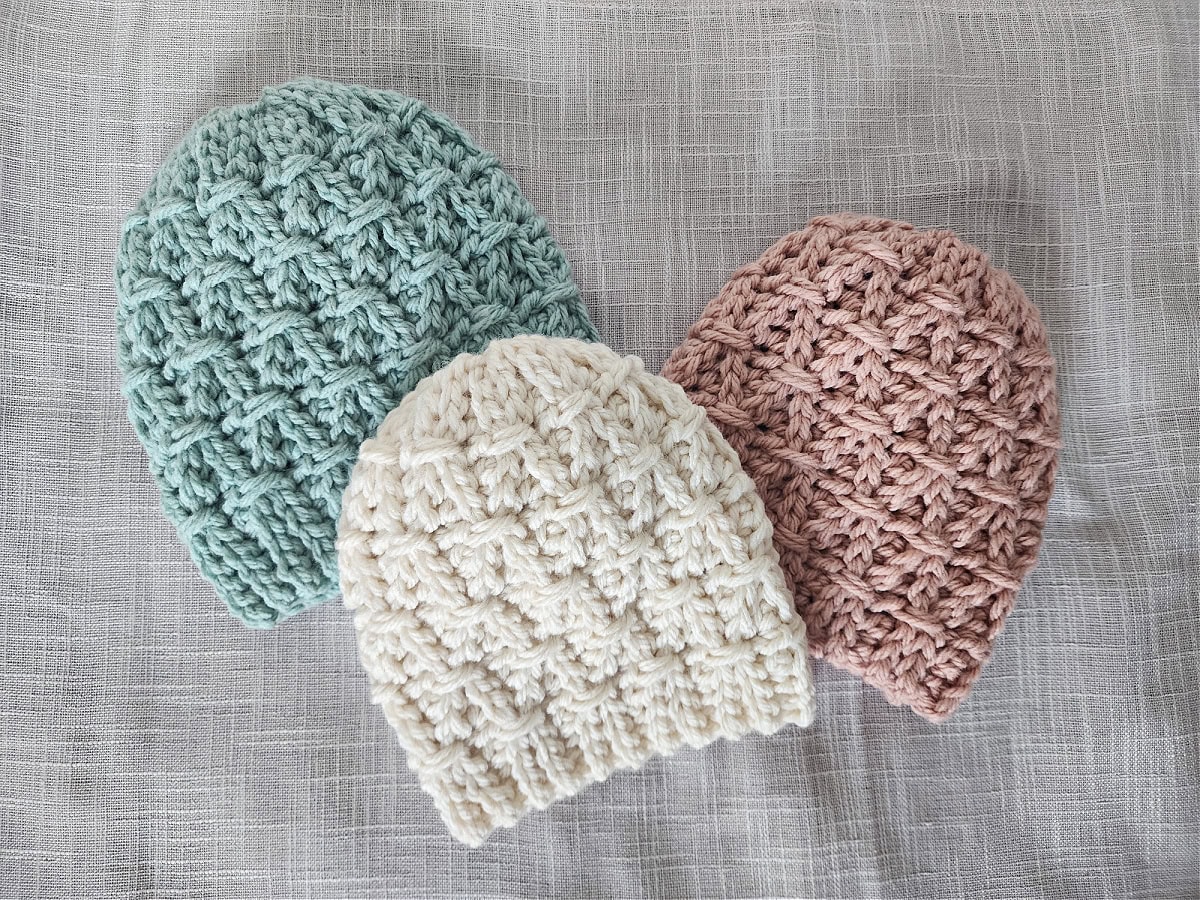
- Hat Colors Shown: Cream (Salt); Aqua (Sea Glass); Pink (Rose Water)
- Sizes are written out individually. Scroll down to the size you’re making. Progression photos are shown after the instructions for all hat sizes.
- Beanie Construction: This beanie is crocheted sideways from crown to brim using crochet short rows. After the hat is crocheted to the needed width, you’ll seam the edges. After seaming the edge, you’ll stitch a few finishing stitches to blend the seam stitches together. Lastly, you’ll use a piece of yarn to close the crown.
Free Crochet Hat Pattern
Toddler Hat Size Instructions
Progression photos can be found below after the crochet hat patterns for all sizes.
Gauge: In pattern as written below: 10 sts = 4.25″; 8 rows = 3″ (row height isn’t crucial)
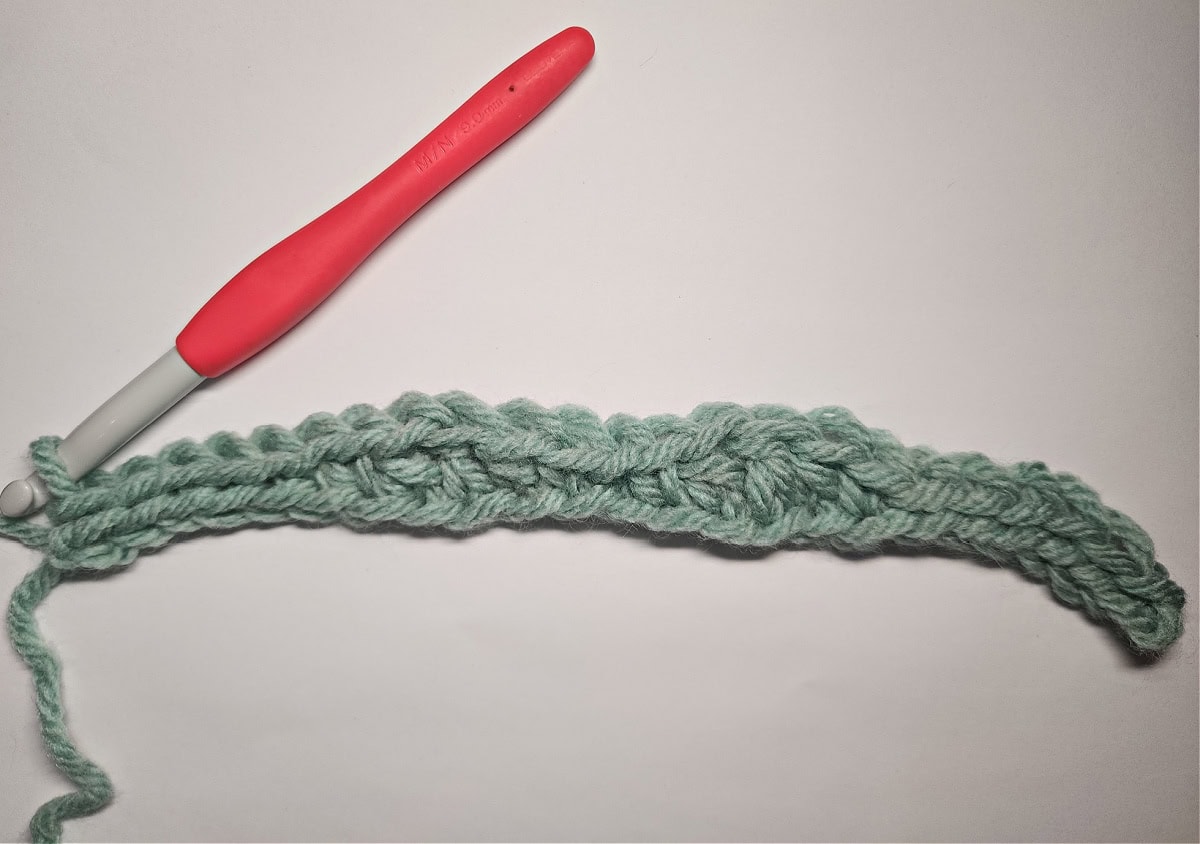
Row 1 (RS): With yarn & a 9.00mm crochet hook, ch 21, working into the back of your foundation ch, sl stc into the 2nd ch from your hook, sl st into each of the next 4 chs, (sc in the next ch, hdc in the next ch, dc in the next ch, hdc in the next ch, sc in the next ch, sl st in the next ch) work from ( to ) 2 times, then sl st in each of the last 3 chs. Turn. (20 sts) Width of Row 1 should be approximately 8.5″.
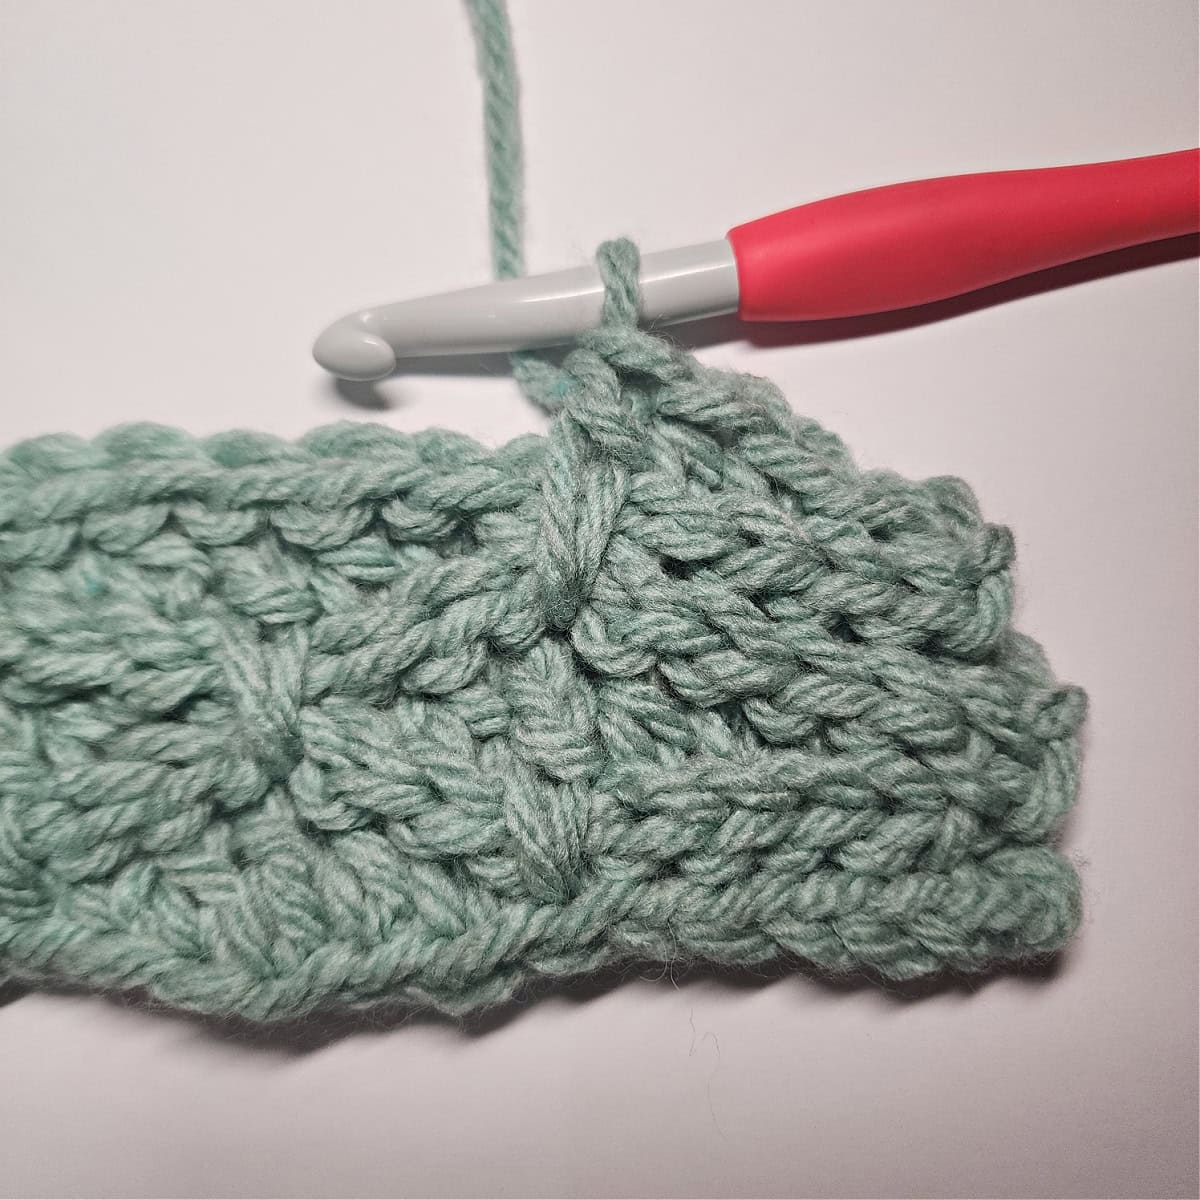
Row 2: Ch 1, BLO sl st in each st across to the last st, skip the last st. Turn. (19 sts)
Row 3: Ch 1, BLO sl st in the first st, (BLO sc in the next st, BLO hdc in the next st, dc in the next foundation ch from Row 1, BLO hdc in the next st, BLO sc in the next st, BLO sl st in the next st) work from ( to ) 3 times. Turn. (19 sts)
Row 4: Ch 1, BLO sl st in each st across the previous row, BLO sl st in the skipped st 3 rows down. Turn. (20 sts)
Row 5: Ch 1, BLO sl st in each of the first 5 sts, (BLO sc in the next st, BLO hdc in the next st, dc in the next dc from Row 1, BLO hdc in the next st, BLO sc in the next st, BLO sl st in the next st) work from ( to ) 2 times, then BLO sl st in each of the last 3 sts. Turn. (20 sts)
Row 6: Ch 1, BLO sl st in each st across to the last st, skip the last st. Turn. (19 sts)
Row 7: Ch 1, BLO sl st in the first st, (BLO sc in the next st, BLO hdc in the next st, dc in the next dc 4 rows below, BLO hdc in the next st, BLO sc in the next st, BLO sl st in the next st) work from ( to ) 3 times. Turn. (19 sts)
Row 8: Ch 1, BLO sl st in each st across the previous row, BLO sl st in the skipped st 3 rows down. Turn. (20 sts)
Row 9: Ch 1, BLO sl st in each of the first 5 sts, (BLO sc in the next st, BLO hdc in the next st, dc in the next dc 4 rows below, BLO hdc in the next st, BLO sc in the next st, BLO sl st in the next st) work from ( to ) 2 times, then BLO sl st in each of the last 3 sts. Turn. (20 sts)
Row 10: Ch 1, BLO sl st in each st across to the last st, skip the last st. Turn. (19 sts)
Row 11: Ch 1, BLO sl st in the first st, (BLO sc in the next st, BLO hdc in the next st, dc in the next dc 4 rows below, BLO hdc in the next st, BLO sc in the next st, BLO sl st in the next st) work from ( to ) 3 times. Turn. (19 sts)
Row 12: Ch 1, BLO sl st in each st across the previous row, BLO sl st in the skipped st 3 rows down. Turn. (20 sts)
Rows 13 – 44: Rep Rows 9 – 12. Your row height should measure 16.5″ H at this point. If it is too short, continue repeating Rows 9 – 12 until it does.
Fasten off leaving a length of yarn 3 times the width of the last row. Finished hat size before seaming: 9″ W x 16.5″ H.
The edge where your beginning tail of yarn is the brim of the beanie. The edge where you fastened off the last row of the beanie will become the crown.
Continue on to the Nearly Invisible Seam below (after the Progression Photos below). Seam your beanie and then continue to Finishing Stitches.
Child Hat Size Instructions
Progression photos can be found below after the crochet hat patterns for all sizes.
Gauge: In pattern as written below: 10 sts = 4.25″; 8 rows = 3″ (row height isn’t crucial)
Row 1 (RS): With yarn & a 9.00mm crochet hook, ch 22, working into the back of your foundation ch, sl stc into the 2nd ch from your hook, sl st into each of the next 4 chs, (sc in the next ch, hdc in the next ch, dc in the next ch, hdc in the next ch, sc in the next ch, sl st in the next ch) work from ( to ) 2 times, then sl st in each of the last 4 chs. Turn. (21 sts) Width of Row 1 should be approximately 9″.
Row 2: Ch 1, BLO sl st in each st across to the last st, skip the last st. Turn. (20 sts)
Row 3: Ch 1, BLO sl st in the first st, (BLO sc in the next st, BLO hdc in the next st, dc in the next foundation ch from Row 1, BLO hdc in the next st, BLO sc in the next st, BLO sl st in the next st) work from ( to ) 3 times, then BLO sl st in the last st. Turn. (20 sts)
Row 4: Ch 1, BLO sl st in each st across the previous row, BLO sl st in the skipped st 3 rows down. Turn. (21 sts)
Row 5: Ch 1, BLO sl st in each of the first 5 sts, (BLO sc in the next st, BLO hdc in the next st, dc in the next dc from Row 1, BLO hdc in the next st, BLO sc in the next st, BLO sl st in the next st) work from ( to ) 2 times, then BLO sl st in each of the last 4 sts. Turn. (21 sts)
Row 6: Ch 1, BLO sl st in each st across to the last st, skip the last st. Turn. (20 sts)
Row 7: Ch 1, BLO sl st in the first st, (BLO sc in the next st, BLO hdc in the next st, dc in the next dc 4 rows below, BLO hdc in the next st, BLO sc in the next st, BLO sl st in the next st) work from ( to ) 3 times, then BLO sl st in the last st. Turn. (20 sts)
Row 8: Ch 1, BLO sl st in each st across the previous row, BLO sl st in the skipped st 3 rows down. Turn. (21 sts)
Row 9: Ch 1, BLO sl st in each of the first 5 sts, (BLO sc in the next st, BLO hdc in the next st, dc in the next dc 4 rows below, BLO hdc in the next st, BLO sc in the next st, BLO sl st in the next st) work from ( to ) 2 times, then BLO sl st in each of the last 4 sts. Turn. (21 sts)
Row 10: Ch 1, BLO sl st in each st across to the last st, skip the last st. Turn. (20 sts)
Row 11: Ch 1, BLO sl st in the first st, (BLO sc in the next st, BLO hdc in the next st, dc in the next dc 4 rows below, BLO hdc in the next st, BLO sc in the next st, BLO sl st in the next st) work from ( to ) 3 times, then BLO sl st in the last st. Turn. (20 sts)
Row 12: Ch 1, BLO sl st in each st across the previous row, BLO sl st in the skipped st 3 rows down. Turn. (21 sts)
Rows 13 – 48: Rep Rows 9 – 12. Your row height should measure 18″ H at this point. If it is too short, continue repeating Rows 9 – 12 until it does.
Fasten off leaving a length of yarn 3 times the width of the last row. Finished hat size before seaming: 9″ W x 18″ H.
The edge where your beginning tail of yarn is the brim of the beanie. The edge where you fastened off the last row of the beanie will become the crown.
Continue on to the Nearly Invisible Seam below (after the Progression Photos below). Seam your beanie and then continue to Finishing Stitches.
Teen / Adult Small Hat Size Instructions
Progression photos can be found below after the crochet hat patterns for all sizes.
Gauge: In pattern as written below: 10 sts = 4.25″; 8 rows = 3″ (row height isn’t crucial)
Row 1 (RS): With yarn & a 9.00mm crochet hook, ch 23, working into the back of your foundation ch, sl stc into the 2nd ch from your hook, sl st into each of the next 5 chs, (sc in the next ch, hdc in the next ch, dc in the next ch, hdc in the next ch, sc in the next ch, sl st in the next ch) work from ( to ) 2 times, then sl st in each of the last 4 chs. Turn. (22 sts) Width of Row 1 should be approximately 9.25″.
Row 2: Ch 1, BLO sl st in each st across to the last st, skip the last st. Turn. (21 sts)
Row 3: Ch 1, BLO sl st in each of the first 2 sts, (BLO sc in the next st, BLO hdc in the next st, dc in the next foundation ch from Row 1, BLO hdc in the next st, BLO sc in the next st, BLO sl st in the next st) work from ( to ) 3 times, then BLO sl st in the last st. Turn. (21 sts)
Row 4: Ch 1, BLO sl st in each st across the previous row, BLO sl st in the skipped st 3 rows down. Turn. (22 sts)
Row 5: Ch 1, BLO sl st in each of the first 6 sts, (BLO sc in the next st, BLO hdc in the next st, dc in the next dc from Row 1, BLO hdc in the next st, BLO sc in the next st, BLO sl st in the next st) work from ( to ) 2 times, then BLO sl st in each of the last 4 sts. Turn. (22 sts)
Row 6: Ch 1, BLO sl st in each st across to the last st, skip the last st. Turn. (21 sts)
Row 7: Ch 1, BLO sl st in each of the first 2 sts, (BLO sc in the next st, BLO hdc in the next st, dc in the next dc 4 rows below, BLO hdc in the next st, BLO sc in the next st, BLO sl st in the next st) work from ( to ) 3 times, then BLO sl st in the last st. Turn. (21 sts)
Row 8: Ch 1, BLO sl st in each st across the previous row, BLO sl st in the skipped st 3 rows down. Turn. (22 sts)
Row 9: Ch 1, BLO sl st in each of the first 6 sts, (BLO sc in the next st, BLO hdc in the next st, dc in the next dc 4 rows below, BLO hdc in the next st, BLO sc in the next st, BLO sl st in the next st) work from ( to ) 2 times, then BLO sl st in each of the last 4 sts. Turn. (22 sts)
Row 10: Ch 1, BLO sl st in each st across to the last st, skip the last st. Turn. (21 sts)
Row 11: Ch 1, BLO sl st in each of the first 2 sts, (BLO sc in the next st, BLO hdc in the next st, dc in the next dc 4 rows below, BLO hdc in the next st, BLO sc in the next st, BLO sl st in the next st) work from ( to ) 3 times, then BLO sl st in the last st. Turn. (21 sts)
Row 12: Ch 1, BLO sl st in each st across the previous row, BLO sl st in the skipped st 3 rows down. Turn. (22 sts)
Rows 13 – 52: Rep Rows 9 – 12. Your row height should measure 19.5″ H at this point. If it is too short, continue repeating Rows 9 – 12 until it does.
Fasten off leaving a length of yarn 3 times the width of the last row. Finished hat size before seaming: 9.25″ W x 19.5″ H.
The edge where your beginning tail of yarn is the brim of the beanie. The edge where you fastened off the last row of the beanie will become the crown.
Continue on to the Nearly Invisible Seam below (after the Progression Photos below). Seam your beanie and then continue to Finishing Stitches.
Adult Medium / Large Hat Size Instructions
Progression photos can be found below after the crochet hat patterns for all sizes.
Gauge: In pattern as written below: 10 sts = 4.25″; 8 rows = 3″ (row height isn’t crucial)
Row 1 (RS): With yarn & a 9.00mm crochet hook, ch 24, working into the back of your foundation ch, sl stc into the 2nd ch from your hook, sl st into each of the next 5 chs, (sc in the next ch, hdc in the next ch, dc in the next ch, hdc in the next ch, sc in the next ch, sl st in the next ch) work from ( to ) 2 times, then sl st in each of the last 5 chs. Turn. (23 sts) Width of Row 1 should be approximately 9.75″.
Row 2: Ch 1, BLO sl st in each st across to the last st, skip the last st. Turn. (22 sts)
Row 3: Ch 1, BLO sl st in each of the first 2 sts, (BLO sc in the next st, BLO hdc in the next st, dc in the next foundation ch from Row 1, BLO hdc in the next st, BLO sc in the next st, BLO sl st in the next st) work from ( to ) 3 times, then BLO sl st in each of the last 2 sts. Turn. (22 sts)
Row 4: Ch 1, BLO sl st in each st across the previous row, BLO sl st in the skipped st 3 rows down. Turn. (23 sts)
Row 5: Ch 1, BLO sl st in each of the first 6 sts, (BLO sc in the next st, BLO hdc in the next st, dc in the next dc from Row 1, BLO hdc in the next st, BLO sc in the next st, BLO sl st in the next st) work from ( to ) 2 times, then BLO sl st in each of the last 5 sts. Turn. (23 sts)
Row 6: Ch 1, BLO sl st in each st across to the last st, skip the last st. Turn. (22 sts)
Row 7: Ch 1, BLO sl st in each of the first 2 sts, (BLO sc in the next st, BLO hdc in the next st, dc in the next dc 4 rows below, BLO hdc in the next st, BLO sc in the next st, BLO sl st in the next st) work from ( to ) 3 times, then BLO sl st in each of the last 2 sts. Turn. (22 sts)
Row 8: Ch 1, BLO sl st in each st across the previous row, BLO sl st in the skipped st 3 rows down. Turn. (23 sts)
Row 9: Ch 1, BLO sl st in each of the first 6 sts, (BLO sc in the next st, BLO hdc in the next st, dc in the next dc 4 rows below, BLO hdc in the next st, BLO sc in the next st, BLO sl st in the next st) work from ( to ) 2 times, then BLO sl st in each of the last 5 sts. Turn. (23 sts)
Row 10: Ch 1, BLO sl st in each st across to the last st, skip the last st. Turn. (22 sts)
Row 11: Ch 1, BLO sl st in each of the first 2 sts, (BLO sc in the next st, BLO hdc in the next st, dc in the next dc 4 rows below, BLO hdc in the next st, BLO sc in the next st, BLO sl st in the next st) work from ( to ) 3 times, then BLO sl st in each of the last 2 sts. Turn. (22 sts)
Row 12: Ch 1, BLO sl st in each st across the previous row, BLO sl st in the skipped st 3 rows down. Turn. (23 sts)
Rows 13 – 56: Rep Rows 9 – 12. Your row height should measure 21″ H at this point. If it is too short, continue repeating Rows 9 – 12 until it does.
Fasten off leaving a length of yarn 3 times the width of the last row. Finished hat size before seaming: 9.75″ W x 21″ H.
The edge where your beginning tail of yarn is the brim of the beanie. The edge where you fastened off the last row of the beanie will become the crown.
Continue on to the Nearly Invisible Seam below (after the Progression Photos below). Seam your beanie and then continue to Finishing Stitches.
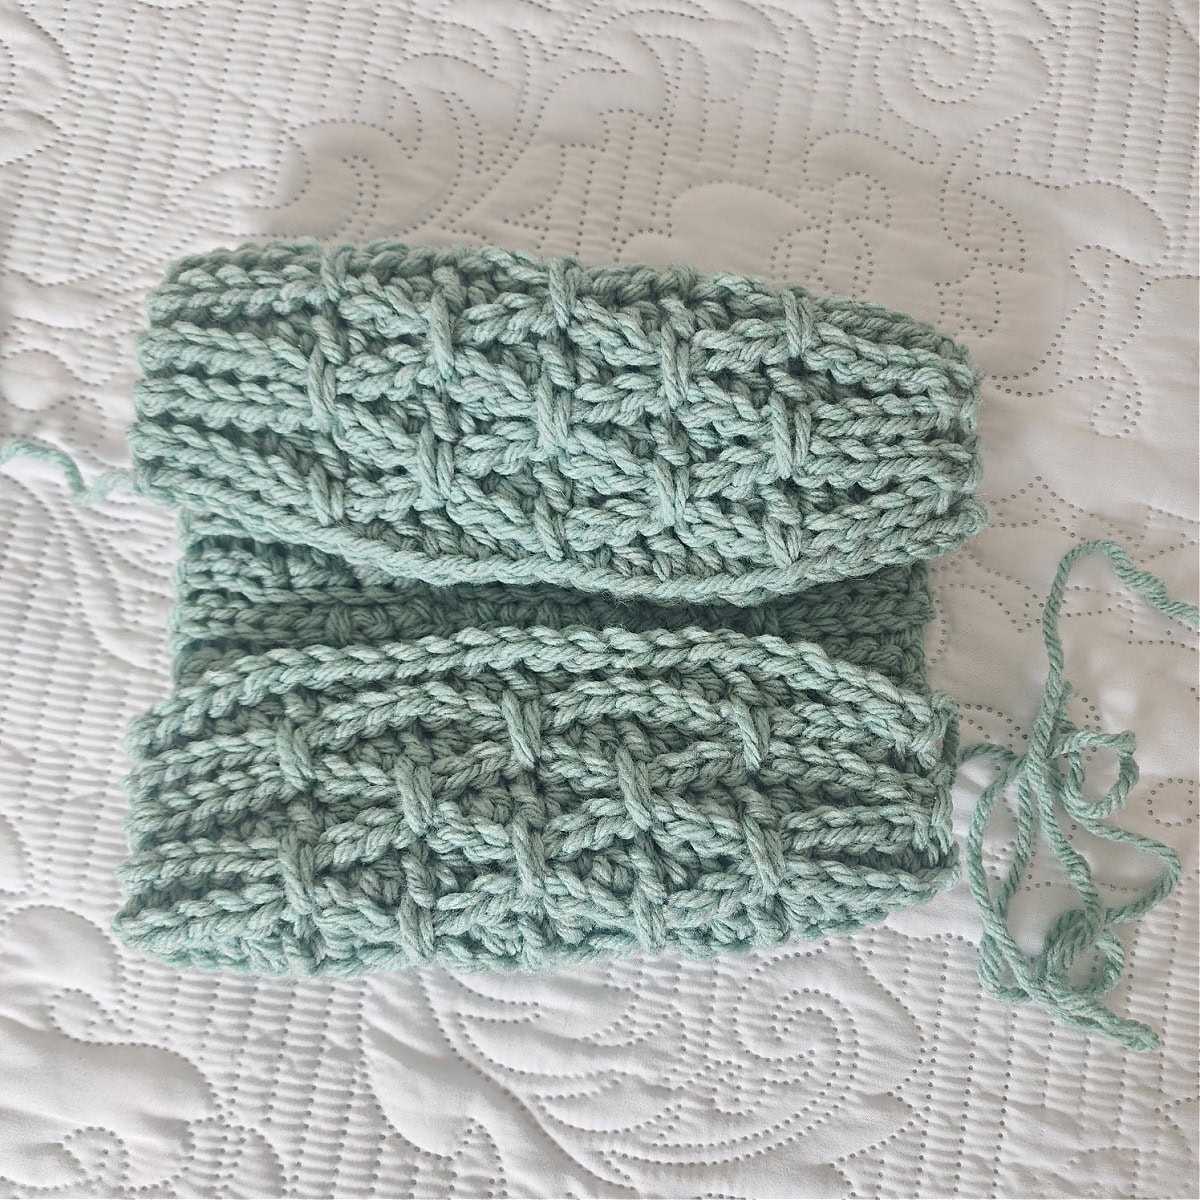
Crochet Hat Progression Photos
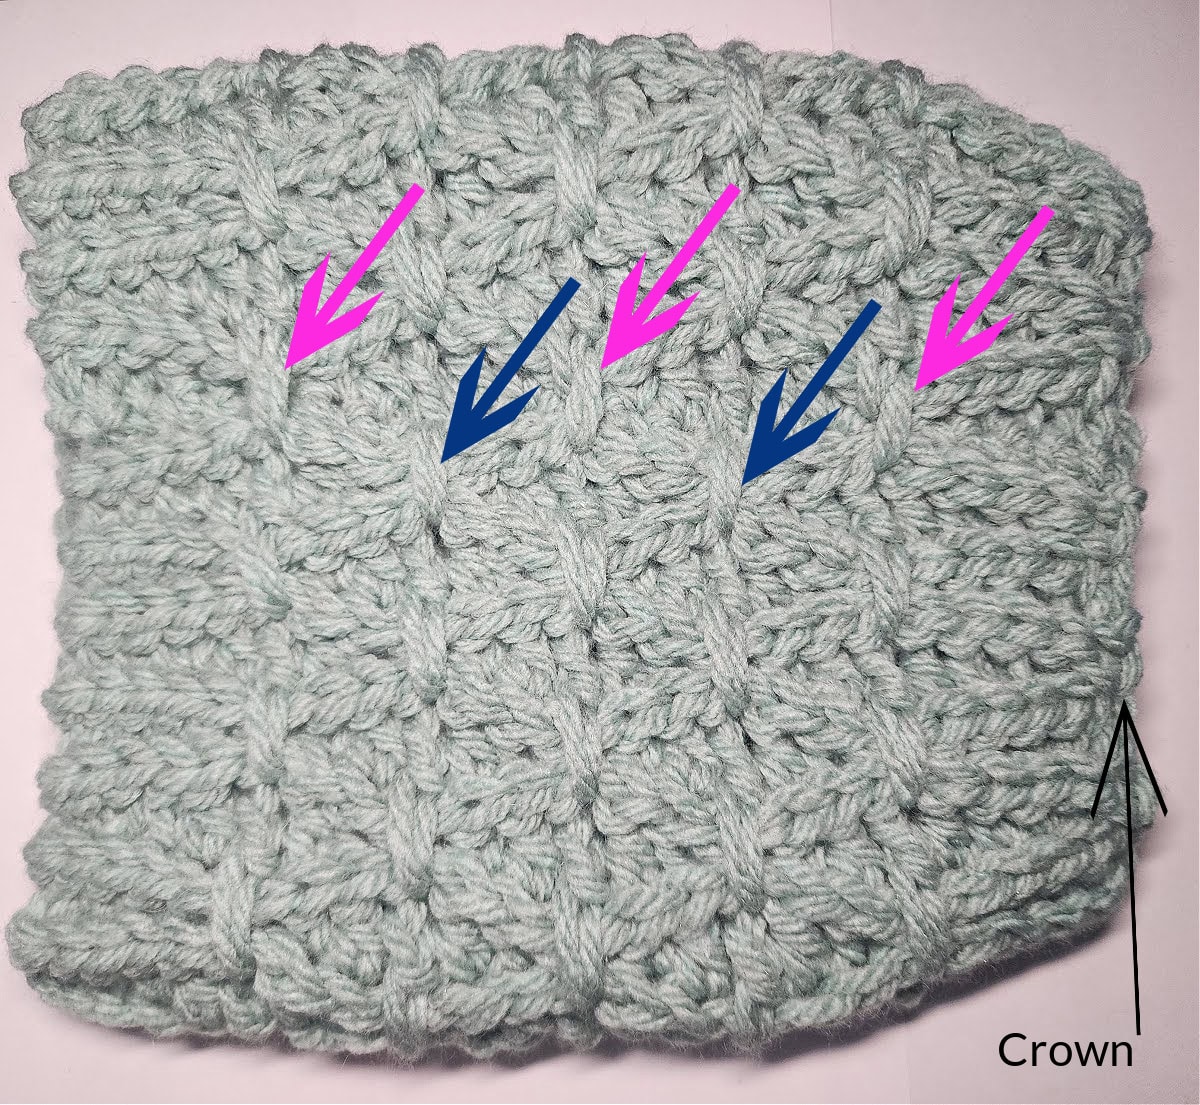
The following photos are of a teen / adult small beanie.
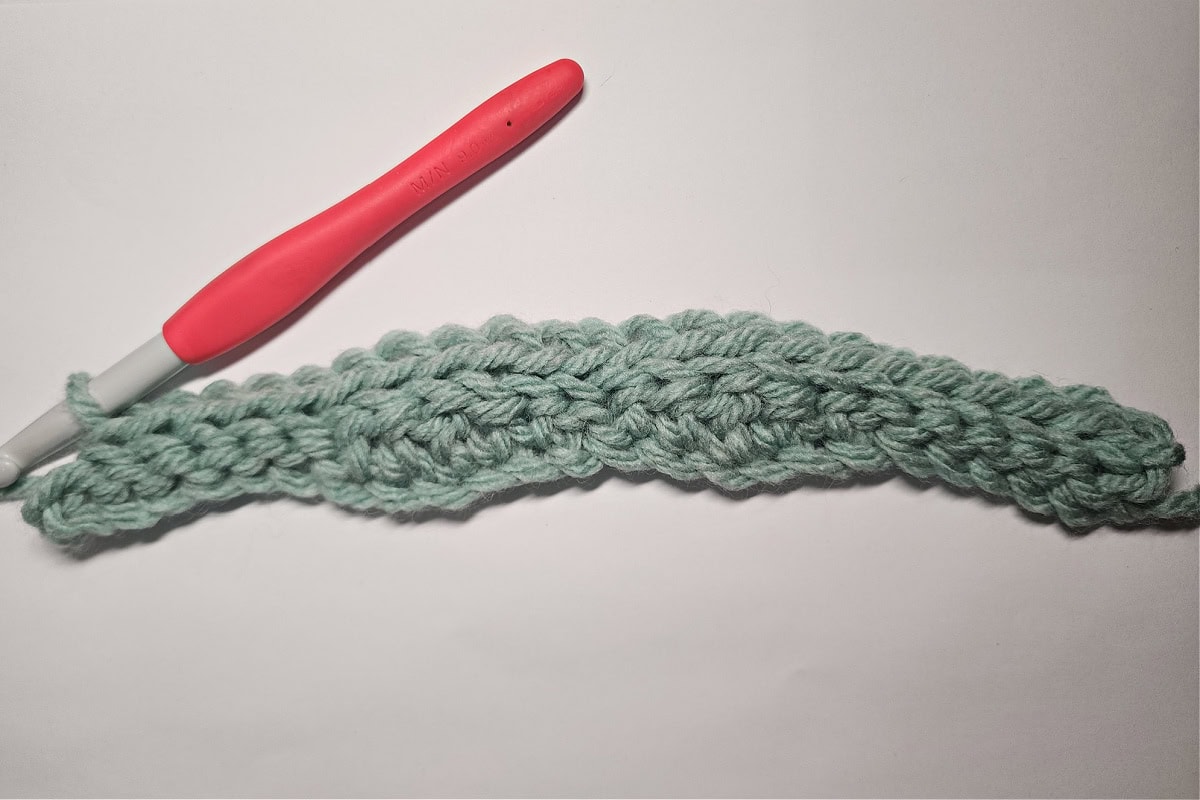
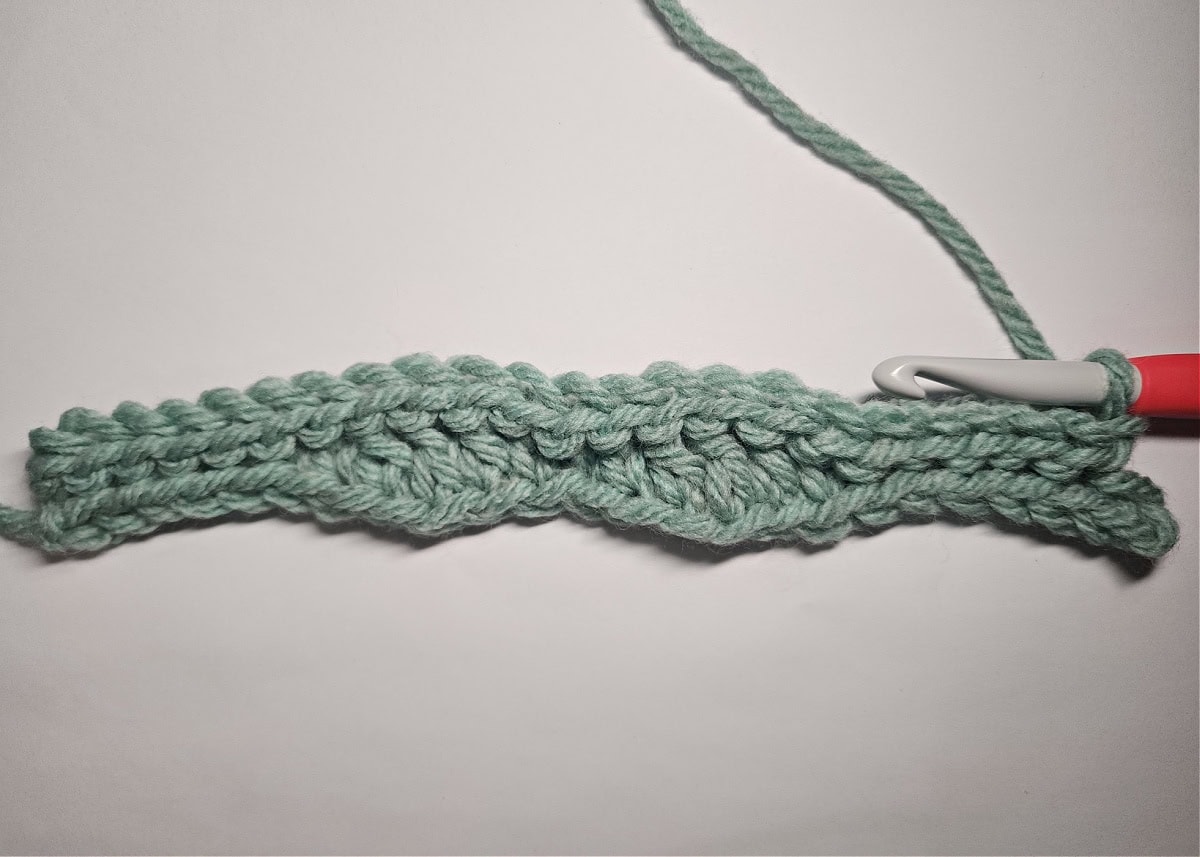

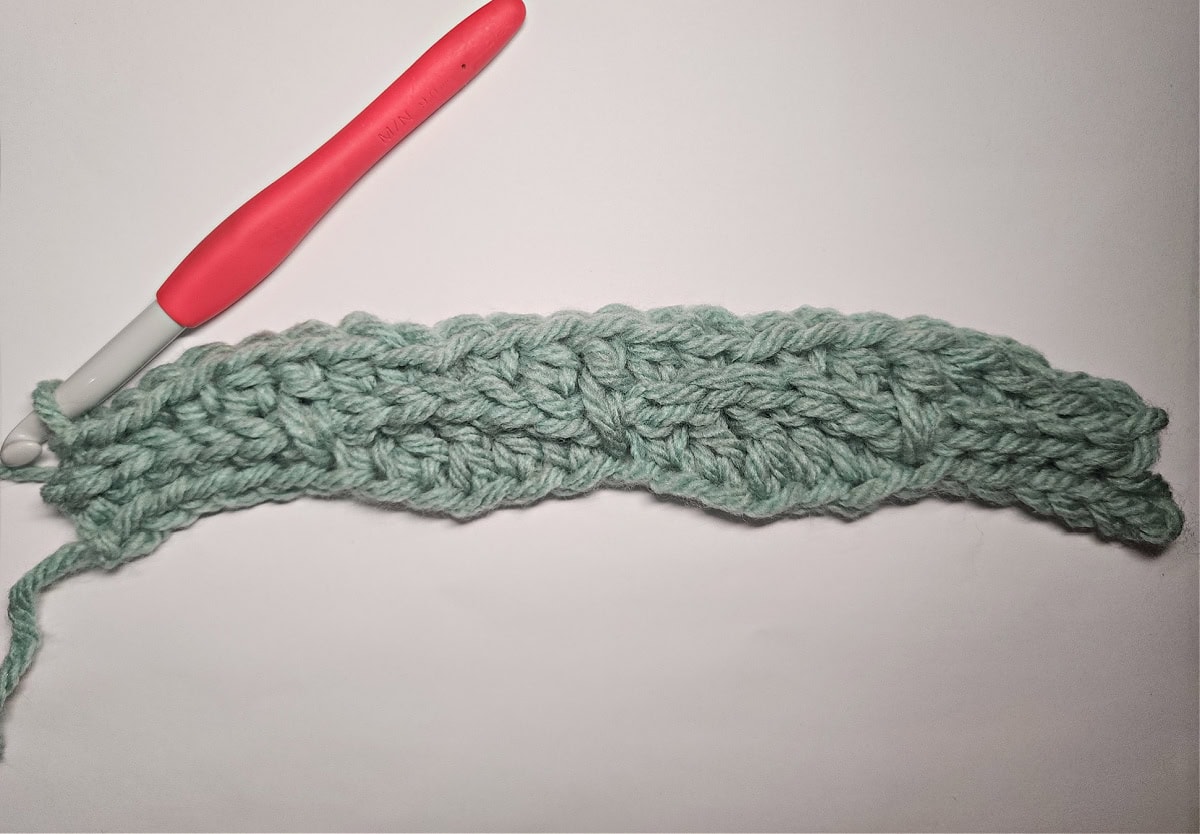
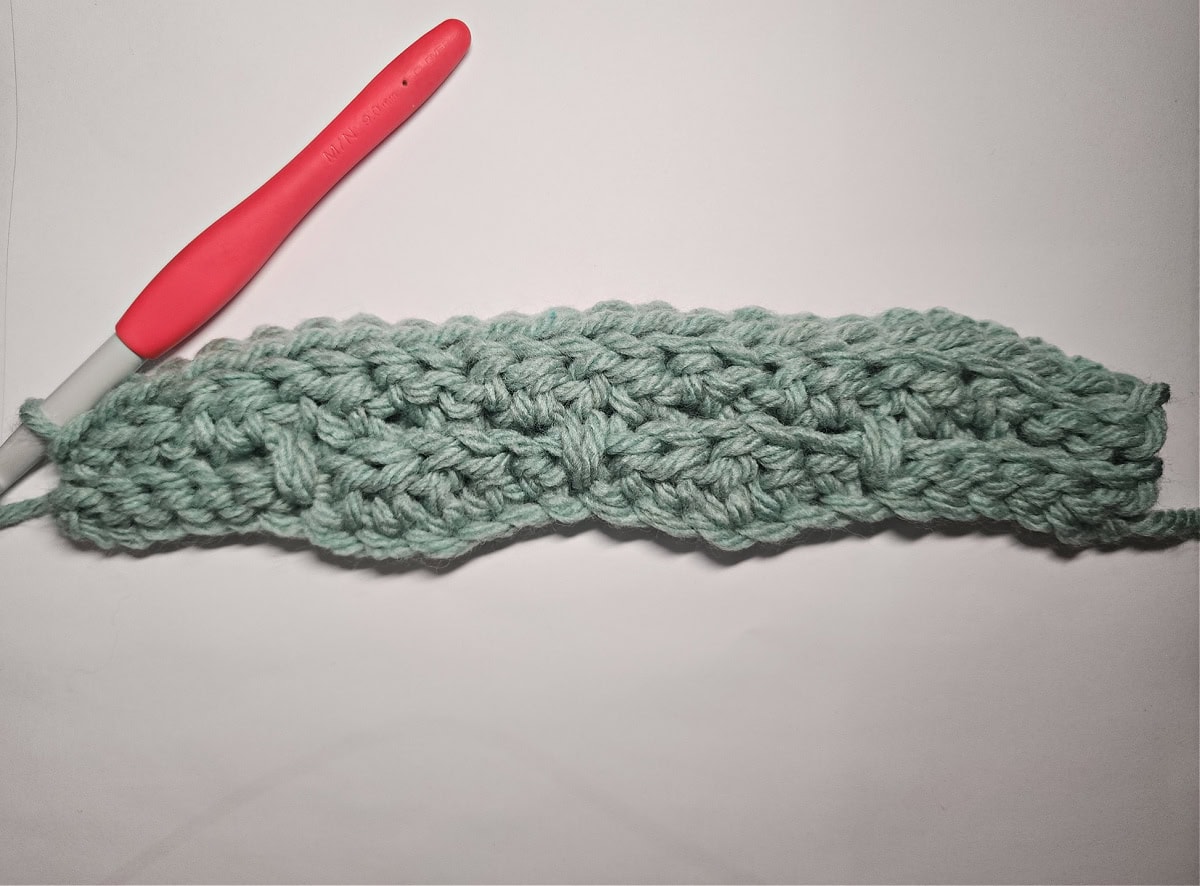
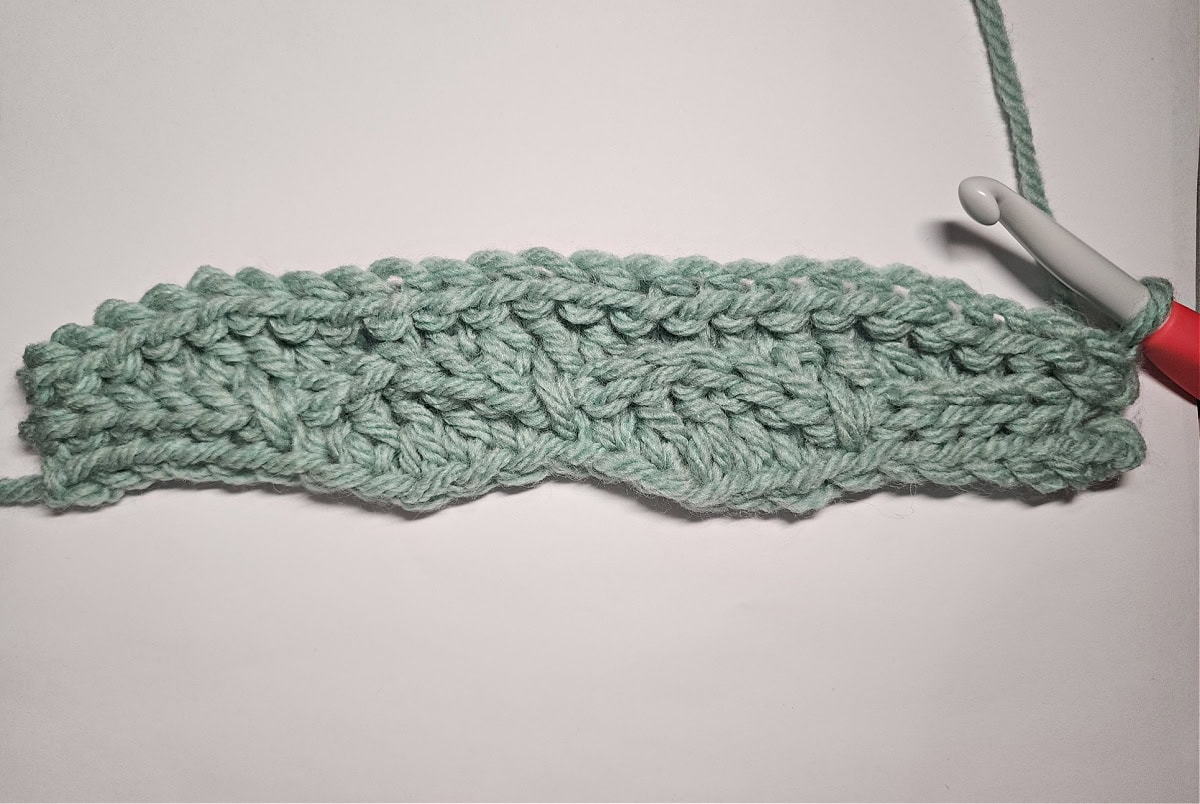
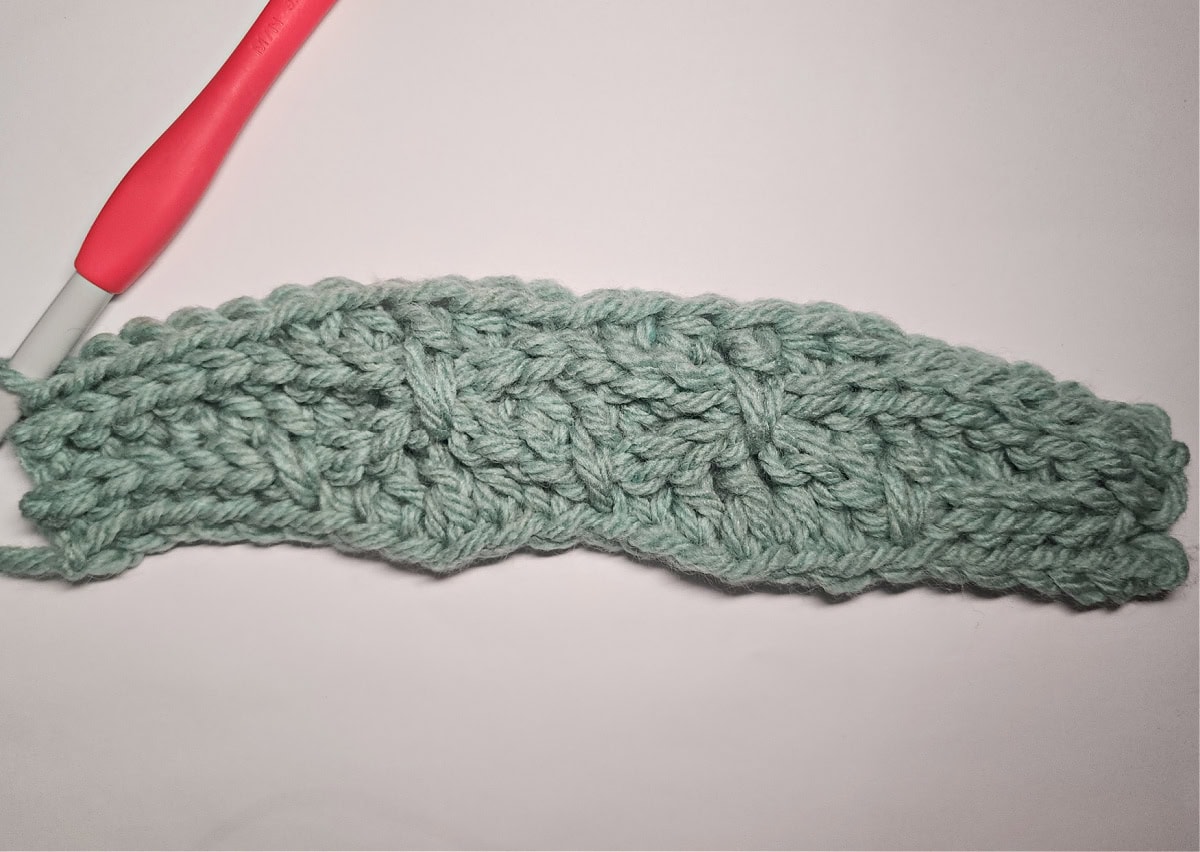
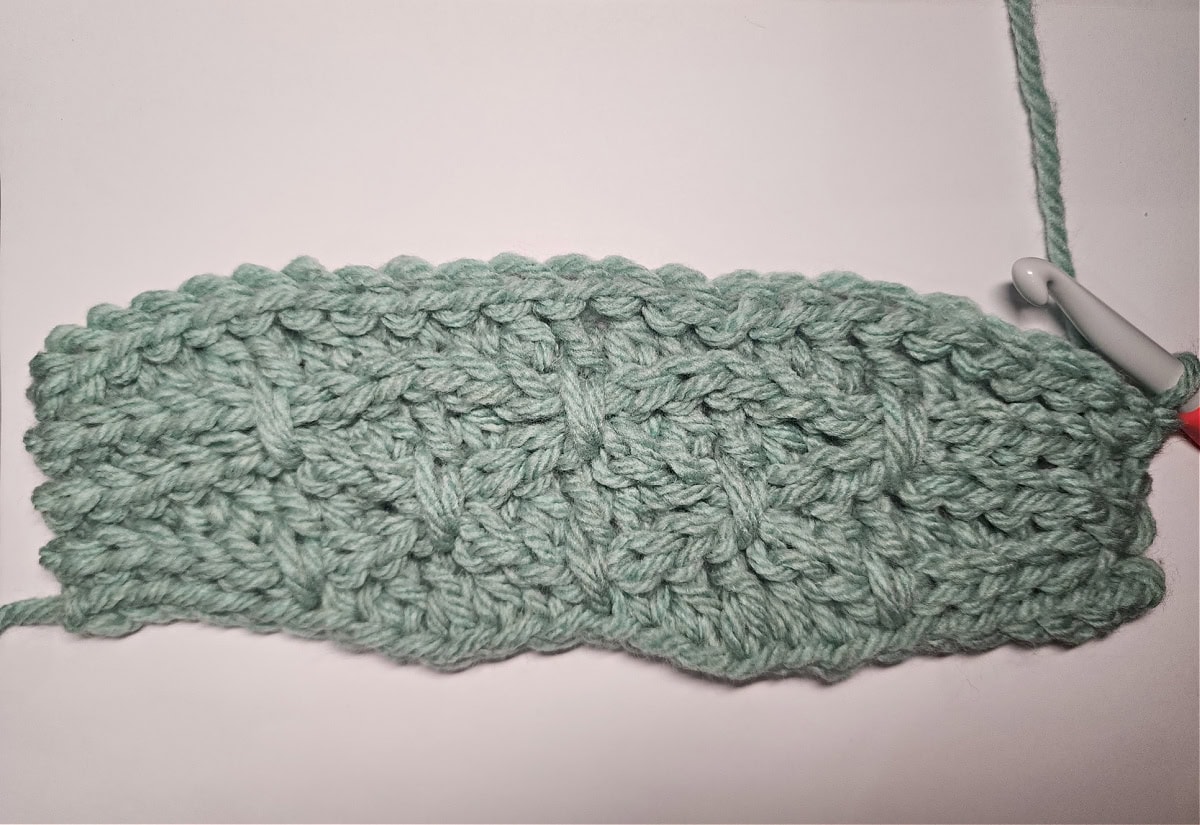
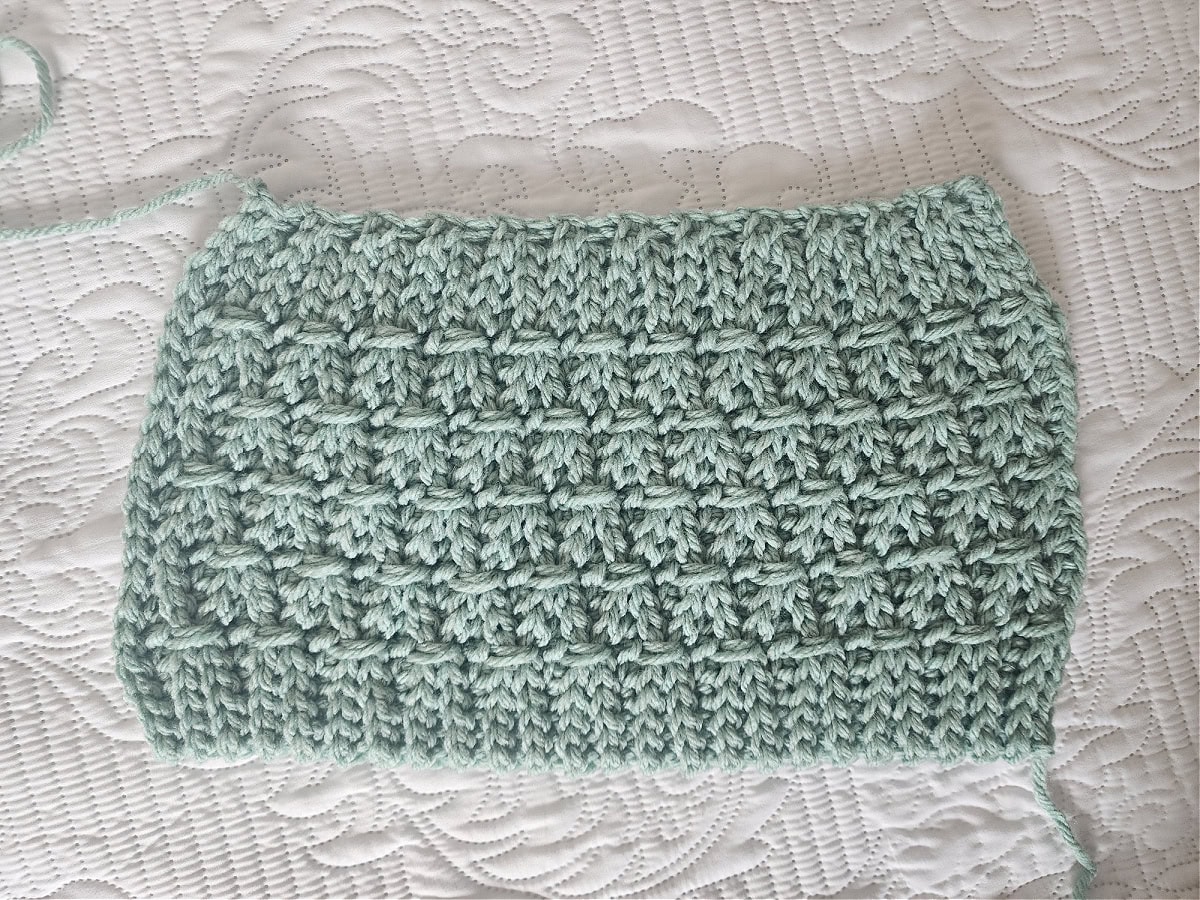
The edge where your beginning tail of yarn is the brim of the beanie (bottom edge in this photo). The edge where you fastened off the last row of the beanie will become the crown (top edge in this photo).
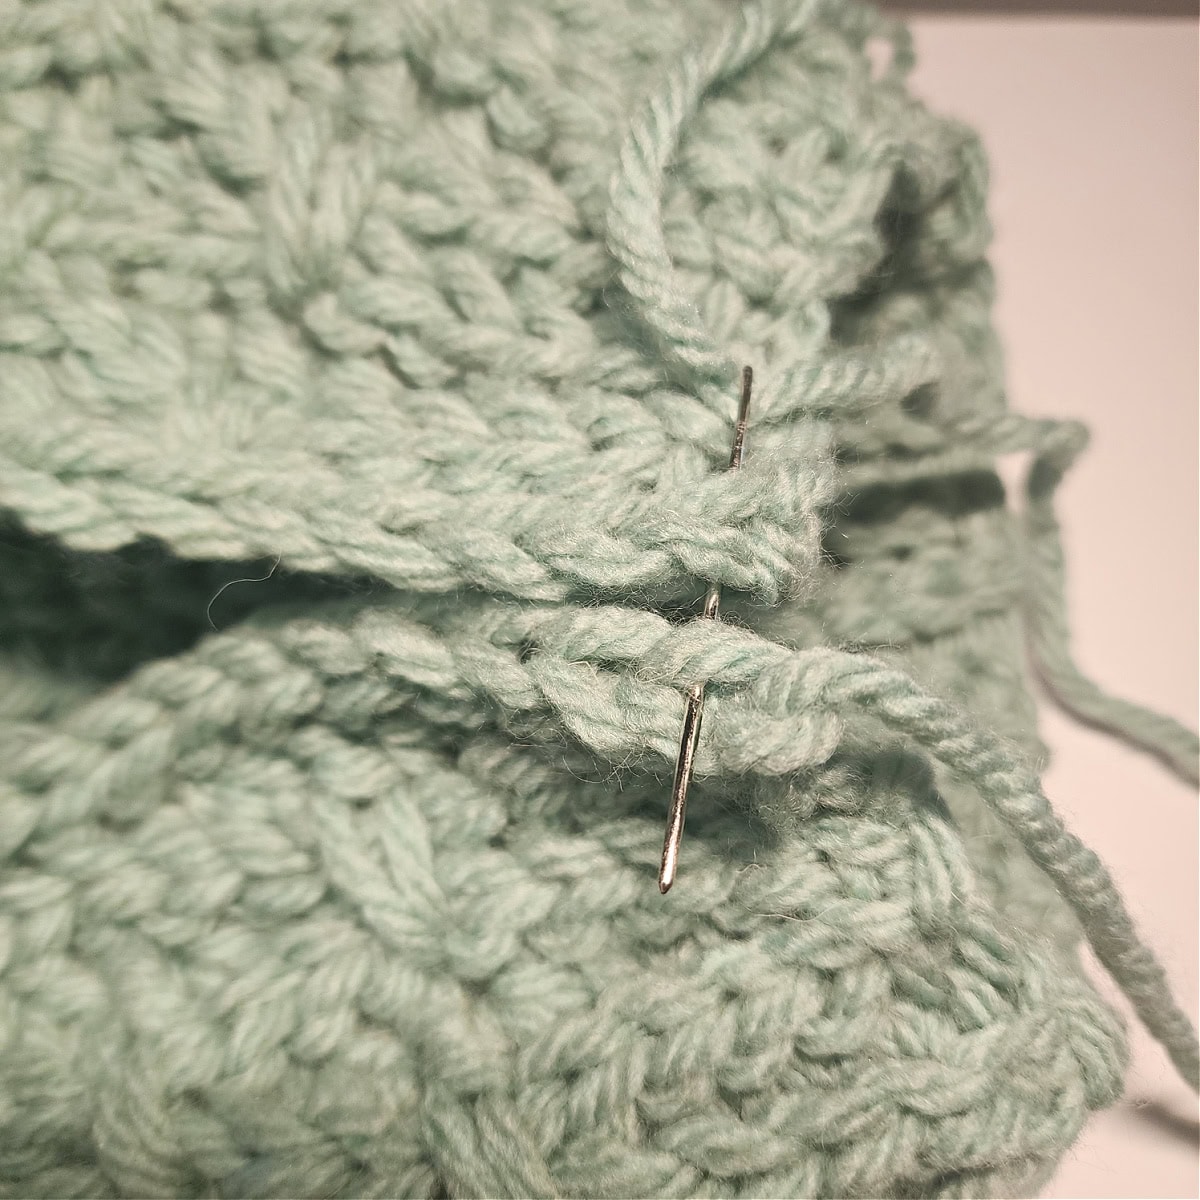
Nearly Invisible Seam

Finishing Stitches
The finishing stitches you’ll be adding are to tie together the first and last rows of the beanie. They are decorative stitches that mimic the double crochet stitches you worked 4 rows down throughout the beanie. These stitches are made using only a yarn needle and piece of yarn that you will use to connect two rows of stitches.
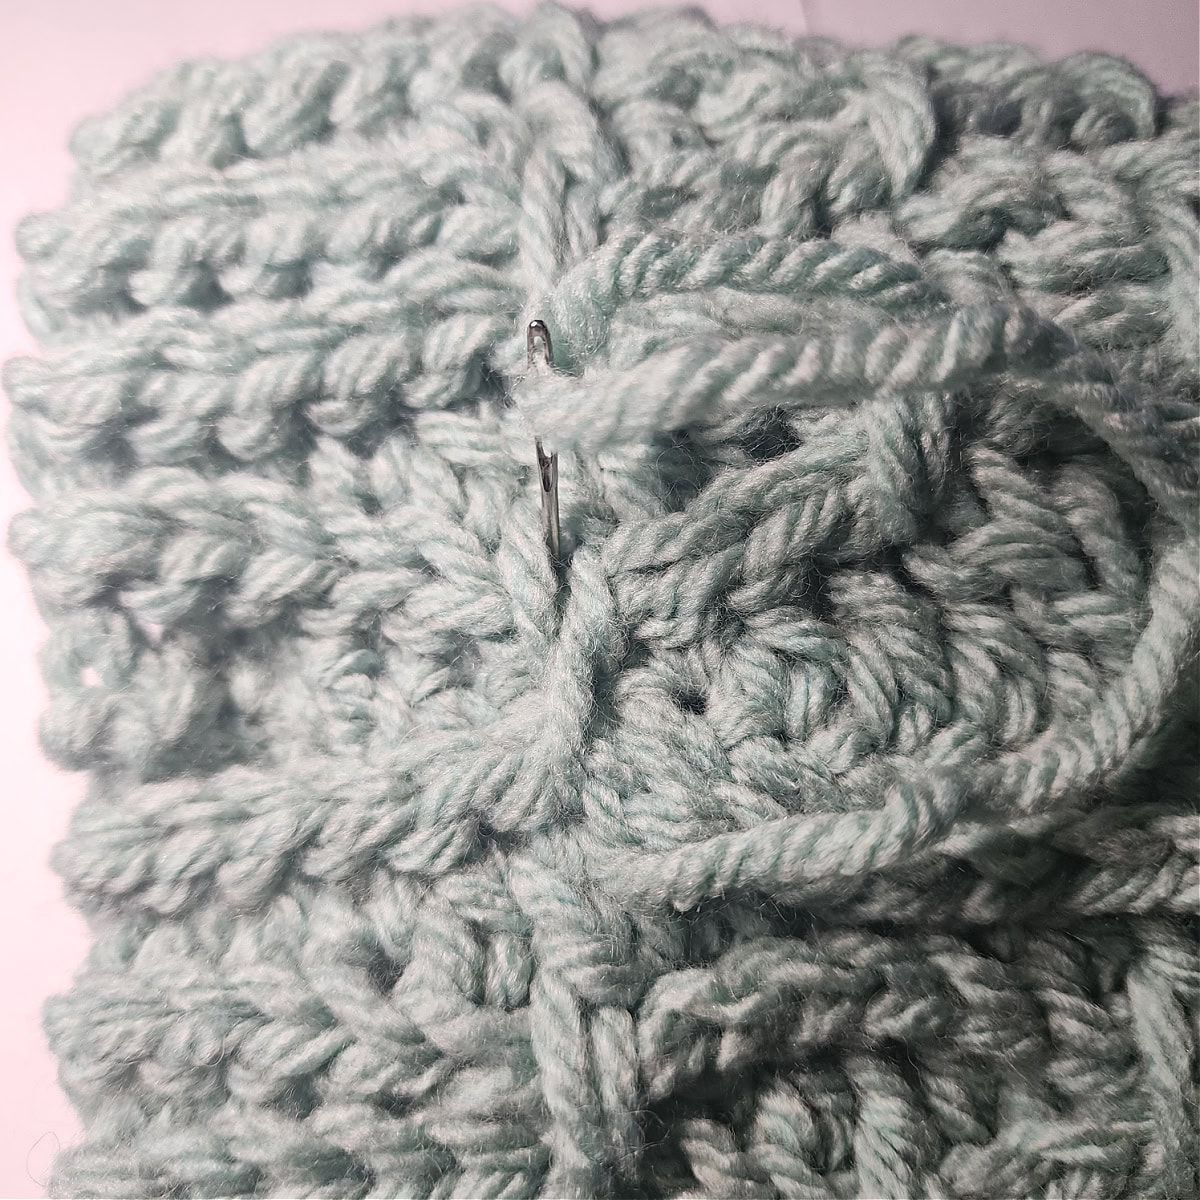
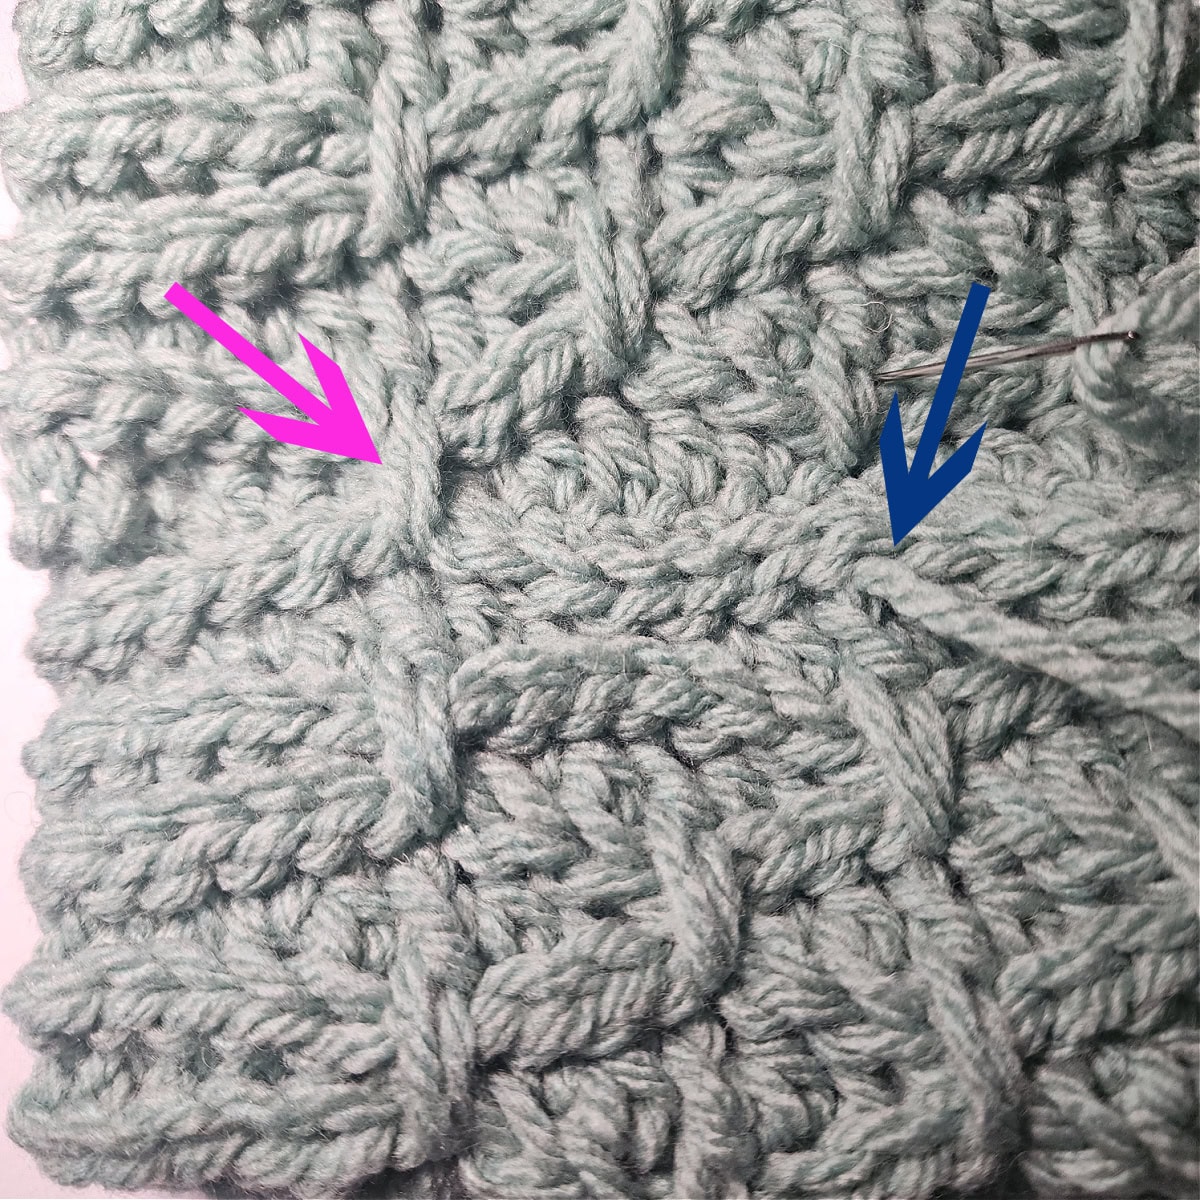
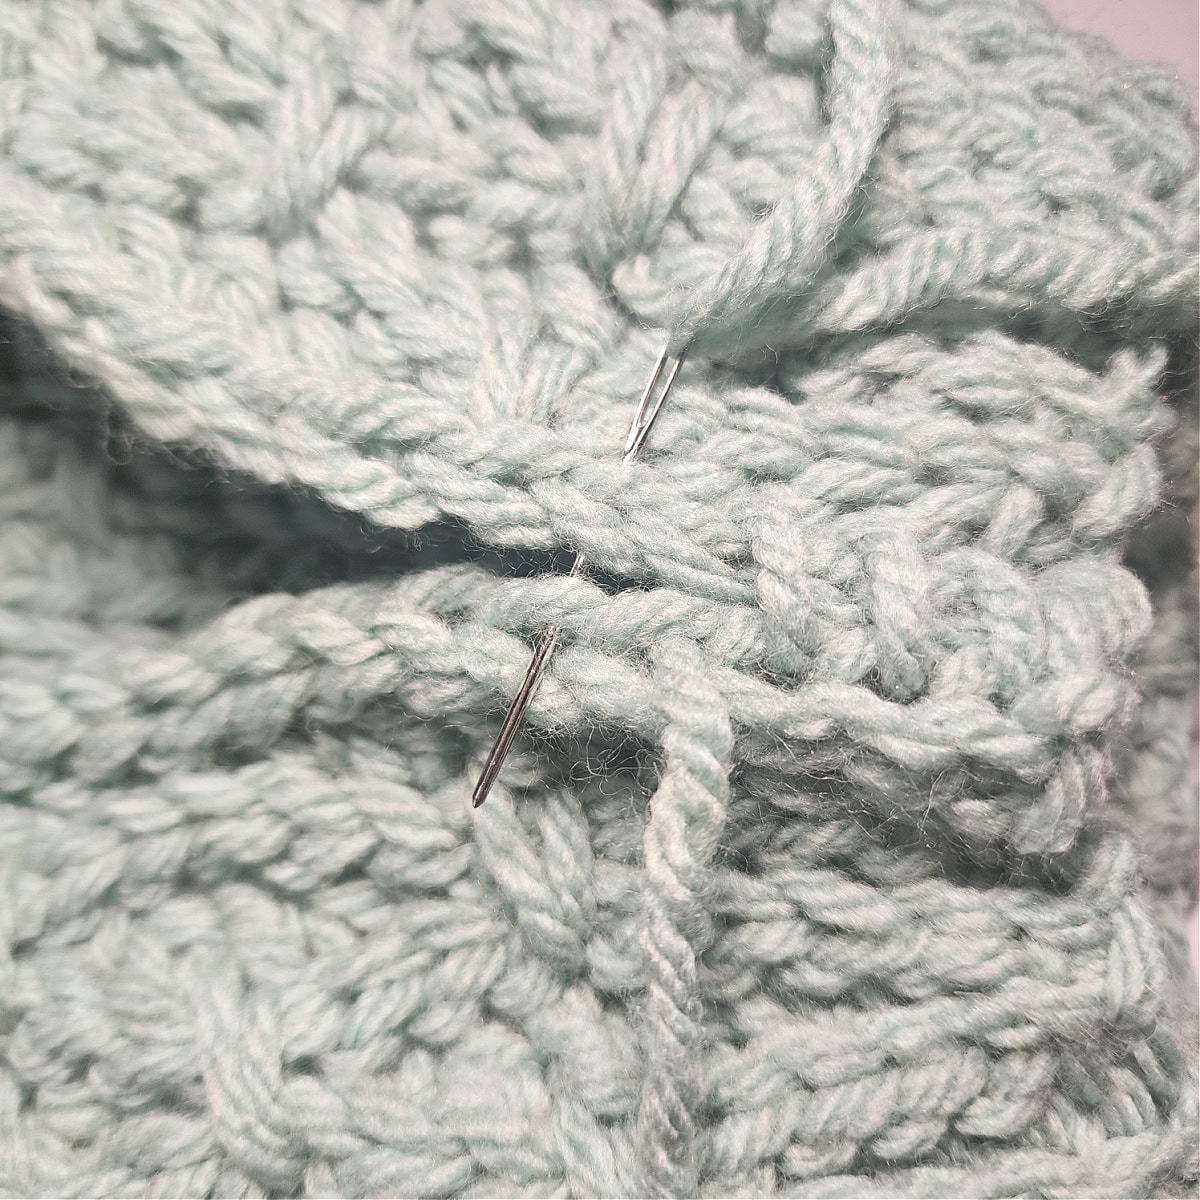
Repeat Photos A – C to tie together each dc from the second to last row of the hat to the dc above it. Weave in ends.
Continue on to complete the second set of finishing stitches.
Second Set of Finishing Stitches
The second set of finishing stitches are worked in the bottom of Row 1 dc’s & the top of the dc’s from the 4th to the last row of your hat.


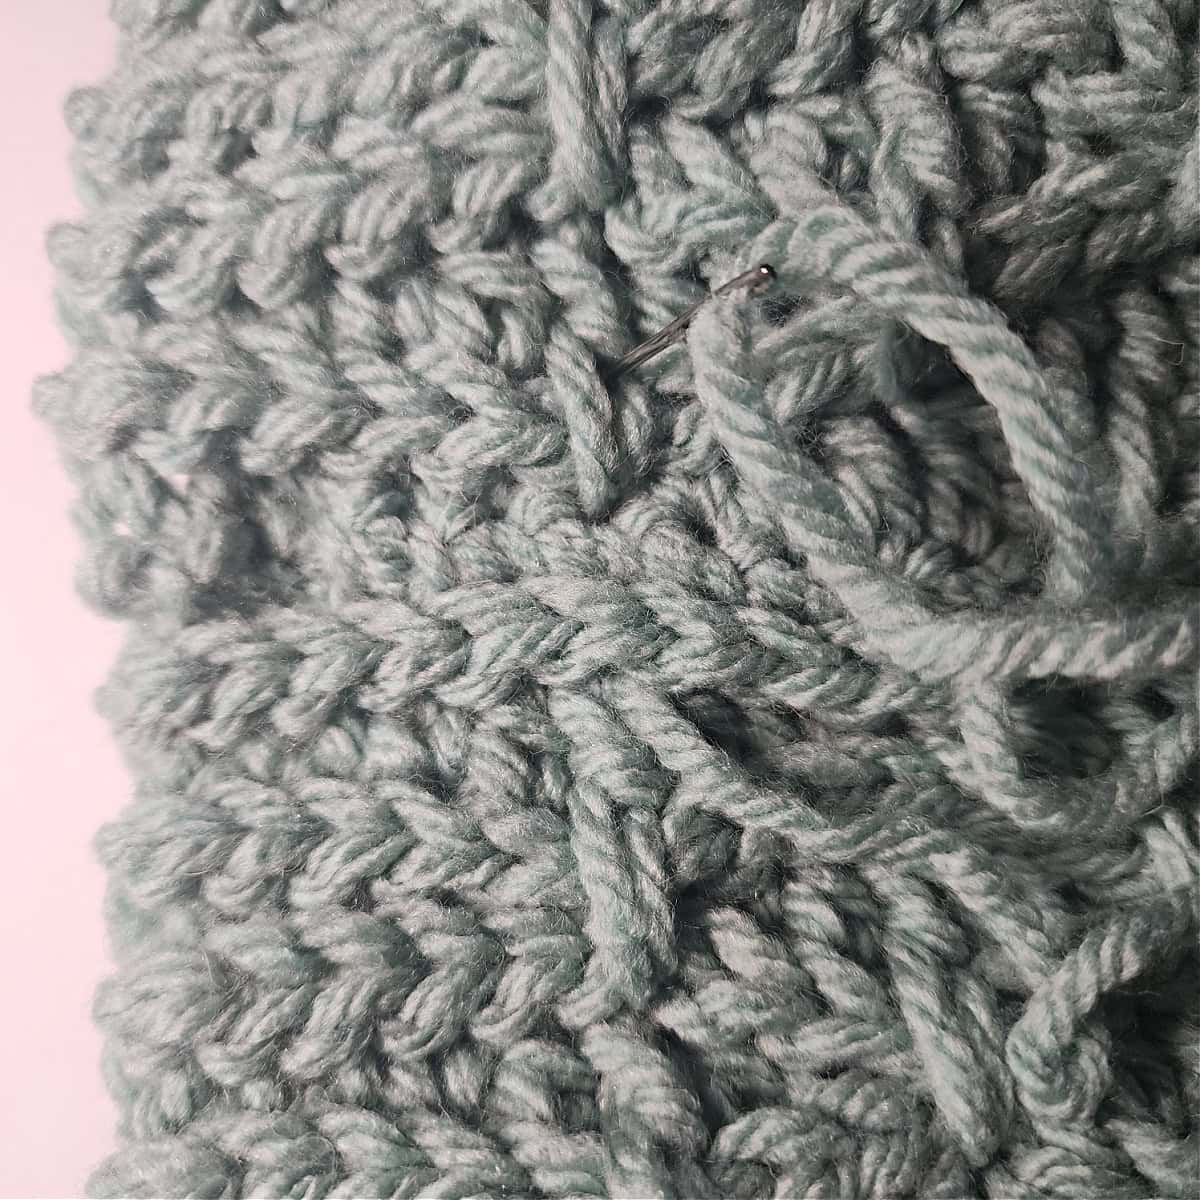
Close the Crown
With a yarn needle and piece of yarn, weave yarn in and out of stitches around the crown opening. Pull the yarn to cinch the crown closed. Weave in ends.
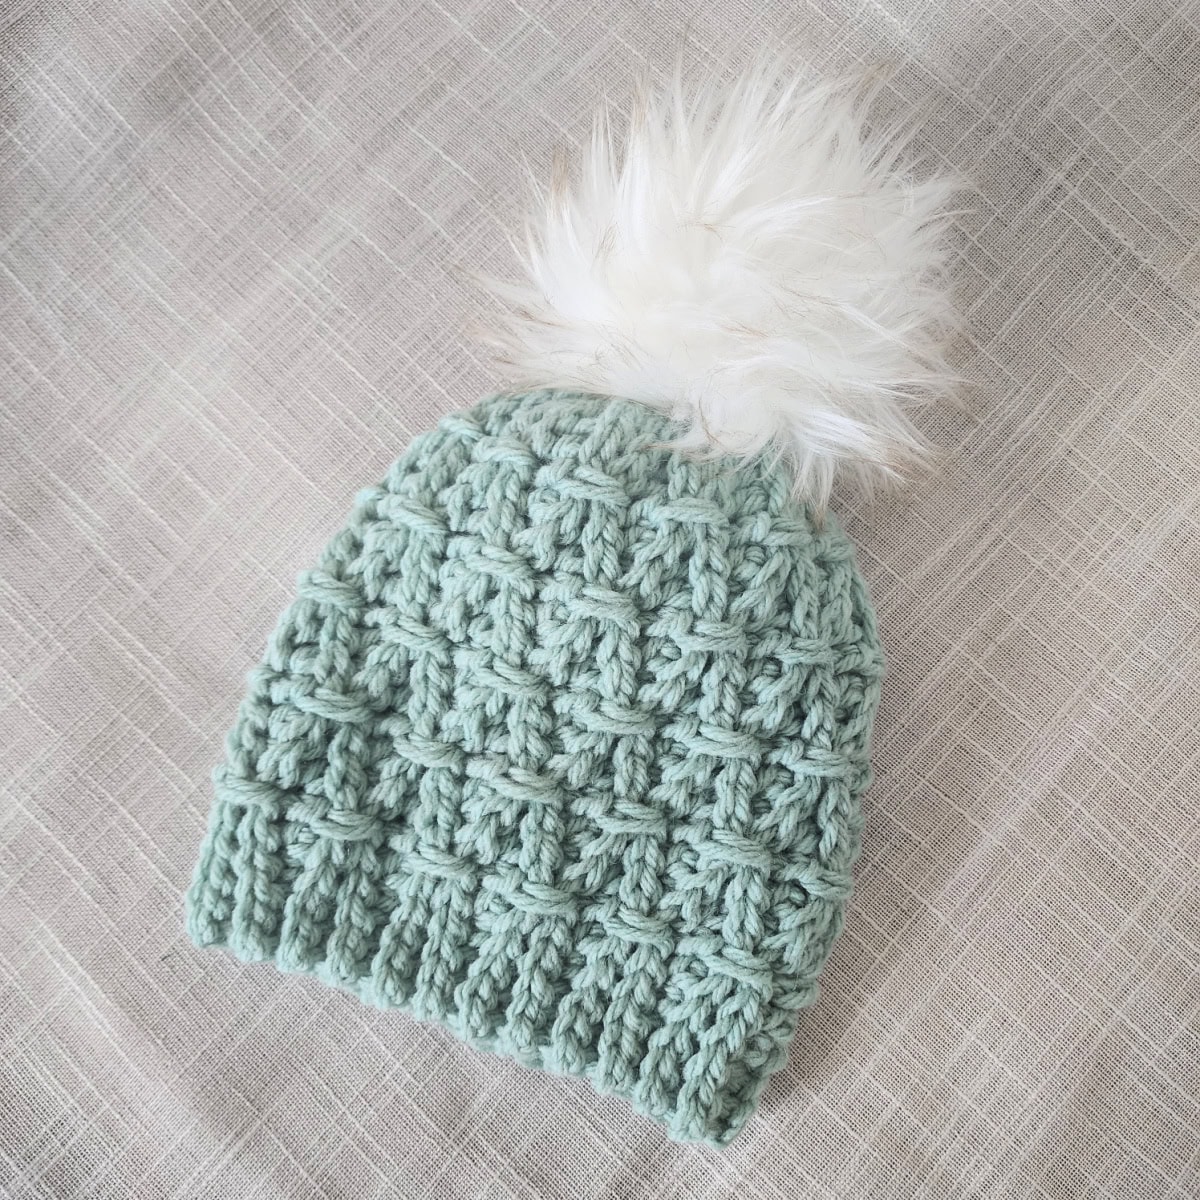
Add Your Own Finishing Touches!
Now that you’ve completed your Fireside Crochet Hat, it’s time to add your own finishing touches using one of the following fun options!
I MADE IT! NOW WHAT?
Pin this post!: Save this crochet hat pattern to your Pinterest boards so that you can come back and make it again.
Leave a comment below: We love to hear your feedback.
Share Your Finished Projects on Facebook or Instagram: I love to see your finished projects! Share with us on social media and tag me @acrochetedsimplicity or use the hashtag #ACrochetedSimplicity so I can find your posts.
Join us in the Facebook Community Group!
Come share your finished projects with us in the A Crocheted Simplicity Crochet Community Group on Facebook. Join us for fun community events such as crochet alongs, join in on crochet conversations, ask questions, get advice, and share your love for crochet!

More Crochet Patterns for Short Row Crochet Hats I Think You’ll Love
- Easy Short Row Crochet Beanie
- Frosty Air Beanie
- Done in One Crochet Beanie Pattern
- Knit-Look Super Bulky Slouch
- Winter Poms 18″ Doll Hat
More Knit Look Crochet Patterns
Are you looking for more crochet patterns that use knit-look crochet stitches and techniques? We have several free crochet patterns for men and women, right here on our blog.
Browse the variety of free knit-look crochet patterns we have on our blog that use knit-look stitches.