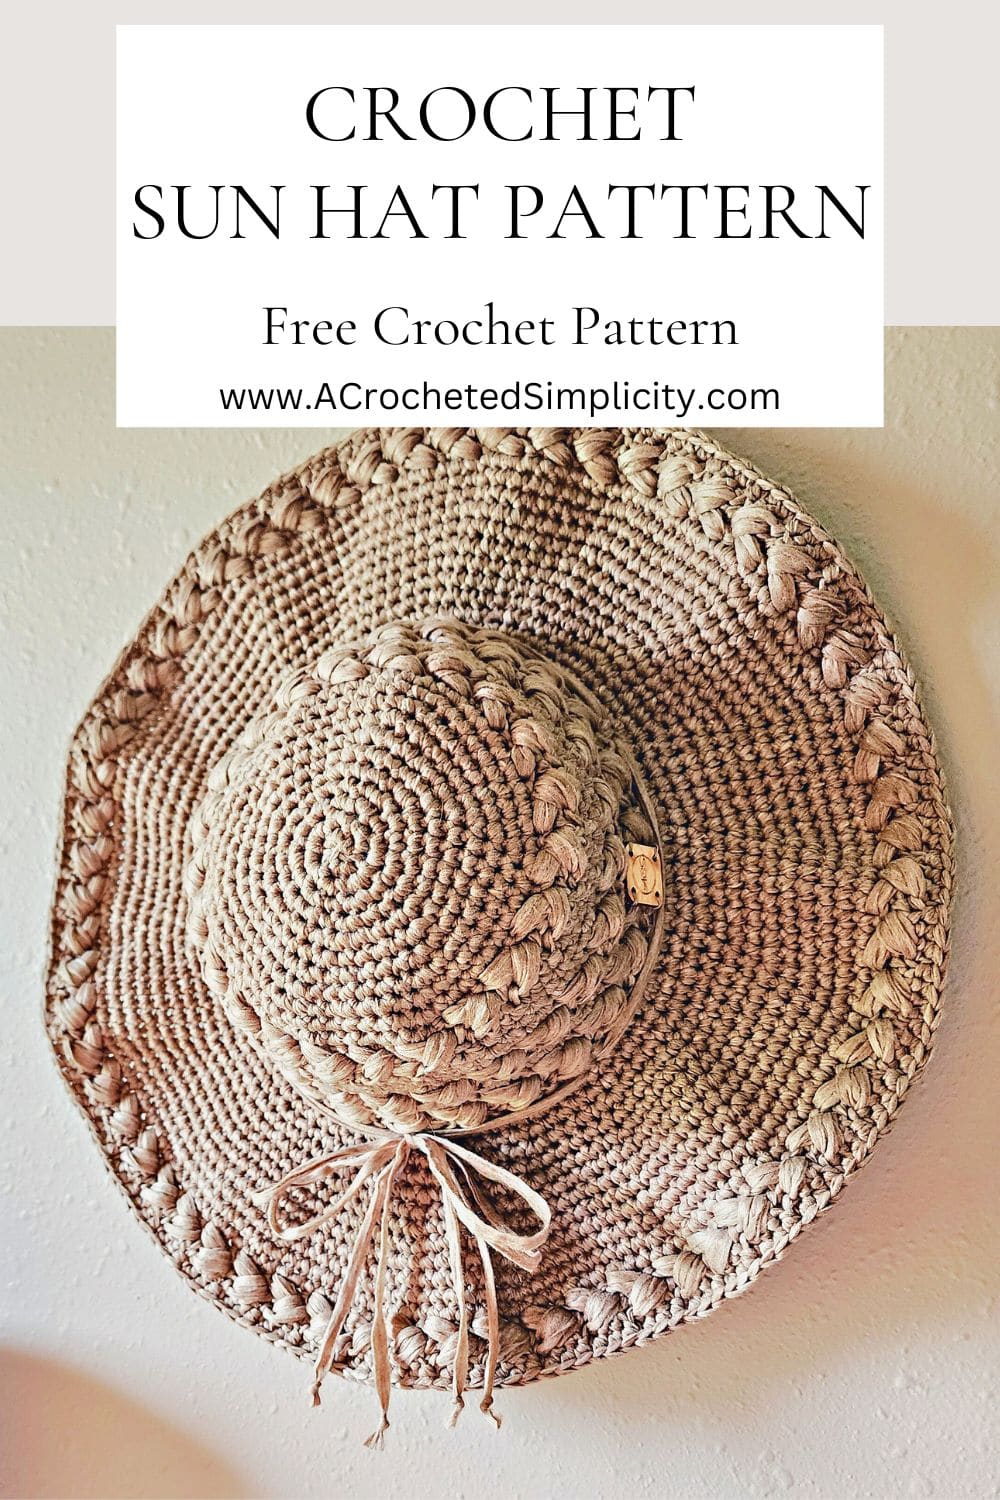
Crochet Sun Hat
Stay cool and chic under the sun with a crochet sun hat!
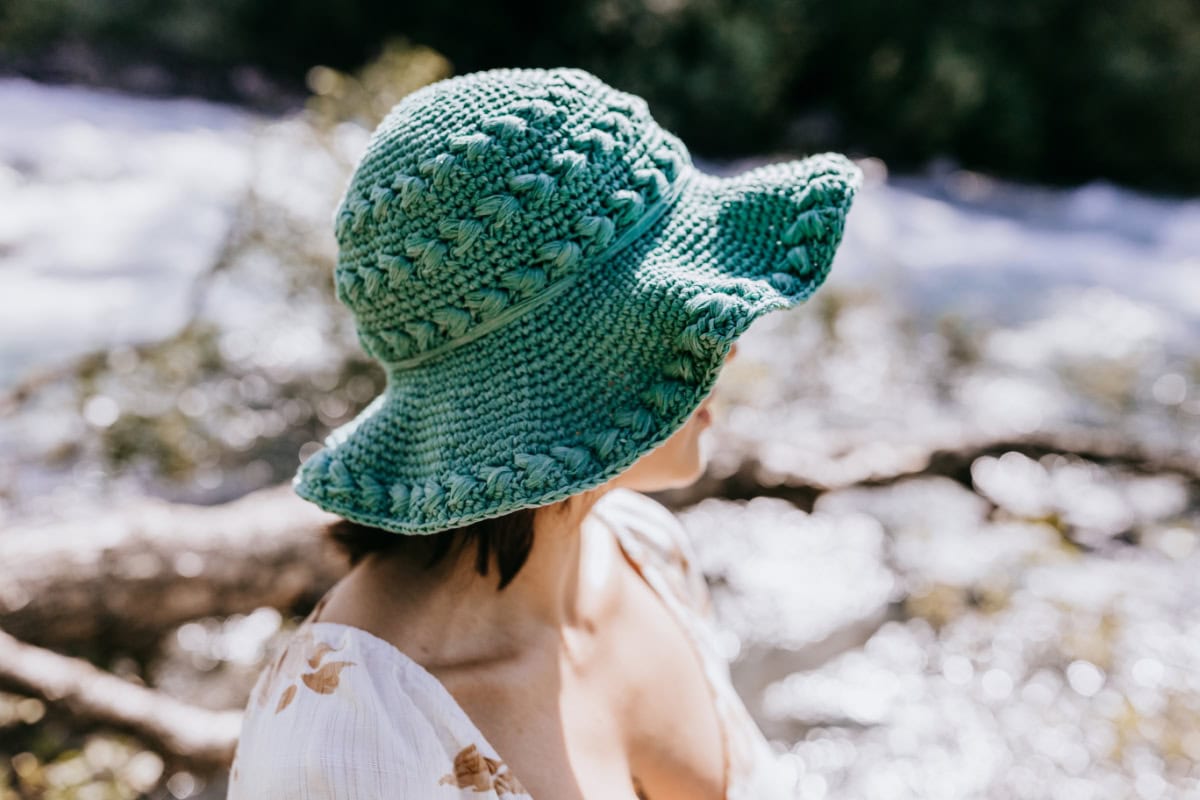
Ideal for beach outings, garden parties, or a casual stroll on the beach, this wide brim sun hat combines fashion and practicality, ensuring your eyes are shaded and you stay cool under the hot summer sun.
You’ll find the free crochet sun hat pattern in the post below, or you can find an ad-free printable PDF (that includes all photo tutorials), on Ravelry, or Etsy (aff).

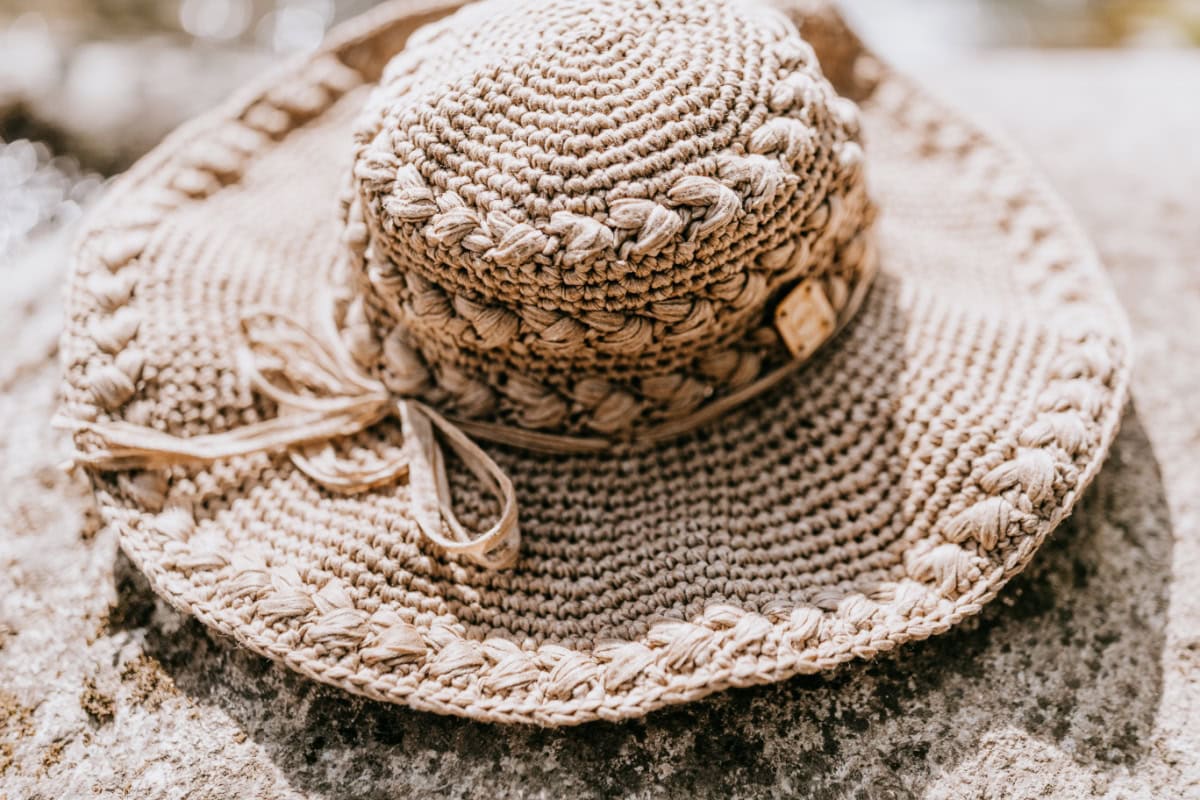
The Summer Lovin’ Sun Hat is a stylish and functional accessory perfect for sunny days. Made with Lion Brand Rewind Yarn, this crochet sun hat is lightweight, breathable, and has a wide brim that provides ample shade from the sun.
My favorite thing about a sun hat made with Rewind Yarn is that it’s compact and packable! Roll it up, pack it in your travel bag, and take it with you wherever you go. When you get to where you’re going, take it out, unroll it, and it molds right back into shape and is ready to wear.
The Summer Lovin’ Sun Hat will keep you cool and chic under the sun no matter where your summer travels take you!
Related: If you love Rewind yarn, I have a couple more free crochet sun hat patterns that I used it for. Check out my Stop & Rewind Sun Hat and Makin’ Lemonade Crochet Sun Hat.
How to Crochet a Sun Hat
This crochet sun hat is crocheted in one piece from the top of the crown all the way to the outer edge of the brim using only single crochet stitches and a variation of a crochet puff stitch.
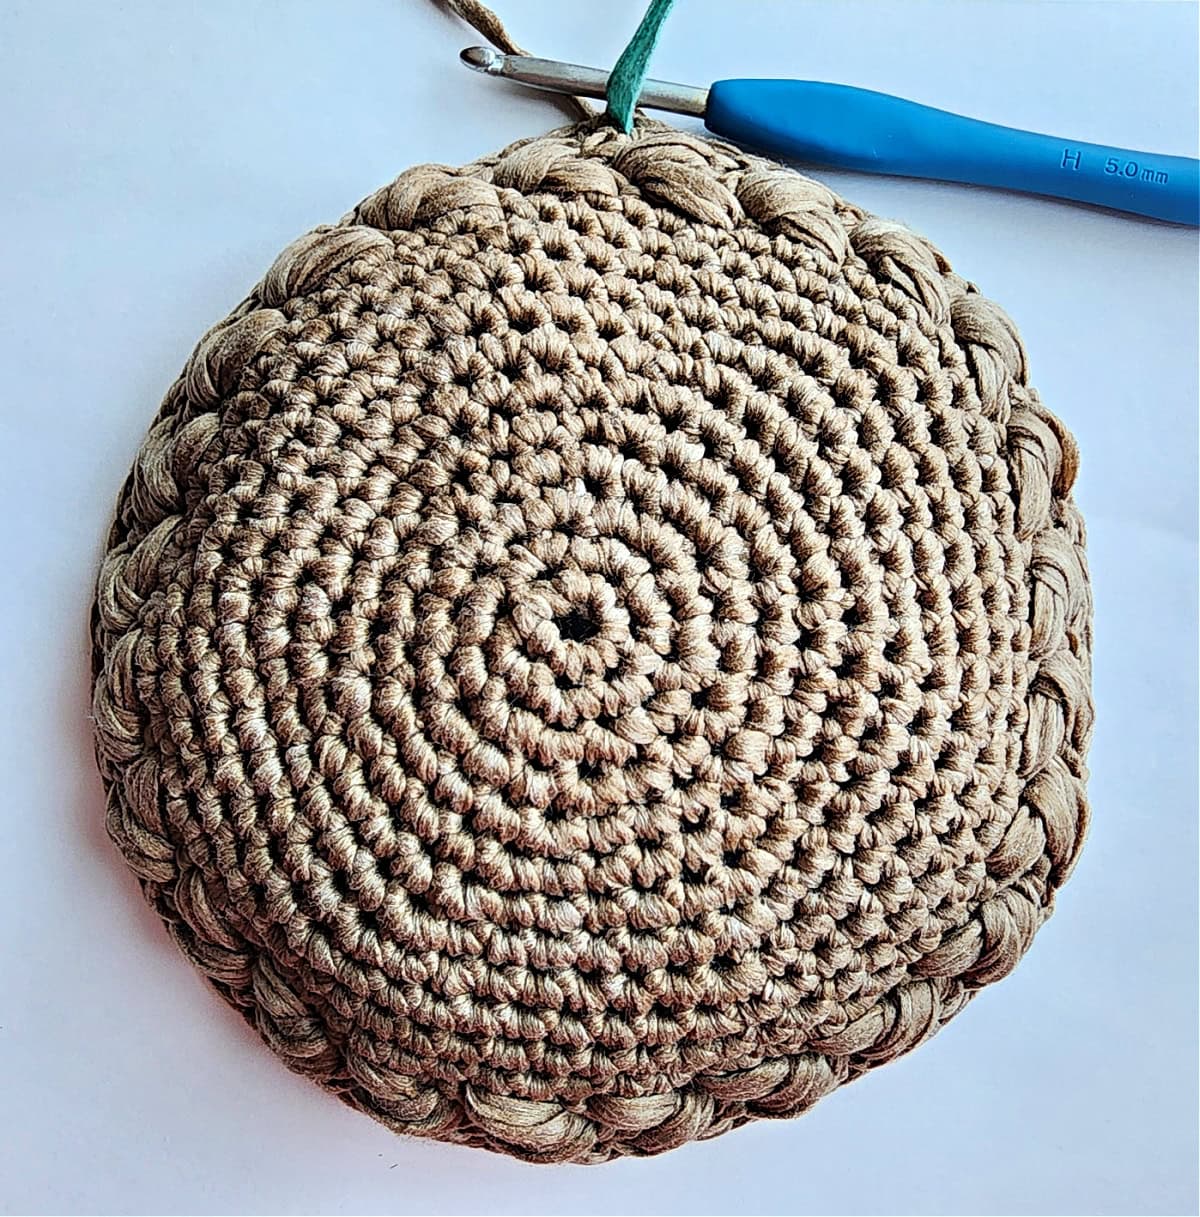
First, you’ll crochet the crown of the sun hat in a spiral (aka continuous rounds), increasing in each round. After you’ve completed the first 6 rounds of the sun hat crochet pattern, you’ll measure your circle to check your gauge.
If your circle is not 3″ in diameter, adjust your hook size until it is. If your circle is larger than 3″ in diameter, decrease your hook size. If your circle is smaller than 3″ in diameter, increase your hook size. Once your circle is 3″, you can continue on to round 7.
Depending on which size you’re making, you’ll have one more gauge check after round 9, 10, 11, or 12. Then you’ll move on to your first round of slanted puff stitches.
You will work two consecutive rounds of slanted puff stitches to create each braided section around the crochet sun hat. Each round of slanted puff stitches will be joined at the end and then turned to work in the opposite direction. The first round of slanted puff stitches will be worked with the RS facing and the second round will be worked with the WS facing.
You’ll then continue working the bucket of the summer hat by alternating sections of single crochet stitches and slanted puff stitches.
After completing the bucket of the hat, you’ll crochet a wide brim. The brim is made by crocheting several rounds of single crochet stitches. You’ll work an increase round every other round. Then, you’ll complete the brim with two more rounds of slanted puff stitches to create one final section of braided crochet stitch, and lastly, finish your crochet sun hat with one final round of single crochet.

Skills & Techniques You’ll Use
This crochet sun hat pattern combines the beginner-friendly single crochet stitch for the solid portion of the sun hat and a slanted puff stitch for the braided crochet stitch that accents the hat.
Crochet skills you’ll practice:
- Measuring as you go to ensure a great fit
- Single Crochet
- Crochet Puff Stitch – you’ll learn to crochet a slanted single crochet puff stitch and there’s a step by step photo tutorial in this blog post
Yarn
Lion Brand Yarns Rewind is my favorite yarn to crochet summer hats. This bulky / chunky yarn is a super soft and lightweight tape yarn that is currently available in 11 sand-washed colors. It’s a polyester, viscose blend and is machine washable for easy care.
Even though Rewind is a bulky yarn, your sun hat will be so lightweight that you’ll hardly notice you’re wearing it!
It’s packable! Roll it, pack it up, and take it with you wherever you roam. When you arrive, take it out, mold it right back into shape, and wear it!
Alternative Yarn
Although Rewind yarn is a chunky weight / 5 yarn, it’s so lightweight that you’ll find it works up more closely to most worsted weight / 4 yarns. Testers were able to substitute worsted weight cotton yarns with no gauge issues.
You can also substitute most raffia, but to be honest, if I had to choose between Rewind yarn and raffia, Rewind would win every single time. Raffia is stiffer, it doesn’t hold it’s shape like Rewind does, and it’s not machine washable.
Crochet Sun Hat – Free Pattern
The free sun hat crochet pattern is below, but if you love to work offline, I’ve got a couple other great options for you.
Purchase the ad-free, printable PDF, including all photo tutorials, on Ravelry, or on Etsy (aff).
Purchase the sun hat crochet kit! (aff): Lion Brand has a full kit of the Summer Lovin’ Crochet Sun Hat, available on their website. The crochet sun hat kit includes your choice of colors and a digital copy of the crochet pattern.
This post contains affiliate links.
Materials
- Yarn: I used Chunky Weight / 5 / Yarn, Lion Brand Yarns Rewind in Willow for the sun hat in the photos, bulky weight / 5 yarn, 70% Polyester / 30% Viscose (219 yards / 200 m / 100 g / 3.5 oz)
- Yardage: See Pattern Notes below.
- Crochet Hook: H/8/5.00mm; or size needed to obtain gauge (My favorite crochet hooks are the Clover Amour Crochet Hooks, I’ve never had an ache in my hand since switching).
- Locking Stitch Markers or scrap piece of yarn
- Scissors
- Yarn Needle
Abbreviations (U.S. Terms)
- ch(s): chain(s)
- sl st(s): slip stitch(es)
- st(s): stitch(es)
- yo: yarn over
- sp(s): space(s)
- sc: single crochet
- slanted puff stitch
- Rep: repeat
- Rnd: round
- SM: stitch marker
Experience Level
- Easy / Intermediate
Gauge
- Measurements are given throughout the crown and are used to check your gauge.
Fits Head Sizes
- Toddler: 18″ – 19″ circumference – 270 yards
- Child: 19″ – 20.5″ circumference – 290 yards
- Teen / Adult Small: 21″ – 22″ circumference – 320 yards
- Adult Medium / Large: 22.5″ – 23.5″ circumference – 340 yards
Special Stitches
- Slanted Puff Stitch (slanted puff st): Insert your hook into the indicated stitch, yo, pull up a loop that’s wide enough to reach around the two sc worked before it, yo, insert your hook into the same stitch, yo, pull up another wide loop, yo, pull through all loops on your hook. Scroll down in this blog post for a step-by-step photo tutorial.
Pattern Notes
- Yarn Notes: Lion Brand Yarns Rewind in Willow was used for the sample. Other comparable yarns may be used as long as gauge is met. See the Alternative Yarn notes above.
- Lion Brand Yarns Rewind in Willow, bulky weight / 5 yarn, 70% Polyester / 30% Viscose (219 yards / 200 m / 100 g / 3.5 oz)
- Yardage & Color
- Willow #523-124W (2 balls for every size)
- Sun Hat Construction: This crochet sun hat is crocheted in one piece from the crown to the outer edge of the brim using single crochet stitches and slanted puff stitches.
- Stiffening the Brim: See the notes at the end of this blog post for ideas to help stiffen the brim on your hat.
The Braided Puff Stitch Photo Tutorial is below the written crochet pattern.
Crochet Sun Hat Pattern
Toddler Size Sun Hat
Single Crochet Rounds: The rounds of single crochet in this crochet sun hat are worked in continuous rounds (also known as crocheting in a spiral) to keep from having an unsightly seam. Do not join at the end of each round, instead use a scrap piece of yarn to keep track of the beginning of each round. Move the scrap of yarn up as you complete each round.
Slanted Puff Stitch Rounds: You will work two consecutive rounds of slanted puff stitches to create each braided section around the sun hat. The rounds of slanted puff stitches will be joined at the end and then turned to work in the opposite direction. The first round of slanted puff stitches will be worked with the RS facing and the second round will be worked with the WS facing.
> Scroll down for the Braided Puff Stitch photo tutorial. <
Rnd 1 (RS): With yarn & a 5.00mm crochet hook, ch 2, work 6 sc into the 2nd ch from your hook. Do not join. (6 sts)
Rnd 2: 2 sc in each st around. (12 sts)
Rnd 3: (2 sc in the next st, sc in the next st) rep from ( to ) around. (18 sts)
Rnd 4: (2 sc in the next st, sc in each of the next 2 sts) rep from ( to ) around. (24 sts)
Rnd 5: (2 sc in the next st, sc in each of the next 3 sts) rep from ( to ) around. (30 sts)
Rnd 6: (2 sc in the next st, sc in each of the next 4 sts) rep from ( to ) around. (36 sts)
Gauge Check: The diameter of your circle should be 3″ at this point. If your circle is not 3″ in diameter, adjust your hook size until it is. If your circle is larger than 3″ in diameter, decrease your hook size. If your circle is smaller than 3″ in diameter, increase your hook size.
Rnd 7: (2 sc in the next st, sc in each of the next 5 sts) rep from ( to ) around. (42 sts)
Rnd 8: (2 sc in the next st, sc in each of the next 6 sts) rep from ( to ) around. (48 sts)
Rnd 9: (2 sc in the next st, sc in each of the next 7 sts) rep from ( to ) around. (54 sts)
Gauge Check: The diameter of your sun hat should measure 4-1/2″ at this point.
Rnd 10: Sc in each of the first 2 sts, slanted puff st into the last sc of the previous rnd, ch 1, (skip the next st, sc in each of the next 2 sts, slanted puff st into the skipped st, ch 1) work from ( to ) 17 times. Join with a sl st to the 1st sc of the rnd. Turn. (54 sts) *ch-1’s are not included in stitch count.
Rnd 11: (skip the ch-1 sp, sc in each of the next 2 sts, slanted puff st in the ch-1 sp from the previous rnd, ch 1) work from ( to ) 18 times. Join with a sl st to the 1st sc of the rnd. Turn. (54 sts) *ch-1’s are not included in stitch count.
Increase Round
Note: In the next round, do NOT work into the ch-1’s as they are not counted as stitches in the puff stitch rounds. Only work into the single crochet or puff stitches.
Rnd 12: (2 sc into the next st, sc in each of the next 8 sts) work from ( to ) 6 times. Do not join. (60 sts)
Rnds 13 – 14: Sc in each st around. Do not join. (60 sts)
Rnd 15: Sc in each of the first 2 sts, slanted puff st into the last sc of the previous rnd, ch 1, (skip the next st, sc in each of the next 2 sts, slanted puff st into the skipped st, ch 1) work from ( to ) 19 times. Join with a sl st to the 1st sc of the rnd. Turn. (60 sts) *ch-1’s are not included in stitch count.
Rnd 16: (skip the ch-1 sp, sc in each of the next 2 sts, slanted puff st in the ch-1 sp from the previous rnd, ch 1) work from ( to ) 20 times. Join with a sl st to the 1st sc of the rnd. Turn. (60 sts) *ch-1’s are not included in stitch count.
Note: In the next round, do NOT work into the ch-1’s as they are not counted as stitches in the puff stitch rounds. Only work into the single crochet or puff stitches.
Rnd 17: Sc into each slanted puff st and sc around (make sure not to work into the ch-1s from the previous rnd). Do not join. (60 sts)
Rnds 18 – 19: Sc in each st around. Do not join. (60 sts)
Rnds 20 – 21: Rep Rnds 15 – 16. (60 sts)
Rnd 22: Sc into each slanted puff st and sc around (make sure not to work into the ch-1s from the previous rnd). Do not join. (60 sts)
Do not fasten off. Continue on to the Toddler Brim.
Toddler Brim
Tip! If you prefer a less floppy brim, go down a hook size or two.
Rnd 1: (2 sc into the next st, sc in each of the next 2 sts) work from ( to ) 18 times, sc in the remaining 6 sts. Do not join. (78 sts)
Rnd 2: Sc in each st around. Do not join. (78 sts)
Rnd 3: (2 sc into the next st, sc in each of the next 4 sts) work from ( to ) 15 times, sc in the remaining 3 sts. Do not join. (93 sts)
Rnd 4: Sc in each st around. Do not join. (93 sts)
Rnd 5: (2 sc into the next st, sc in each of the next 5 sts) work from ( to ) 15 times, sc in the remaining 3 sts. Do not join. (108 sts)
Rnd 6: Sc in each st around. Do not join. (108 sts)
Rnd 7: (2 sc into the next st, sc in each of the next 6 sts) work from ( to ) 15 times, sc in the remaining 3 sts. Do not join. (123 sts)
Rnd 8: Sc in each st around. Do not join. (123 sts)
Rnd 9: (2 sc into the next st, sc in each of the next 7 sts) work from ( to ) 15 times, sc in the remaining 3 sts. Do not join. (138 sts)
Rnd 10: Sc in each st around. Do not join. (138 sts)
Your brim at this point should be 2-1/2″ wide.
Rnd 11: Sc in each of the first 2 sts, slanted puff st into the last sc of the previous rnd, ch 1, (skip the next st, sc in each of the next 2 sts, slanted puff st into the skipped st, ch 1) work from ( to ) 45 times. Join with a sl st to the 1st sc of the rnd. Turn. (138 sts) *ch-1’s are not included in stitch count.
Rnd 12: (skip the ch-1 sp, sc in each of the next 2 sts, slanted puff st in the ch-1 sp from the previous rnd, ch 1) work from ( to ) 46 times. Join with a sl st to the 1st sc of the rnd. Turn. (138 sts) *ch-1’s are not included in stitch count.
Note: In the next round, do NOT work into the ch-1’s as they are not counted as stitches in the puff stitch rounds. Only work into the single crochet or puff stitches.
Rnd 13: Sc into each slanted puff st and sc around (make sure not to work into the ch-1s from the previous rnd). Join with a sl st to the first st. (138 sts)
The width of your hat brim should be 3-1/2″.
Fasten off. Weave in ends. Continue below to the Decorative Tie, if desired.
Child Size Sun Hat
Single Crochet Rounds: The rounds of single crochet in this crochet sun hat are worked in continuous rounds (also known as crocheting in a spiral) to keep from having an unsightly seam. Do not join at the end of each round, instead use a scrap piece of yarn to keep track of the beginning of each round. Move the scrap of yarn up as you complete each round.
Slanted Puff Stitch Rounds: You will work two consecutive rounds of slanted puff stitches to create each braided section around the sun hat. The rounds of slanted puff stitches will be joined at the end and then turned to work in the opposite direction. The first round of slanted puff stitches will be worked with the RS facing and the second round will be worked with the WS facing.
> Scroll down for the Braided Puff Stitch photo tutorial. <
Rnd 1 (RS): With yarn & a 5.00mm crochet hook, ch 2, work 6 sc into the 2nd ch from your hook. Do not join. (6 sts)
Rnd 2: 2 sc in each st around. (12 sts)
Rnd 3: (2 sc in the next st, sc in the next st) rep from ( to ) around. (18 sts)
Rnd 4: (2 sc in the next st, sc in each of the next 2 sts) rep from ( to ) around. (24 sts)
Rnd 5: (2 sc in the next st, sc in each of the next 3 sts) rep from ( to ) around. (30 sts)
Rnd 6: (2 sc in the next st, sc in each of the next 4 sts) rep from ( to ) around. (36 sts)
Gauge Check: The diameter of your circle should be 3″ at this point. If your circle is not 3″ in diameter, adjust your hook size until it is. If your circle is larger than 3″ in diameter, decrease your hook size. If your circle is smaller than 3″ in diameter, increase your hook size.
Rnd 7: (2 sc in the next st, sc in each of the next 5 sts) rep from ( to ) around. (42 sts)
Rnd 8: (2 sc in the next st, sc in each of the next 6 sts) rep from ( to ) around. (48 sts)
Rnd 9: (2 sc in the next st, sc in each of the next 7 sts) rep from ( to ) around. (54 sts)
Rnd 10: (2 sc in the next st, sc in each of the next 8 sts) rep from ( to ) around. (60 sts)
Gauge Check: The diameter of your sun hat should measure 5″ at this point.
Rnd 11: Sc in each of the first 2 sts, slanted puff st into the last sc of the previous rnd, ch 1, (skip the next st, sc in each of the next 2 sts, slanted puff st into the skipped st, ch 1) work from ( to ) 19 times. Join with a sl st to the 1st sc of the rnd. Turn. (60 sts) *ch-1’s are not included in stitch count.
Rnd 12: (skip the ch-1 sp, sc in each of the next 2 sts, slanted puff st in the ch-1 sp from the previous rnd, ch 1) work from ( to ) 20 times. Join with a sl st to the 1st sc of the rnd. Turn. (60 sts) *ch-1’s are not included in stitch count.
Increase Round
Note: In the next round, do NOT work into the ch-1’s as they are not counted as stitches in the puff stitch rounds. Only work into the single crochet or puff stitches.
Rnd 13: (2 sc into the next st, sc in each of the next 9 sts) work from ( to ) 6 times. Do not join. (66 sts)
Rnds 14 – 15: Sc in each st around. Do not join. (66 sts)
Rnd 16: Sc in each of the first 2 sts, slanted puff st into the last sc of the previous rnd, ch 1, (skip the next st, sc in each of the next 2 sts, slanted puff st into the skipped st, ch 1) work from ( to ) 21 times. Join with a sl st to the 1st sc of the rnd. Turn. (66 sts) *ch-1’s are not included in stitch count.
Rnd 17: (skip the ch-1 sp, sc in each of the next 2 sts, slanted puff st in the ch-1 sp from the previous rnd, ch 1) work from ( to ) 22 times. Join with a sl st to the 1st sc of the rnd. Turn. (66 sts) *ch-1’s are not included in stitch count.
Note: In the next round, do NOT work into the ch-1’s as they are not counted as stitches in the puff stitch rounds. Only work into the single crochet or puff stitches.
Rnd 18: Sc into each slanted puff st and sc around (make sure not to work into the ch-1s from the previous rnd). Do not join. (66 sts)
Rnds 19 – 20: Sc in each st around. Do not join. (66 sts)
Rnds 21 – 22: Rep Rnds 16 – 17. (66 sts)
Rnd 23: Sc into each slanted puff st and sc around (make sure not to work into the ch-1s from the previous rnd). Do not join. (66 sts)
Do not fasten off. Continue on to the Brim.
Child Brim
Tip! If you prefer a less floppy brim, go down a hook size or two.
Rnd 1: (2 sc into the next st, sc in each of the next 2 sts) work from ( to ) 18 times, sc in the remaining 12 sts. Do not join. (84 sts)
Rnd 2: Sc in each st around. Do not join. (84 sts)
Rnd 3: (2 sc into the next st, sc in each of the next 4 sts) work from ( to ) 15 times, sc in the remaining 9 sts. Do not join. (99 sts)
Rnd 4: Sc in each st around. Do not join. (99 sts)
Rnd 5: (2 sc into the next st, sc in each of the next 5 sts) work from ( to ) 15 times, sc in the remaining 9 sts. Do not join. (114 sts)
Rnd 6: Sc in each st around. Do not join. (114 sts)
Rnd 7: (2 sc into the next st, sc in each of the next 6 sts) work from ( to ) 15 times, sc in the remaining 9 sts. Do not join. (129 sts)
Rnd 8: Sc in each st around. Do not join. (129 sts)
Rnd 9: (2 sc into the next st, sc in each of the next 7 sts) work from ( to ) 15 times, sc in the remaining 9 sts. Do not join. (144 sts)
Rnd 10: Sc in each st around. Do not join. (144 sts)
Your brim at this point should be 2-1/2″ wide.
Rnd 11: Sc in each of the first 2 sts, slanted puff st into the last sc of the previous rnd, ch 1, (skip the next st, sc in each of the next 2 sts, slanted puff st into the skipped st, ch 1) work from ( to ) 47 times. Join with a sl st to the 1st sc of the rnd. Turn. (144 sts) *ch-1’s are not included in stitch count.
Rnd 12: (skip the ch-1 sp, sc in each of the next 2 sts, slanted puff st in the ch-1 sp from the previous rnd, ch 1) work from ( to ) 48 times. Join with a sl st to the 1st sc of the rnd. Turn. (144 sts) *ch-1’s are not included in stitch count.
Note: In the next round, do NOT work into the ch-1’s as they are not counted as stitches in the puff stitch rounds. Only work into the single crochet or puff stitches.
Rnd 13: Sc into each slanted puff st and sc around (make sure not to work into the ch-1s from the previous rnd). Join with a sl st to the first st. (144 sts)
The width of your hat brim should be 3-1/2″.
Fasten off. Weave in ends. Continue believe to Decorative Tie, if desired.
Teen / Adult Small Size Sun Hat
Single Crochet Rounds: The rounds of single crochet in this crochet sun hat are worked in continuous rounds (also known as crocheting in a spiral) to keep from having an unsightly seam. Do not join at the end of each round, instead use a scrap piece of yarn to keep track of the beginning of each round. Move the scrap of yarn up as you complete each round.
Slanted Puff Stitch Rounds: You will work two consecutive rounds of slanted puff stitches to create each braided section around the sun hat. The rounds of slanted puff stitches will be joined at the end and then turned to work in the opposite direction. The first round of slanted puff stitches will be worked with the RS facing and the second round will be worked with the WS facing.
> Scroll down for the Braided Puff Stitch photo tutorial. <
Rnd 1 (RS): With yarn & a 5.00mm crochet hook, ch 2, work 6 sc into the 2nd ch from your hook. Do not join. (6 sts)
Rnd 2: 2 sc in each st around. (12 sts)
Rnd 3: (2 sc in the next st, sc in the next st) rep from ( to ) around. (18 sts)
Rnd 4: (2 sc in the next st, sc in each of the next 2 sts) rep from ( to ) around. (24 sts)
Rnd 5: (2 sc in the next st, sc in each of the next 3 sts) rep from ( to ) around. (30 sts)
Rnd 6: (2 sc in the next st, sc in each of the next 4 sts) rep from ( to ) around. (36 sts)
Gauge Check: The diameter of your circle should be 3″ at this point. If your circle is not 3″ in diameter, adjust your hook size until it is. If your circle is larger than 3″ in diameter, decrease your hook size. If your circle is smaller than 3″ in diameter, increase your hook size.
Rnd 7: (2 sc in the next st, sc in each of the next 5 sts) rep from ( to ) around. (42 sts)
Rnd 8: (2 sc in the next st, sc in each of the next 6 sts) rep from ( to ) around. (48 sts)
Rnd 9: (2 sc in the next st, sc in each of the next 7 sts) rep from ( to ) around. (54 sts)
Gauge Check: The diameter of your circle should be just over 4-1/2″ at this point.
Rnd 10: (2 sc in the next st, sc in each of the next 8 sts) rep from ( to ) around. (60 sts)
Rnd 11: (2 sc in the next st, sc in each of the next 9 sts) rep from ( to ) around. (66 sts)
Gauge Check: The diameter of your sun hat should measure 5-1/2″ at this point.
Rnd 12: Sc in each of the first 2 sts, slanted puff st into the last sc of the previous rnd, ch 1, (skip the next st, sc in each of the next 2 sts, slanted puff st into the skipped st, ch 1) work from ( to ) 21 times. Join with a sl st to the 1st sc of the rnd. Turn. (66 sts) *ch-1’s are not included in stitch count.
Rnd 13: (skip the ch-1 sp, sc in each of the next 2 sts, slanted puff st in the ch-1 sp from the previous rnd, ch 1) work from ( to ) 22 times. Join with a sl st to the 1st sc of the rnd. Turn. (66 sts) *ch-1’s are not included in stitch count.
Increase Round
Note: In the next round, do NOT work into the ch-1’s as they are not counted as stitches in the puff stitch rounds. Only work into the single crochet or puff stitches.
Rnd 14: (2 sc into the next st, sc in each of the next 10 sts) work from ( to ) 6 times. Do not join. (72 sts)
Rnds 15 – 16: Sc in each st around. Do not join. (72 sts)
Rnd 17: Sc in each of the first 2 sts, slanted puff st into the last sc of the previous rnd, ch 1, (skip the next st, sc in each of the next 2 sts, slanted puff st into the skipped st, ch 1) work from ( to ) 23 times. Join with a sl st to the 1st sc of the rnd. Turn. (72 sts) *ch-1’s are not included in stitch count.
Rnd 18: (skip the ch-1 sp, sc in each of the next 2 sts, slanted puff st in the ch-1 sp from the previous rnd, ch 1) work from ( to ) 24 times. Join with a sl st to the 1st sc of the rnd. Turn. (72 sts) *ch-1’s are not included in stitch count.
Note: In the next round, do NOT work into the ch-1’s as they are not counted as stitches in the puff stitch rounds. Only work into the single crochet or puff stitches.
Rnd 19: Sc into each slanted puff st and sc around (make sure not to work into the ch-1s from the previous rnd). Do not join. (72 sts)
Rnds 20 – 21: Sc in each st around. Do not join. (72 sts)
Rnds 22 – 23: Rep Rnds 17 – 18. (72 sts)
Rnd 24: Sc into each slanted puff st and sc around (make sure not to work into the ch-1s from the previous rnd). Do not join. (72 sts)
Do not fasten off. Continue on to the Brim.
Teen / Adult Small Brim
Tip! If you prefer a less floppy brim, go down a hook size or two.
Rnd 1: (2 sc into the next st, sc in each of the next 3 sts) work from ( to ) 18 times. Do not join. (90 sts)
Rnd 2: Sc in each st around. Do not join. (90 sts)
Rnd 3: (2 sc into the next st, sc in each of the next 5 sts) work from ( to ) 15 times. Do not join. (105 sts)
Rnd 4: Sc in each st around. Do not join. (105 sts)
Rnd 5: (2 sc into the next st, sc in each of the next 6 sts) work from ( to ) 15 times. Do not join. (120 sts)
Rnd 6: Sc in each st around. Do not join. (120 sts)
Rnd 7: (2 sc into the next st, sc in each of the next 7 sts) work from ( to ) 15 times. Do not join. (135 sts)
Rnd 8: Sc in each st around. Do not join. (135 sts)
Rnd 9: (2 sc into the next st, sc in each of the next 8 sts) work from ( to ) 15 times. Do not join. (150 sts)
Rnd 10: Sc in each st around. Do not join. (150 sts)
Rnd 11: (2 sc into the next st, sc in each of the next 9 sts) work from ( to ) 15 times. Do not join. (165 sts)
Rnd 12: Sc in each st around. Do not join. (165 sts)
Your brim at this point should be 3″ wide.
Rnd 13: Sc in each of the first 2 sts, slanted puff st into the last sc of the previous rnd, ch 1, (skip the next st, sc in each of the next 2 sts, slanted puff st into the skipped st, ch 1) work from ( to ) 54 times. Join with a sl st to the 1st sc of the rnd. Turn. (165 sts) *ch-1’s are not included in stitch count.
Rnd 14: (skip the ch-1 sp, sc in each of the next 2 sts, slanted puff st in the ch-1 sp from the previous rnd, ch 1) work from ( to ) 55 times. Join with a sl st to the 1st sc of the rnd. Turn. (165 sts) *ch-1’s are not included in stitch count.
Note: In the next round, do NOT work into the ch-1’s as they are not counted as stitches in the puff stitch rounds. Only work into the single crochet or puff stitches.
Rnd 15: Sc into each slanted puff st and sc around (make sure not to work into the ch-1s from the previous rnd). Join with a sl st to the first st. (165 sts)
The width of your hat brim should be 4″.
Fasten off. Weave in ends. Continue below to Decorative Tie, if desired.
Adult Medium / Large Sun Hat
Single Crochet Rounds: The rounds of single crochet in this crochet sun hat are worked in continuous rounds (also known as crocheting in a spiral) to keep from having an unsightly seam. Do not join at the end of each round, instead use a scrap piece of yarn to keep track of the beginning of each round. Move the scrap of yarn up as you complete each round.
Slanted Puff Stitch Rounds: You will work two consecutive rounds of slanted puff stitches to create each braided section around the sun hat. The rounds of slanted puff stitches will be joined at the end and then turned to work in the opposite direction. The first round of slanted puff stitches will be worked with the RS facing and the second round will be worked with the WS facing.
> Scroll down for the Braided Puff Stitch photo tutorial. <
Rnd 1 (RS): With yarn & a 5.00mm crochet hook, ch 2, work 6 sc into the 2nd ch from your hook. Do not join. (6 sts)
Rnd 2: 2 sc in each st around. (12 sts)
Rnd 3: (2 sc in the next st, sc in the next st) rep from ( to ) around. (18 sts)
Rnd 4: (2 sc in the next st, sc in each of the next 2 sts) rep from ( to ) around. (24 sts)
Rnd 5: (2 sc in the next st, sc in each of the next 3 sts) rep from ( to ) around. (30 sts)
Rnd 6: (2 sc in the next st, sc in each of the next 4 sts) rep from ( to ) around. (36 sts)
Gauge Check: The diameter of your circle should be 3″ at this point. If your circle is not 3″ in diameter, adjust your hook size until it is. If your circle is larger than 3″ in diameter, decrease your hook size. If your circle is smaller than 3″ in diameter, increase your hook size.
Rnd 7: (2 sc in the next st, sc in each of the next 5 sts) rep from ( to ) around. (42 sts)
Rnd 8: (2 sc in the next st, sc in each of the next 6 sts) rep from ( to ) around. (48 sts)
Rnd 9: (2 sc in the next st, sc in each of the next 7 sts) rep from ( to ) around. (54 sts)
Gauge Check: The diameter of your circle should be just over 4-1/2″ at this point.
Rnd 10: (2 sc in the next st, sc in each of the next 8 sts) rep from ( to ) around. (60 sts)
Rnd 11: (2 sc in the next st, sc in each of the next 9 sts) rep from ( to ) around. (66 sts)
Rnd 12: (2 sc in the next st, sc in each of the next 10 sts) rep from ( to ) around. (72 sts)
Gauge Check: The diameter of your sun hat should measure 6″ at this point.
Rnd 13: Sc in each of the first 2 sts, slanted puff st into the last sc of the previous rnd, ch 1, (skip the next st, sc in each of the next 2 sts, slanted puff st into the skipped st, ch 1) work from ( to ) 23 times. Join with a sl st to the 1st sc of the rnd. Turn. (72 sts) *ch-1’s are not included in stitch count.
Rnd 14: (skip the ch-1 sp, sc in each of the next 2 sts, slanted puff st in the ch-1 sp from the previous rnd, ch 1) work from ( to ) 24 times. Join with a sl st to the 1st sc of the rnd. Turn. (72 sts) *ch-1’s are not included in stitch count.
Increase Round
Note: In the next round, do NOT work into the ch-1’s as they are not counted as stitches in the puff stitch rounds. Only work into the single crochet or puff stitches.
Rnd 15: (2 sc into the next st, sc in each of the next 11 sts) work from ( to ) 6 times, sc in each remaining st. Do not join. (78 sts)
Rnds 16 – 17: Sc in each st around. Do not join. (78 sts)
Rnd 18: Sc in each of the first 2 sts, slanted puff st into the last sc of the previous rnd, ch 1, (skip the next st, sc in each of the next 2 sts, slanted puff st into the skipped st, ch 1) work from ( to ) 25 times. Join with a sl st to the 1st sc of the rnd. Turn. (78 sts) *ch-1’s are not included in stitch count.
Rnd 19: (skip the ch-1 sp, sc in each of the next 2 sts, slanted puff st in the ch-1 sp from the previous rnd, ch 1) work from ( to ) 26 times. Join with a sl st to the 1st sc of the rnd. Turn. (78 sts) *ch-1’s are not included in stitch count.
Note: In the next round, do NOT work into the ch-1’s as they are not counted as stitches in the puff stitch rounds. Only work into the single crochet or puff stitches.
Rnd 20: Sc into each slanted puff st and sc around (make sure not to work into the ch-1s from the previous rnd). Do not join. (78 sts)
Rnds 21 – 22: Sc in each st around. Do not join. (78 sts)
Rnds 23 – 24: Rep Rnds 18 – 19. (78 sts)
Rnd 25: Sc into each puff st and sc around (make sure not to work into the ch-1s from the previous rnd). Do not join. (78 sts)
Do not fasten off. Continue below to the Brim.
Adult Medium / Large Brim
Tip! If you prefer a less floppy brim, go down a hook size or two.
Rnd 1: (2 sc into the next st, sc in each of the next 3 sts) work from ( to ) 18 times, sc in the remaining 6 sts. Do not join. (96 sts)
Rnd 2: Sc in each st around. Do not join. (96 sts)
Rnd 3: (2 sc into the next st, sc in each of the next 5 sts) work from ( to ) 15 times, sc in the remaining 6 sts. Do not join. (111 sts)
Rnd 4: Sc in each st around. Do not join. (111 sts)
Rnd 5: (2 sc into the next st, sc in each of the next 6 sts) work from ( to ) 15 times, sc in the remaining 6 sts. Do not join. (126 sts)
Rnd 6: Sc in each st around. Do not join. (126 sts)
Rnd 7: (2 sc into the next st, sc in each of the next 7 sts) work from ( to ) 15 times, sc in the remaining 6 sts. Do not join. (141 sts)
Rnd 8: Sc in each st around. Do not join. (141 sts)
Rnd 9: (2 sc into the next st, sc in each of the next 8 sts) work from ( to ) 15 times, sc in the remaining 6 sts. Do not join. (156 sts)
Rnd 10: Sc in each st around. Do not join. (156 sts)
Rnd 11: (2 sc into the next st, sc in each of the next 9 sts) work from ( to ) 15 times, sc in the remaining 6 sts. Do not join. (171 sts)
Rnd 12: Sc in each st around. Do not join. (171 sts)
Your brim at this point should be 3″ wide.
Rnd 13: Sc in each of the first 2 sts, slanted puff st into the last sc of the previous rnd, ch 1, (skip the next st, sc in each of the next 2 sts, slanted puff st into the skipped st, ch 1) work from ( to ) 56 times. Join with a sl st to the 1st sc of the rnd. Turn. (171 sts) *ch-1’s are not included in stitch count.
Rnd 14: (skip the ch-1 sp, sc in each of the next 2 sts, slanted puff st in the ch-1 sp from the previous rnd, ch 1) work from ( to ) 57 times. Join with a sl st to the 1st sc of the rnd. Turn. (171 sts) *ch-1’s are not included in stitch count.
Note: In the next round, do NOT work into the ch-1’s as they are not counted as stitches in the puff stitch rounds. Only work into the single crochet or puff stitches.
Rnd 15: Sc into each slanted puff st and sc around (make sure not to work into the ch-1s from the previous rnd). Join with a sl st to the first st. (171 sts)
The width of your hat brim should be 4″.
Fasten off. Weave in ends. Continue below to the Decorative Tie, if desired.
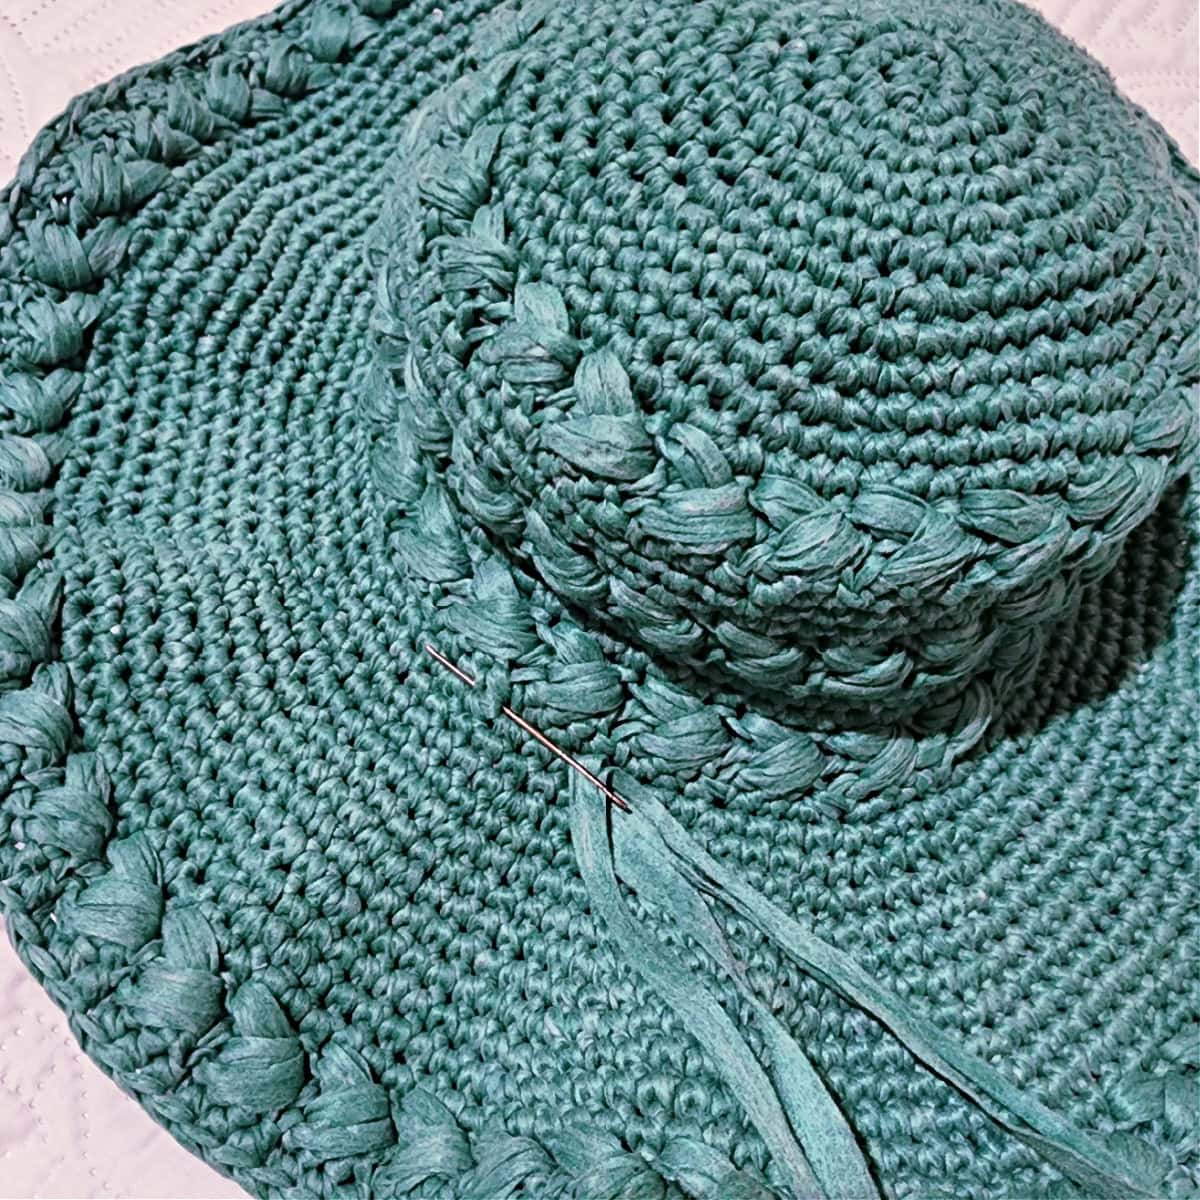
Decorative Tie (optional)
Cut two strands of yarn, 1.5 yards long each.
Holding the two strands together as one, and with a yarn needle wrap the tie around the sun hat and weave in and out of 4 stitches (evenly spaced around the sun hat) to hold it in place.
Tie a bow. Trim the four separate strands of yarn to length.
Add a small knot to the end of each strand, if desired.
Braided Puff Stitch Tutorial
The braided puff stitch is created by working two rows of slanted puff stitches in opposite directions. The following is a step-by-step photo tutorial for the braided puff stitch used in this sun hat pattern.
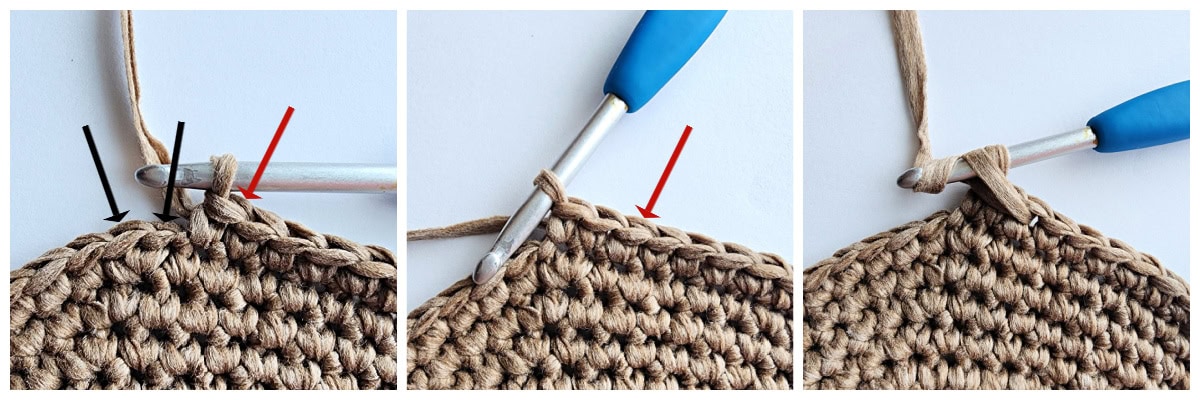
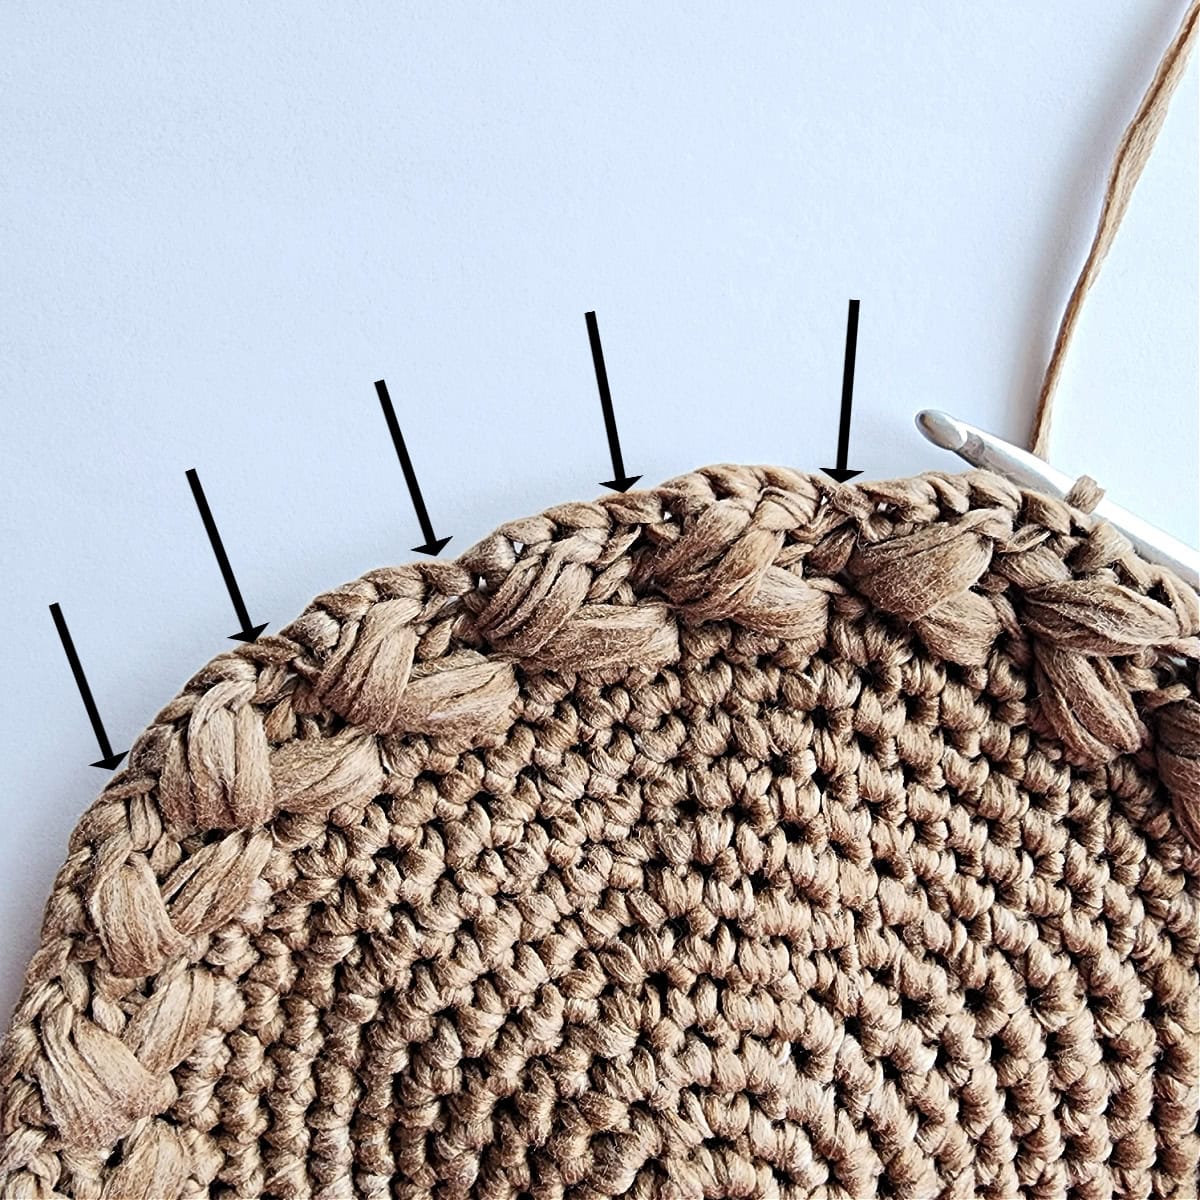
Photo Above Left: Begin the first round of slanted puff stitches by working a sc in each of the two stitches marked with a black arrow. You’ll then work your first slanted puff stitch into the last stitch of the previous round (marked with a red arrow).
Photo Above Middle: The red arrow is pointing to the last stitch of the previous round where you will work the first slanted puff stitch.
Photo Above Right: Insert your hook into the last stitch of the previous round, yarn over and pull up a loop that is as long as the two single crochets are wide (as shown in the photo above). Yarn over.

Photo Above Left: Insert your hook into the same stitch, yarn over, pull up a loop, yarn over.
Photo Above Middle: Pull through all loops on your hook. This photo shows the first slanted puff stitch completed.
Photo Above Right: Ch 1. This photo shows the slanted puff stitch and ch-1 complete. The red arrow is pointing to the stitch you will skip next.
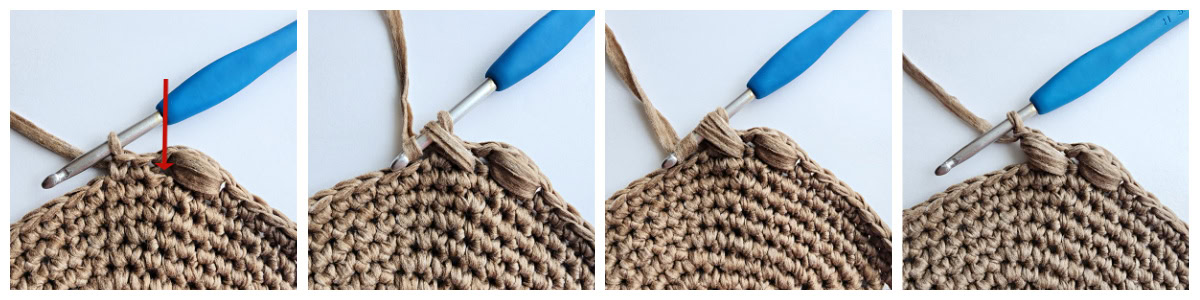
Photo Above Left: Skip the next st, sc in each of the next 2 stitches. The red arrow is pointing to the skipped stitch where you will work the next slanted puff stitch.
Photo Above Middle Left: Insert your hook into the skipped stitch to begin the next slanted puff stitch, yo, pull up a loop, yo.
Photo Above Middle Right: Insert your hook into the same skipped stitch, yo, pull up a loop, yo.
Photo Above Right: Pull through all loops on your hook, then ch-1.
Repeat the stitch pattern all the way around.
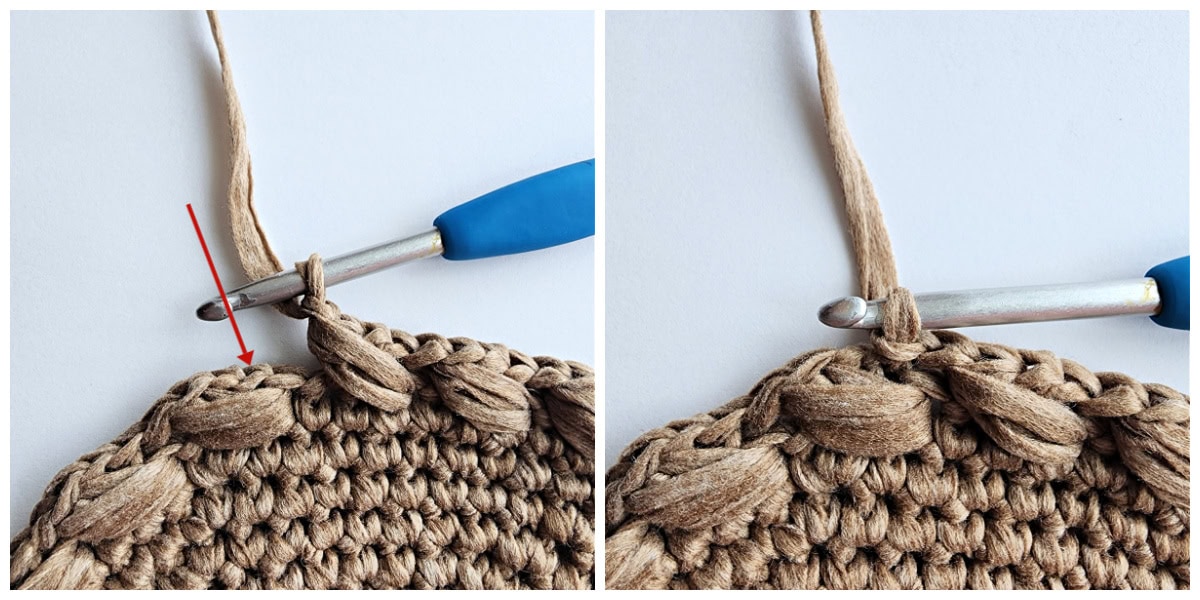
Photo Above Left: This photo shows the last slanted puff stitch of the round completed and ready to join the round. The red arrow is pointing to the first sc of the round where you will join the round. Join with a sl st to the first sc of the round.
Photo Above Right: This photo shows the first round of slanted puff stitches joined.
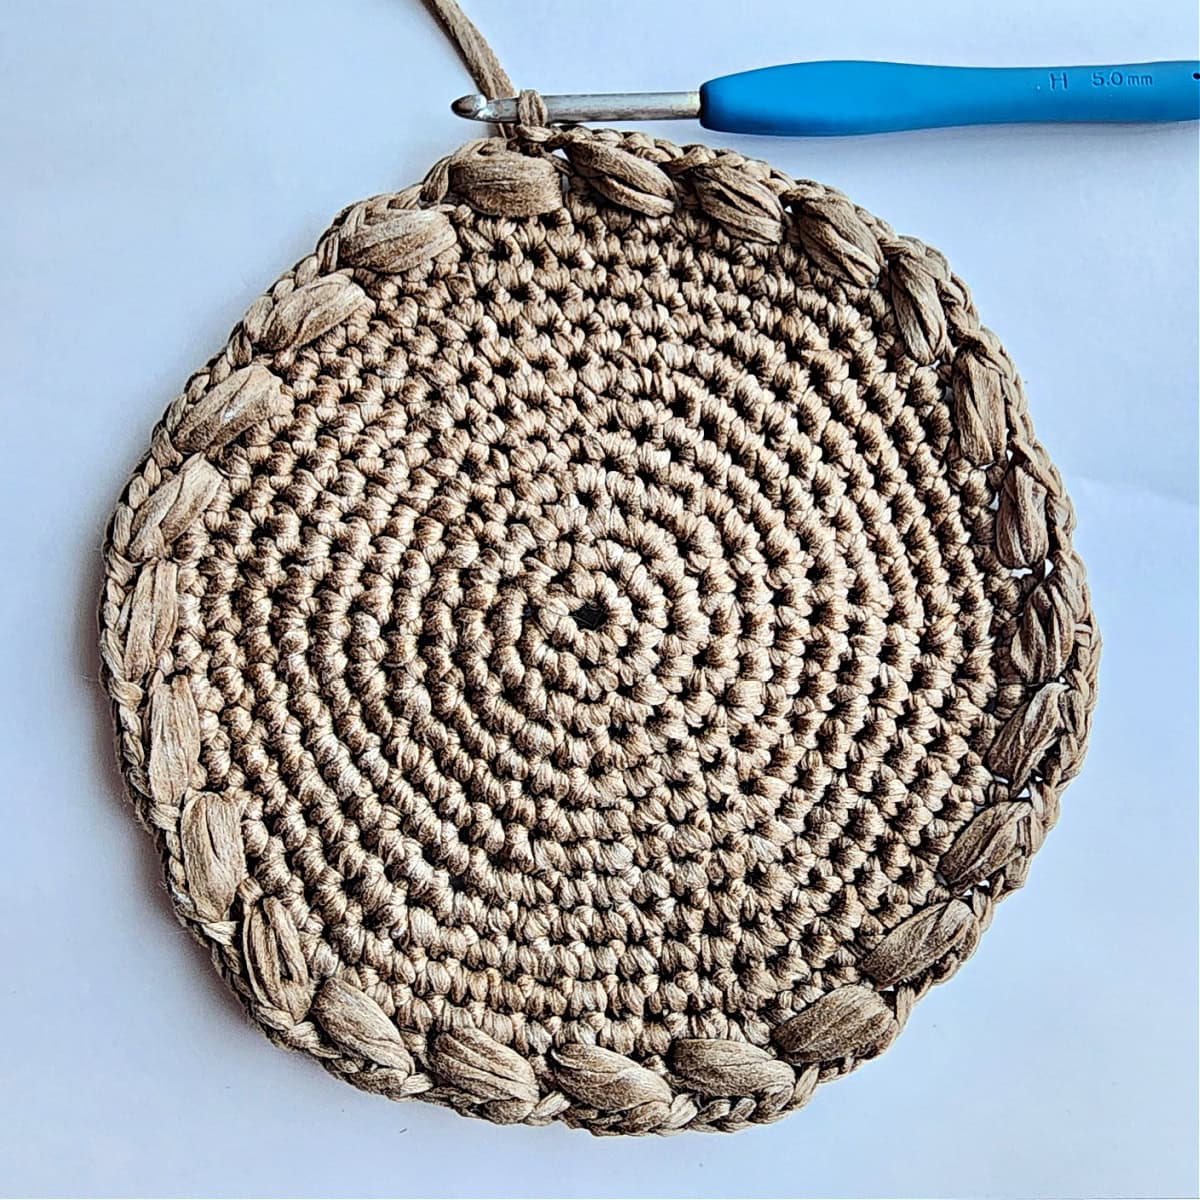
Photo Above: This photo shows the first round of slanted puff stitches complete.
Turn to begin the second round of slanted puff stitches.
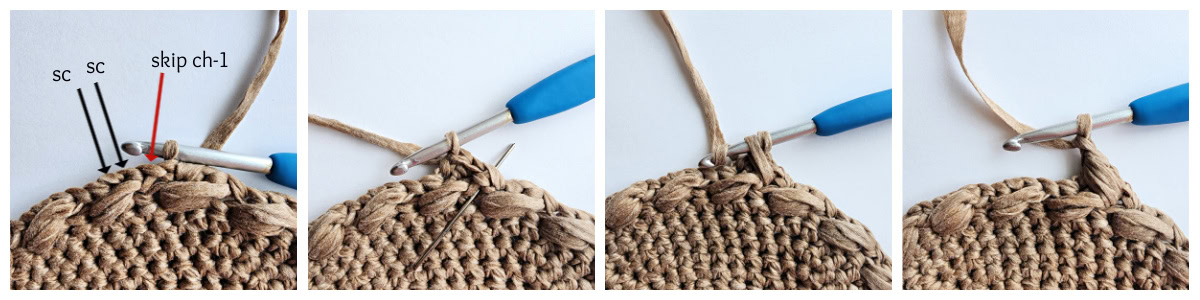
Photo Above Left: Make sure you remembered to turn after completing the first round of slanted puff stitches. Skip the ch-1 sp (red arrow), sc in each of the next 2 stitches (black arrows).
Photo Above Left Middle: Work a slanted puff stitch into the ch-1 sp from the previous round (the ch-1 sp marked with a yarn needle).
Photo Above Middle Right: This photo shows a slanted puff stitch being worked into the ch-1 space.
Photo Above Right: This photo shows the first slanted puff stitch and ch-1 complete.
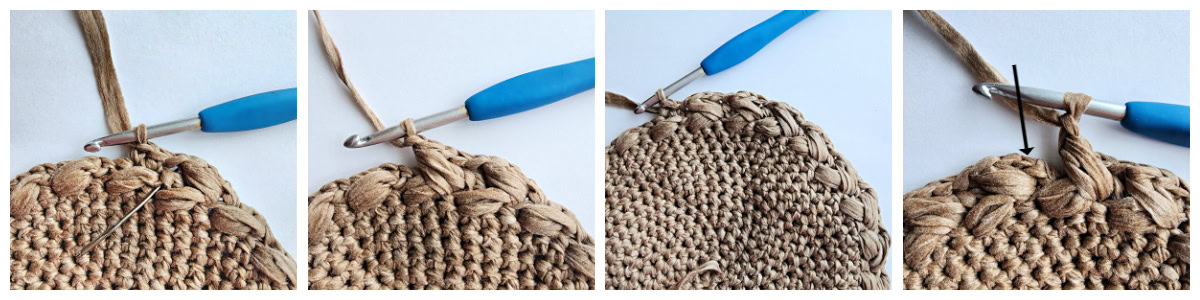
Photo Above Left: Skip the next ch-1 sp (marked with a yarn needle), sc in each of the next 2 stitches.
Photo Above Left Middle: Work a slanted puff stitch into the ch-1 sp from the previous round (the ch-1 sp you just skipped).
Photo Above Middle Right: Continue repeating the stitch pattern all the way around the sun hat.
Photo Above Right: This photo shows the last slanted puff stitch of the round completed and ready to join the round. The black arrow is pointing to the first sc of the round where you will join the round. Join with a sl st to the first sc of the round.

Best Yarn for a Crochet Sun Hat
The best yarns for a summer crochet hat are lightweight and breathable. Wearing a hat that traps the heat in the hot summer sun is just miserable. Cotton yarns and raffia are the two most popular fibers for sun hats, but Lion Brand Rewind is my go-to!
Rewind yarn isn’t cotton or raffia, but it is a lightweight tape yarn that’s machine washable and packable. Cotton is more durable and washable, but it is a touch heavier than raffia and Rewind. And raffia is lightweight and cool, but typically not soft or machine washable.
You can’t go wrong with any of the above yarns so choose the best yarn and fiber that fits your needs.
Stiffening the Brim
I love Lion Brand Rewind Yarn because it keeps its’ shape so well that I don’t feel the need to add wire to stiffen the brim of my sun hats. BUT, if you prefer a wide brim sun hat with a stiff brim, there are a few different options for you to explore.
The easiest way to add a tad more stability to the brim of your sun hat is to crochet the brim with a smaller hook and tighten up your gauge. You can also slip stitch in each stitch around the last round of the brim, or work a round of crab stitches for the last round.
If you want an even stiffer option, the following are a few different wire options that you can crochet over in the last round of the brim:
- Weed Wacker String: This is a packable option and it should be readily available in most hardware stores. If not, you can purchase it on Amazon.
- Plastic Hat Brim Wire & Wire Joints – This is a flexible plastic wire that snaps back into shape after it’s been bent. This is a packable option for stiffening the brim of your summer crochet hat.
- Millinery Wire & Wire Joints – This wire is shapeable the first time it’s used, but doesn’t pop back into shape after it’s bent. If you plan to travel a lot with your sun hat and want to be able to pack it in your suitcase, this isn’t the best option.
Do you Prefer a Floppy Brim Sun Hat? If you prefer a floppier brim, I would suggest using a larger hook size to crochet the brim, or adding in another round of increases.
I MADE IT! NOW WHAT?
Pin this post!: Save this crochet summer hat pattern to your Pinterest boards so that you can come back and make it again.
Leave a comment below: We love to hear your feedback.
Share Your Finished Projects on Facebook or Instagram: I love to see your finished projects! Share with us on social media and tag me @acrochetedsimplicity or use the hashtag #ACrochetedSimplicity so I can find your posts.
Join us in the Facebook Community Group!
Come share your finished projects with us in the A Crocheted Simplicity Crochet Community Group on Facebook. Join us for fun community events such as crochet alongs, join in on crochet conversations, ask questions, get advice, and share your love for crochet!

Wide Brim Sun Hats for Women I Think You’ll Love
More Free Crochet Brimmed Hat Patterns
Are you looking for more summer crochet hat patterns? We have several more patterns for crochet sun hats for babies, kids, women, and even 18″ dolls.
We also have a few premium crochet sun hat patterns as well.