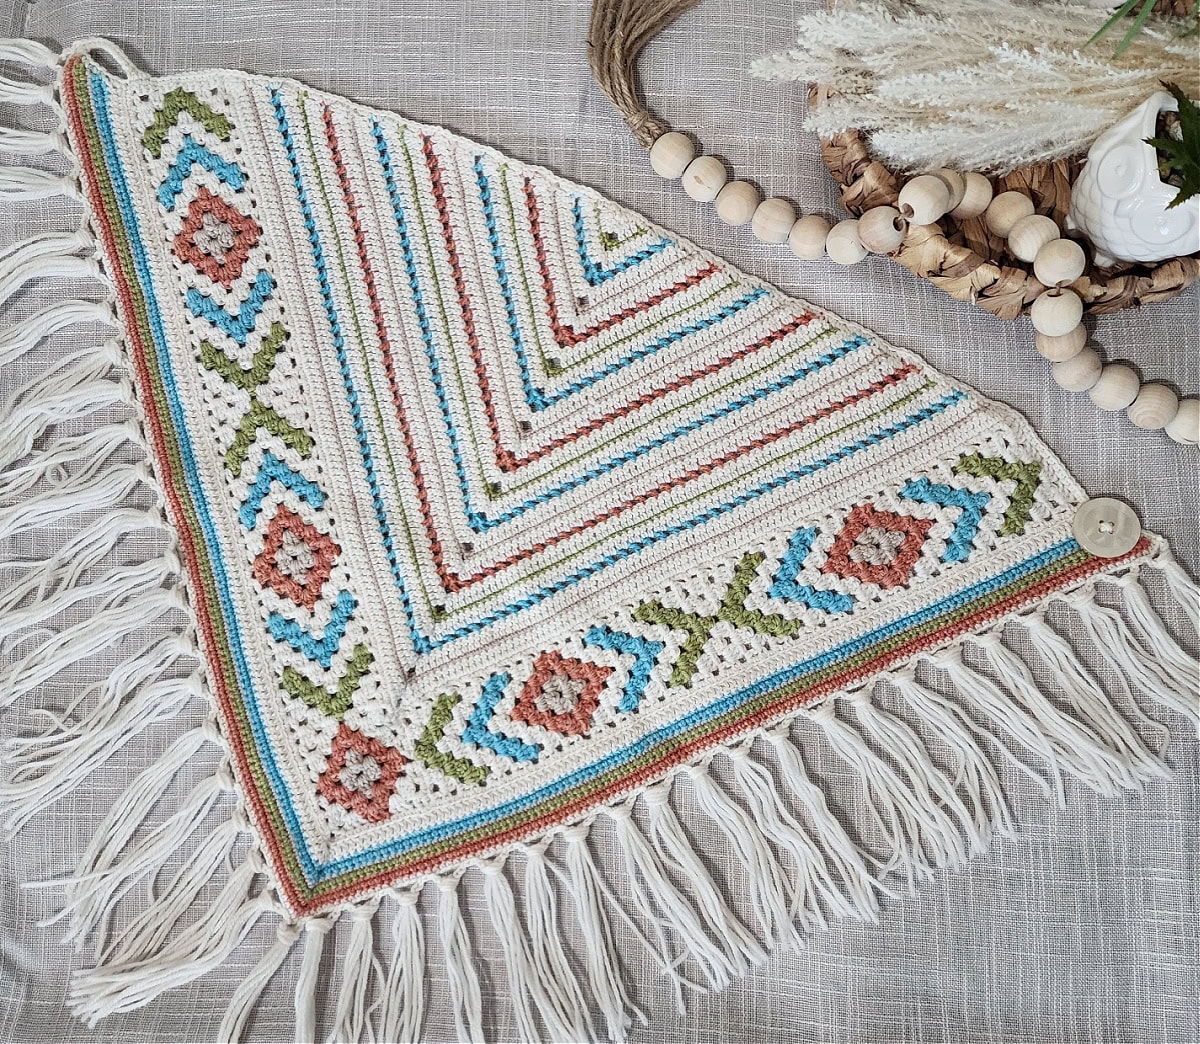
Boho Chic Crochet Triangular Scarf Pattern
Are you looking for a stylish yet cozy accessory to add to your wardrobe? This crochet triangular scarf pattern is great for beginners and seasoned crocheters alike.
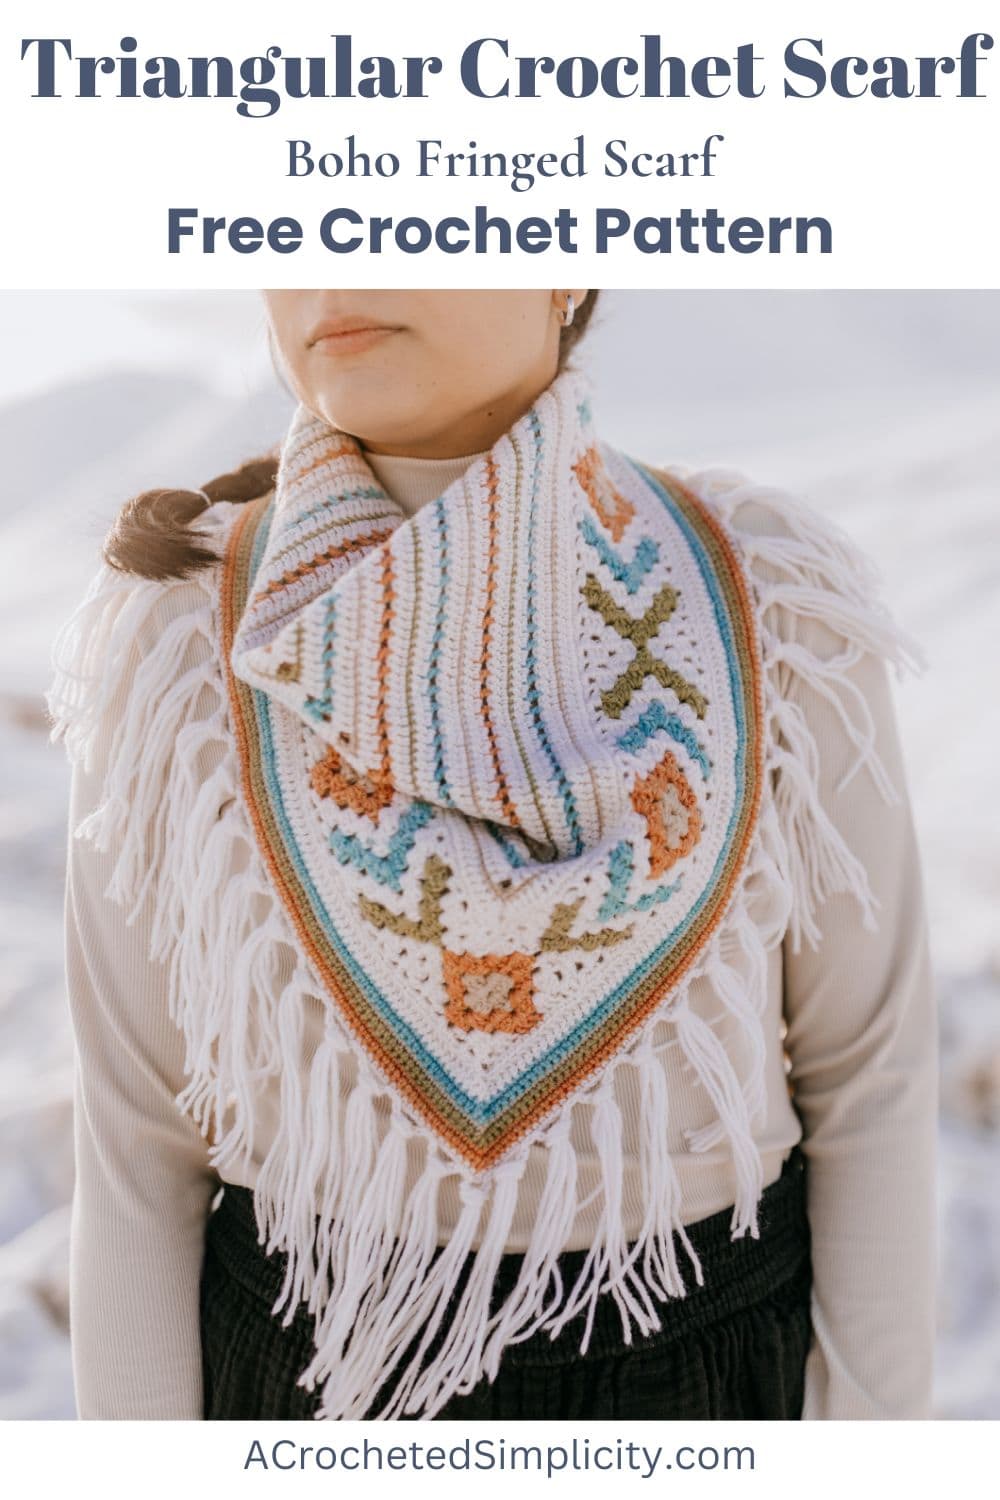
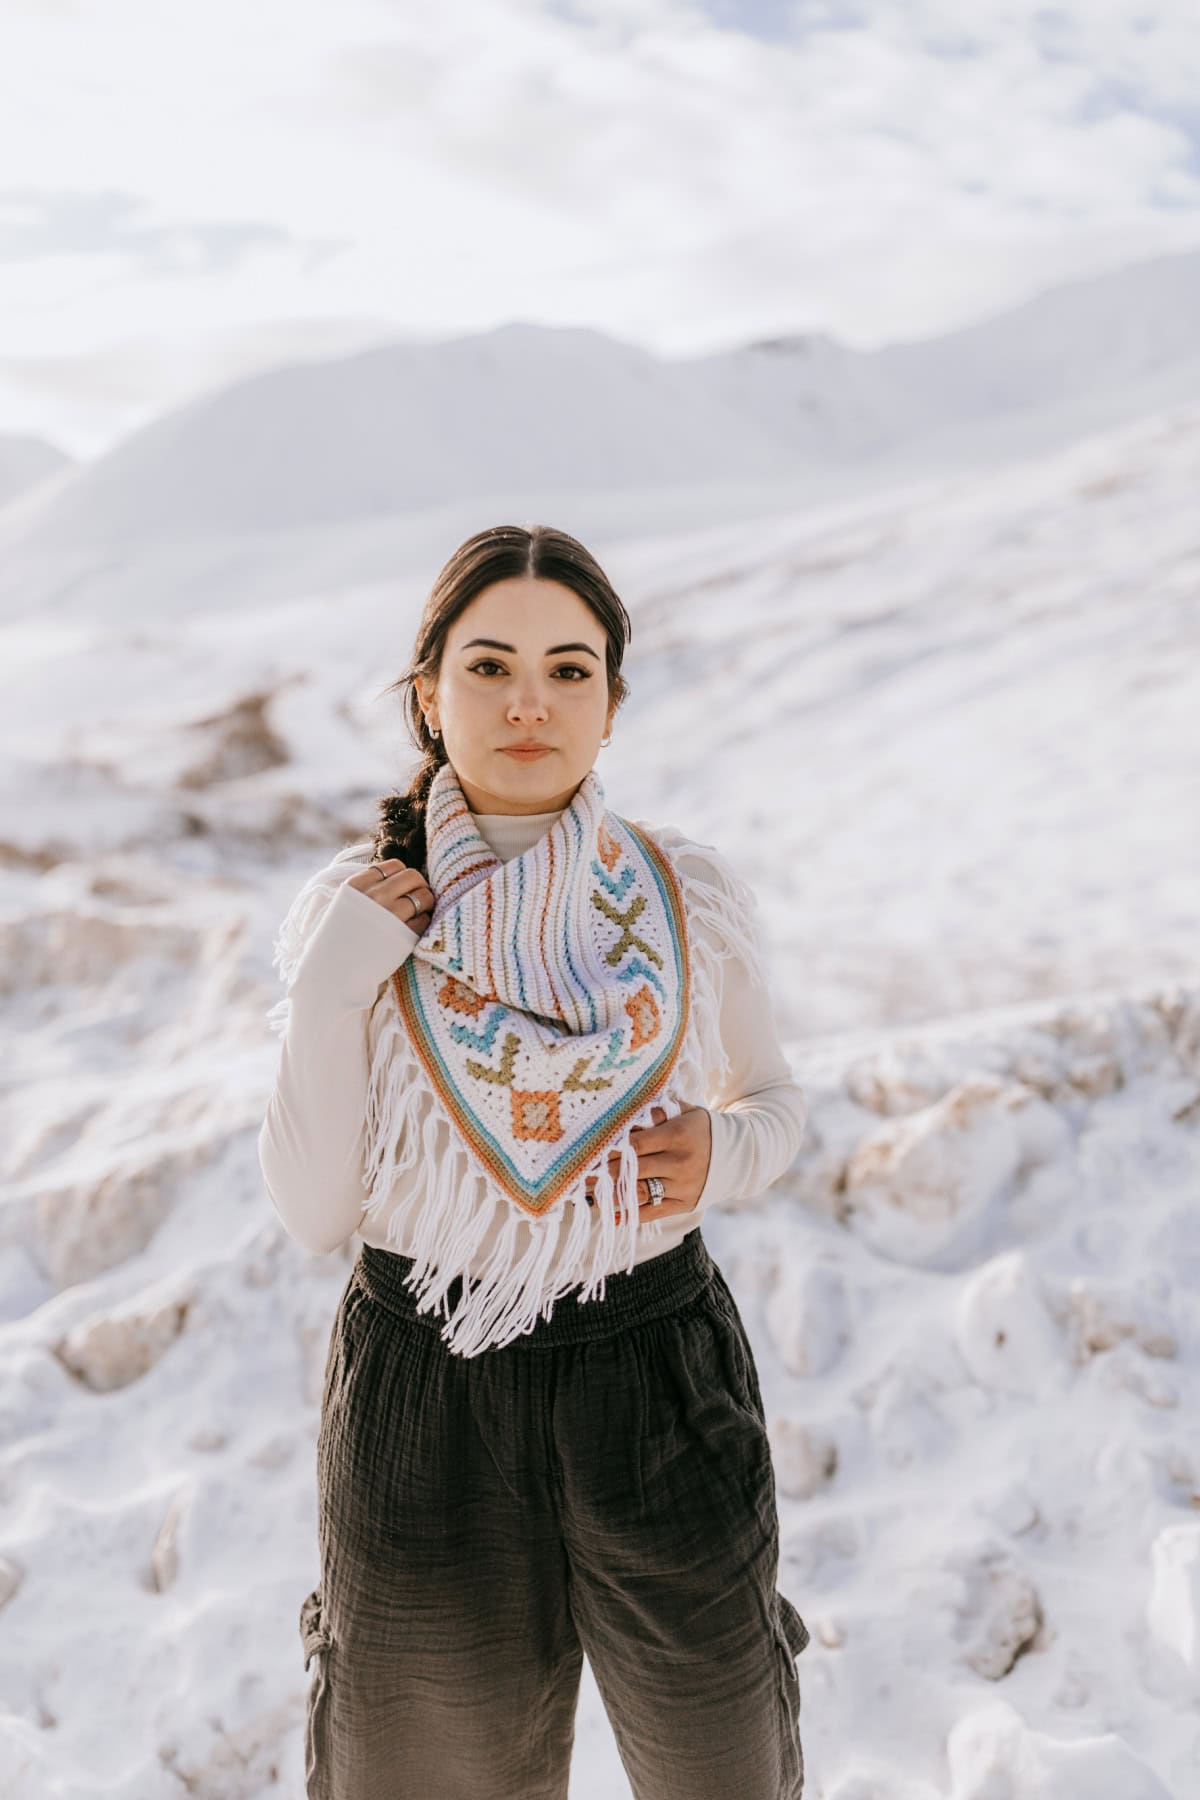
With its versatile design, this scarf can be worn in multiple ways—draped over the shoulders, wrapped around the neck, or even as a shawl.
You’ll find the free crochet triangle scarf pattern below, or an ad-free print friendly PDF on Ravelry, or Etsy (aff).

The Boho Chic Mosaic crochet triangular scarf is a versatile design, this scarf can be worn in multiple ways—draped over the shoulders, wrapped around the neck, or even as a shawl.
Have fun with the colorwork of the crochet triangular scarf pattern. You’ll use crochet intarsia, (the best way to work granny stitch colorwork), to create a detailed pattern on your motif of granny stitch diamonds and arrows.
Why Crochet a Triangular Scarf?
A triangular scarf is not only fashionable but also incredibly practical. Here are a few reasons why you should consider making one:
- Easy to Make: This pattern is great for advanced beginners, requiring only basic stitches and color changes.
- Customizable: Choose your favorite yarn and color to match your personal style.
- Perfect for Any Season: Make it with lightweight yarn for spring and summer. It’s great for layering all year round.
Looking for more crochet triangular scarves? The Chimera Scarf and Griffin Scarf are colorful crochet scarves with very few ends to weave in!
How to Crochet a Triangular Scarf
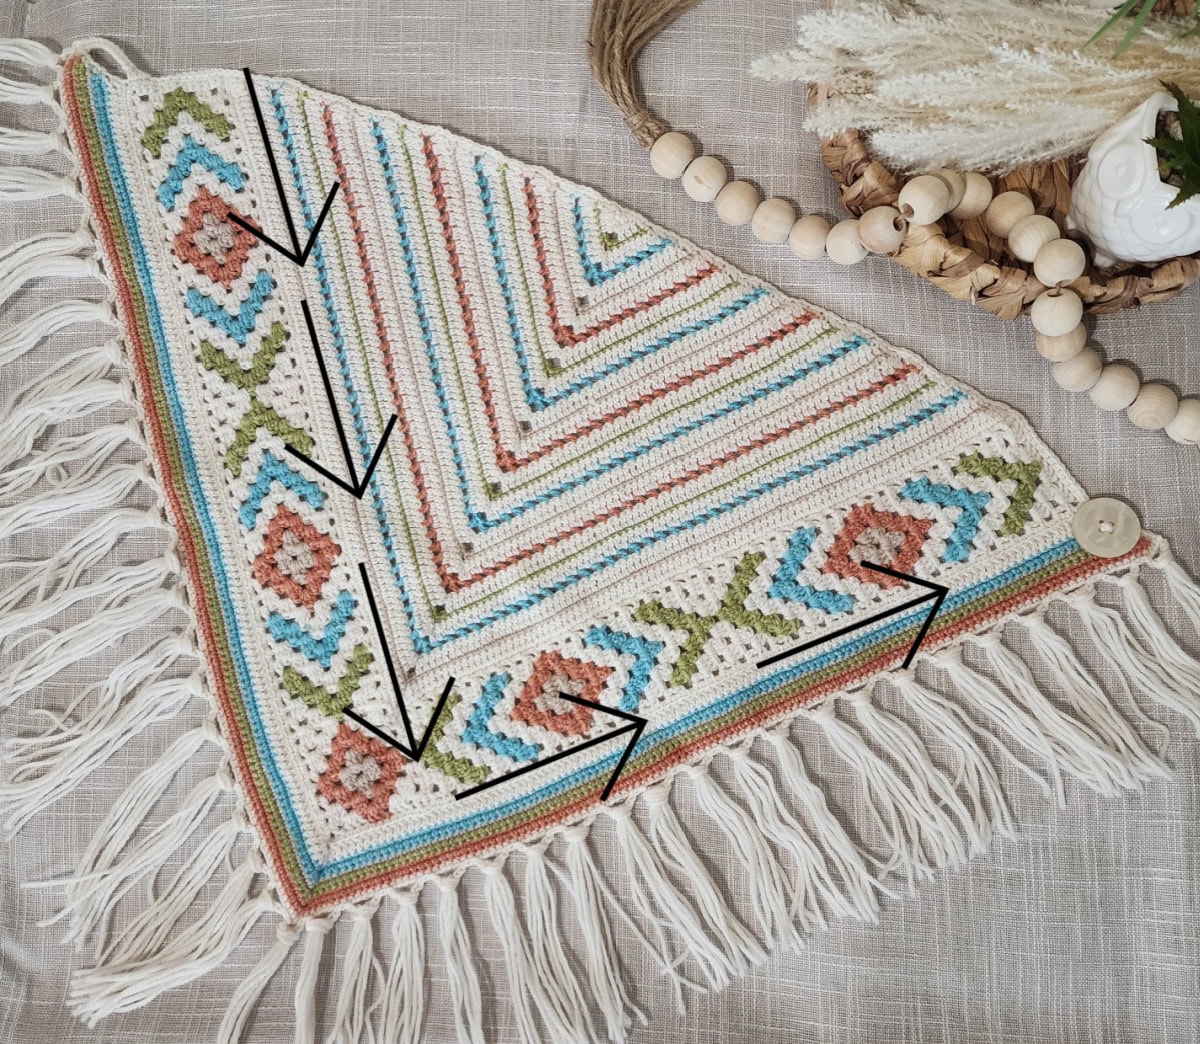
This crochet triangular scarf pattern is worked in a non-traditional way, but the construction is seamless so it’s worked all in one piece!
First, you’ll use granny stitch colorwork to crochet the mosaic boho motif. This motif uses intarsia colorwork techniques to create a granny stitch diamonds and granny stitch arrows design. The motif will become a large V shape.
After completing the crochet granny motif, you’ll fill in the inside of the V with rows of double crochet stitches and single crochet stitches, decreasing each row.
After the inside of the motif is filled in, you’ll work along the outside edge of the V and add a simple striped edge.
Next, you’ll add chain loops along the outer edge of the triangular scarf and attach fringe to these loops, if desired. Lastly, attach a button.
How To Get The
Boho Chic Crochet Triangular Scarf Pattern
Option 1: Scroll down for the free crochet triangular scarf pattern right here in this blog post.
Option 2: Purchase the ad-free printable PDF from one of my shops:
Yarn
I used Knit Picks Wool of the Andes Sport weight yarn for my scarf. Most other sport weight yarns can be easily substituted for this scarf, especially since it isn’t a garment where gauge is critical.
You need to choose a main color and four contrasting colors for your triangular scarf.
Crochet Triangular Scarf Pattern
The Boho Chic triangular crochet scarf is a free pattern below, but if you love to work offline, I’ve got a couple other great options for you.
Purchase the ad-free, printable PDF, on Ravelry, or on Etsy (aff).
This post contains affiliate links.
Materials
- Yarn: Sport weight / 2 yarn was used for this triangle fringe scarf. Knit Picks Wool of the Andes sport was used for the scarf shown in the photos. (137 yards / 50 g) per ball, 100% Peruvian Highland Wool.
- MC: White (3 balls / 411 yards)
- CC1: Green Tea Heather (1 ball / 137 yards)
- CC2: Wonderland Heather (1 ball / 137 yards)
- CC3: Mai Tai Heather (1 ball / 137 yards)
- CC4: Oyster Heather (1 ball / 137 yards)
- Crochet Hook: C/2.75mm; or size needed to obtain gauge (My favorite crochet hooks are the Clover Amour Crochet Hooks, I’ve never had an ache in my hand since switching).
- Scissors
- Yarn Needle
- (1) Button: 1-1/4″
Abbreviations (U.S. Terms)
- ch(s): chain(s)
- sl st(s): slip stitch(es)
- st(s): stitch(es)
- yo: yarn over
- sc: single crochet
- dc: double crochet
- sc2tog: single crochet decrease by 1 st
- dc2tog: double crochet decrease by 2 sts
- dc3tog: double crochet decrease by 3 sts
- Alt-ch3: alternate chain 3
- Join yarn with a standing single crochet
- FLO: front loop only
- RS: right side
- WS: wrong side
- MC: main color
- CC1-4: contrasting colors
Gauge
- See gauge swatch instructions below.
- Mosaic Granny Stitch Motif: 12 sts = 2″; 6 rows = 2″
- Inside Body of Scarf: 12.5 sts = 2″; 8 rows = 2″
Experience Level
- Easy / Intermediate
Size
- One Size: 27″ W x 17-1/2″ H (not including fringe)
Special Stitches
- Alt-ch3: Complete the last stitch of previous row, take the loop off your hook, insert your hook into the space between the last dc and the last 3 dc group of the previous row, put the loop back on your hook and pull through the space, turn, then ch 3.
- Join yarn with a standing single crochet: Begin with a slip knot on your hook, insert your hook into the stitch or space indicated, yo, pull up a loop, yo and draw thru both loops on hook.
- Single Crochet Decrease by 1 st (sc2tog): (Insert hook in next st, yo, pull up a loop) 2 times, yo, pull through all loops on hook.
- Double Crochet Decrease by 1 st (dc2tog): (Yo, insert hook in next st, yo, pull up a loop, yo, pull thru 2 loops on hook) 2 times, yo, pull through remaining 3 loops on hook.
- Double Crochet Decrease by 2 sts (dc3tog): (Yo, insert hook in next st, yo, pull up a loop, yo, pull thru 2 loops on hook) 3 times, yo, pull through remaining 4 loops on hook.
Pattern Notes
- The first stitch of each row is worked into the same stitch as the turning chain, unless stated otherwise.
- Turning chain 3’s in the Motif are counted as stitches. Turning chain 2’s in the rest of the scarf are not counted as stitches.
- When a beginning chain is counted as a stitch, the last stitch of the next row will be worked into the top of the chain, unless stated otherwise.
- Yarn Notes: Knit Picks Wool of the Andes Sport was used for the scarf in the photos. Other comparable yarns may be used as long as gauge is met.
- Using another weight yarn: You can easily substitute another weight yarn, if you prefer a heavier triangle scarf. Adjust your hook size for the yarn of choice. Yardage will vary from what’s noted.
- Knit Picks Wool of the Andes Sport / 2 weight yarn, (137 yards / 50g ball), 100% Peruvian Highland Wool.
- Color Changes & Floating Yarn: For help and tips with working the color changes, check out my color change tutorial with the granny stitch. It also includes tips for carrying (floating) your yarn.
- Construction Notes: This crochet triangular scarf is constructed by first creating the mosaic granny stitch motif using intarsia crochet for color changes. The motif ends in the shape of a large V. Next, you’ll fill in the V with rows of double crochet and single crochet stitches, each row decreasing. After the V is filled in, you’ll add a simple striped edge to the outside edge of the scarf and chain loops for the fringe. Lastly, add fringe to the chain loops and attach a button.
Gauge Swatch for the Mosaic Granny Stitch Motif Section
Checking your gauge before you begin is very important and can save you the heartache and frustration of having to frog your entire project (or keep you from throwing it across the room) because it’s too big or too small.
Make sure to read over my Color Change Tutorial for the Granny Stitch & Tutorial for Carrying (Floating) Yarn as this can help if you’re having trouble meeting gauge.
Gauge in granny stitch pattern: 12 sts = 2″; 6 rows = 2″
Row 1: With yarn & a 2.75mm crochet hook, ch 14, working into the back hump of the foundation ch, sc in the 2nd ch from your hook and in each ch across. (13 sts)
Row 2: Ch 3 (counts as a st), Turn, dc in the same st as ch 3, (skip each of the next 2 sts, 3 dc in the next st) work from ( to ) 3 times, skip each of the next 2 sts, 2 dc in the last st. (13 sts)
Row 3: Ch 3, Turn, 3 dc in each of the next 4 sps, dc in top of ch 3. (14 sts)
Row 4: Alt-ch3, dc in the same sp, 3 dc in each of the next 3 sps, 2 dc in the last sp. (13 sts)
Row 5: Ch 3, Turn, 3 dc in each of the next 4 sps, dc in the top of ch 3. (14 sts)
Row 6: Alt-ch3, dc in the same sp, 3 dc in each of the next 3 sps, 2 dc in the last sp. (13 sts)
Row 7: Ch 3, Turn, 3 dc in each of the next 4 sps, dc in top of ch 3. (14 sts)
Row 8: Alt-ch3, dc in the same sp, 3 dc in each of the next 3 sps, 2 dc in the last sp. (13 sts)
Finished Dimensions: approximately 2-1/4″ W x 2-3/4″ H.
Need help adjusting your gauge? Check out my video for Mastering Your Crochet Gauge.
Boho Chic Mosaic Triangular Scarf – Free Crochet Triangle Scarf Pattern
Mosaic Granny Stitch Motif
Progression photos can be found just past the color chart.
Color Changes & Floating Yarn: For help and tips with working the color changes, check out my color change tutorial with the granny stitch. It also includes tips for carrying (floating) your yarn.
Row 1: With MC yarn & a 2.75mm crochet hook, ch 14, working into the back hump of the foundation ch, sc in 2nd ch from hook, sc in each ch across. Turn. (13 sts) *Place a locking SM (or scrap of yarn) in the last stitch to mark the beginning of the Bottom Edge of Scarf for later.
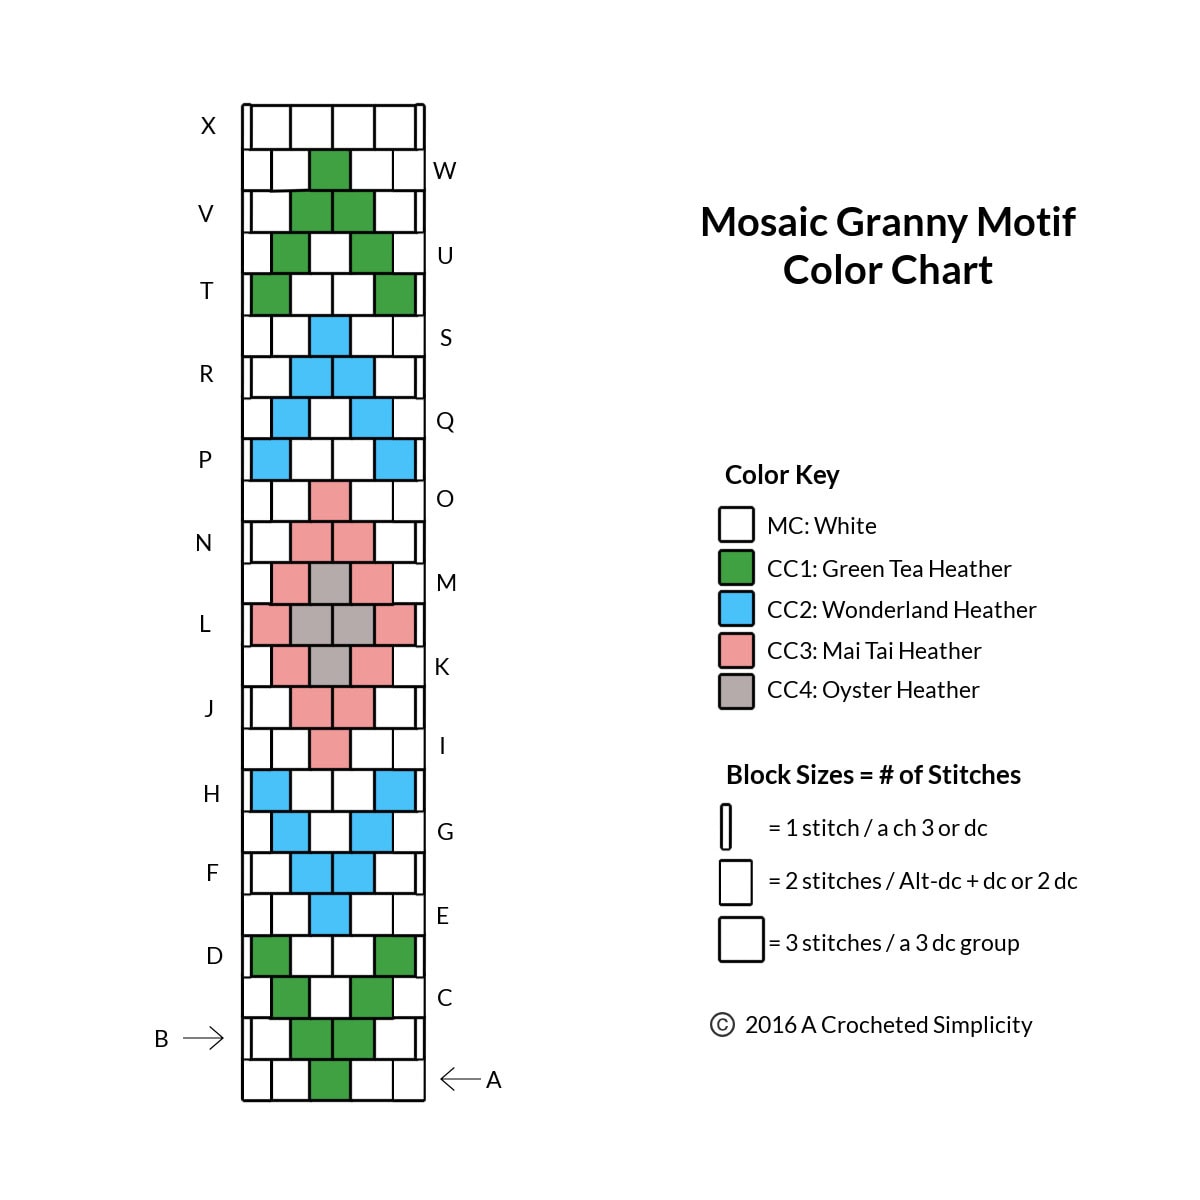
Beginning with Row 2, follow the color chart below the written instructions. For example, when working Row 2, follow color chart Row A. For Row 3, follow color chart Row B. For Row 4, follow color chart Row C, and so on.
Row 2 (RS): Ch 3 (counts as a st), dc in same st, skip 2 sts, (3 dc in next st, skip next 2 sts) work from ( to ) 3 times, 2 dc in last st. Turn. (13 sts)
Row 3: Ch 3 (counts as a st), 3 dc in next 4 sps, dc in top of ch 3. (14 sts)
Row 4: Alt-ch3, dc in same sp, 3 dc in next 3 sps, 2 dc in last sp. Turn. (13 sts)
Rows 5 – 24: Repeat Rows 3 – 4. Work Color Chart Rows D – W.
Row 25: Repeat Row 3. Work Color Chart Row X.
Row 26: Repeat Row 4. Work Color Chart Row A.
Rows 27 – 48: Repeat Rows 3 – 4. Work Color Chart Rows B – W.
Row 49: Repeat Row 3. Work Color Chart Row X.
Row 50: Repeat Row 4. Work Color Chart Row A.
Rows 51 – 56: Repeat Rows 3 – 4. Work Color Chart Rows I – O.
Do not turn at the end of Row 56. Rotate clockwise to work the next row along the long edge of the motif. See the photo below the progression photos for a visual of the finished motif.
Row 57 (RS): Ch 1, 1 sc into the side of the 1st dc, 2 sc into the side of the next 6 dc. Turn. (13 sts)
Rows 58 – 105: Repeat Rows 2 – 49.
Do not fasten off. Continue on to Edge Inside “V” of Motif (below the motif progression photos).
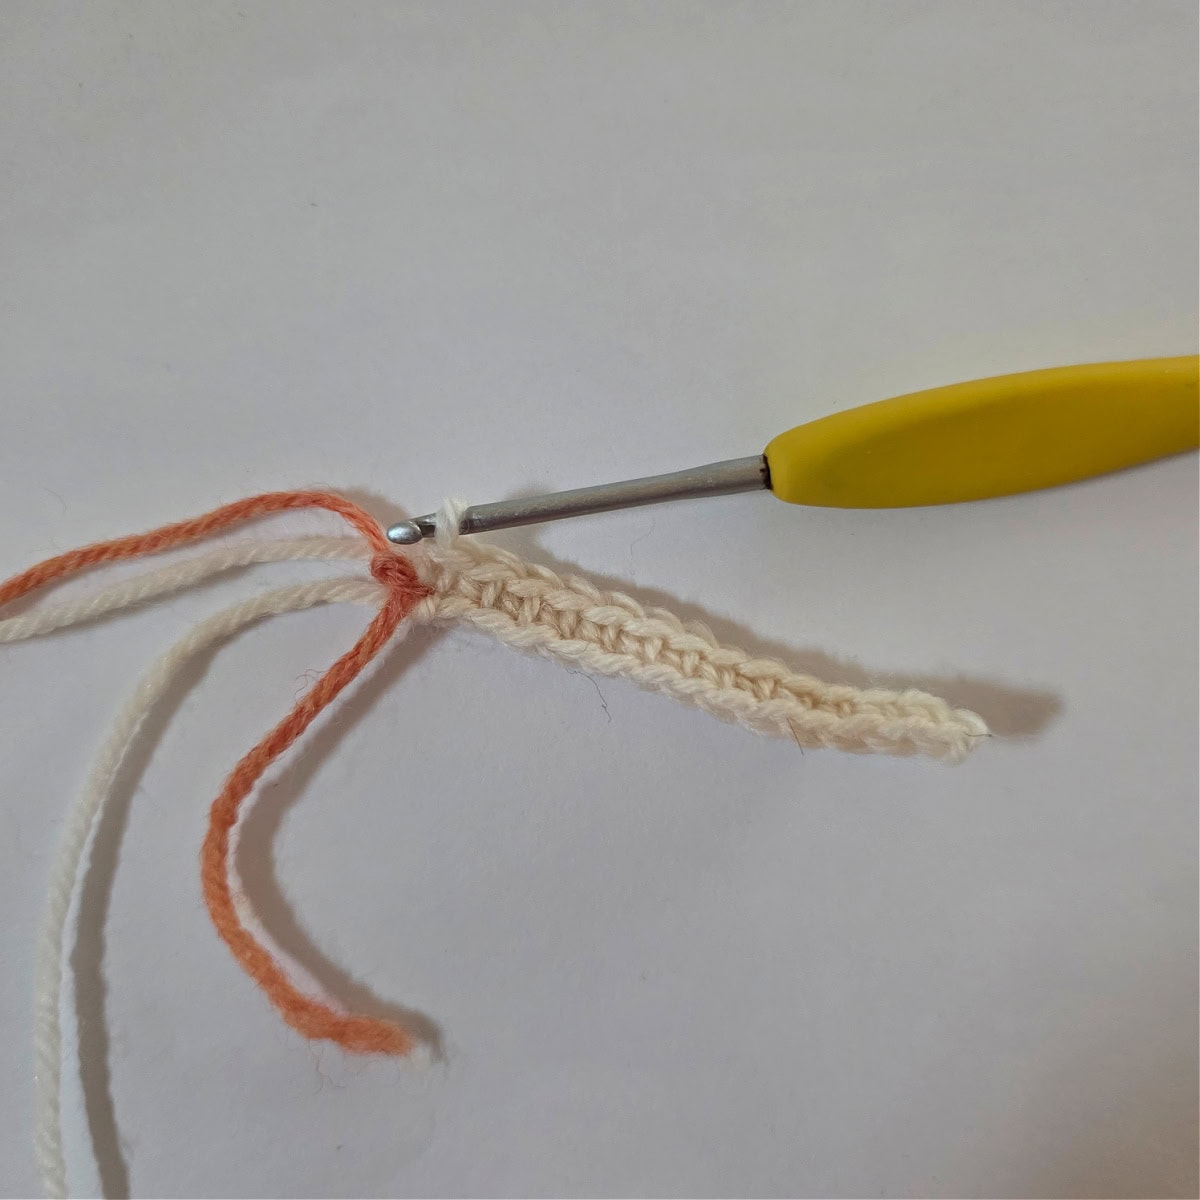
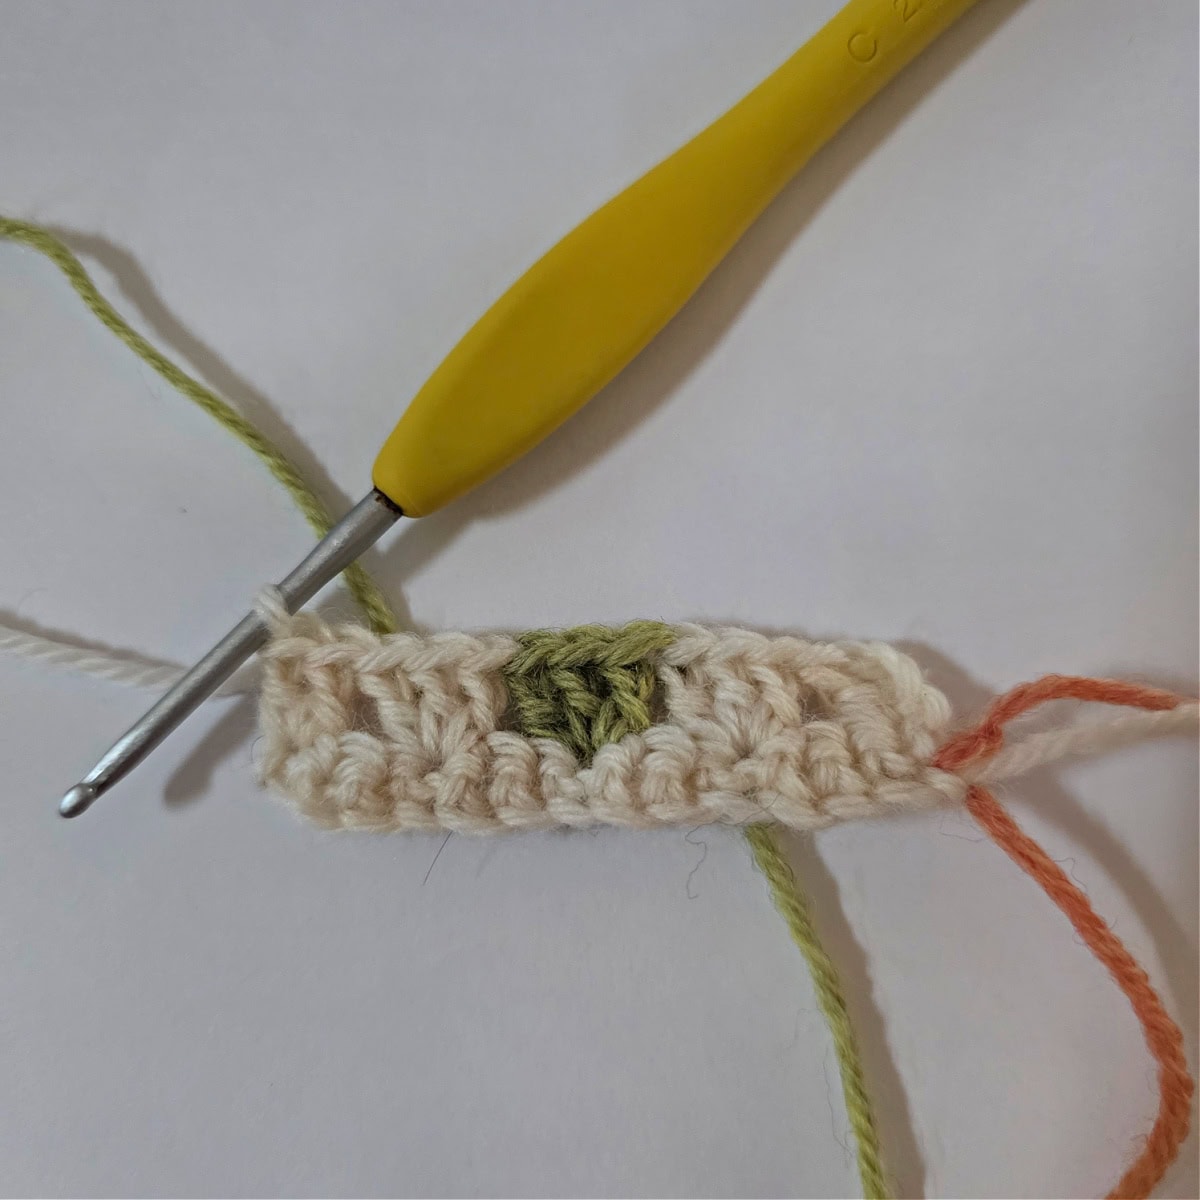
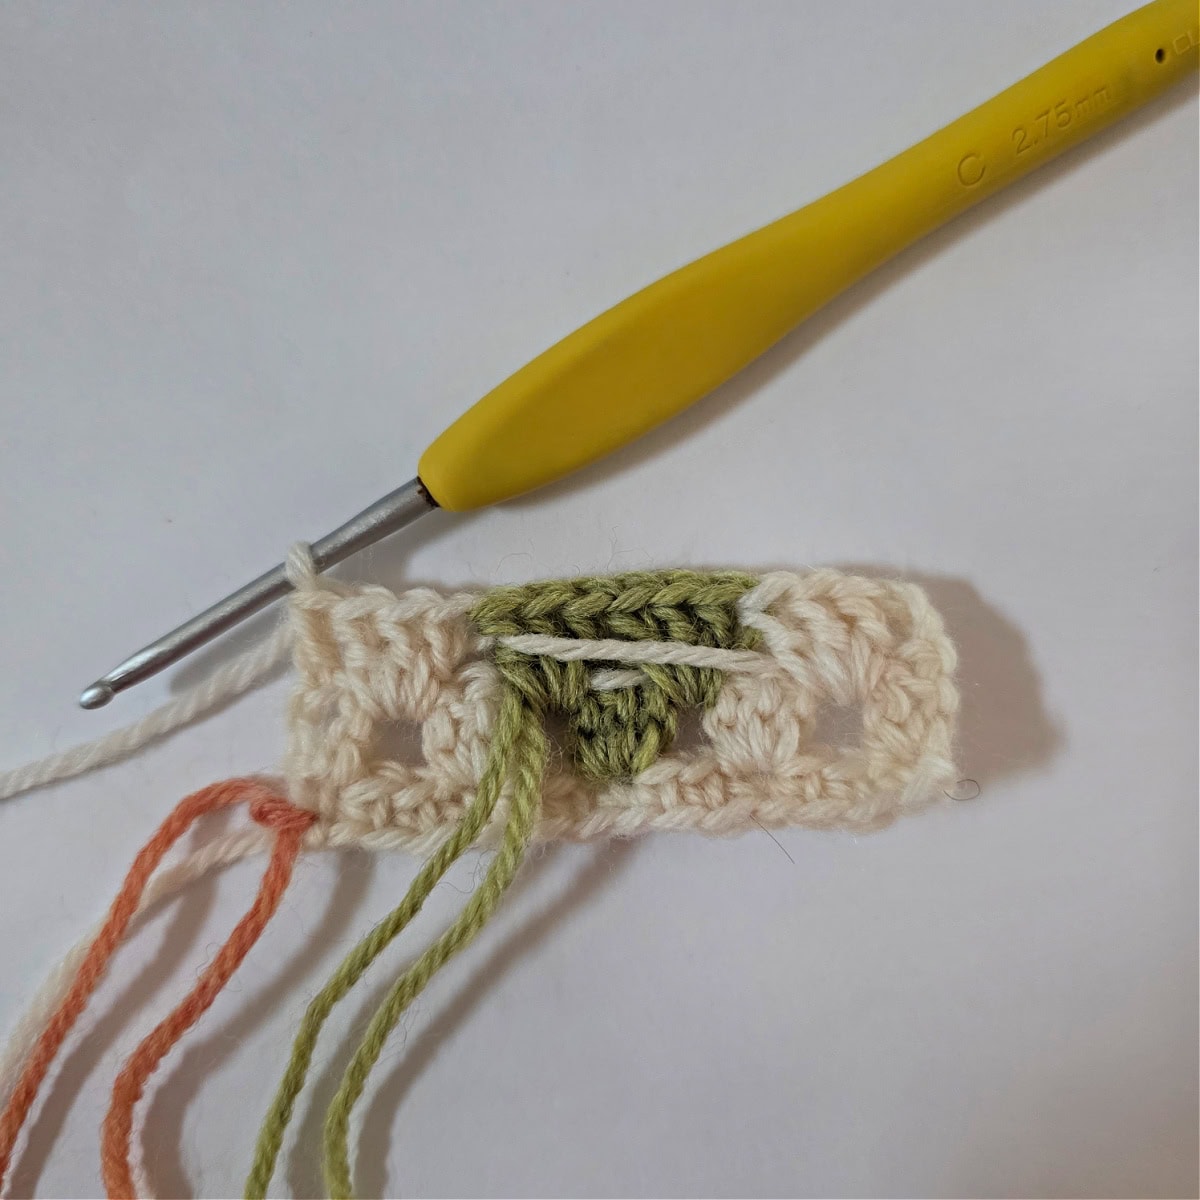
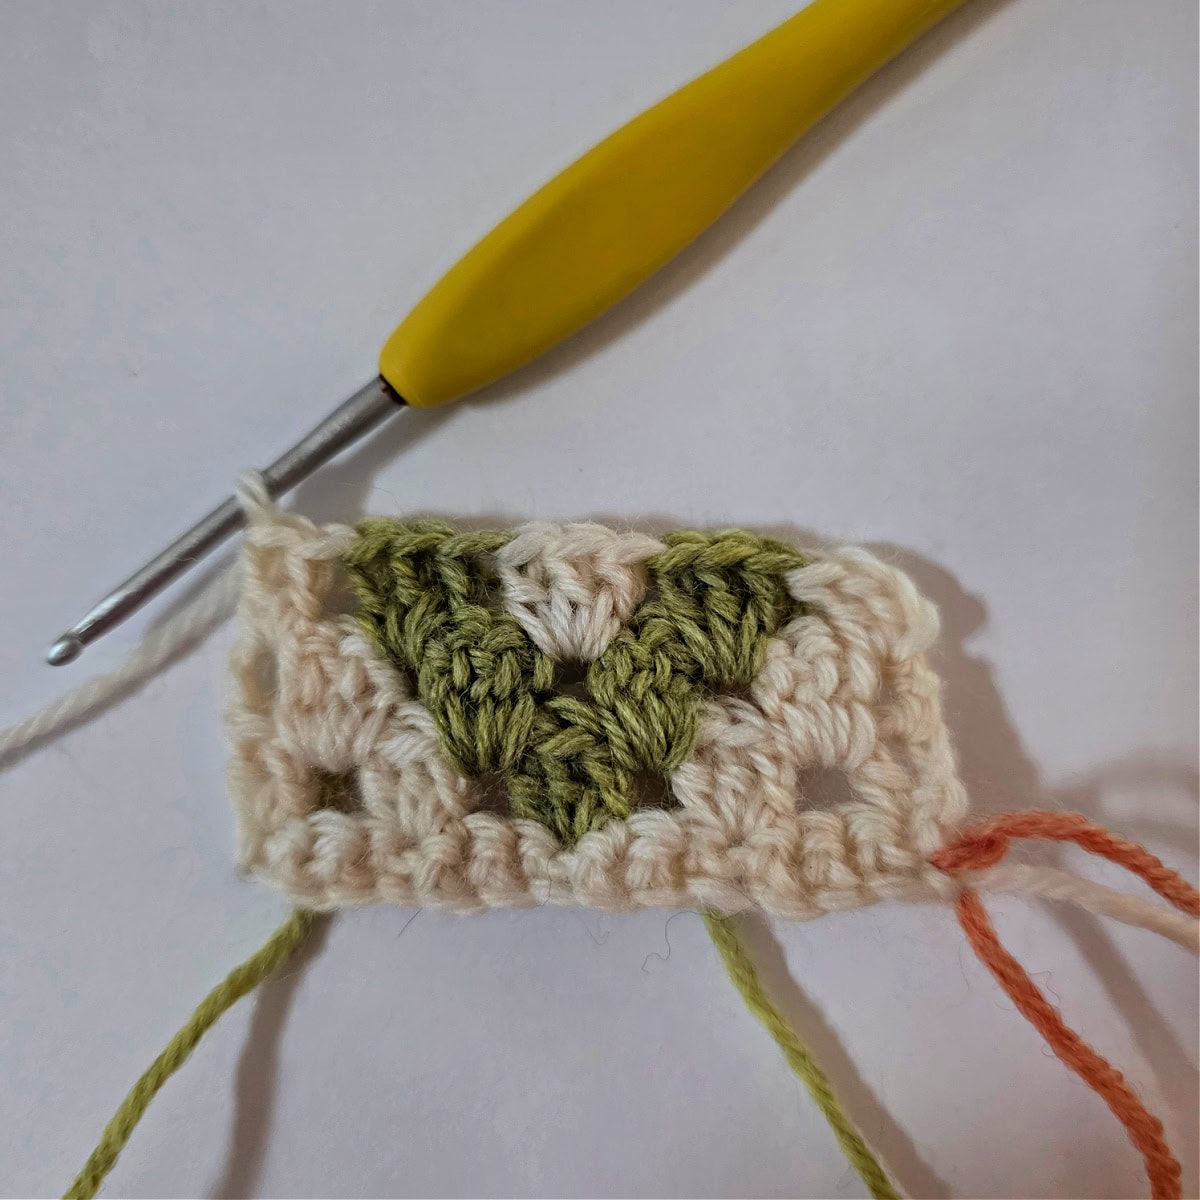
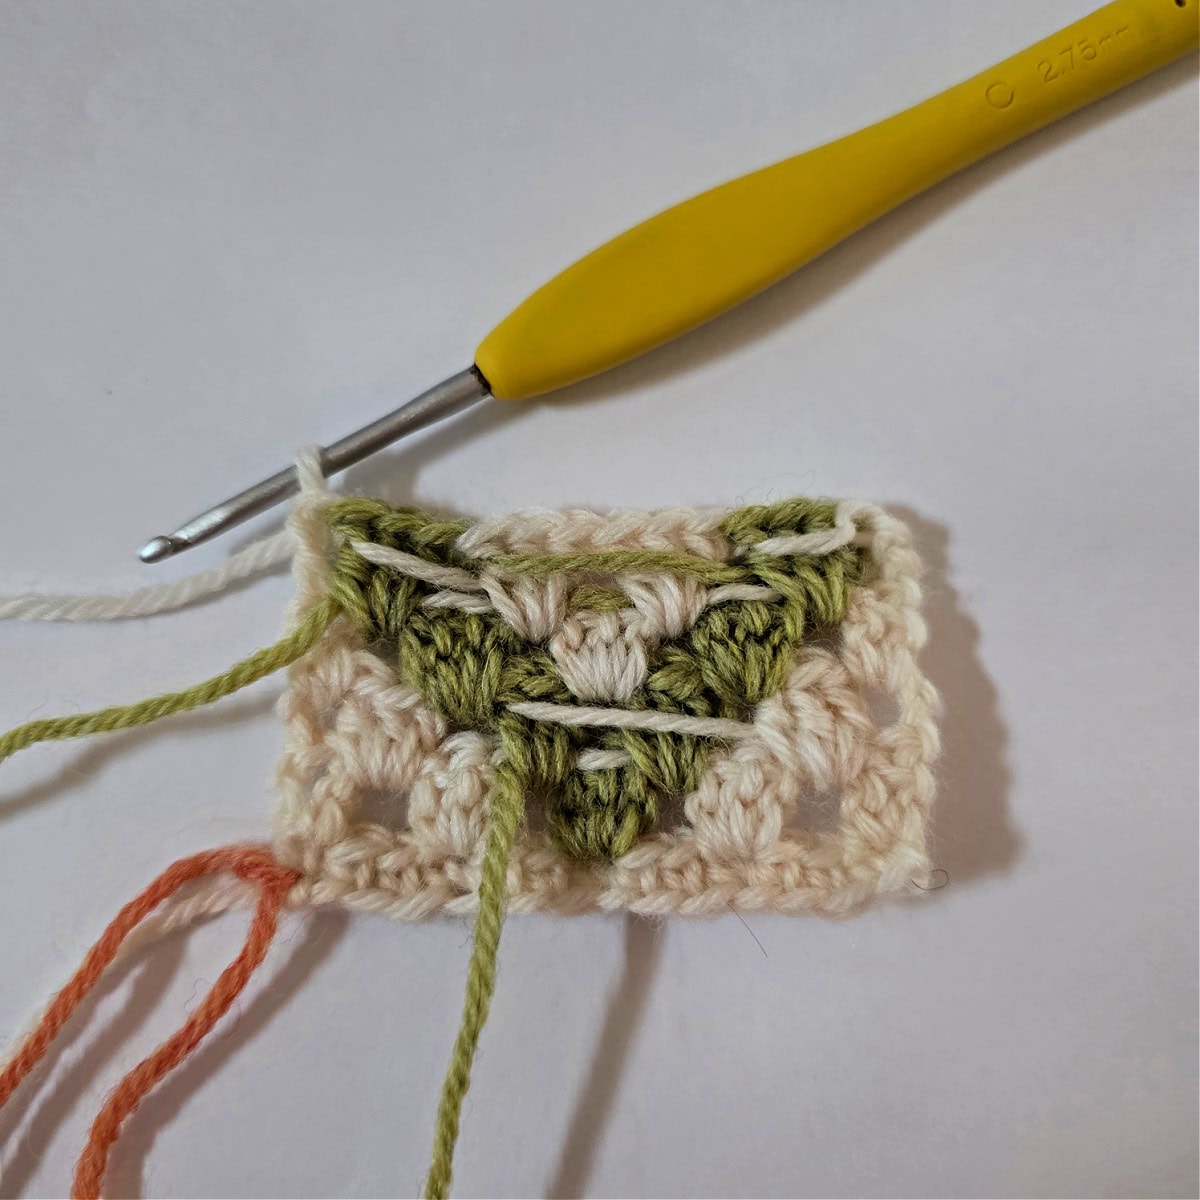
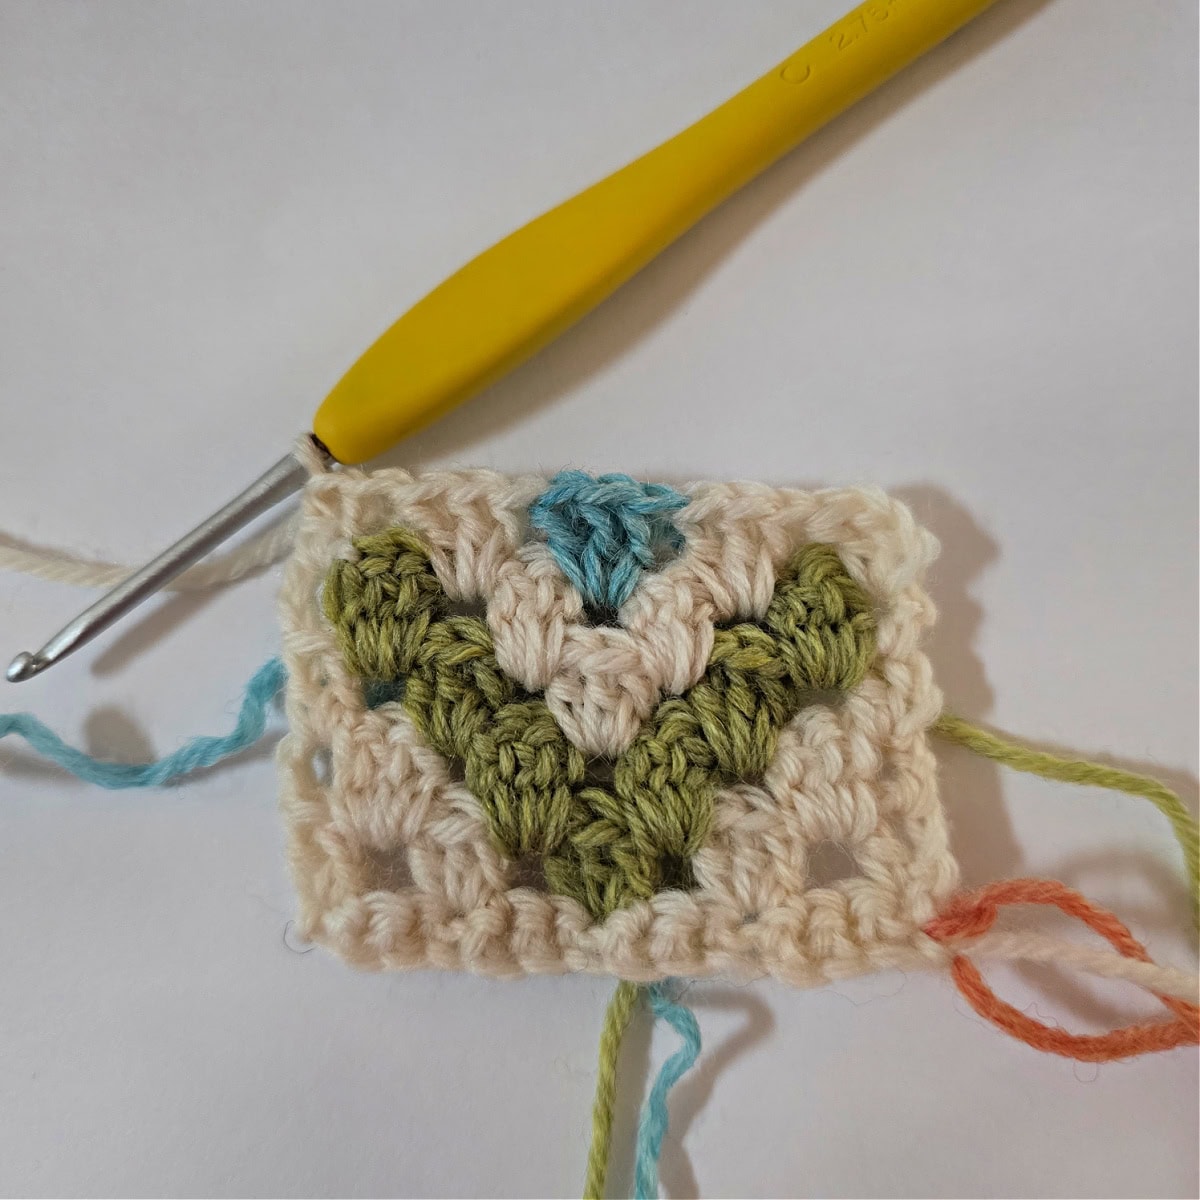
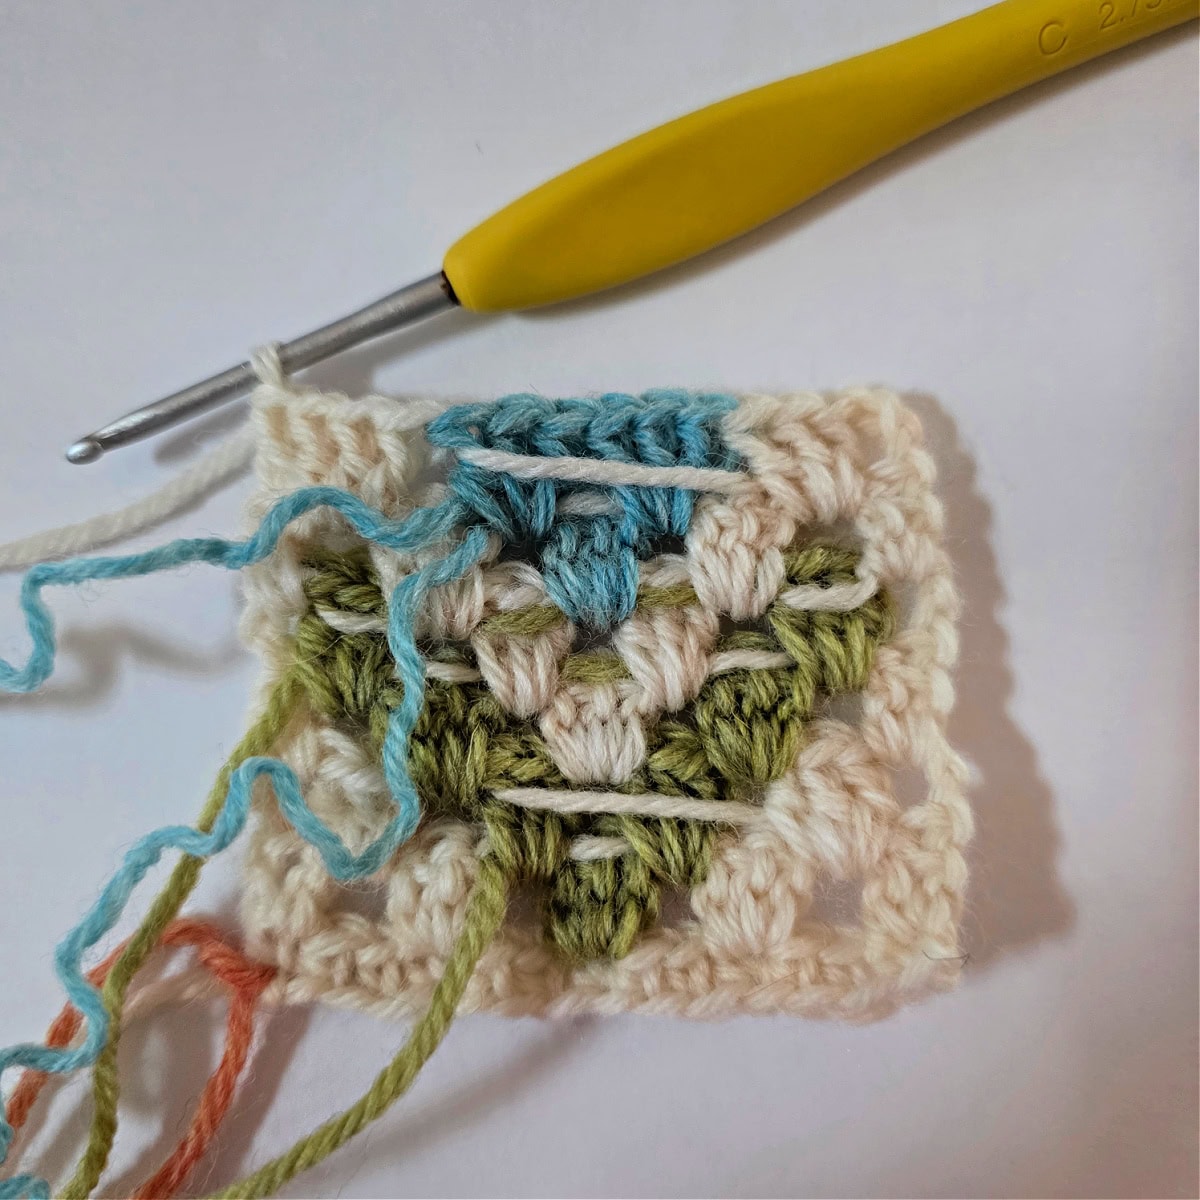
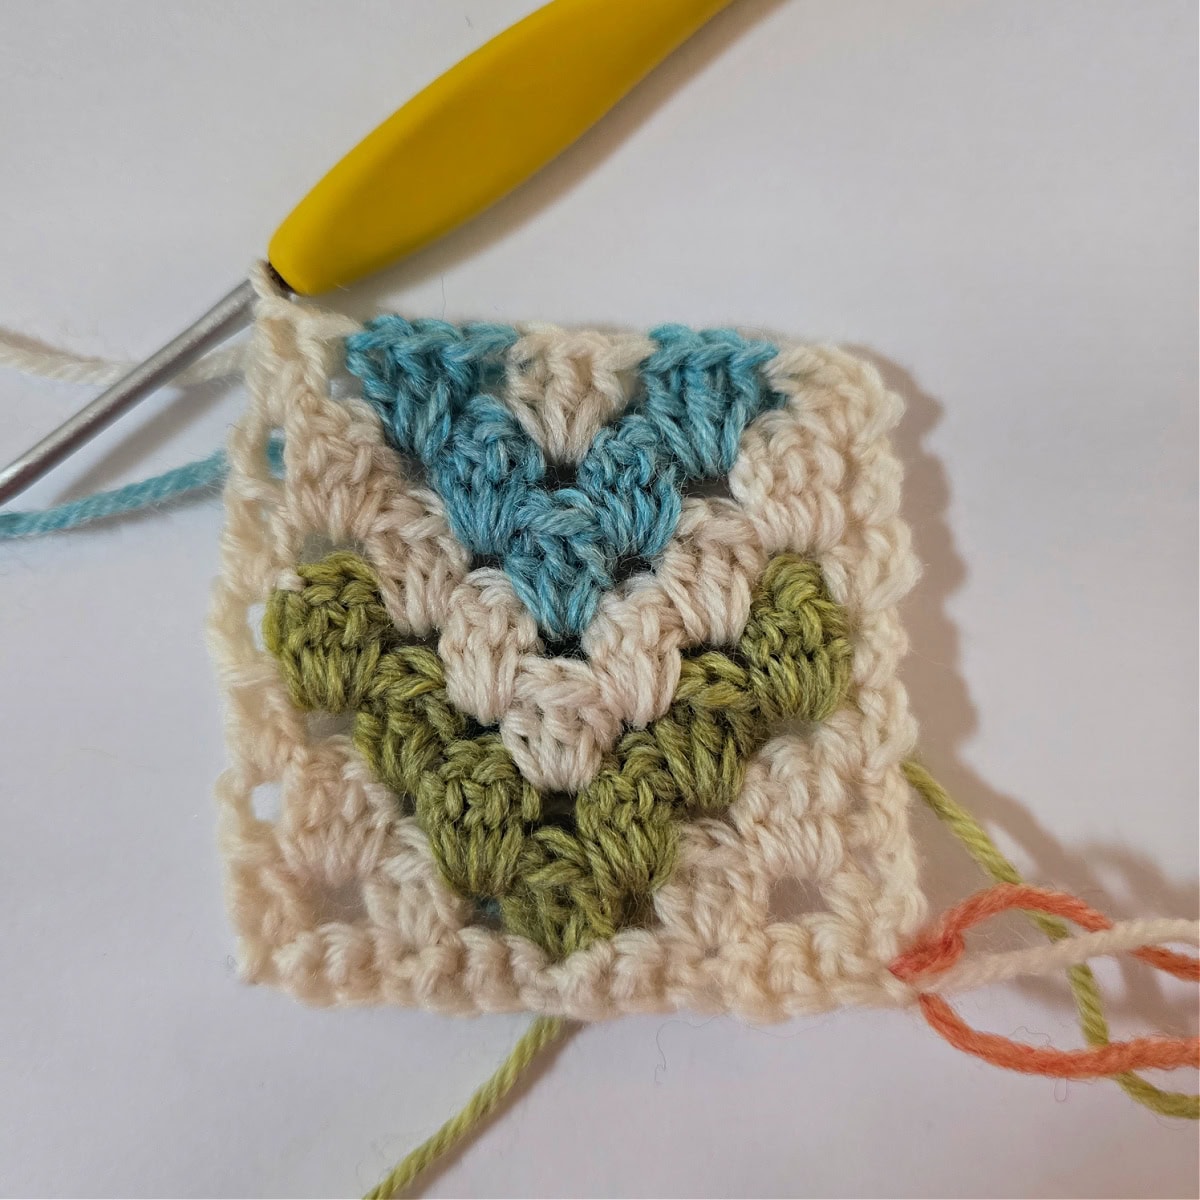
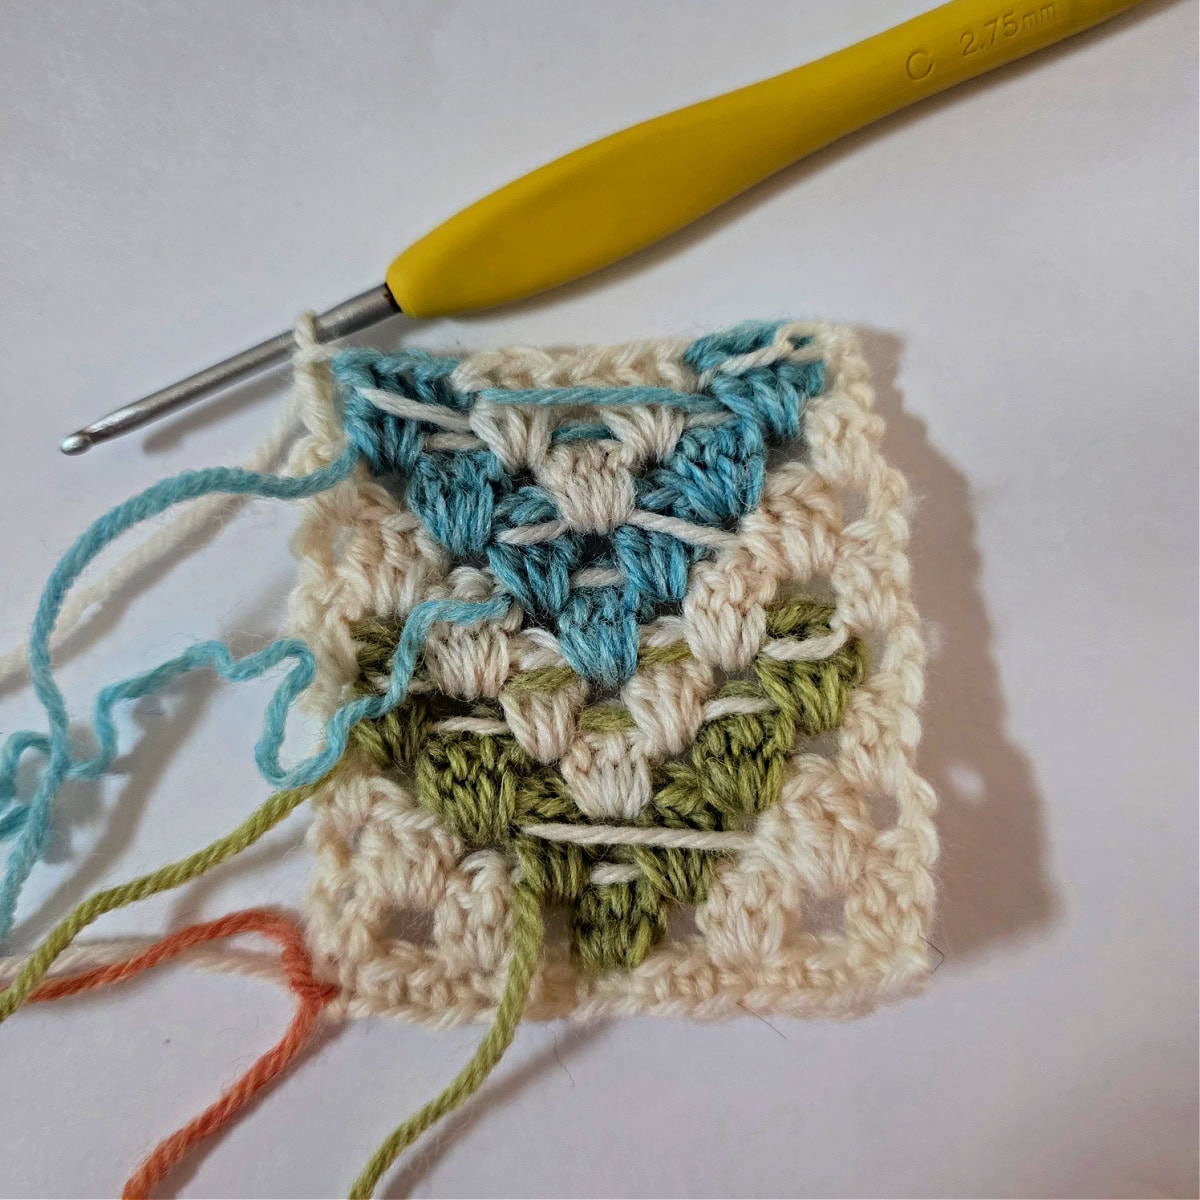
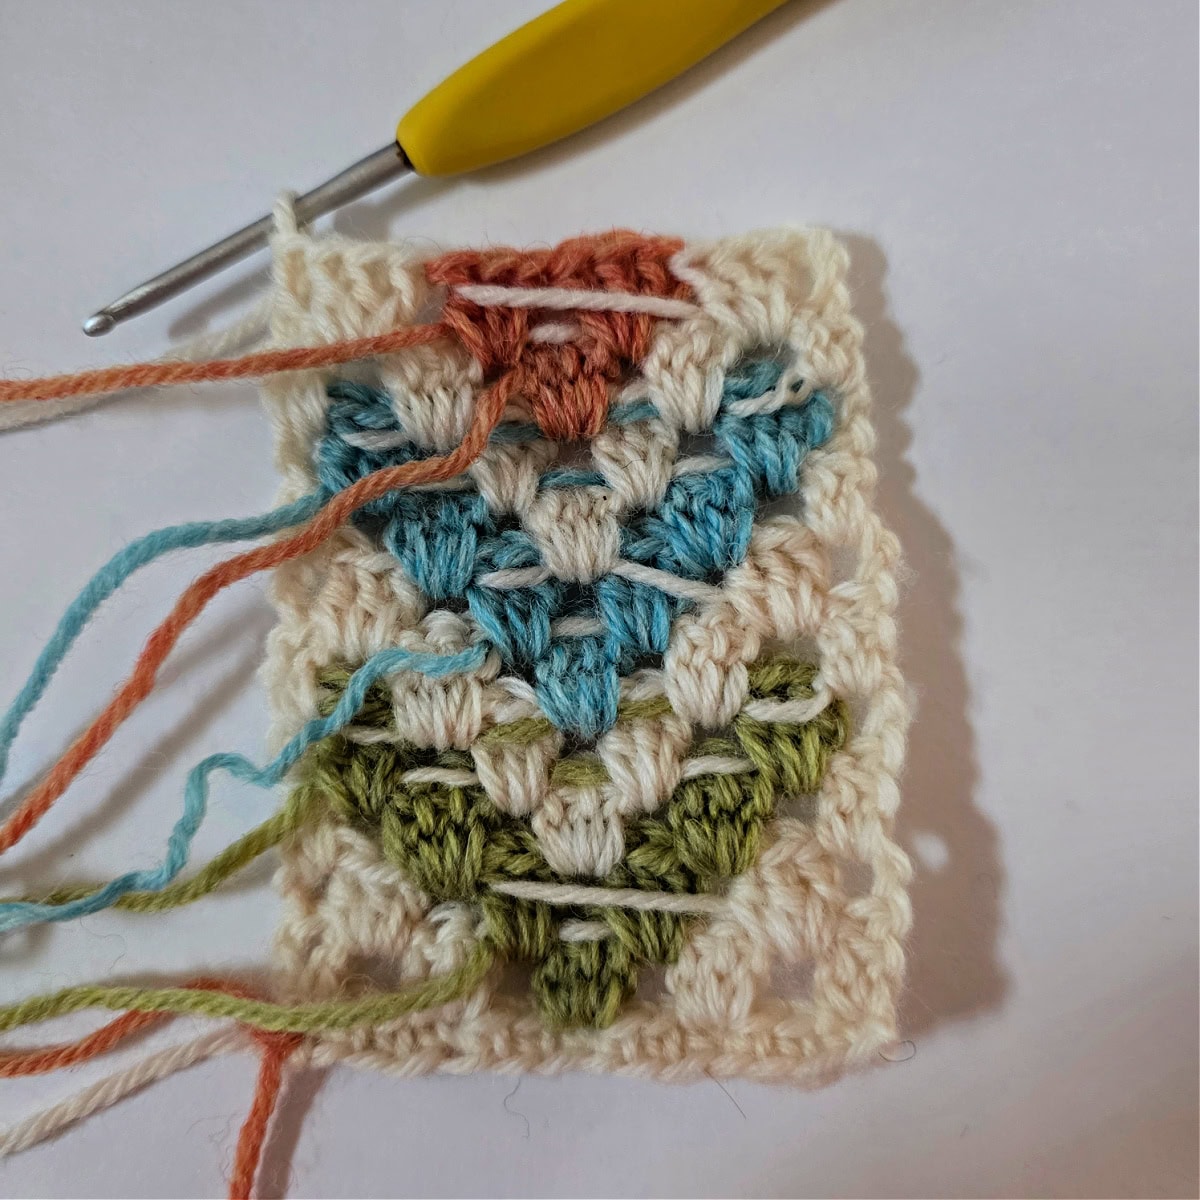
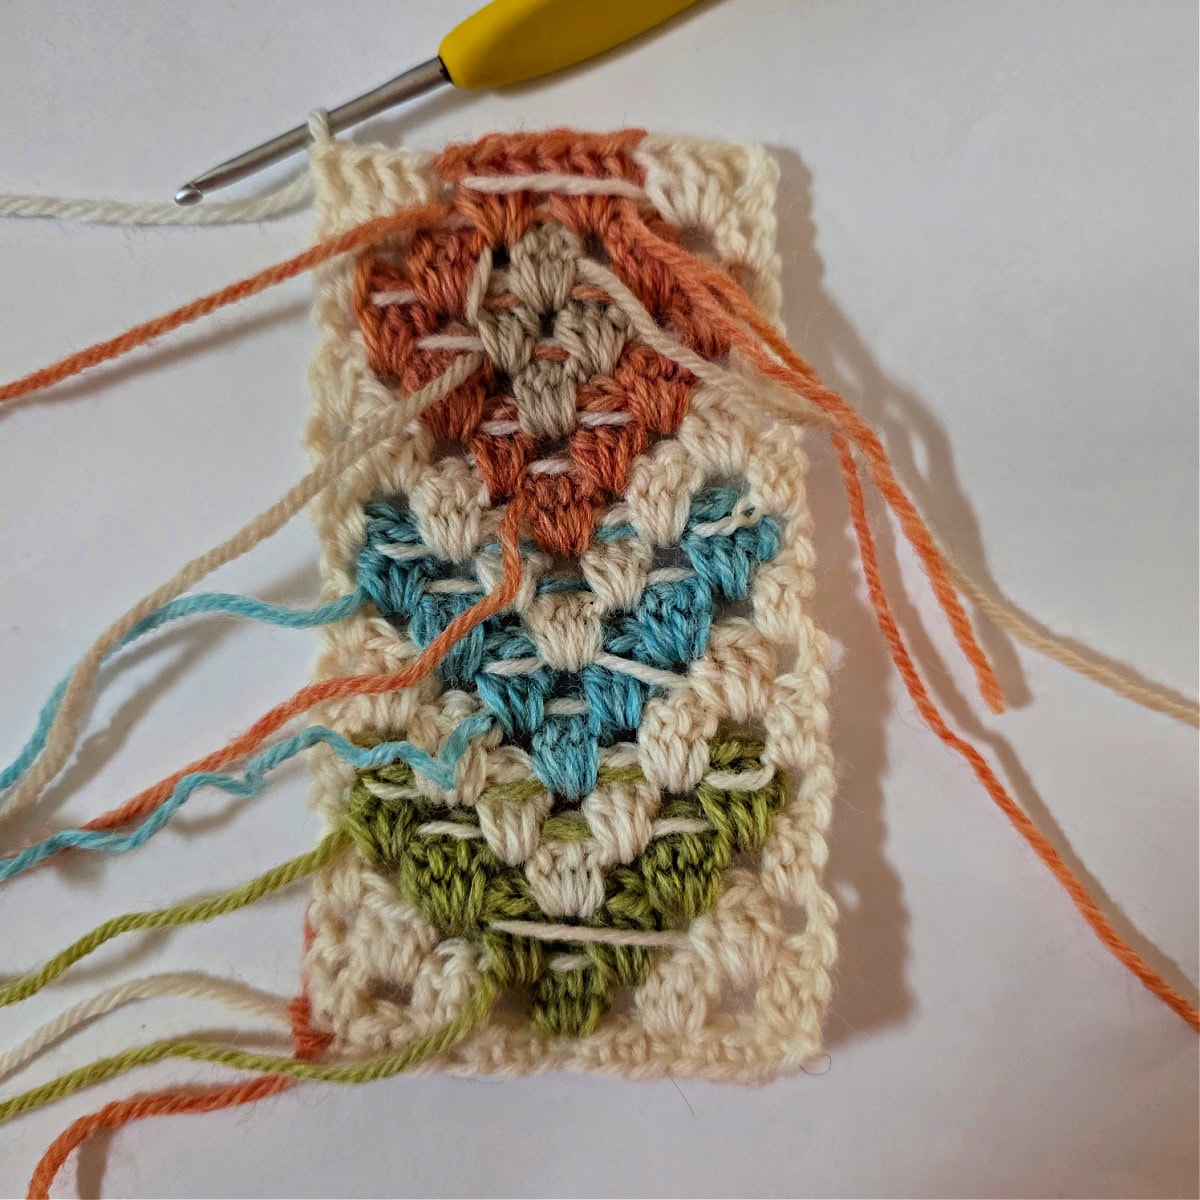
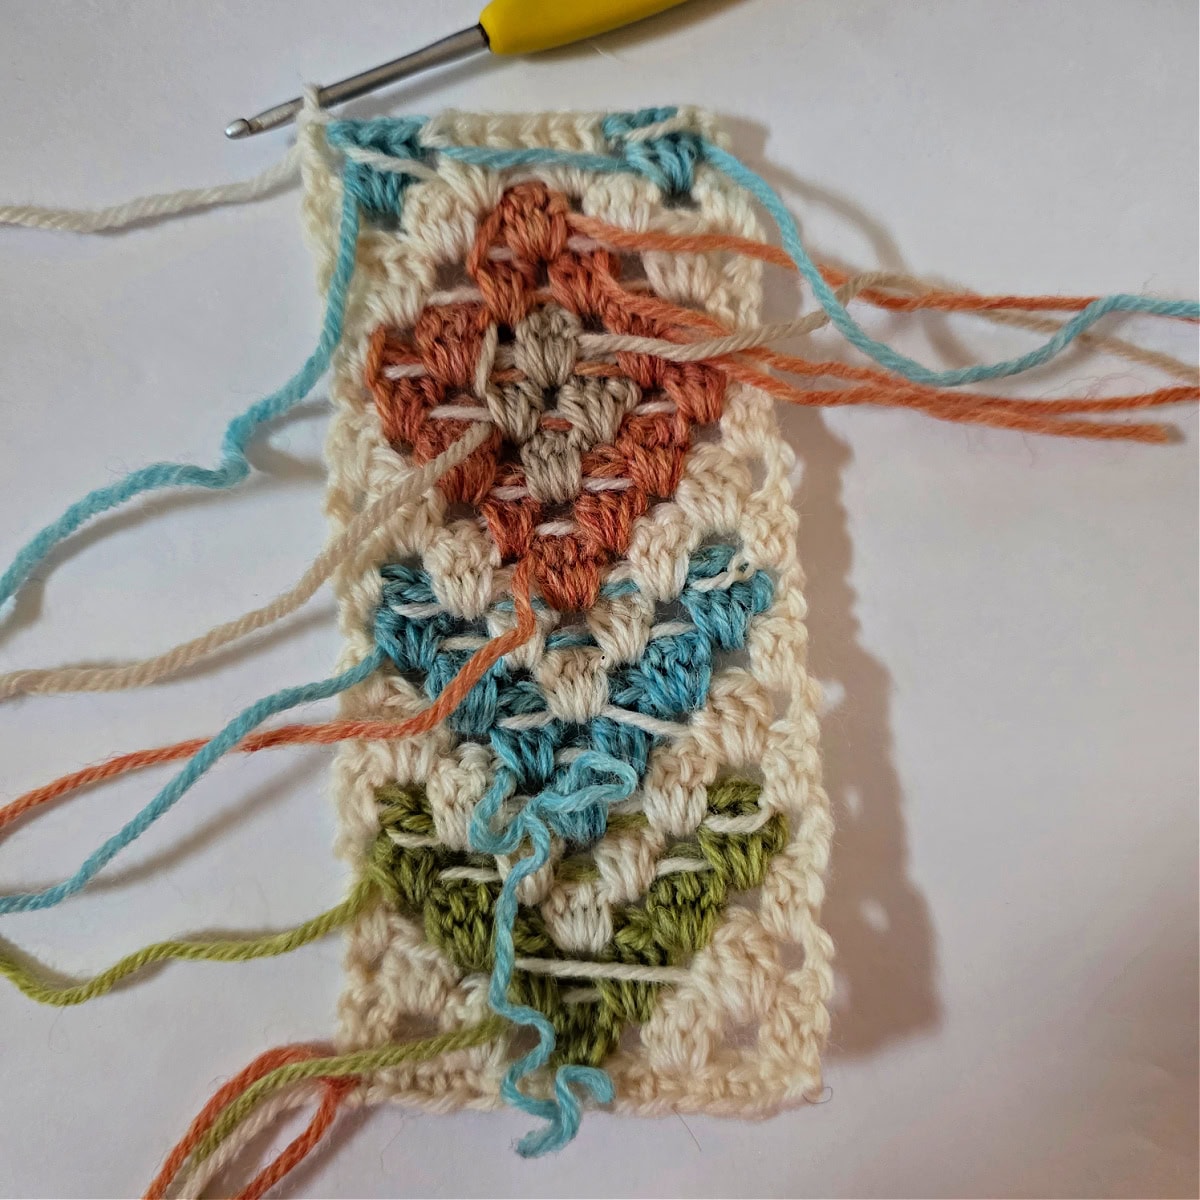
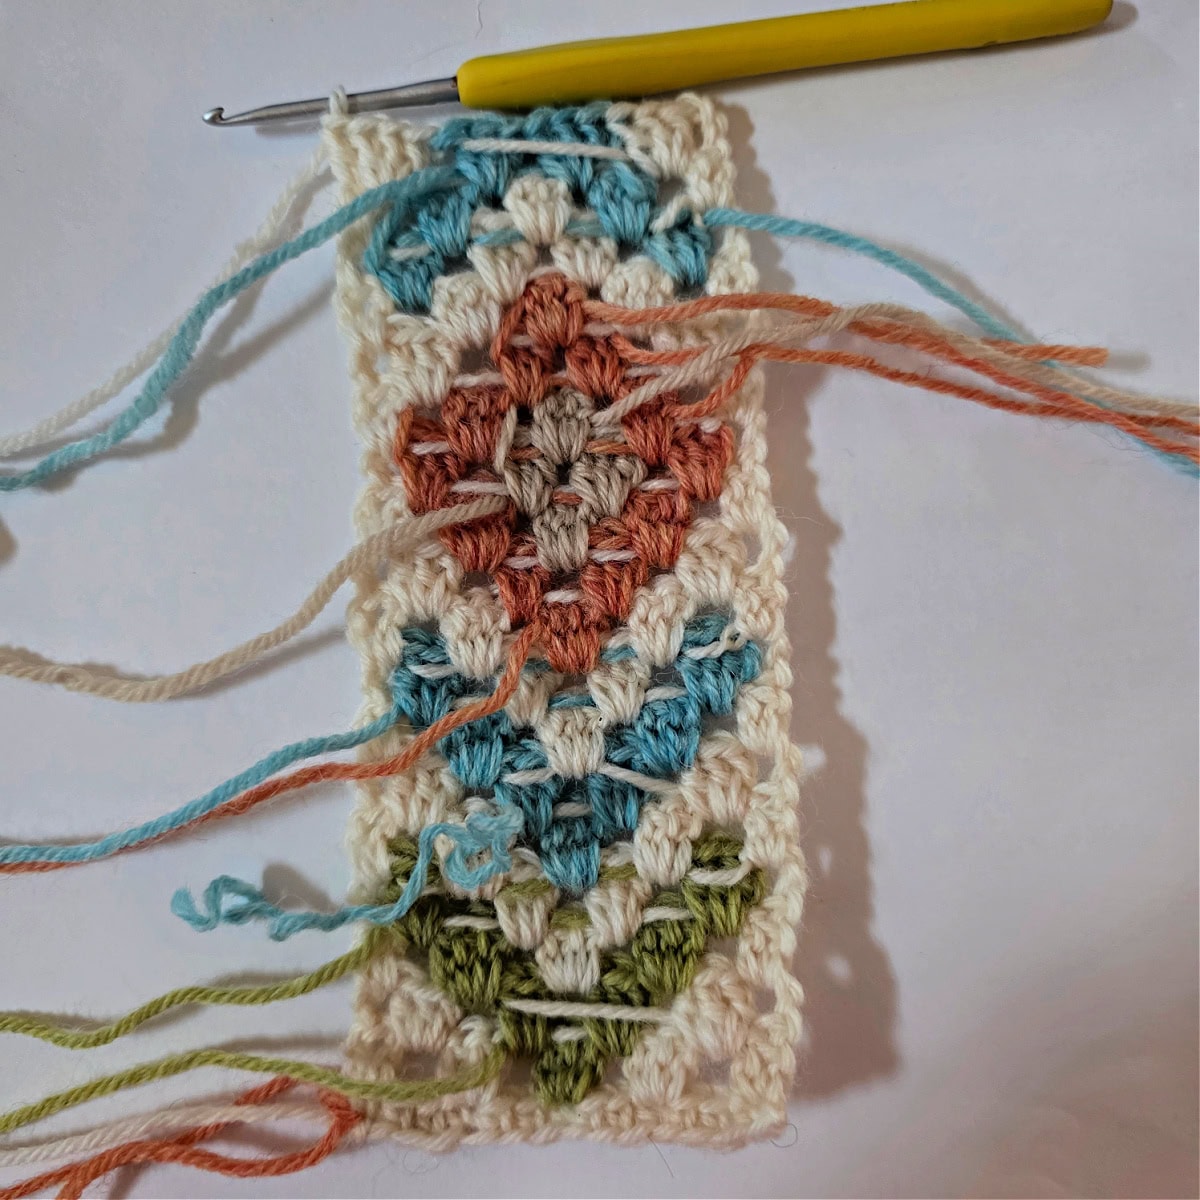
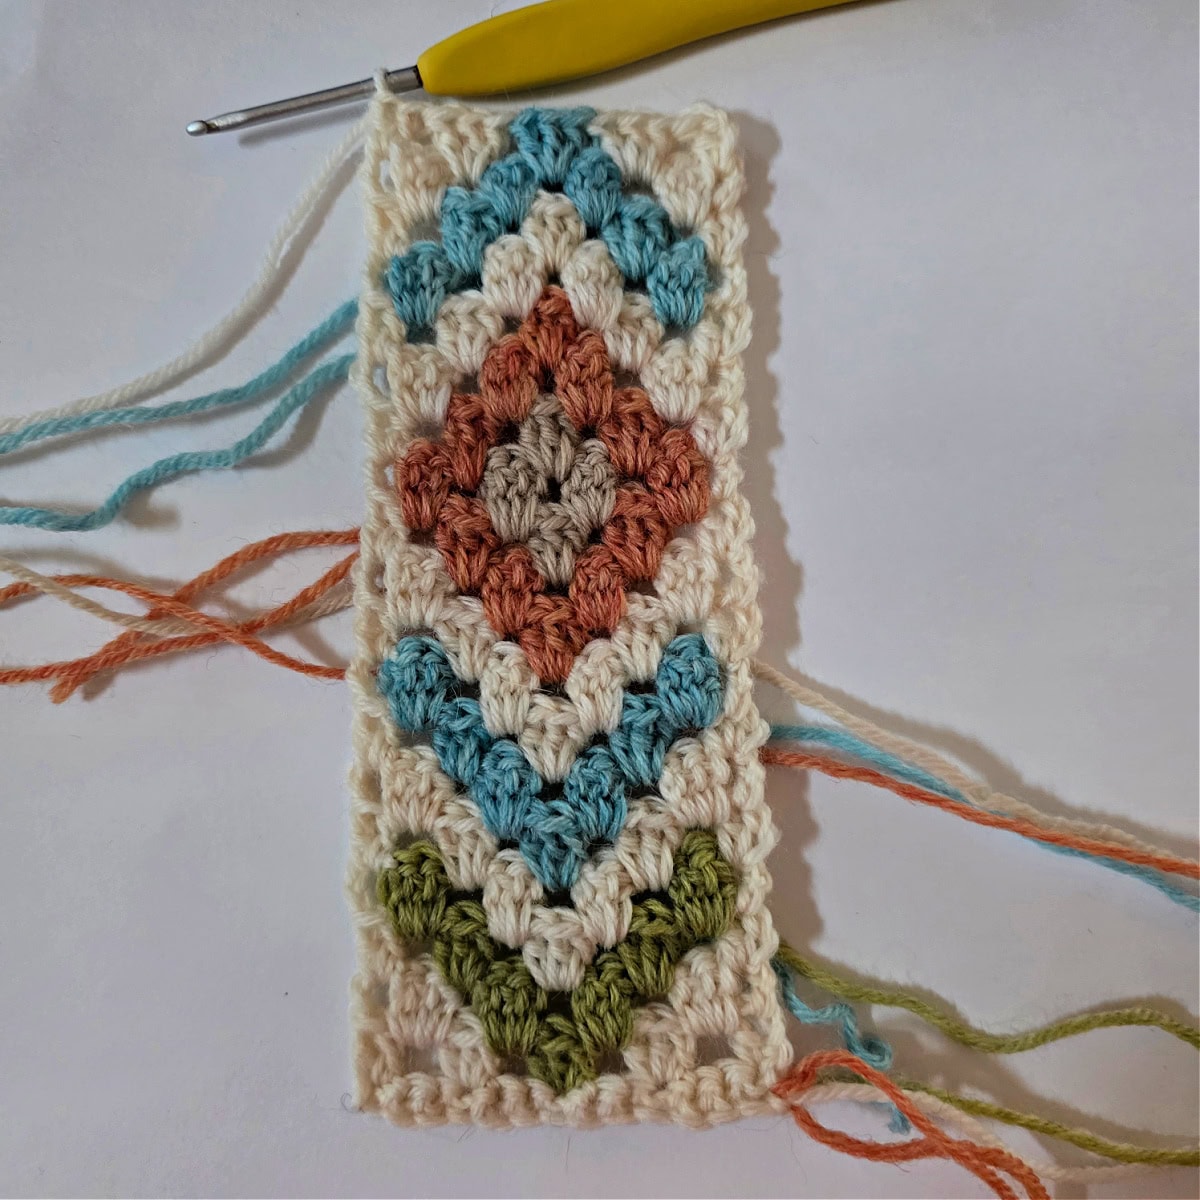
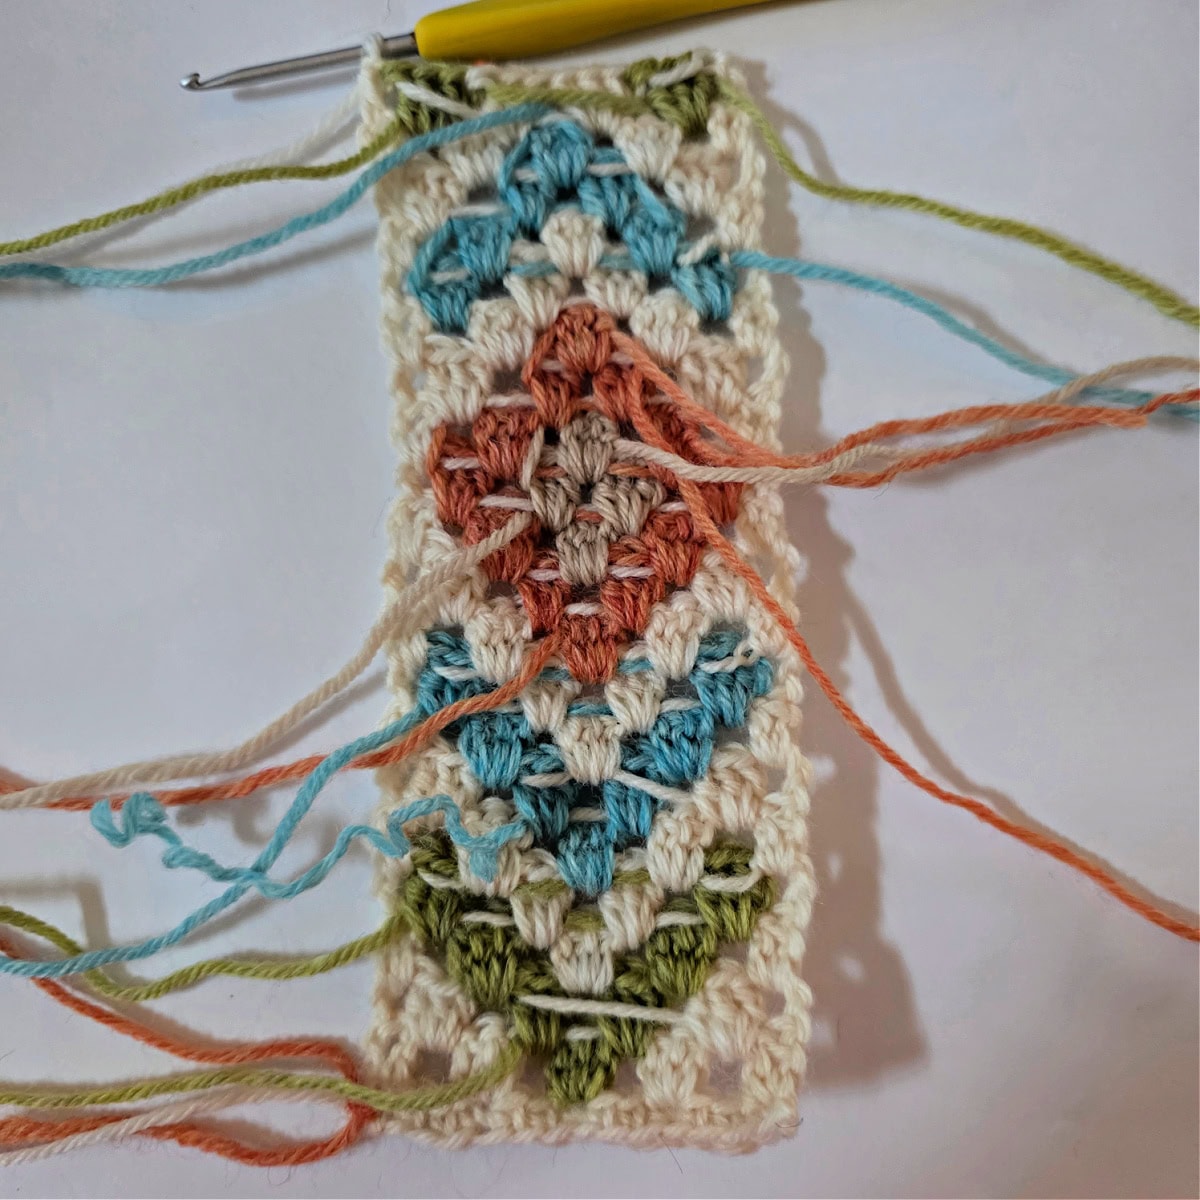
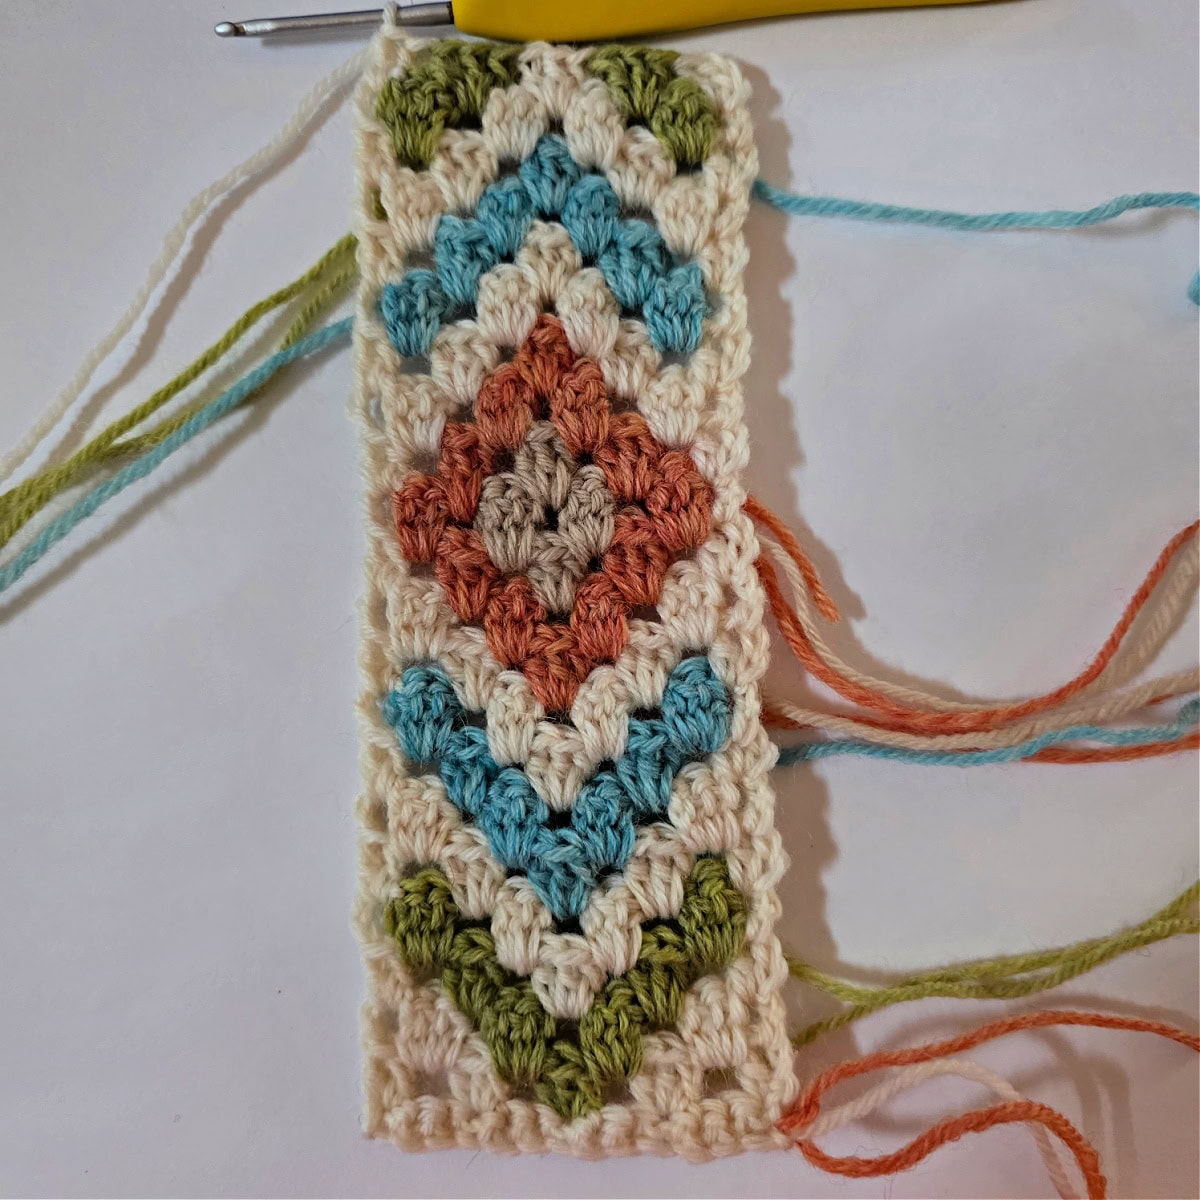
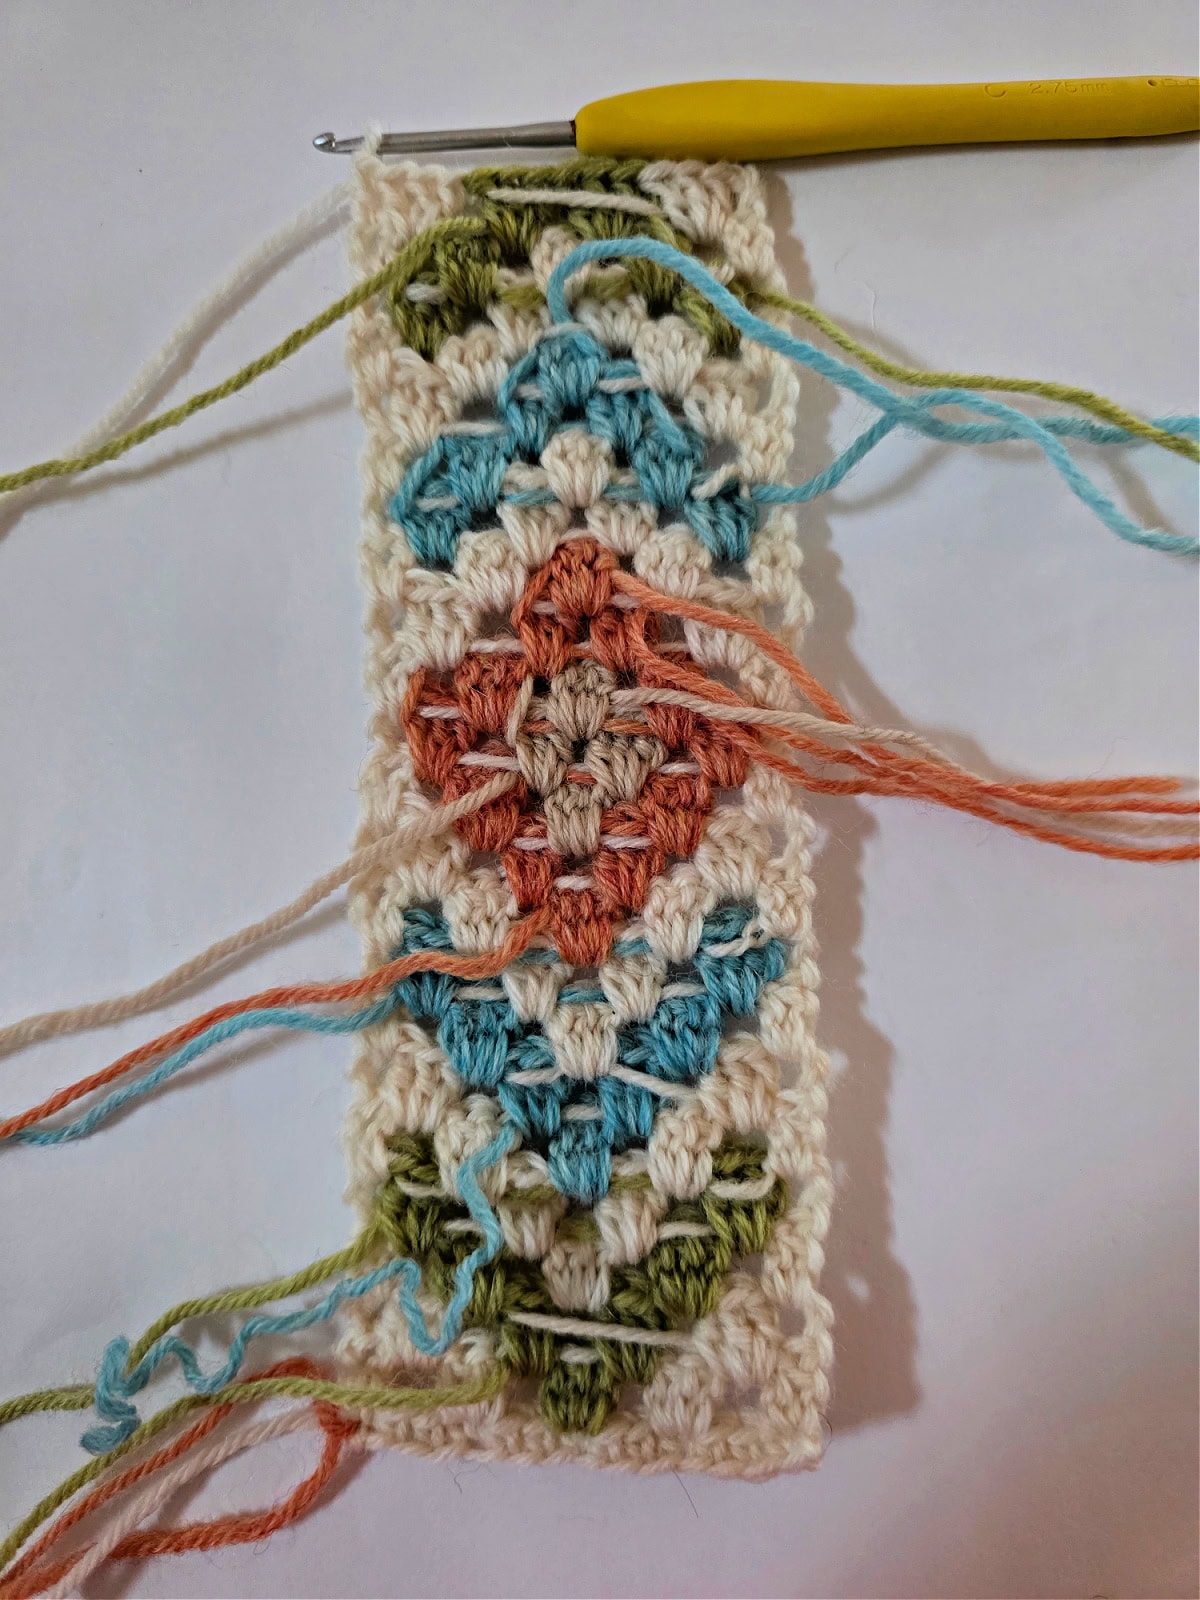
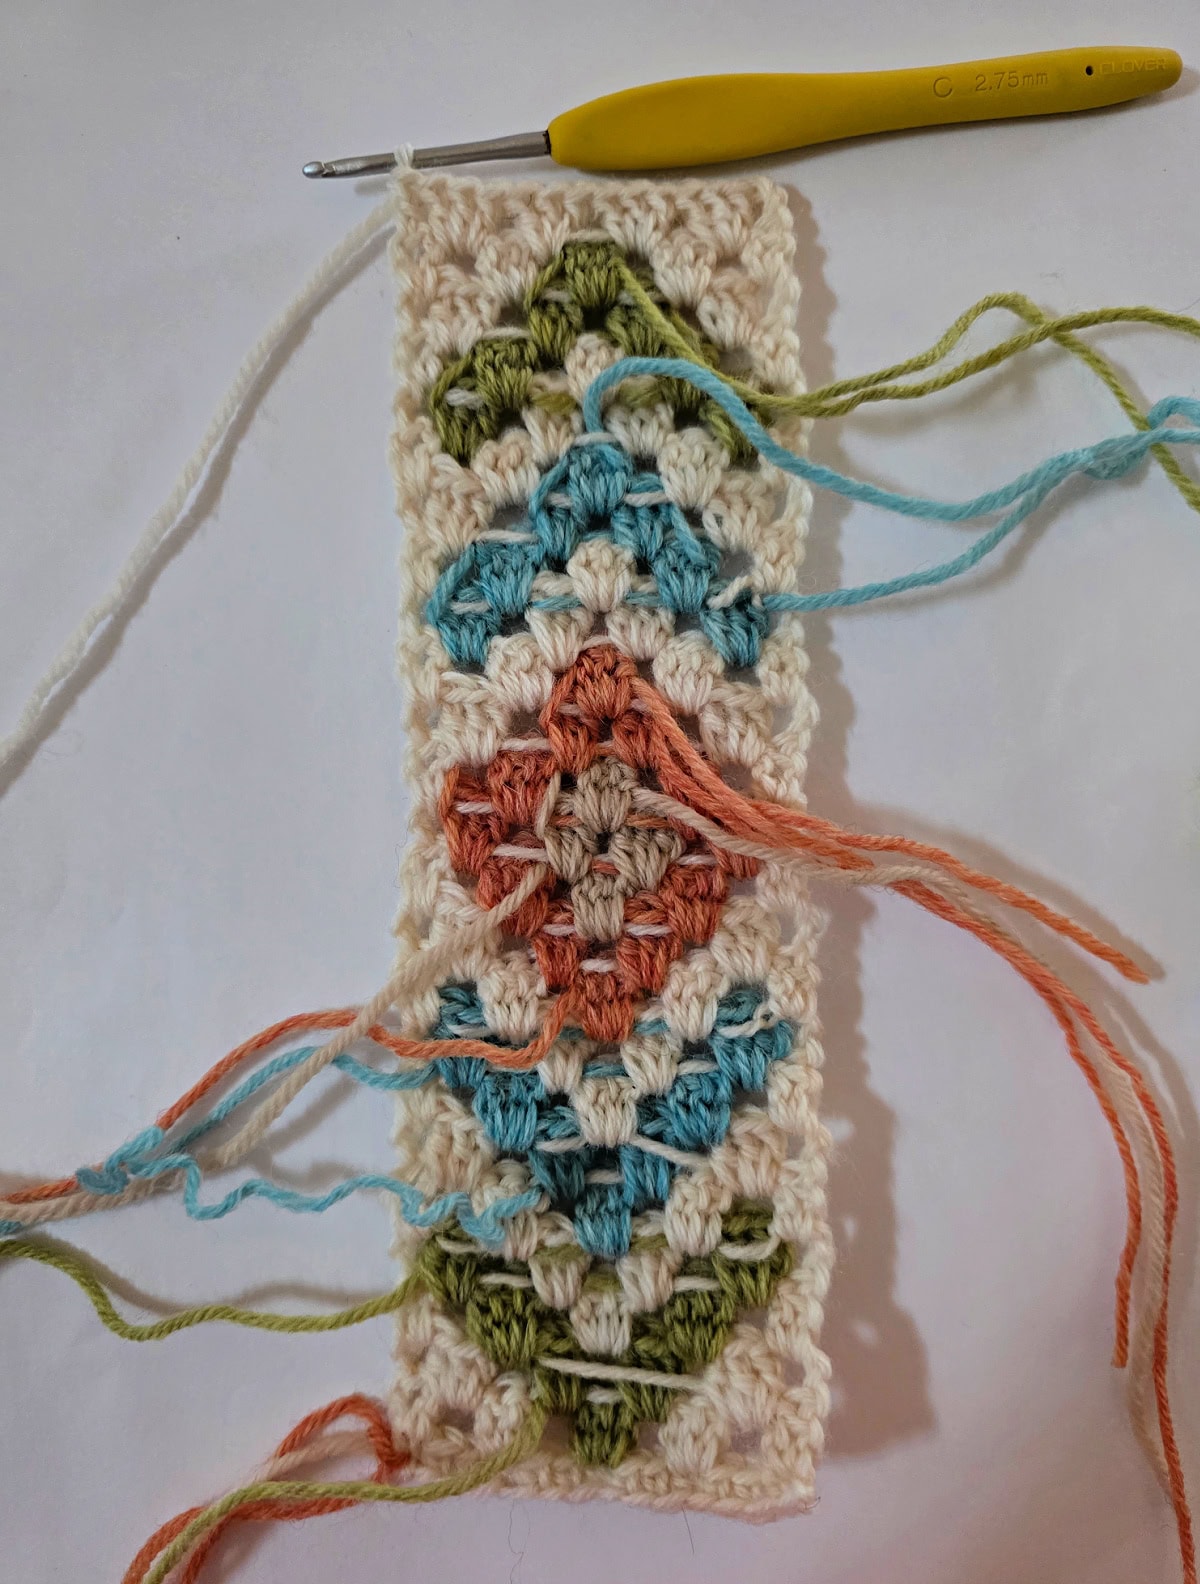
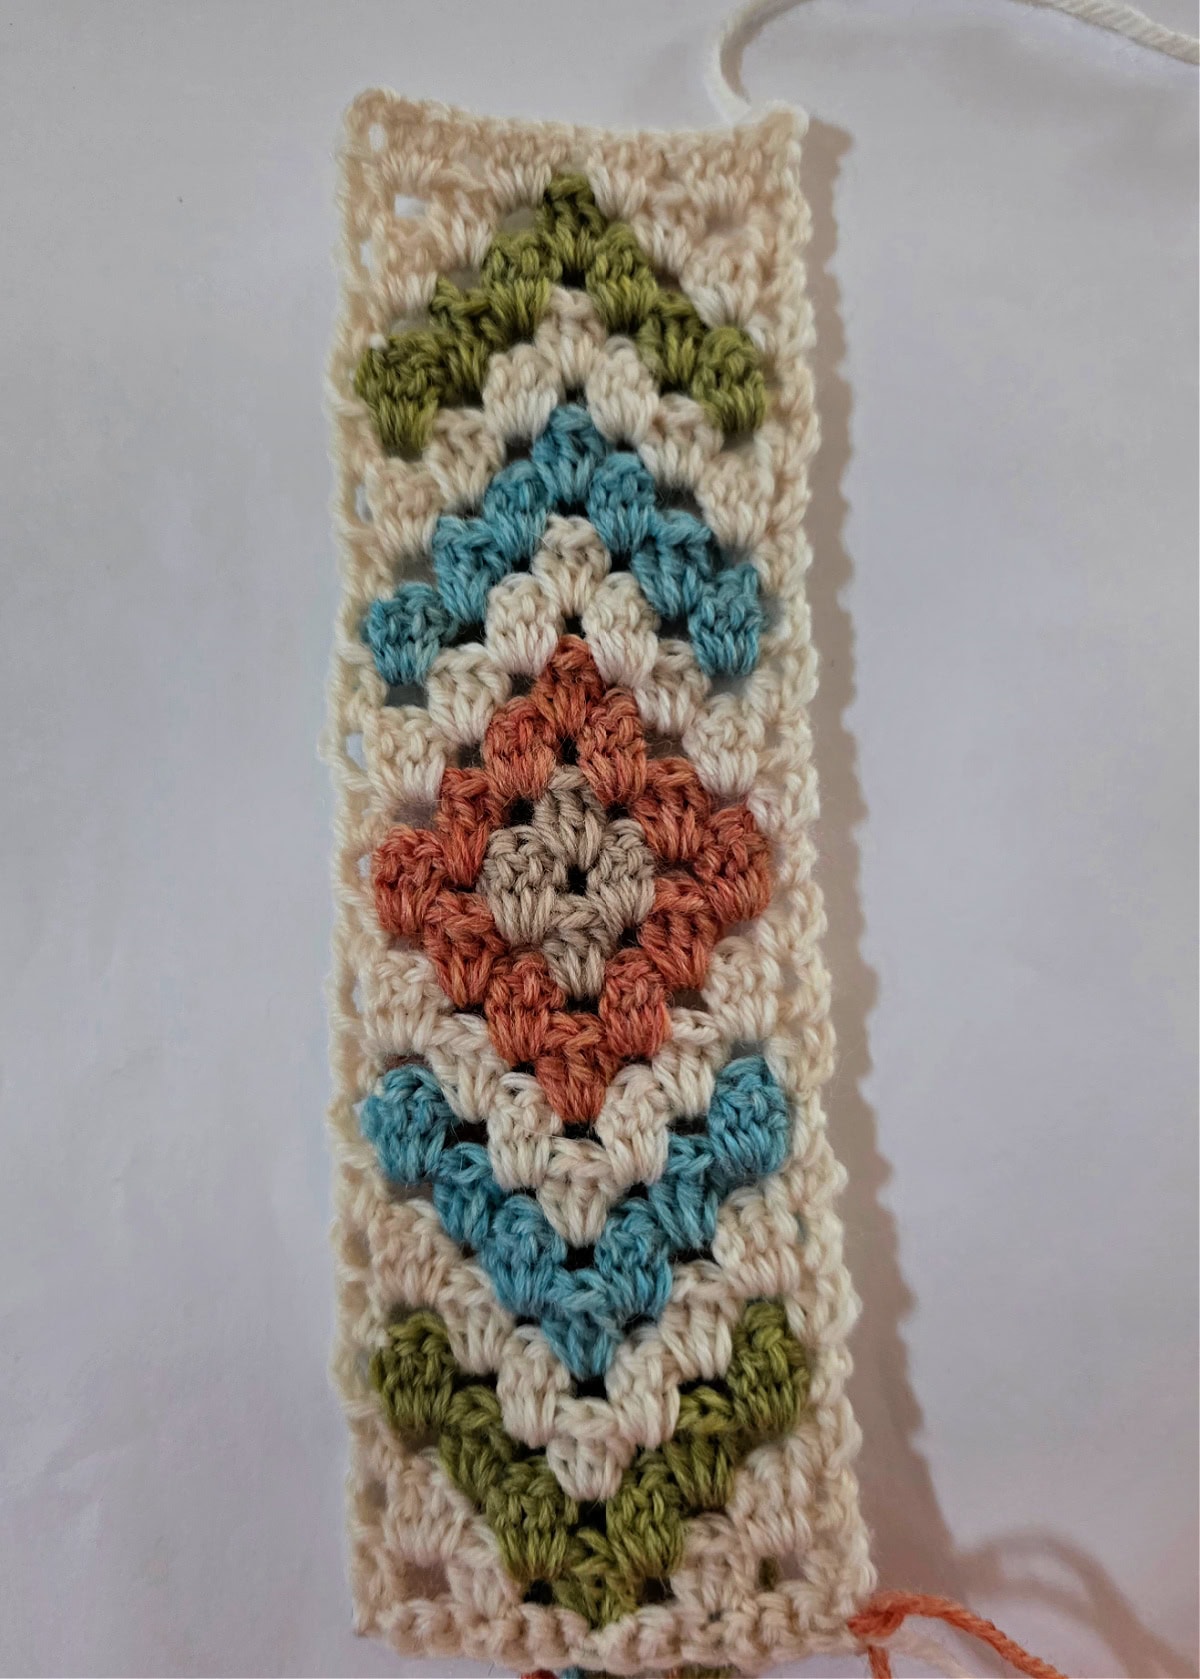
Progression Photos of the Mosaic Granny Stitch Motif
These photos show progression of the first color chart repeat of the Mosaic Granny Motif. For helpful tips with working the color changes, check out my color change tutorial with the granny stitch. It also includes tips for carrying (floating) your yarn.

Edge Inside “V” of Motif
(RS) Rotate your motif clockwise to work along the inside “V” of the motif. Work 2 sc into the side of each dc and 1 sc into the side of each sc. Turn. (194 sts)
Do not fasten off. Continue on to Inside of Scarf.
Inside of Scarf
Colors for the Inside of the Scarf alternate the following sequence: MC, CC4, MC, CC2, MC, CC1, MC, CC3
- Beginning ch 2 does not count as a stitch for the remainder of the pattern.
- When working repeats of Row 2, alternate CC4 and CC1.
- When working repeats of Row 4, alternate CC2 and CC3.
Row 1: Continuing with MC yarn & a 2.75mm crochet hook, ch 2 (does not count as a st), work the entire row in FLO, dc3tog over the first 3 sts, dc in each st across to the last 3 sts skipping 4 sts at the center of “V”, dc3tog over the last 3 sts. Turn. (186 sts)
Row 2: With CC4 or CC1 yarn (depending on where you are in your color scheme), ch 1, sc2tog over the first 2 sts, sc in each st across to the last 2 sts skipping 4 sts at the center of “V”, sc2tog over the last 2 sts. Turn. (180 sts)
Row 3: With MC yarn, ch 2, dc2tog over the first 2 sts, dc in each st across to the last 2 sts skipping 4 sts at the center of “V”, dc2tog over the last 2 sts. Turn. (174 sts)
Row 4: With CC2 or CC3 yarn (depending on where you are in your color scheme), ch 2, dc in the first st, ch 1, skip the next st, (dc in the next st, ch 1, skip the next st) rep from ( to ) across to 3 sts before the center “V”, dc in next st, skip each of the next 4 sts, rep from ( to ) across to last st, dc in the last st. (170 sts)
Rows 5 – 28: Repeat Rows 1 – 4.
Rows 29 – 31: Repeat Rows 1 – 3.
Row 32: Ch 1, sc4tog in 1st 2 and last 2 sts. (1 st)
Fasten off. Continue on to the Bottom Edge of Scarf.
Bottom Edge of Scarf
Row 1: With MC yarn & a 2.75mm crochet hook, join yarn with a standing sc in the st you marked with a SM, work 2 sc into the side of each dc and 1 sc into the side of each sc. Turn. (221 sts)
Row 2: Ch 2, work the entire row in FLO, 2 dc in the first st, dc in each st across to the center st, 5 dc in the center st, dc in each st across to the last st, 2 dc in the last st. Turn. (227 sts)
Row 3: With CC2 yarn, ch 1, 2 sc in the first st, sc in each st across to the center st, 3 sc in the center st, sc in each st across to the last st, 2 sc in the last st. Turn. (231 sts)
Row 4: With CC2 yarn, Repeat Row 3. (235 sts)
Row 5: With CC4 yarn, Repeat Row 3. (239 sts)
Row 6: With CC1 yarn, Repeat Row 3. (243 sts)
Row 7: With CC3 yarn, Repeat Row 3. (247 sts)
Row 8: With CC3 yarn, Repeat Row 3. (251 sts)
Row 9: With MC yarn, Repeat Row 3. Do Not Turn. (255 sts) *Place a stitch marker in the 1st st of Row 9 to mark the end of Upper Edge.
Do not fasten off. Continue on to Edge Upper Edge of Scarf.
Edge Upper Edge of Scarf
Rotate your clockwise to work along upper edge of the scarf. Work 1 sc into the side of each sc row and 2 sc into the side of each dc row across. Join to the 1st st from Row 9 of bottom edge of scarf. Turn. (158 sts)
Do not fasten off. Continue on to the Buttonhole.
Buttonhole
Row 1: Ch 1, sc in each of the first 2 sts, ch 8, skip each of the next 8 sts, sc in each of the next 2 sts, sl st in the next st. Turn. (13 sts)
Row 2: Ch 1, sc in each st across. Join to the 1st st of Row 9 of bottom edge. (13 sts)
Do not fasten off. Continue on to the Bottom Edging for Fringe.
Bottom Edging for Fringe
Row 1: (ch 6, skip each of the 3 sts, sl st in each of the next 3 sts) rep from ( to ) 21 times, ch 6, skip the next st, sl st in each of the next 3 sts, (ch 6, skip each of the next 3 sts, sl st in each of the next 3 sts) rep from ( to ) 20 times, ch 6, skip each of the next 3 sts, sl st in the next st. (43 ch-6’s for fringe)
Fasten off. Continue on to the Fringe.
Fringe
Cut 172 strands of yarn to 15” or longer. Use 4 strands of yarn per tassel.
Hold 4 strands of yarn together as one. Fold in half. Pull center fold through a ch-6 space.
Thread the cut ends of yarn through the center fold. Pull cut ends firmly to tighten knot.
Repeat for each ch-6 space across bottom edge of scarf. Trim ends to even lengths.
Finishing
Weave in all ends. Line up buttonhole to opposite side of scarf, center button under buttonhole and sew it on the right side of the triangle scarf.
Block your triangle scarf, if needed.
I MADE IT! NOW WHAT?
Pin this post!: Save this triangle crochet scarf free pattern to your Pinterest boards so that you can come back and make it again.
Leave a comment below: We love to hear your feedback.
Share Your Finished Projects on Facebook or Instagram: I love to see your finished projects! Share with us on social media and tag me @acrochetedsimplicity or use the hashtag #ACrochetedSimplicity so I can find your posts.
Join us in the Facebook Community Group!
Come share your finished projects with us in the A Crocheted Simplicity Crochet Community Group on Facebook. Join us for fun community events such as crochet alongs, join in on crochet conversations, ask questions, get advice, and share your love for crochet!

Looking for More Crochet Patterns?
Check out our other free crochet patterns for scarves, hats, and cozy accessories.
This is a lovely pattern, I think it would also make a great basket design, with the stripes on the side and the arrows around the top. Have you thought about doing a basket in this. I would be very interested in it.
Thank you
Hi Linda,
I have actually thought about this! I have a fun bag with a similar design.
Happy Crocheting,
Jennifer