How to Crochet Spike Stitch – Step-by-Step Tutorial
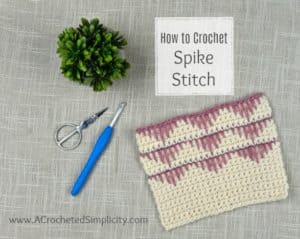
The crochet spike stitch is a super simple stitch that is used to add visual interest to projects. You may have also seen it referred to as a long single crochet or elongated single crochet. It is worked like a regular single crochet with the exception of where you place your hook to begin the stitch. A spike is created when you form a single crochet in the same stitch, but work it two, three, or four rows below the current row.
>CLICK HERE TO SIGN-UP TO RECEIVE OUR NEWSLETTER!<
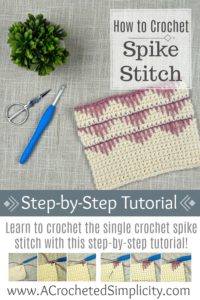
In this tutorial, you’ll learn how to successfully work the crochet spike stitch! Before we begin, let’s go over a few stitch abbreviations and make a small swatch.
Materials
- Yarn: You can use 2 colors of any weight yarn you’d like. I used the worsted weight/4 yarn Lion Brand Yarns Wool Ease in Fisherman and Dark Rose Heather.
- Crochet Hook: H/8/5.00mm (or hook size to match the weight of yarn you chose)
- Scissors
- Tapestry Needle
These items are available through our affiliates below.


Abbreviations
- ch: chain
- sc: single crochet
- spike sc: single crochet spike stitch
- yo: yarn over
- st(s): stitch(es)
- MC: fisherman yarn
- CC: dark rose heather yarn
- RS: right side
- WS: wrong side
- Join w/ a sc: Click here for photo tutorial
Make a Swatch
You can follow the swatch directions written below, or work any multiple of 8 chs + 2 chs for the foundation chain.
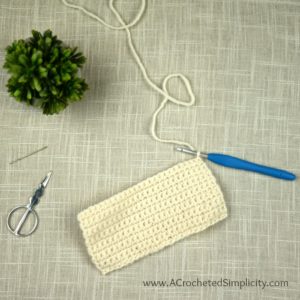
Row 1: Using a 5mm crochet hook and MC, ch 26, working into the back hump of the chain, sc in the 2nd ch from your hook, sc in each ch across. Turn. (25 sts)
Rows 2 – 14: Ch 1, sc in each st across. Turn. (25 sts)
Fasten off MC. Continue on to Crochet Spike Stitch Tutorial.
Crochet Spike Stitch Tutorial
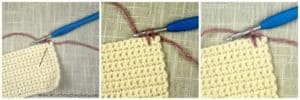
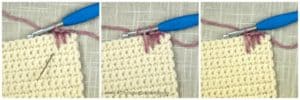
Step 1 (Left): Using a 5mm crochet hook, join CC w/ a sc in the first st (click HERE for join w/ sc tutorial). The tapestry needle in this photo shows where you will insert your hook to begin the spike sc.
Step 2 (Middle): Insert your hook into the next st, 1 row below the current row, yo, pull up a loop that is the same height as your current row stitches (do you see why this stitch is sometimes referred to as a long sc?), yo.
Step 3 (Right): Pull through both loops to complete the stitch. You’ve just completed a spike sc 1 row below the current row.
Now let’s work even longer spike sc stitches! The further down you insert your hook to begin the spike sc, the longer your spike stitches will be.
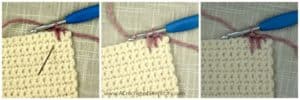
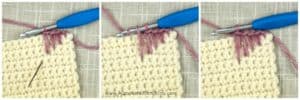
Step 4 (Left): This photo shows you where to insert your hook to work a spike sc 2 rows below your current row.
Step 5 (Middle): Insert your hook into the next st, 2 rows below the current row, yo, pull up a loop that is the same height as your current row stitches, yo.
Step 6 (Right): Pull through both loops to complete the stitch. You’ve just completed a spike sc 2 rows below the current row.
Let’s work even longer spike stitches!
Step 7 (Left): This photo shows you where to insert your hook to work a spike sc 3 rows below your current row.
Step 8 (Middle): Insert your hook into the next st, 3 rows below the current row, yo, pull up a loop that is the same height as your current row stitches, yo.
Step 9 (Right): Pull through both loops to complete the stitch. You’ve just completed a spike sc 3 rows below the current row.
Let’s go just a little longer!
Step 10 (Left): This photo shows you where to insert your hook to work a spike sc 4 rows below your current row.
Step 11 (Middle): Insert your hook into the next st, 4 rows below the current row, yo, pull up a loop that is the same height as your current row stitches, yo.
Step 12 (Right): Pull through both loops to complete the stitch. You’ve just completed a spike sc 4 rows below the current row.
Now let’s gradually work shorter spike stitches.
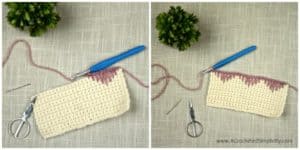
Continuing on from Step 12, work a spike sc 3 rows below the current row, then work a spike sc 2 rows below the current row, then work a spike sc 1 row below the current row. This sequence completes one repeat of the stitch pattern shown in the photos above.
Work the following to repeat the stitch pattern across the swatch:
[sc in the next st, spike sc 1 row below the current row, spike sc 2 rows below the current row, spike sc 3 rows below the current row, spike sc 4 rows below the current row, spike sc 3 rows below the current row, spike sc 2 rows below the current row, spike sc 1 row below the current row] rep from [ to ] across to the last st, work a sc in the last st. (25 sts)
You can fasten off, or continue practicing to complete a swatch like the one shown in the photo below.
Work the following to complete your swatch like the one shown in the photo above.
Main Color Rows
Row 1 (WS): Using a 5mm crochet hook, join MC w/ a sc in the first st, sc in each st across. Turn. (25 sts)
Rows 2 – 5: Ch 1, sc in each st across. Turn. (25 sts)
Fasten off MC. Continue to Spike Stitch Row.
Spike Stitch Row
Row 1 (RS): Using a 5mm crochet hook, join CC w/ a sc in the first st, [spike sc 1 row below the current row, spike sc 2 rows below the current row, spike sc 3 rows below the current row, spike sc 4 rows below the current row, spike sc 3 rows below the current row, spike sc 2 rows below the current row, spike sc 1 row below the current row, sc in the next st] rep from [ to ] across. Turn. (25 sts)
Fasten off CC. Repeat one more section of Main Color Rows followed by one more Spike Stitch Row. Weave in ends.
CLICK PLAY TO WATCH, LEARN AND PRACTICE MY 1 QUICK TIP TO WORKING PERFECT SPIKE STITCHES!
I recently used the crochet spike stitch on my Frankenstein Candy Bowl. To find this Free Crochet Pattern, click the photo below.
FIND ALL OF MY FREE CROCHET PATTERNS HERE
Are you intimidated by knit-look crochet? Would you love to learn my tips & tricks? Take an Annies Video Class with me and let me ease your fears and help you increase your skills! Click on the photo below to watch a free preview. You can also see the other 4 video classes I have available!
Please share your finished ACS projects with me in the A Crocheted Simplicity Crochet Community Group on Facebook!
HAPPY CROCHETING!



I am trying to learn this stitch.but what I can’t understand is where to put the hook to make the next stitch.
Is a stitch actually skipped, it under the spike is that the one that is skipped?
Hi Cheryl,
You’re not truly skipping a stitch, but you are working around/over it and not into it, when working a spike stitch. So make sure that you have one stitch under/inside your spike stitch as you work and then work into the next stitch.
Does this make sense?
Jennifer