O’ Christmas Tree Wine Tote – Free Crochet Pattern
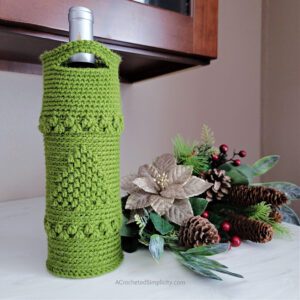
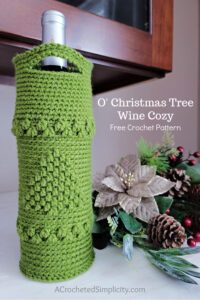
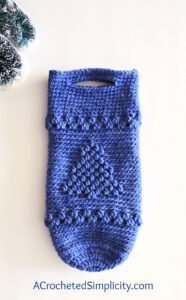
Crochet wine totes are the perfect quick crochet project for when you find yourself needing a last minute gift. Pair one with a bottle of wine and they make excellent last-minute crochet gifts. Crochet wine totes make great housewarming, wedding, and holiday gifts. I like to keep a couple different styles made up ahead of time. This way, I always have a last minute gift on hand, if needed. The O’ Christmas Tree Wine Tote will be great to keep on hand for last minute holiday gifts! Not only is it great for last minute gifts, the O’ Christmas Tree Wine Tote is a great one skein crochet project.
The free crochet pattern for the O’ Christmas Tree Wine Tote can be found below, or you can find an ad-free print friendly version on Love Crafts here, Ravelry here, or on Etsy here.
>CLICK HERE TO SIGN-UP TO RECEIVE OUR NEWSLETTER!<
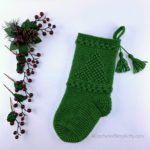
If you love the Christmas tree design on this crochet wine tote, you may also love the O’ Christmas Tree Stocking. You can find the crochet Christmas stocking HERE.
I’m excited to be participating in the 8th Annual Holiday Stashdown Crochet Along! The O’ Christmas Tree Wine Tote is my contribution to the 2022 Holiday Stashdown CAL. During this event, 22 of your favorite crochet designers will bring you free crochet patterns for winter holiday gifts, decorations, gift wrap, and more! Join us to make wonderful projects, chat with other crocheters, and enter for your chance to win a prize from one of our 11 generous sponsors!
The MAIN post for the 2022 Holiday Stashdown CAL can be found on Marie’s blog HERE. In Marie’s blog post you will find ALL of the important CAL info and answers to your burning questions. You’ll also find photos of the great prizes you can enter to win!
YARN
For this crochet wine cozy, I chose Lion Brand Yarn’s Vanna’s Choice. Vanna’s Choice is a great worsted weight acrylic yarn that’s available in 54 colors! You’ll have a hard time choosing colors, but this crochet wine tote will look great in many colors!
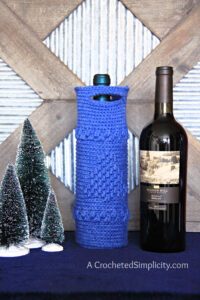
Nicole made her O’ Christmas Tree Wine Tote in Denim, using Lion Brand Yarns Pound of Love. When I think OF Christmas trees, I automatically think “green”, but for this project, the blue works great too! This is one of the reasons I love seeing other people’s color choices!
O’ CHRISTMAS TREE WINE TOTE – FREE CROCHET WINE TOTE PATTERN
The free pattern is below, but if you love to work offline, I’ve got a couple other great options for you.
Purchase the ad-free, printable PDF, including all photo tutorials, on Love Crafts here, Ravelry here, or on Etsy here.
Save this pattern to your Ravelry favorites here.
Pin it for later here.
This post contains affiliate links.
Materials
- Yarn: Worsted Weight / 4 yarn / I used Lion Brand Yarn’s Vanna’s Choice for my wine tote/ Yardage (140 yards)
- Crochet Hook: G/6/4.00mm; or size needed to obtain gauge (My favorite crochet hooks are the Clover Amour Crochet Hooks, I’ve never had an ache in my hand since switching).
- Scissors
- Yarn Needle
- Locking Stitch Markers


Abbreviations (US Terms)
- ch(s): chain(s)
- sl st(s): slip stitch(es)
- st(s): stitch(es)
- sc: single crochet
- dc: double crochet
- bpsc: back post single crochet
- dc2tog: double crochet 2 together (see special stitches below)
- BLO: back loop only
- FLO: front loop only
- RS: right side
- Rep: repeat
- Rnd: round
- yo: yarn over
- Alt-dc: alternate double crochet (click HERE for tutorial)
Size
- One Size: Fits standard size wine bottle
- 10″ circumference x 10″ H (including handles)
Gauge
- Cozy Base: dimensions are given at the end of each round
- In BLO sc: 6 sts = 1.25″; 6 rounds = 1.25″
Notes
- Beginning chains are not included in stitch count, unless noted otherwise.
- The majority of the pattern is worked in continuous rounds (a spiral). I suggest using a stitch marker to keep track of the round you’re on.
- Lion Brand Yarns Vanna’s Choice, worsted weight yarn, was used for the sample shown in the photos. 100% Acrylic, (solids: 170 yards / 100 g / 3.5 oz / 156 m)
- Yardage: 140 yards
- You can use another similar worsted weight / 4 yarn as long as you meet gauge.
- This wine bottle cozy is worked from the bottom up. It will stand 10″ tall when holding a bottle of wine.
Special Stitches
- Back Post Single Crochet (bpsc): Insert hook from back to front to back around the post of the designated stitch, yo, pull up a loop, yo, pull thru both loops on hook.
- Double Crochet 2 Together (dc2tog): (Yo, insert hook into the FLO of the next st indicated, yo, pull up a loop, yo, pull thru 2 loops on hook) twice, yo, pull thru remaining 3 loops on hook. Note: Because of how this stitch is being used in this design, stitch count will not decrease. Photos are included in the pattern below.
- Alternate Double Crochet (Alt-dc): Do not ch, instead, insert your hook into the first st, yo, pull up a loop, yo, pull thru both loops, insert your hook between the legs of the st just made, yo, pull up a loop, yo, pull thru one loop, yo, pull thru remaining loops. Click HERE for tutorial.
O’ Christmas Tree Wine Tote Instructions
Tote Base
Rnd 1: With a 4.00 mm hook, ch 3 (does not count as a st), work 12 dc into the 3rd ch from your hook. Join with a sl st to the 1st dc. (12 sts) The diameter of your circle should be approximately 1″.
Rnd 2: Alt-dc in the first st, work 1 more dc in the same st, 2 dc in each remaining st around. Join. (24 sts) The diameter of your circle should be approximately 1.8″.
Rnd 3: Alt-dc in the first st, work 1 more dc in the same st, dc in the next st, * 2 dc in the next st, dc in the next st, rep from * around. Join. (36 sts) The diameter of your circle should be approximately 2.75″.
Rnd 4: Alt-dc in the first st, work 1 more dc in the same st, dc in each of the next 2 sts, * 2 dc in the next st, dc in each of the next 2 sts, rep from * around. Join. (48 sts) The diameter of your circle should be approximately 3.5″.
Do not fasten off. Continue on to Sides of Tote.
Sides of Tote
This section is worked in continuous rounds. I strongly suggest using a scrap piece of yarn to keep track of the beginning and ending of each round.
Rnd 1: Ch 1, bpsc in each st around. Do not join. (48 sts)
Rnds 2 – 8: BLO sc in each st around.
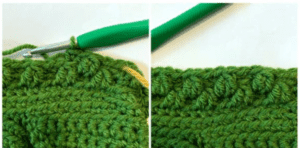
Rnd 9: (FLO dc2tog in the next 2 sts 2 rnds below, skip only 1 st behind the dc2tog, BLO sc in each of the next 2 sts) 16 times. See photo tutorial below.
Rnd 10: BLO sl st in the first st (does not count as a st), (FLO dc2tog in the next 2 sts 2 rnds below, skip only 1 st behind the dc2tog, BLO sc in each of the next 2 sts) 16 times. *Last sc of the rnd is worked into the first st of the rnd, under the sl st. Make sure to place the scrap piece of yarn after the last sc of the rnd (work shifts to the left 1 st). See photo tutorial below.
Rnds 11 – 12: BLO sc in each st around.
Do not fasten off. Continue on to Christmas Tree Design.
Christmas Tree Design
This section is worked in continuous rounds. I strongly suggest using a scrap piece of yarn to keep track of the beginning and ending of each round.
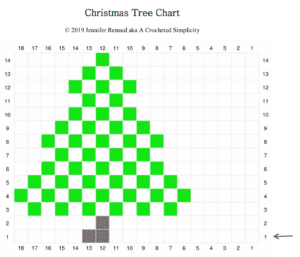
*See the chart below for a visual of the Christmas tree design.*
Rnd 1: BLO sc in each st around. (48 sts)
Rnd 2: BLO sc in each of the next 11 sts, FLO dc2tog in each of the next 2 sts from 2 rounds below (skip only 1 st behind dc2tog), BLO sc in each of the remaining 36 sts.
Rnd 3: BLO sc in each of the next 6 sts, FLO dc in the next st 2 rnds below, (BLO sc in the next st, FLO dc in the next st 2 rnds below) 5 times, BLO sc in each of the remaining 31 sts.
Rnd 4: BLO sc in each of the next 5 sts, FLO dc in the next st 2 rnds below, (BLO sc in the next st, FLO dc in the next st 2 rnds below) 6 times, BLO sc in each of the remaining 30 sts.
Rnd 5: Rep Rnd 3.
Rnd 6: BLO sc in each of the next 7 sts, FLO dc in the next st 2 rnds below, (BLO sc in the next st, FLO dc in the next st 2 rnds below) 4 times, BLO sc in each of the remaining 32 sts.
Rnd 7: BLO sc in each of the next 8 sts, FLO dc in the next st 2 rnds below, (BLO sc in the next st, FLO dc in the next st 2 rnds below) 3 times, BLO sc in each of the remaining 33 sts.
Rnd 8: Rep Rnd 6.
Rnd 9: Rep Rnd 7.
Rnd 10: BLO sc in each of the next 9 sts, FLO dc in the next st 2 rnds below, (BLO sc in the next st, FLO dc in the next st 2 rnds below) 2 times, BLO sc in each of the remaining 34 sts.
Rnd 11: BLO sc in each of the next 10 sts, FLO dc in the next st 2 rnds below, BLO sc in the next st, FLO dc in the next st 2 rnds below, BLO sc in each of the remaining 35 sts.
Rnd 12: Rep Rnd 10.
Rnd 13: Rep Rnd 11.
Rnd 14: BLO sc in each of the next 11 sts, FLO dc in the next st 2 rnds below, BLO sc in each of the remaining 36 sts.
Rnds 15 – 17: BLO sc in each st around.
Rnd 18: (FLO dc2tog in the next 2 sts 2 rnds below, skip only 1 st behind the dc2tog, BLO sc in each of the next 2 sts) 16 times.
Rnd 19: BLO sl st in the first st (does not count as a st), (FLO dc2tog in the next 2 sts 2 rnds below, skip only 1 st behind the dc2tog, BLO sc in each of the next 2 sts) 16 times. *Last sc of the rnd is worked into the first st of the rnd, under the sl st. Make sure to place the scrap piece of yarn after the last sc of the rnd (work shifts to the left 1 st).
Rnds 20 – 27: BOTH LOOPS sc in each st around.
Do not fasten off. Continue on to Handles. Approximate height should be 9″ at this point.
HOW TO READ THE CHART ABOVE:
- Read the chart from right to left, bottom to top.
- The Green squares indicate when you’ll work a dc.
- Make sure to work the dc in the front loops of stitches 2 rounds below the current round.
- The vertical numbers indicate the round you’re on.
- After working Round 14, continue with Round 15 of the written instructions above.
Handles
This section is worked in continuous rounds. I strongly suggest using a scrap piece of yarn to keep track of the beginning and ending of each round.
Rnd 1: Sc in the first st, sc in each of the next 4 sts, ch12, skip each of the next 12 sts, sc in each of the next 12 sts, ch 12, skip each of the next 12 sts, sc in each of the remaining 7 sts. Do not join. (48 sts)
Rnd 2: Sc in each st and ch around. Join.
Rnd 3: Ch 1, sc in each st around. Join.
Rnd 4: Ch 1, sl st in each st around. Use special join technique to join (click HERE for tutorial).
Fasten off. Weave in ends.
MORE FREE CROCHET PATTERNS FROM A CROCHETED SIMPLICITY
If you enjoy this free crochet wine tote pattern, you may enjoy these other projects as well. And if you just want to browse, you can find all of our free crochet patterns HERE.
Are you intimidated by knit-look crochet? Would you love to learn my tips & tricks? Take an Annies Video Class with me and let me ease your fears and help you increase your skills! Click on the photo below to watch a free preview. You can also see the other 4 video classes I have available!
Please share your finished ACS projects with us in the A Crocheted Simplicity Crochet Community Group on Facebook! Use hashtag #ACrochetedSimplicity when sharing on social media so I can find your posts!

